1. Introduction
Thank you for choosing the VIHELM ST9450 Portable Handheld Thermal Imager. This device is designed for accurate and efficient temperature measurement and thermal imaging in various industrial and scientific applications. Please read this manual thoroughly before operating the device to ensure proper use and to maximize its lifespan.
1.1 What's in the Box
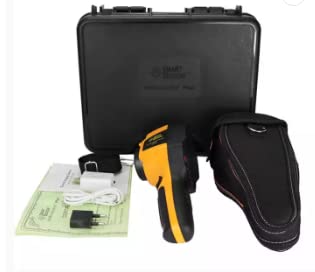
Verify that all items listed below are present in your package:
- ST9450 Thermal Imager (x1)
- USB Cable (x1)
- Power Adapter (x1)
- User Manual (x1)
- Carrying Case (x1)
2. Product Overview
2.1 Components and Controls
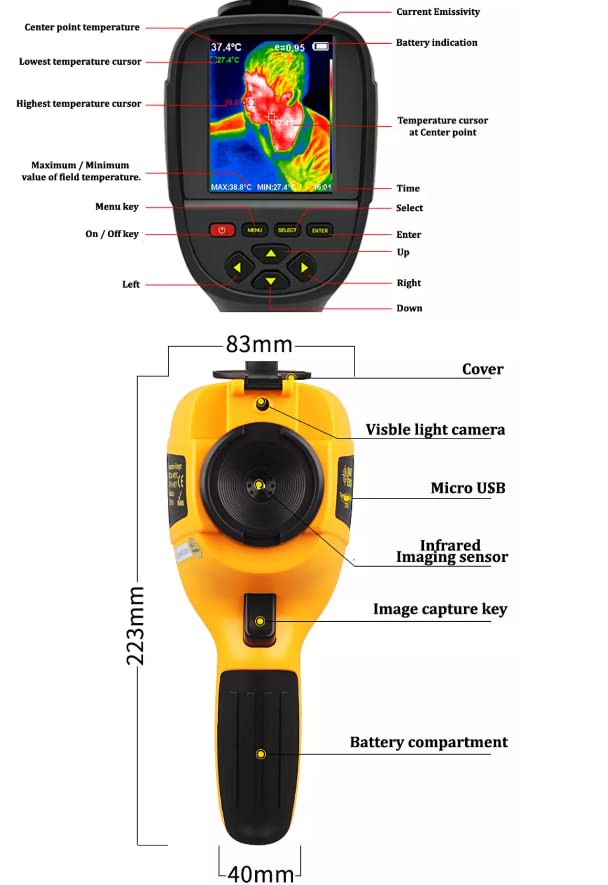
Familiarize yourself with the various parts and controls of your ST9450 Thermal Imager as shown in the diagram below:
- Display Screen: 3.2" full angle TFT display for thermal and visible images.
- Menu Key: Accesses the main menu for settings and options.
- Navigation Keys (Up, Down, Left, Right): Used to navigate through menus and adjust settings.
- Select/Enter Key: Confirms selections or enters sub-menus.
- Power Button: Turns the device on or off.
- Image Capture Key: Triggers image capture.
- Visible Light Camera: Captures visible light images.
- Infrared Imaging Sensor: Detects infrared radiation for thermal imaging.
- Micro USB Port: For charging and data transfer.
- Battery Compartment: Houses the rechargeable battery.
2.2 Physical Dimensions
The ST9450 is designed to be compact and portable. Its approximate dimensions are:
- Length: 223mm (8.78 inches)
- Width: 83mm (3.27 inches)
- Thickness: 40mm (1.57 inches)
- Weight: Approximately 389g (0.86 lbs)
3. Setup
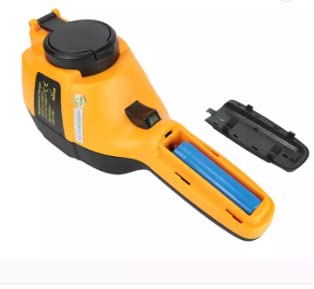
3.1 Battery Installation
The ST9450 uses a built-in rechargeable battery. To access the battery compartment for initial setup or replacement:
- Locate the battery compartment cover on the underside of the handle.
- Slide or unlatch the cover to open it.
- Insert the rechargeable battery, ensuring correct polarity.
- Close the battery compartment cover securely.
3.2 Charging the Battery
Before first use, fully charge the device. Connect the provided USB cable to the Micro USB port on the imager and the other end to the power adapter. Plug the adapter into a standard wall outlet. The charging indicator will show the charging status.
3.3 Powering On/Off
- To Power On: Press and hold the Power button until the display screen illuminates.
- To Power Off: Press and hold the Power button until the device shuts down.
4. Operating Instructions
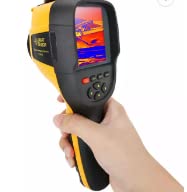
4.1 Basic Operation
Once powered on, the device will display the thermal image. The center point temperature, highest and lowest temperature cursors, and battery indication will be visible on the screen. Point the imager at the target object to measure its temperature.
4.2 Menu Navigation and Settings
Press the Menu key to access the main menu. Use the Up/Down/Left/Right navigation keys to scroll through options and the Select/Enter key to confirm. Common settings include:
- Emissivity: Adjustable from 0.01 to 1.0. Adjust this setting based on the material being measured for accurate readings.
- Color Palette: Choose from various color display modes (see Section 4.3).
- Automatic Power-Off: Set the device to automatically power off after 5 minutes, 20 minutes, or disable this feature.
- Time/Date: Set the current time and date.
- Language: Select the display language.
4.3 Image Capture
To capture a thermal image, aim the imager at your desired target and press the Image Capture Key. The image will be saved to the built-in 3GB storage in JPG format.
4.4 Color Palettes
The ST9450 offers several color palettes to visualize temperature differences. Each palette highlights different temperature ranges, making specific thermal patterns more apparent.
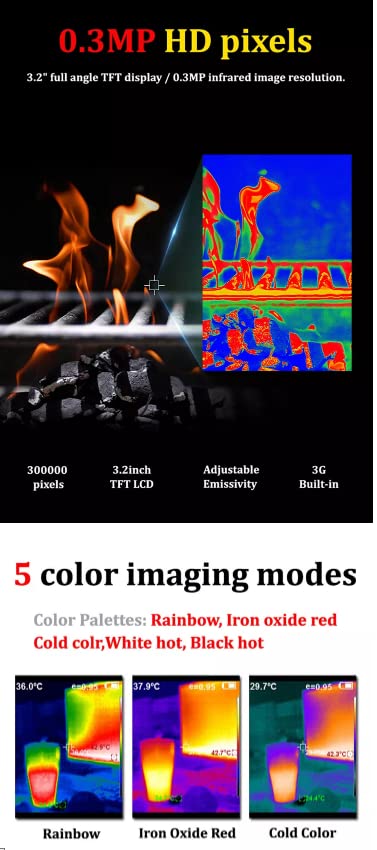
- Rainbow: Provides a full spectrum of colors, ideal for general thermal analysis.
- Iron Oxide Red: Highlights hot spots with red and yellow tones.
- Cold Color: Emphasizes cooler temperatures with blue and purple tones.
- Black & White: A grayscale palette, useful for high contrast.
- White & Black: Inverted grayscale.
5. Maintenance
5.1 Cleaning
- Device Body: Use a soft, dry cloth to wipe the exterior of the imager. For stubborn dirt, a slightly damp cloth with mild soap can be used, then wipe dry immediately.
- Lens: Gently clean the infrared lens and visible light camera lens with a lens cleaning cloth or a soft, lint-free cloth. Do not use abrasive materials or harsh chemicals.
5.2 Storage
- Store the device in its original carrying case when not in use to protect it from dust, moisture, and physical damage.
- Keep the imager in a cool, dry place, away from direct sunlight and extreme temperatures.
- If storing for extended periods, ensure the battery is partially charged (around 50%) and recharge it every few months to maintain battery health.
6. Troubleshooting
If you encounter issues with your ST9450 Thermal Imager, please refer to the following common problems and solutions:
| Problem | Possible Cause | Solution |
|---|---|---|
| Device does not power on. | Battery is low or depleted. Battery not installed correctly. | Charge the battery. Ensure the battery is inserted with correct polarity. |
| Image is blurry or unclear. | Lens is dirty. Object is outside focus range. | Clean the lens gently. Ensure the object is within the 0.5m minimum focus distance. |
| Temperature readings are inaccurate. | Incorrect emissivity setting. Measurement distance too far. | Adjust emissivity according to the material. Move closer to the target object. |
| Device freezes or becomes unresponsive. | Software glitch. | Press and hold the power button for 10 seconds to force a restart. |
| Cannot transfer files to computer. | USB cable issue. Driver not installed (rare). | Try a different USB port or cable. Ensure the device is powered on and in data transfer mode (if applicable). |
If the problem persists after trying these solutions, please contact customer support.
7. Specifications
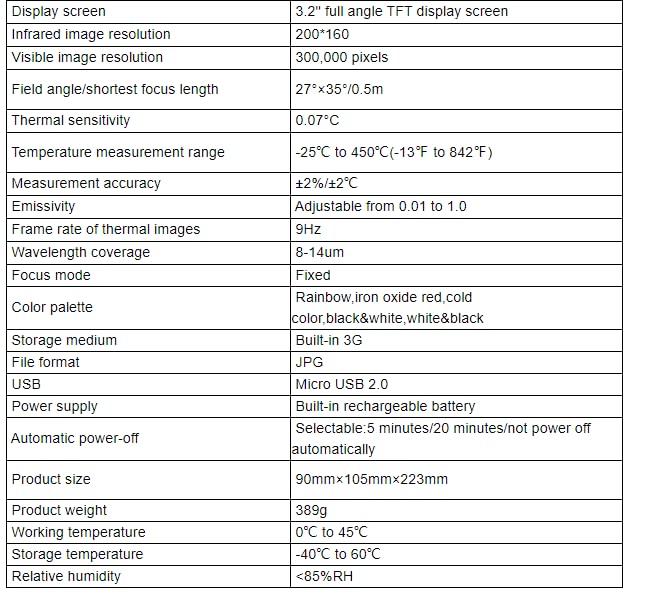
Detailed technical specifications for the VIHELM ST9450 Portable Handheld Thermal Imager:
| Feature | Specification |
|---|---|
| Display Screen | 3.2" full angle TFT display screen |
| Infrared Image Resolution | 200*160 pixels |
| Visible Image Resolution | 300,000 pixels |
| Field Angle/Shortest Focus Length | 27°×35°/0.5m |
| Thermal Sensitivity | 0.07°C |
| Temperature Measurement Range | -25°C to 450°C (-13°F to 842°F) |
| Measurement Accuracy | ±2%/±2°C |
| Emissivity | Adjustable from 0.01 to 1.0 |
| Frame Rate of Thermal Images | 9Hz |
| Wavelength Coverage | 8-14um |
| Focus Mode | Fixed |
| Color Palette | Rainbow, Iron Oxide Red, Cold Color, Black & White, White & Black |
| Storage Medium | Built-in 3G |
| File Format | JPG |
| USB | Micro USB 2.0 |
| Power Supply | Built-in rechargeable battery |
| Automatic Power-Off | Selectable: 5 minutes/20 minutes/not power off automatically |
| Product Size | 90mm×105mm×223mm |
| Product Weight | 389g |
| Working Temperature | 0°C to 45°C |
| Storage Temperature | -40°C to 60°C |
| Relative Humidity | <85% RH |
8. Warranty and Support
8.1 Warranty Information
VIHELM products are manufactured to high quality standards. For specific warranty terms and conditions, please refer to the warranty card included with your product or contact VIHELM customer service. Keep your purchase receipt as proof of purchase for warranty claims.
8.2 Customer Support
If you have any questions, require technical assistance, or need to report an issue with your ST9450 Thermal Imager, please contact VIHELM customer support through the contact information provided on the product packaging or the official VIHELM website. When contacting support, please have your product model (ST9450) and purchase details ready.