
1. Introduction
This manual provides detailed instructions for the ASUS ROG Phone 6, Model AI2201-12G256G-WH. It covers device setup, operation, maintenance, and troubleshooting. Please read this manual thoroughly before using your device to ensure proper function and longevity.
2. Package Contents
Verify that all items are present in your product package. If any item is missing or damaged, contact your retailer.
- ASUS ROG Phone 6 (AI2201-12G256G-WH)
- Phone Case
- SIM Tray Ejector
- USB Cable
- Power Adapter (65-watt HyperCharge adapter)

Image: The ASUS ROG Phone 6 in Storm White, highlighting both the front screen and the unique design elements on the back panel, along with some accessories.
3. Device Overview
The ASUS ROG Phone 6 is designed for high-performance mobile gaming, featuring advanced hardware and software.
Key Features:
- Processor: Qualcomm Snapdragon 8+ Gen 1 Mobile Platform (3.2 GHz)
- Display: 6.78-inch FHD+ AMOLED display with 165Hz refresh rate, HDR+, and eye care technology.
- Battery: 6000 mAh dual-cell battery with 65-watt fast charging support.
- Cooling System: GameCool 6 thermal system with a 30% larger vapor chamber.
- Controls: AirTrigger 6 system with ultrasonic sensors for enhanced gaming input.
- Camera: Rear triple-camera system with a 50MP Sony IMX766 sensor, 13MP ultrawide, and 5MP macro. Front 12MP camera.
- Audio: Symmetrical front-firing dual speakers tuned by Dirac, aptX Adaptive codec, 3.5mm headphone jack.
- Software: ROG Armoury Crate for customization and gaming enhancements.
- Connectivity: 5G LTE Unlocked Dual SIM.

Image: The back of the ASUS ROG Phone 6 features a customizable 2-inch OLED display, capable of showing various animations and notifications.
4. Setup
4.1. Inserting SIM Cards
- Locate the SIM tray on the side of the device.
- Insert the SIM ejector tool into the small hole on the SIM tray to open it.
- Place your Nano-SIM cards into the designated slots on the tray. Ensure the gold contacts face downwards.
- Carefully reinsert the SIM tray into the phone.
4.2. Initial Power On
- Press and hold the Power button until the ASUS logo appears.
- Follow the on-screen instructions to complete the initial setup, including language selection, Wi-Fi connection, and Google account setup.
4.3. Charging the Device
Connect the provided USB cable to the phone's USB-C port and the 65-watt power adapter. Plug the adapter into a power outlet. The device supports fast charging.
5. Operating Instructions
5.1. Display and Navigation
The ROG Phone 6 features a 6.78-inch FHD+ AMOLED display with a 165Hz refresh rate.
- Touch Gestures: Navigate the interface using standard Android touch gestures (tap, swipe, pinch).
- Refresh Rate: Adjust the display refresh rate in the settings menu for optimal visual performance or battery efficiency.

Image: This image demonstrates the visual superiority of the ASUS ROG Phone 6's 6.78-inch 165Hz AMOLED display, showing enhanced smoothness and color accuracy compared to a standard screen.
5.2. Performance and Cooling
The device is powered by the Qualcomm Snapdragon 8+ Gen 1 Mobile Platform and features the GameCool 6 thermal system.
- Armoury Crate: Use the pre-installed Armoury Crate application to monitor system performance, customize game profiles, and manage cooling settings.
- X Mode: Activate X Mode for maximum performance during demanding gaming sessions. This mode optimizes CPU, GPU, and RAM.

Image: A visual representation of the Qualcomm Snapdragon 8+ Gen 1 Mobile Platform, the core processor of the ASUS ROG Phone 6, illustrating its advanced architecture.
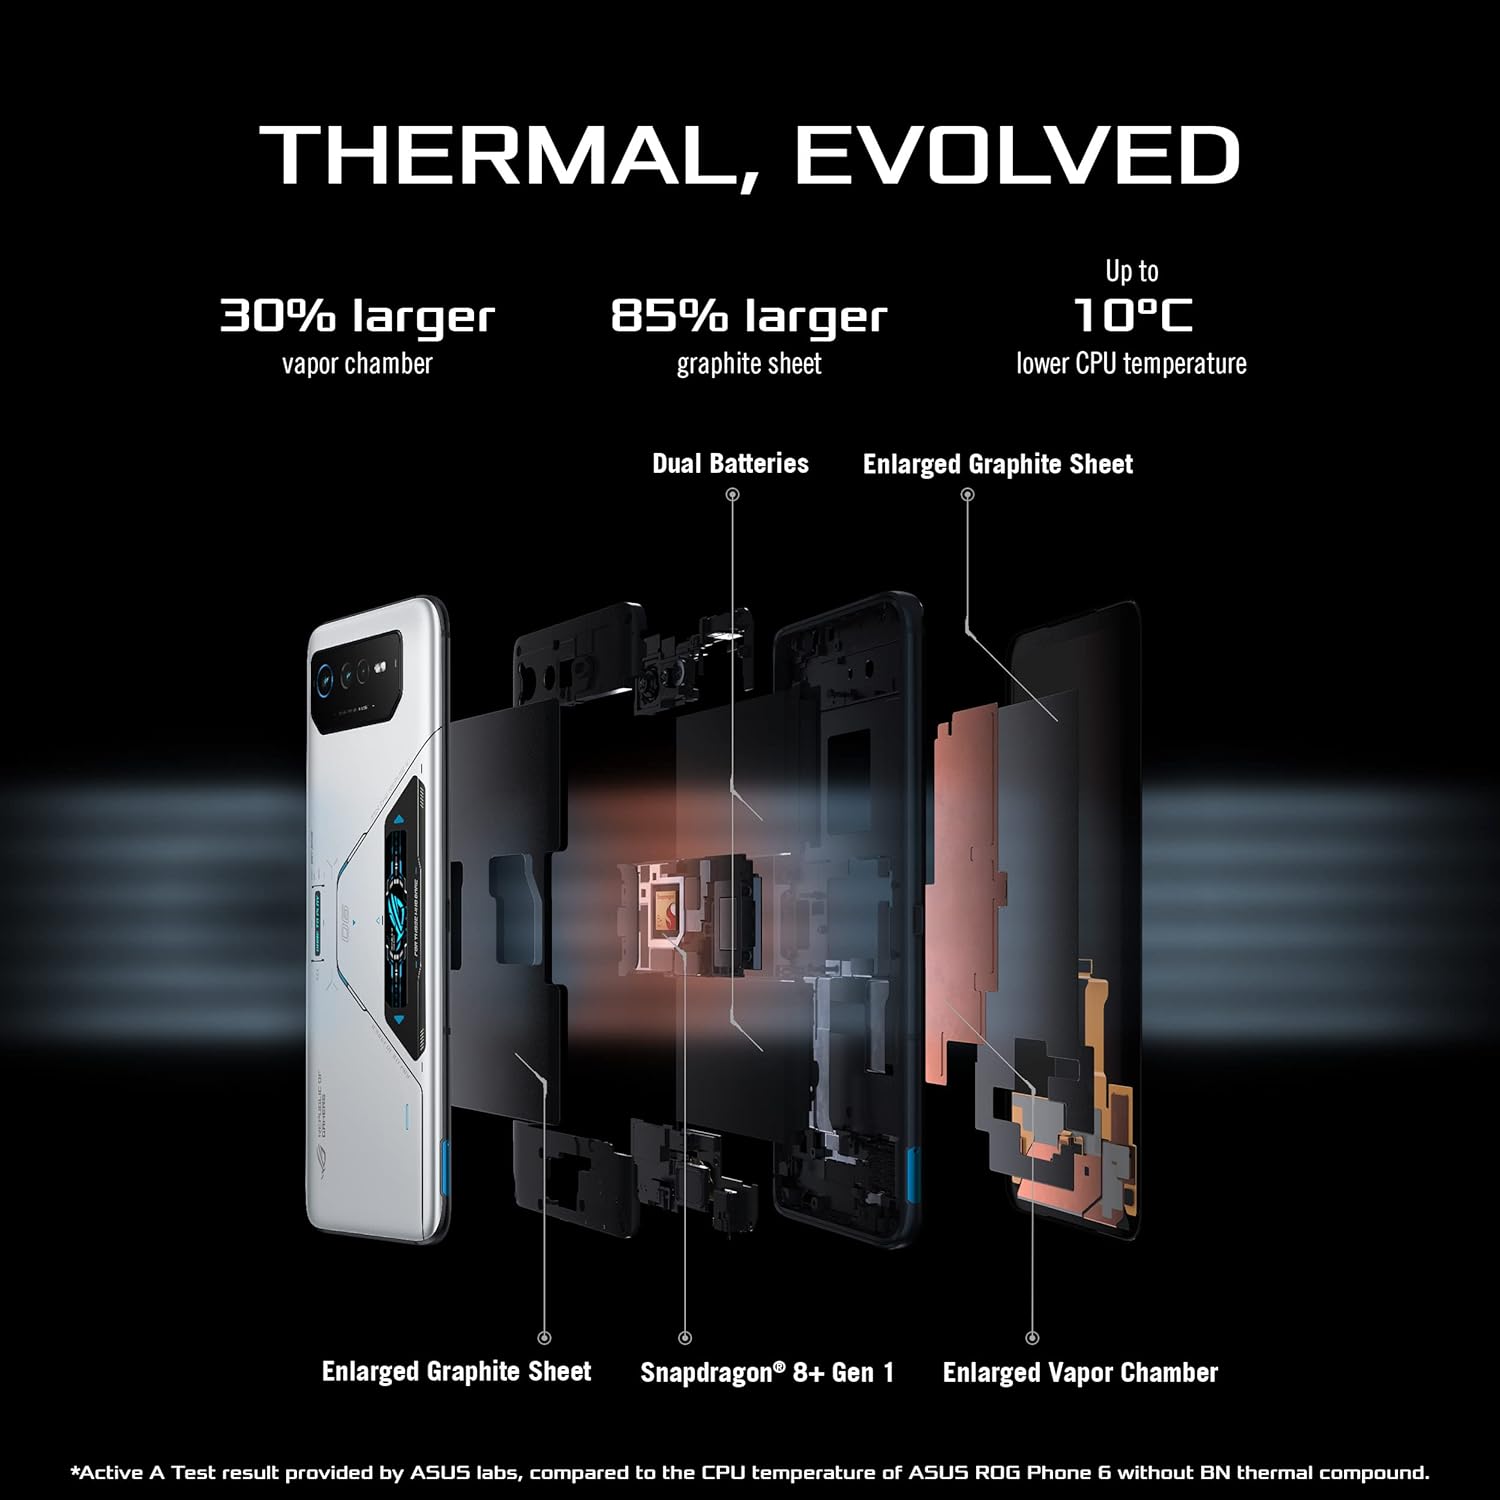
Image: An internal diagram detailing the components of the GameCool 6 thermal system, including the vapor chamber and graphite sheets, designed to dissipate heat efficiently.
For enhanced cooling, the optional AeroActive Cooler 6 accessory can be attached.

Image: The ASUS ROG Phone 6 shown with the AeroActive Cooler 6 accessory, which provides additional thermoelectric AI cooling and extra physical buttons for enhanced gaming.
5.3. AirTrigger 6 Controls
The AirTrigger 6 system provides ultrasonic sensors for additional input during gameplay.
- Customization: Configure AirTrigger actions within the Armoury Crate app. Options include tap, slide, dual partition, dual control, dual action, press and lift, and gyroscope aiming.
- Usage: These virtual buttons can be mapped to in-game controls for a more tactile and responsive gaming experience.

Image: A graphic illustrating the different touch and motion gestures supported by the AirTrigger 6 ultrasonic sensors, including tap, slide, and gyroscope aiming, for precise in-game control.
5.4. Camera Operation
The ROG Phone 6 features a triple rear camera system (50MP main, 13MP ultrawide, 5MP macro) and a 12MP front camera.
- Launching Camera: Open the Camera app from the home screen or lock screen.
- Modes: Select various shooting modes such as Photo, Portrait, Video, Pro, and Night mode.
- Settings: Adjust camera settings like resolution, aspect ratio, and HDR options.
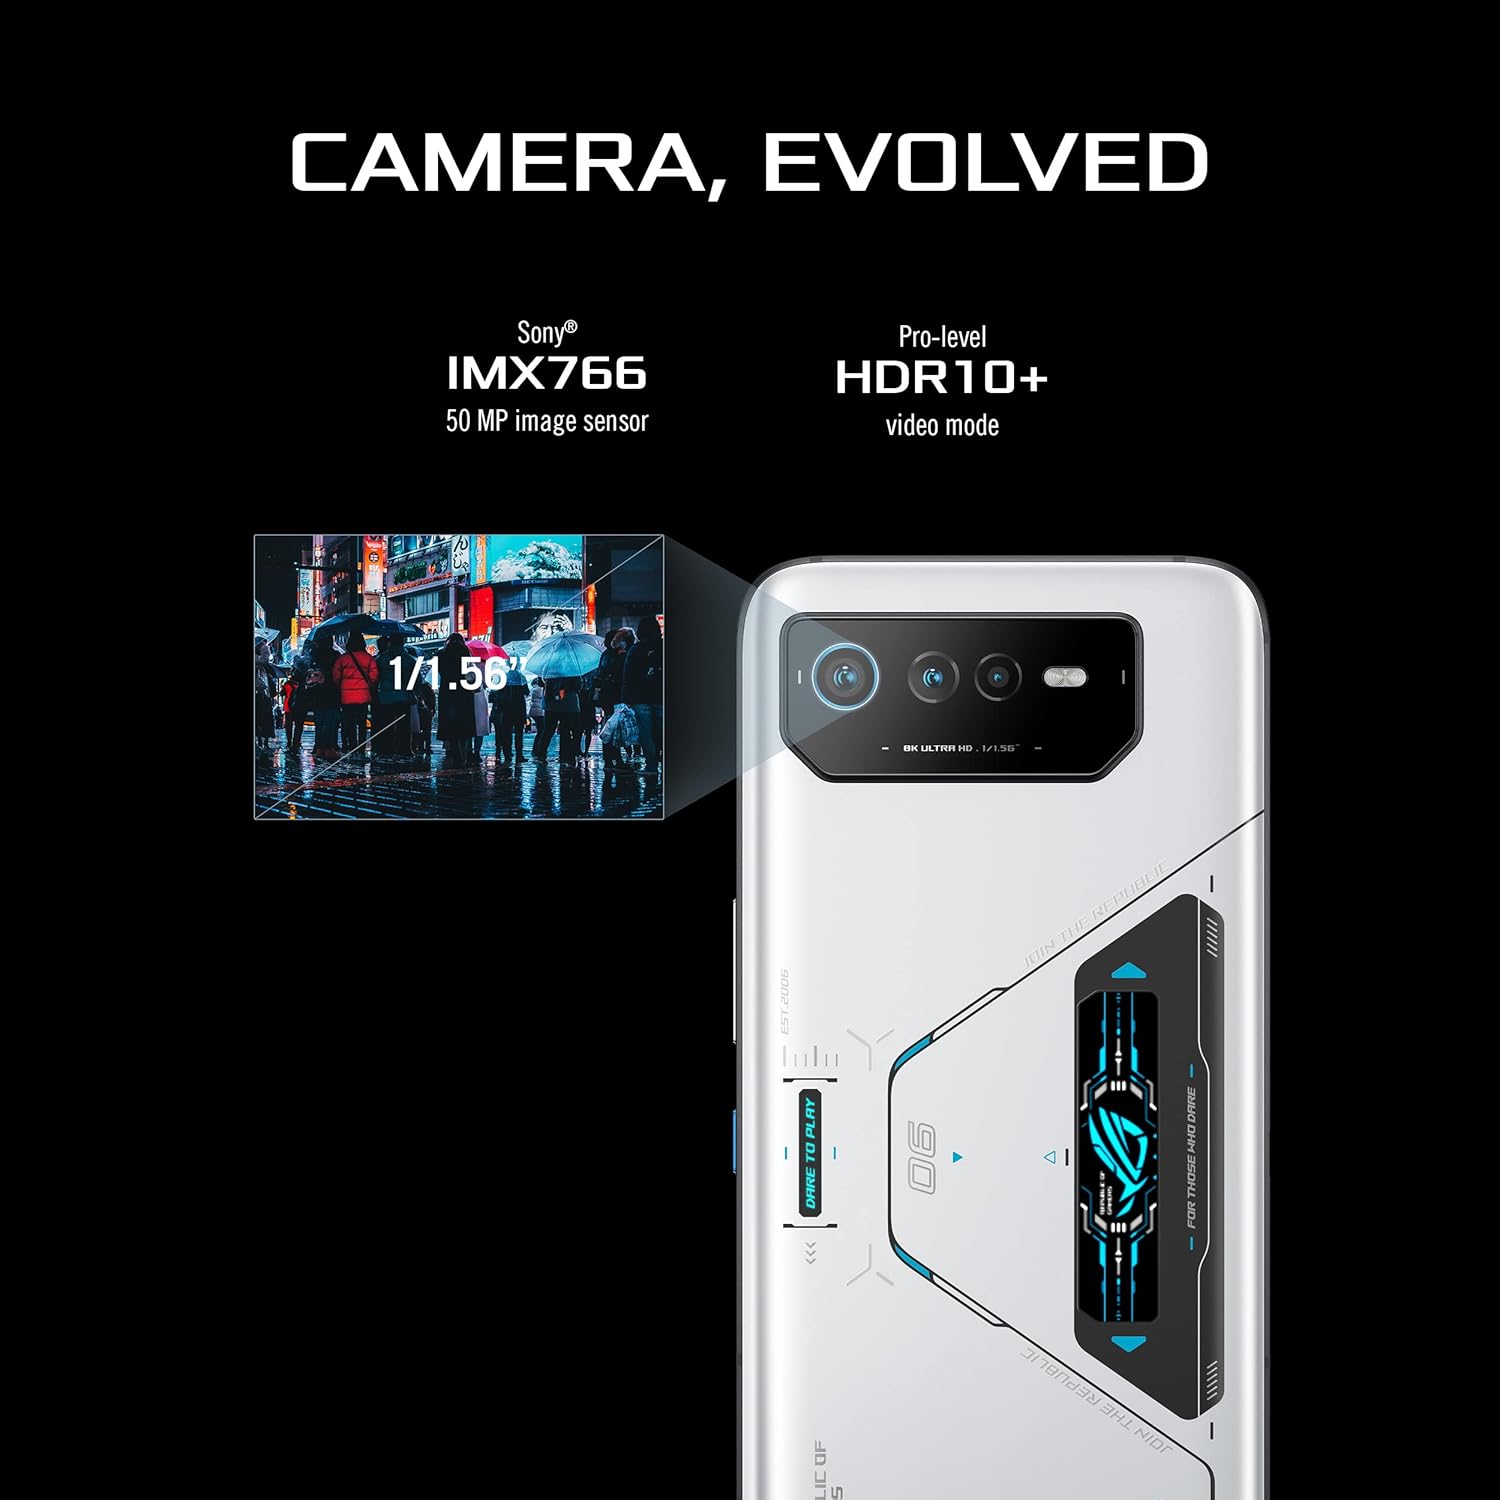
Image: A detailed view of the ASUS ROG Phone 6's rear camera setup, featuring the 50MP main sensor, 13MP ultrawide lens, and 5MP macro lens.
5.5. Battery Management
The device is equipped with a 6000 mAh battery.
- Charging: Use the provided 65-watt charger for optimal charging speed.
- Battery Bypass Charging: This feature allows the phone to draw power directly from the charger, bypassing the battery, which can extend battery longevity during extended gaming sessions.
- Steady Charging: This mode helps manage charging speed to reduce heat and prolong battery life.

Image: An internal schematic illustrating the dual-cell 6000 mAh battery configuration within the ASUS ROG Phone 6, designed for extended usage.

Image: The image shows the ASUS ROG Phone 6 being charged through its convenient side-mounted USB-C port, which supports advanced charging modes like Battery Bypass.
5.6. Audio Features
The ROG Phone 6 includes symmetrical front-firing dual speakers and a 3.5mm headphone jack.
- Dirac Audio: The speakers are tuned by Dirac for balanced stereo sound.
- aptX Adaptive: Supports high-quality wireless audio with compatible Bluetooth devices.

Image: This graphic highlights the advanced audio capabilities of the ASUS ROG Phone 6, such as Dirac-tuned symmetrical front-firing stereo speakers and Qualcomm aptX Adaptive support.
6. Maintenance
6.1. Cleaning
Use a soft, lint-free cloth to clean the screen and body of the phone. Avoid abrasive materials or harsh chemicals.
6.2. Software Updates
Regularly check for and install system updates to ensure optimal performance, security, and access to new features. Navigate to Settings > System > System updates.
6.3. Battery Care
To prolong battery life, avoid extreme temperatures and do not leave the phone fully charged or fully discharged for extended periods. Utilize features like Steady Charging and Battery Bypass Charging when appropriate.
7. Troubleshooting
7.1. Device Not Powering On
- Ensure the battery is sufficiently charged. Connect the phone to the charger for at least 30 minutes.
- Press and hold the Power button for 10-15 seconds to perform a force restart.
7.2. Apps Crashing or Freezing
- Close and reopen the problematic app.
- Clear the app's cache (Settings > Apps > [App Name] > Storage & cache > Clear cache).
- If the issue persists, consider uninstalling and reinstalling the app.
7.3. Network Connectivity Issues
- Check if Airplane Mode is enabled.
- Restart the device.
- Verify that your SIM card is correctly inserted and active.
- Contact your network provider if problems persist.
7.4. Overheating
- Reduce usage of demanding applications, especially during charging.
- Ensure the GameCool 6 system is functioning correctly (check Armoury Crate settings).
- Avoid direct sunlight or hot environments.
8. Specifications
| Feature | Detail |
|---|---|
| Model | AI2201-12G256G-WH |
| Operating System | Android 12.0 |
| Processor | Qualcomm Snapdragon 8+ Gen 1 Mobile Platform, 3.2 GHz |
| Display | 6.78 Inches FHD+ AMOLED, 2448 x 1080 Resolution, 165 Hz Refresh Rate |
| RAM | 12 GB |
| Storage | 256 GB |
| Rear Camera | 50MP (Main), 13MP (Ultrawide), 5MP (Macro) |
| Front Camera | 12MP |
| Battery | 6000 mAh Lithium Polymer |
| Charging | 65-watt HyperCharge |
| Connectivity | 5G, LTE, Dual SIM, Wi-Fi, Bluetooth, GPS |
| Audio Jack | 3.5 mm |
| Dimensions | 6.8 x 3.04 x 0.41 inches |
| Weight | 8 ounces |
9. Warranty and Support
For warranty information and technical support, please refer to the official ASUS website or contact ASUS customer service. Keep your proof of purchase for warranty claims.
Online Support: Visit the official ASUS support page for FAQs, driver downloads, and service center locations.
Contact Information: Refer to the documentation included with your device or the ASUS website for regional contact details.