1. Introduction
The M8 Car HUD (Head-Up Display) is an advanced automotive electronic device designed to project essential driving information directly onto your car's windshield. This system utilizes the OBD2 II or EUOBD interface to display real-time data such as vehicle speed, water temperature, oil temperature, voltage, fuel consumption, RPM, mileage, driving time, and more. It enhances driving safety by allowing drivers to view critical information without diverting their eyes from the road. The M8 also includes various alarm functions for overspeed, high water temperature, low voltage, and engine faults.
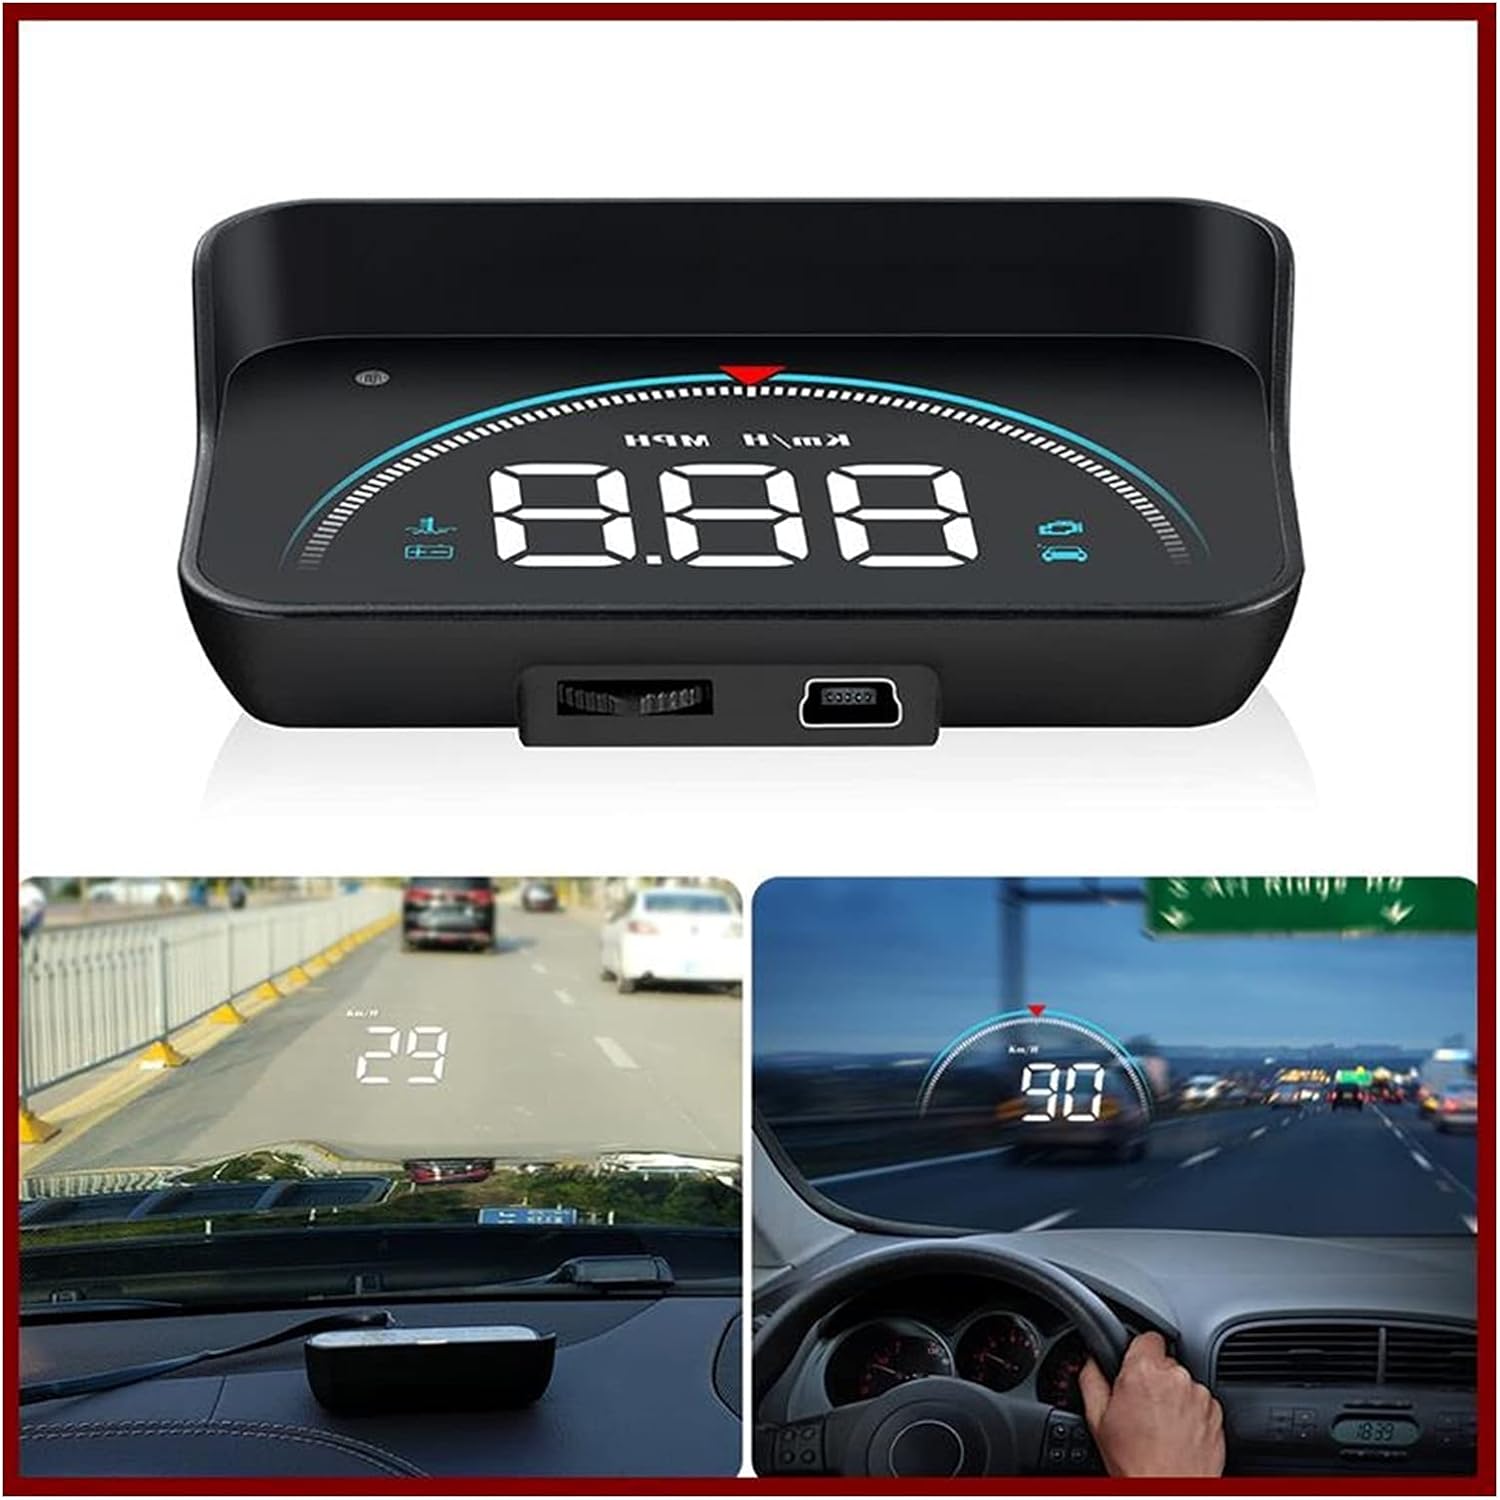
Figure 1.1: M8 Car HUD device and its projected display in a vehicle. The image shows the compact HUD unit, and two in-car views demonstrating how speed and other data are projected onto the windshield, visible to the driver.
2. Package Contents
Please check the package contents upon opening to ensure all items are present and undamaged:
- 1 x M8 HUD Unit
- 1 x OBD Cable
- 1 x Reflective Film
- 1 x User Manual
- 1 x Non-slip Mat

Figure 2.1: All components included in the M8 Car HUD package. This image displays the main HUD device, its connecting OBD cable, a reflective film for windshield projection, the instruction manual, and a non-slip mat to secure the device on the dashboard.
3. Features
The M8 Car HUD offers a comprehensive set of features to enhance your driving experience:
- Displays real-time data from OBD2 Port: Car Speed, Water Temperature, Oil Temperature, Voltage, Fuel Consumption, RPM, Single Mileage, Total Cumulative Mileage, Driving Time, System Time, Intake Pressure, Air-Fuel Ratio, Pressure (if turbo function is present), Speed Up Test, Brake Test, Read Data Stream, Engine Faulty Number.
- Alarm functions for: Overspeed, High Water Temperature, Low Voltage, Engine Fault.
- Smart Functions: Clear fault codes, Switch between Kilometers and Miles, Switch between Celsius and Fahrenheit.
4. Setup and Installation
Follow these steps to properly install your M8 Car HUD:
Locate the OBD Socket: Identify your vehicle's OBD2 socket, typically located under the steering wheel or near the driver's side dashboard.
Route the Cable: Carefully route the OBD cable from the socket to the desired placement of the HUD unit on your dashboard. You can use a wire rod (not included, but common for cable routing) to tuck the cable into the A-column sealing strip for a neat installation.
Place the HUD Unit: Place the M8 HUD unit on the non-slip mat on your dashboard, ensuring it is in a position that does not obstruct your view of the road. Connect the OBD cable to the HUD unit.
Apply Reflective Film (Optional): For clearer projection, especially in bright conditions, apply the reflective film to the windshield directly above where the HUD unit is placed. Clean the windshield thoroughly before application.
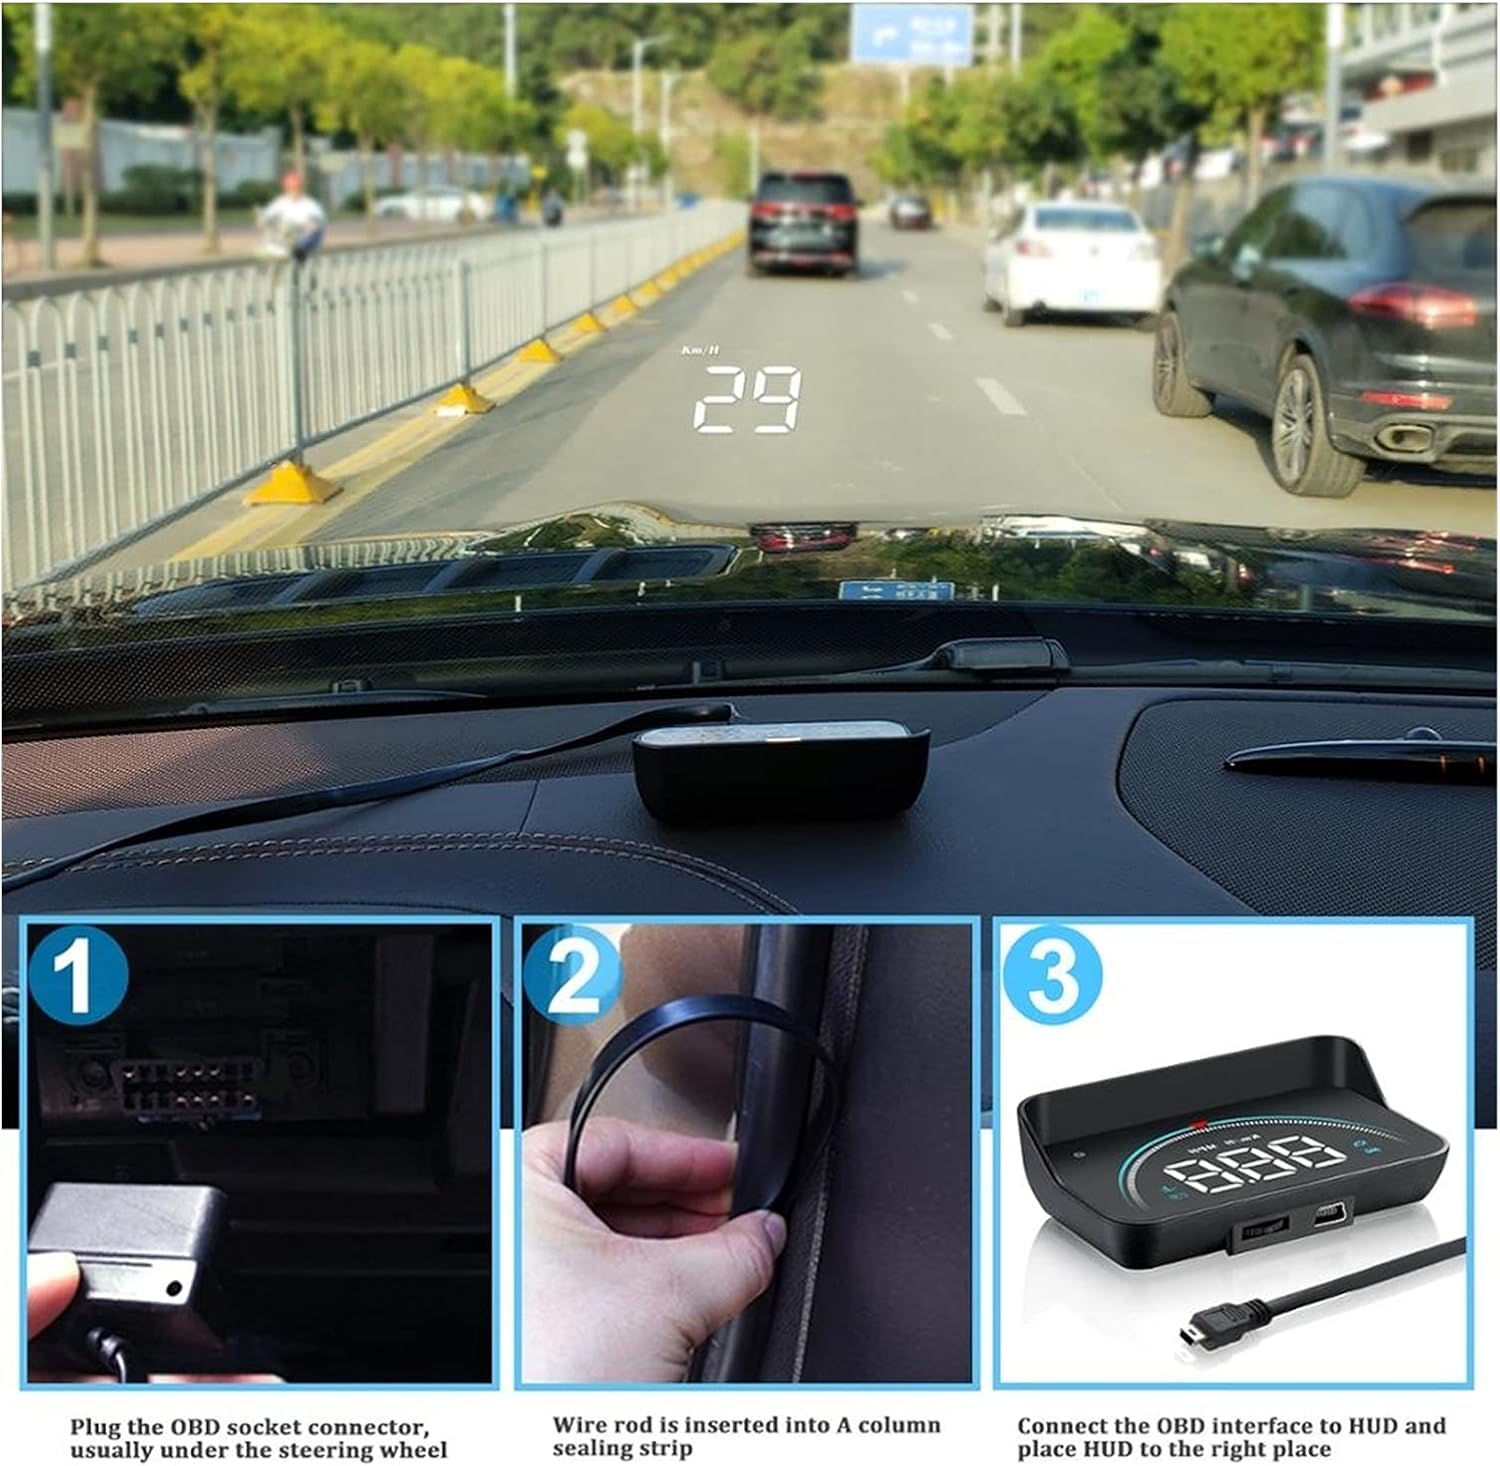
Figure 4.1: Step-by-step installation process. Image 1 shows plugging the OBD cable into the car's OBD socket. Image 2 illustrates routing the cable along the A-pillar. Image 3 depicts connecting the cable to the HUD unit and placing it on the dashboard.
5. Operating Instructions
5.1 Power On/Off
The M8 HUD will automatically power on when the vehicle's ignition is turned on and power off when the ignition is turned off, provided it is correctly connected to the OBD2 port.
5.2 Display Modes and Data
The M8 HUD offers various display modes and can show multiple types of driving data. Use the dial key on the device to switch between modes and adjust settings.

Figure 5.1: Overview of 16 distinct screen display modes. This graphic illustrates various combinations of speed, engine RPM, water temperature, and voltage, with some modes including decorative lighting or specific speed units, all accessible via a one-click switch.
The device supports 16 different display modes, allowing you to customize the information shown. These modes combine various data points such as speed, engine RPM, water temperature, and voltage, often with decorative lighting or specific unit displays. A single click on the dial key allows you to cycle through these modes.

Figure 5.2: Four practical driving data displays. This image showcases different display layouts: "Normal mode" with speed, RPM, and decorative lighting; "High speed mode" focusing on speed and RPM; "Mileage measurement" showing driving distance; and "Simple mode" displaying only speed.
Beyond the 16 modes, the HUD also provides four practical driving data views at a glance:
- Normal Mode: Displays Speed, Engine RPM, and Decorative Lighting.
- High Speed Mode: Focuses on Speed and Engine RPM.
- Mileage Measurement: Shows driving mileage (e.g., 18.9 km from company to home).
- Simple Mode: Displays only Speed.
5.3 Alarm Functions
The M8 HUD is equipped with several alarm functions to alert the driver to potential issues:
- Overspeed Alarm: Alerts when the vehicle exceeds a preset speed limit.
- High Water Temperature Alarm: Warns if the engine's water temperature becomes excessively high.
- Low Voltage Alarm: Notifies the driver of low battery voltage.
- Engine Fault Alarm: Indicates an engine fault detected via the OBD system.
The alarm sound level is typically more than 30dB to ensure audibility.
5.4 Smart Functions
- Clear Fault Code: Allows you to clear detected engine fault codes directly from the device.
- Unit Switching: Easily switch between Kilometers (km/h) and Miles (mph) for speed display, and between Celsius (°C) and Fahrenheit (°F) for temperature readings.
6. Troubleshooting
If you encounter issues with your M8 Car HUD, please refer to the following common troubleshooting steps:
- No Display/Power:
- Ensure the OBD cable is securely connected to both the vehicle's OBD port and the HUD unit.
- Verify that your vehicle's ignition is on.
- Check the vehicle's OBD port for power (consult your car's manual if unsure).
- Inaccurate Speed/Data:
- Ensure the correct unit (km/h or mph) is selected in the HUD settings.
- Some vehicles may require calibration. Refer to the detailed user manual (physical copy) for calibration procedures if available.
- Display Not Clear/Double Image:
- Adjust the angle of the HUD unit.
- Ensure the reflective film is properly applied to the windshield, if used. Clean the windshield thoroughly.
- Adjust the brightness setting on the HUD unit.
- HUD Does Not Turn Off:
- Ensure the vehicle's ignition is completely off and the car's electrical system has powered down. Some vehicles may keep the OBD port powered for a short period after ignition off.
- If the issue persists, disconnect the OBD cable when the vehicle is not in use to prevent battery drain.
7. Specifications
| Specification | Detail |
|---|---|
| Model | M8hud head up display |
| Output Frequency | OBD2 or EU OBD interface |
| Rated Power | 12V |
| Material | Plastic, electronic components |
| Size Name | 90*53*26cm (Note: This size seems unusually large for a HUD unit, please refer to product dimensions for accuracy if available.) |
| Alarm Sound Level | More than 30dB |
| External Testing Certification | Rohs, CE, FCC |
| Language | English |
| Item Weight | 2.2 pounds |
| Manufacturer | Lifyn2 |
| Country of Origin | China |
| Noise Level | 30 dB |
| Remote Control Included? | No |
8. Important Notes and Compatibility
Attention: The OBD2 HUD is only suitable for cars that comply with the OBD II protocol. All Italian and some Japanese cars are not available. Please select the GPS model if your car is not OBD II compatible. OBDII models in Europe and the United States must be produced after 2004. Asian car brands OBDII models can be used after 2008.
9. Maintenance
To ensure the longevity and optimal performance of your M8 Car HUD, follow these maintenance guidelines:
- Cleaning: Use a soft, dry cloth to clean the display screen and the unit's exterior. Avoid using abrasive cleaners or solvents, which can damage the surface.
- Storage: If the device will not be used for an extended period, disconnect it from the OBD port and store it in a cool, dry place away from direct sunlight and extreme temperatures.
- Cable Care: Do not bend or crimp the OBD cable excessively. Ensure it is not pinched by car doors or other components.
- Temperature: Avoid exposing the device to extreme heat or cold, as this can affect its electronic components.
10. Warranty and Support
For warranty information and technical support, please refer to the specific warranty card included with your product or contact the seller/manufacturer directly. Keep your purchase receipt as proof of purchase for any warranty claims.