Introduction
Thank you for purchasing the IOJBKI Digital Alarm Clock. This device features a large LED mirror surface display, adjustable brightness, snooze function, voice control, and 12/24H time display. This manual provides detailed instructions for setup, operation, and maintenance to ensure optimal performance and longevity of your alarm clock.

Image: Front view of the IOJBKI Digital Alarm Clock displaying 12:42 PM with white digits on a black mirror surface.
Product Features
- Large LED Display: Clear time visibility with a mirror surface.
- Adjustable Brightness: Three-level brightness settings, with automatic dimming from 18:00 to 6:00.
- Snooze Function: Adjustable snooze duration from 1 to 60 minutes.
- Voice Control: Activates display when powered by AAA batteries by making noise (e.g., rapping on table, touching clock).
- Power Saving Mode: LED display turns off after 16 seconds when battery-powered to conserve energy.
- Time Memory: Retains time settings when powered by AAA batteries.
- Multi-function Display: Includes clock, date, temperature, night mode, and alarm modes.
- 12/24H Display: Option to switch between 12-hour and 24-hour formats.
Product Overview
Familiarize yourself with the buttons and ports on your alarm clock.

Image: Rear view of the alarm clock showing the control buttons (DOWN, UP, LIGHT/SNOOZE, MODE, ALARM) and the USB power input. Text indicates power saving mode with batteries, voice control, and screen stay on with DC power.
Control Buttons:
- MODE: Used to switch between display modes (Clock, Date, Temperature, Night Mode, Alarm Mode) and confirm settings.
- ALARM: Used to enter alarm setting mode and turn the alarm on/off.
- UP: Used to increase values or adjust brightness.
- DOWN: Used to decrease values or adjust temperature unit.
- SNOOZE/LIGHT: Used to activate snooze during an alarm or adjust display brightness.
Setup
Powering the Device:
The alarm clock can be powered by either AAA batteries or a USB cable.
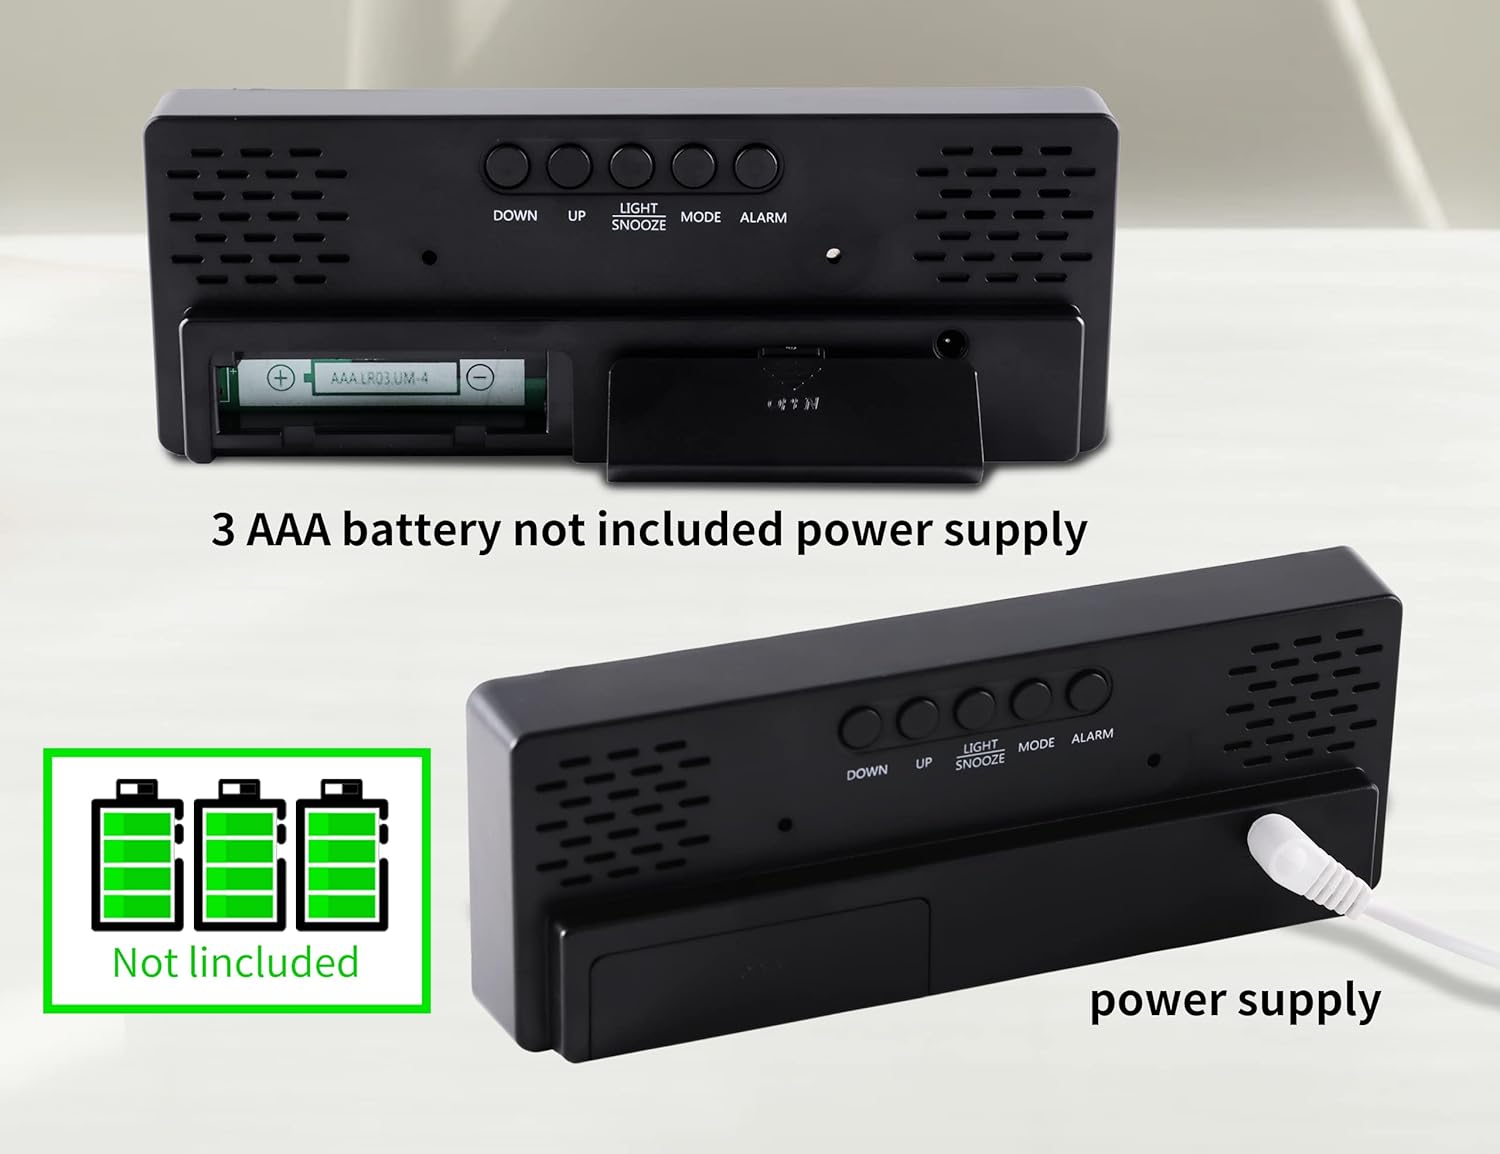
Image: The back of the alarm clock showing the open battery compartment for 3 AAA batteries (not included) and the USB power input port with a cable connected.
- Battery Power (3 x AAA batteries, not included):
- Open the battery compartment cover on the back of the clock.
- Insert 3 AAA batteries, ensuring correct polarity (+/-).
- Close the battery compartment cover.
- When powered by batteries, the LED display will turn off after 16 seconds to conserve energy. The display can be activated by voice control (making noise or touching the clock).
- Battery power provides time memory function.
- USB Power (DC 5V):
- Connect the provided USB cable to the DC 5V port on the back of the clock.
- Connect the other end of the USB cable to a USB power adapter (not included) or a powered USB port.
- When powered by the USB cable, the display will remain steadily on.
- Note: When powered by USB alone, there is no time memory function after power off.
Operating Instructions
1. Setting the Time (12/24H Format)

Image: A three-step diagram illustrating how to set the time. Step 1 shows setting 12/24 hour system, Step 2 shows adjusting hour and minute, and Step 3 shows returning to time display.
- In normal time display state, press and hold the "MODE" button for approximately 2 seconds. The display will show "24H" or "12H".
- Press "UP" or "DOWN" to select between 12-hour and 24-hour formats.
- Press "MODE" again to enter hour setting. Press "UP" or "DOWN" to adjust the hour.
- Press "MODE" again to enter minute setting. Press "UP" or "DOWN" to adjust the minute.
- Press "MODE" again to return to the time display.
2. Setting the Date

Image: A three-step diagram illustrating how to set the date. Step 1 shows entering date mode, Step 2 shows adjusting the year, and Step 3 shows adjusting month and day before returning to time display.
- In normal time display state, press the "MODE" button once to enter date mode. The default display is January 1, 2021 (1.01).
- Press and hold "MODE" for about 2 seconds to enter the date setting. The year will flash.
- Press "UP" or "DOWN" to adjust the year.
- Press "MODE" again to enter month setting. Press "UP" or "DOWN" to adjust the month.
- Press "MODE" again to enter day setting. Press "UP" or "DOWN" to adjust the day.
- Press "MODE" again to return to the time display.
3. Setting the Alarm

Image: A three-step diagram illustrating how to set the alarm. Step 1 shows entering alarm mode, Step 2 shows adjusting alarm hour and minute, and Step 3 shows selecting weekday alarm and snooze settings.
- In any mode, press the "ALARM" button to display the alarm mode.
- In alarm mode, press the "ALARM" button again to turn the alarm on/off.
- To set the alarm time, press and hold the "ALARM" button for about 2 seconds. The hour will flash.
- Press "UP" or "DOWN" to adjust the alarm hour.
- Press "ALARM" again to enter minute setting. Press "UP" or "DOWN" to adjust the alarm minute.
- Press "ALARM" again to select the weekday alarm (1-7 for everyday, 1-6 for Monday-Saturday, 1-5 for Monday-Friday). Press "UP" or "DOWN" to select.
- Press "ALARM" again to confirm and exit alarm setting.
4. Snooze Function

Image: A person's hand reaching to press the "LIGHT/SNOOZE" button on the top of the alarm clock while the alarm is sounding. Text indicates 1-60 minutes of adjustable snooze time.
- When the alarm sounds, press the "SNOOZE/LIGHT" button to pause the alarm and activate the snooze function. The alarm will sound again after the set snooze duration.
- The snooze duration can be set from 1 to 60 minutes. To set, during alarm setting (step 6 above), press "ALARM" again after selecting weekday alarm, then use "UP" or "DOWN" to adjust snooze time. Default is 5 minutes.
- To cancel the alarm completely, press any other button (MODE, ALARM, UP, DOWN) when the alarm is sounding.
5. Adjusting Brightness

Image: Three identical alarm clocks displaying the time 10:46, each with a different brightness level (low, medium, high) to illustrate the 3 brightness settings.
- In normal time display state, press the "UP" button to cycle through the three brightness levels (High, Medium, Low).
- The clock also features an automatic dimming function: the brightness will automatically reduce from 18:00 (6 PM) to 6:00 (6 AM). The automatic brightness interval can be adjusted in Night Mode settings.
6. Night Mode

Image: A three-step diagram illustrating how to set the night mode. Step 1 shows entering night mode setting, Step 2 shows adjusting the start hour and minute, and Step 3 shows adjusting the end hour and minute for automatic dimming.
- In normal time display state, press the "MODE" button three times to enter the night mode setting. The display will show "OFF" (default).
- Press "UP" or "DOWN" to turn Night Mode "ON" or "OFF".
- If Night Mode is "ON", press and hold "MODE" to set the start hour (default 18:00). Press "UP" or "DOWN" to adjust.
- Press "MODE" again to set the start minute. Press "UP" or "DOWN" to adjust.
- Press "MODE" again to set the end hour (default 6:00). Press "UP" or "DOWN" to adjust.
- Press "MODE" again to set the end minute. Press "UP" or "DOWN" to adjust.
- Press "MODE" again to confirm and exit night mode setting.
7. Voice Control & Power Saving Mode (Battery Powered)

Image: The alarm clock display showing 10:46, with sound wave icons and a hand icon touching the clock, indicating that the display can be activated by noise or touch when battery powered.
- When the alarm clock is powered by AAA batteries, the LED display will automatically turn off after 16 seconds to enter energy conservation mode.
- To activate the display, make a noise (e.g., clap, rap on the table) or physically touch the clock.
- Note: When the alarm clock is powered by the USB cable, the display will remain steadily on, and voice control is not active.
8. Temperature Display

Image: A three-step diagram illustrating how to display and adjust the temperature unit. Step 1 shows entering temperature mode, Step 2 shows switching between Celsius and Fahrenheit, and Step 3 shows setting cycle display with time and date.
- In normal time display state, press the "MODE" button twice to enter temperature mode. The temperature will be displayed (e.g., 29°C).
- Press the "DOWN" button to switch between Celsius (°C) and Fahrenheit (°F).
- To set cycle display (time, date, and temperature in sequence), long press "MODE" in temperature mode until you hear a "Bi" sound. The clock will then cycle through time, date, and temperature.
- To display only the time, long press "MODE" again in cycle display mode.
9. Nighttime Anti-Disturbance (Screen Off Mode)
- In the non-setting state, press and hold the "SNOOZE/LIGHT" button for more than 3 seconds to turn off the display completely. This prevents the bright screen from disturbing sleep.
- After entering the screen off mode, you can press any key to turn the display back on.
- Note: Voice control cannot activate the display when it is in the screen off mode.
Maintenance
- Clean the clock surface with a soft, dry cloth. Avoid using abrasive cleaners or solvents.
- Keep the device away from water and high humidity.
- Do not expose the clock to direct sunlight or extreme temperatures.
- If using battery power, replace batteries when the display becomes dim or unresponsive. Remove batteries if the clock will not be used for an extended period.
Troubleshooting
| Problem | Possible Cause | Solution |
|---|---|---|
| Display is off (battery powered) | Power saving mode is active. | Make a noise (voice control) or touch the clock to activate the display. |
| Display is always off (USB powered) | No power or faulty USB connection. | Ensure USB cable is securely connected and power adapter is working. Try a different USB port or adapter. |
| Clock loses time/settings | No batteries or dead batteries (when USB power is disconnected). | Insert fresh AAA batteries for time memory function. If only using USB, settings will be lost upon power disconnection. |
| Alarm does not sound | Alarm is not set or turned off. | Verify alarm time and ensure alarm is turned "ON" (check alarm icon on display). |
| Display too dim/bright | Brightness setting needs adjustment. | Press the "UP" button to cycle through brightness levels. Check Night Mode settings if automatic dimming is undesired. |
Specifications
| Feature | Detail |
|---|---|
| Brand | IOJBKI |
| Model Number | IOJBKI01 |
| Display Type | Digital LED |
| Color | Black Case + White Digit |
| Product Dimensions | 6.69"W x 2.75"H (approx. 17cm x 7cm) |
| Item Weight | 0.37 Pounds (approx. 5.9 ounces / 167 grams) |
| Power Source | Battery Powered (3 x AAA, not included), Corded Electric (USB DC 5V) |
| Material | Plastic, Acrylonitrile Butadiene Styrene (Frame) |
| Special Features | Adjustable Brightness, Large Display, Snooze, Temperature Display, Voice Control, Time Memory |

Image: A diagram illustrating the dimensions of the alarm clock (6.3 inches wide, 2.36 inches high, 0.98 inches deep) and icons representing its features: battery powered, 12/24 hour mode, adjustable LED brightness, daily alarm, snooze function, and bedroom decor.
Warranty and Support
For warranty information or technical support, please refer to the product packaging or contact the retailer where the product was purchased. Keep your purchase receipt as proof of purchase.