Introduction
This instruction manual provides essential information for the safe and effective use of your YATO YT-05897 Stud Extractor Set. This set is designed for removing damaged, rusted, or stubborn bolts, nuts, and studs. Please read this manual thoroughly before operating the tools and retain it for future reference.
Safety Information
Always observe basic safety precautions when using hand tools to reduce the risk of injury. Failure to follow these instructions may result in personal injury or damage to the tools or workpiece.
- Wear appropriate personal protective equipment (PPE), including safety glasses, gloves, and hearing protection, especially when using impact tools.
- Inspect tools before each use. Do not use damaged or worn extractors.
- Ensure the workpiece is securely clamped or supported to prevent movement during extraction.
- Select the correct size extractor for the fastener. Using an incorrect size can damage the extractor or the fastener further.
- Apply steady, controlled force. Avoid excessive force or sudden jerking motions.
- Keep children and bystanders away from the work area.
- Store tools properly in their case when not in use to prevent damage and loss.
- Do not modify the tools. Use them only for their intended purpose.
Package Contents
The YATO YT-05897 Stud Extractor Set includes the following components, neatly organized in a durable plastic storage case:
- 13 x Stud/Nut Extractors (various sizes)
- 1 x 1/4" to 3/8" Hex Adapter (for specific models/shipments)
- 1 x Plastic Storage Case

Figure 1: The YATO YT-05897 Stud Extractor Set, including the plastic storage case and outer packaging.

Figure 2: The stud extractors organized within the durable plastic storage case.
Product Overview and Components
The YATO YT-05897 set features high-strength Cr-Mo steel extractors designed with a reverse spiral flute for maximum gripping power. Each extractor is laser-etched with its size for easy identification.
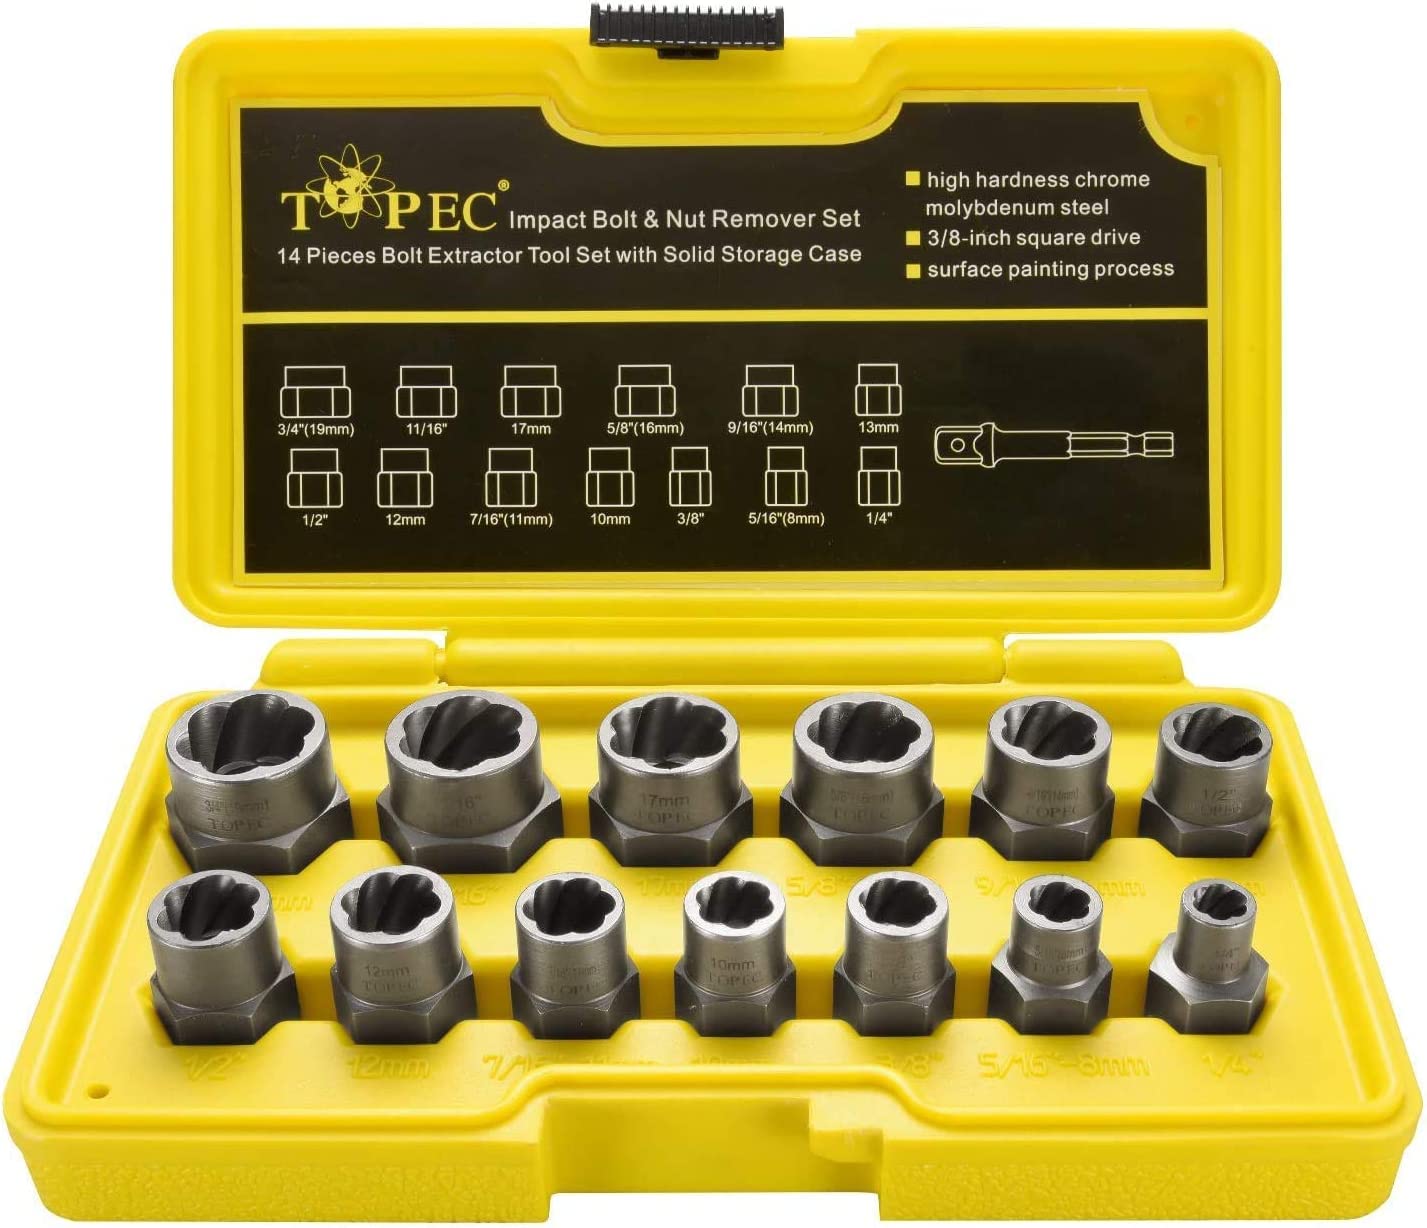
Figure 3: All components of the YATO YT-05897 set, showing laser-etched sizes and the adapter.
The set includes extractors with both 1/4-inch and 3/8-inch square drive compatibility, allowing use with various wrenches and impact drivers. The sizes typically include:
- Metric: 8mm, 10mm, 11mm, 12mm, 13mm, 14mm, 16mm, 17mm, 19mm
- SAE: 1/4", 3/8", 1/2", 11/16"
- Adapter: 1/4" to 3/8" Hex
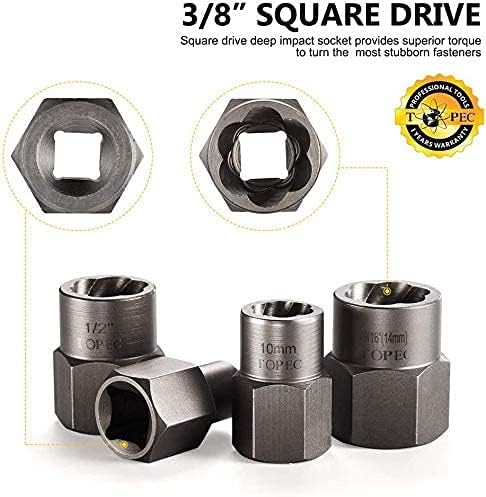
Figure 4: Detail of the 3/8-inch square drive and internal spiral design of the extractors.
Setup
Before beginning any extraction task, ensure you have the necessary tools and a safe working environment.
- Prepare the Work Area: Clear any obstructions and ensure adequate lighting.
- Gather Additional Tools: You will need a ratchet, breaker bar, or impact wrench with the appropriate drive size (1/4" or 3/8") to operate the extractors. Lubricant or penetrating oil may also be helpful for stubborn fasteners.
- Select the Correct Extractor: Choose an extractor that is slightly smaller than the head of the damaged bolt or nut. The extractor should bite firmly onto the fastener when tapped into place.
- Attach to Drive Tool: Connect the selected extractor to your ratchet, breaker bar, or impact wrench. If using the 1/4" to 3/8" adapter, attach it first to your drive tool, then the extractor.
Operating Instructions
Follow these steps for effective removal of damaged fasteners:
- Clean the Fastener: Remove any dirt, rust, or debris from around the damaged fastener to ensure a good grip. Applying penetrating oil and allowing it to soak can significantly aid in removal.
- Position the Extractor: Place the chosen extractor over the damaged bolt head or nut.
- Engage the Extractor: Gently tap the extractor onto the fastener using a hammer until it firmly grips the surface. The reverse spiral flutes are designed to dig into the fastener as torque is applied.
- Apply Torque: Using your ratchet, breaker bar, or impact wrench, slowly and steadily apply counter-clockwise (loosening) torque. The extractor's internal spiral design will increase its grip as you turn.
- Continue Turning: Maintain steady pressure and continue turning until the fastener begins to loosen and can be removed.
- Remove Extractor: Once the fastener is removed, you may need to use a punch or another tool to tap the extracted fastener out of the extractor.

Figure 5: Example of using the stud extractor set to remove a stubborn fastener from a vehicle wheel.
Applications: This set is suitable for various applications, including automotive repair, industrial maintenance, and general household tasks where damaged fasteners need to be removed.

Figure 6: Versatile applications of the YATO stud extractor set.
Maintenance
Proper maintenance ensures the longevity and performance of your YATO stud extractor set.
- Cleaning: After each use, wipe the extractors clean of any dirt, grease, or metal shavings. A wire brush can be used for stubborn debris.
- Lubrication: Apply a light coat of rust-preventative oil to the extractors, especially if storing them in a humid environment.
- Storage: Always store the extractors in their original plastic case. This protects them from damage, corrosion, and keeps them organized.
- Inspection: Periodically inspect the extractors for signs of wear, cracks, or damage. Replace any damaged tools immediately.
Troubleshooting
If you encounter difficulties while using the stud extractor set, consider the following common issues and solutions:
| Problem | Possible Cause | Solution |
|---|---|---|
| Extractor slips on fastener. | Incorrect extractor size; fastener too rounded; insufficient tapping. | Ensure the correct size extractor is used. Tap the extractor firmly onto the fastener to ensure a secure bite. If the fastener is severely rounded, consider grinding flats onto it or using a smaller extractor. |
| Fastener does not loosen. | Excessive rust/corrosion; insufficient torque; fastener seized. | Apply penetrating oil and allow it to soak. Use a longer breaker bar or an impact wrench for increased torque. Apply heat to the surrounding material (if safe and appropriate for the application) to help break the bond. |
| Extractor gets stuck on fastener. | Extractor has bitten too deeply; fastener material is soft. | Once the fastener is removed, place the extractor on a sturdy surface and use a punch to tap the fastener out from the drive end. Avoid over-tapping the extractor onto the fastener initially. |
Specifications
| Feature | Detail |
|---|---|
| Model Number | YT-05897 |
| Brand | YATO |
| Material | Cr-Mo Steel (Chrome Molybdenum Steel) |
| Drive Sizes | 1/4 inch, 3/8 inch |
| Number of Tools | 13 Extractors + 1 Adapter (Total 14 pieces) |
| Extractor Sizes (Metric) | 8mm, 10mm, 11mm, 12mm, 13mm, 14mm, 16mm, 17mm, 19mm |
| Extractor Sizes (SAE) | 1/4", 3/8", 1/2", 11/16" |
| Hardness (Rockwell) | 47-50 HRC |
| Packaging | Durable Plastic Storage Case |
| Product Weight | 1.58 kg |
| Product Dimensions | 15 x 10 x 5 cm |
Warranty and Support
YATO products are manufactured to high-quality standards and are designed for durability and performance. For specific warranty information, please refer to the documentation included with your purchase or visit the official YATO website. For technical support, product inquiries, or assistance with parts, please contact YATO customer service through their official channels.
Note: No specific warranty details were provided in the product data. Please consult the manufacturer's official resources for the most accurate and up-to-date information.
Video Resources
No official product videos from the seller were found in the provided data. For visual guides or demonstrations, please check the manufacturer's official website or authorized retailers.