siterlink GS886W-C
Siterlink Smart Smoke and Carbon Monoxide Detector Combo User Manual
Model: GS886W-C
1. Introduction
Thank you for choosing the Siterlink Smart Smoke and Carbon Monoxide Detector Combo. This advanced device is engineered to provide comprehensive protection against two critical household threats: smoke and carbon monoxide. Integrating modern technology with essential safety features, it offers WiFi connectivity, clear voice alerts, and convenient remote control via a mobile application, enhancing both your home's safety and your peace of mind. This manual contains vital information regarding the proper installation, operation, and maintenance of your detector to ensure its optimal performance and your family's safety.
This product is designed and manufactured to comply with UL 217 and UL 2034 standards, ensuring reliable and accurate detection capabilities.
2. Key Features
- 2-in-1 Protection: Simultaneously detects both smoke and carbon monoxide, offering a dual layer of safety for your home.
- Talking Alarms: Delivers clear, specific voice warnings such as "Fire! Please leave the building and call 911 immediately." and "Warning! Carbon Monoxide, evacuate." for immediate and unambiguous understanding.
- WiFi Connectivity (2.4GHz): Seamlessly connects to your mobile application, enabling real-time notifications and remote management of the device.
- Real-Time Notifications: Receive instant alerts on your smartphone when smoke or CO is detected, or when there is any change in the device's status.
- Remote Control: Offers the convenience to mute alarms directly from your phone app, which is particularly useful for false alarms triggered by cooking fumes or other non-emergency events.
- Self-Check Function: Automatically performs a diagnostic check of the circuit, electronics, and battery status every 80 seconds to guarantee continuous proper operation.
- High Sensitivity Sensors: Equipped with a photoelectric smoke sensor and an electrochemical CO sensor, ensuring sensitive and intelligent detection of hazards.
3. Package Contents
Please verify that all the following items are included in your package and are in good condition:
- Siterlink Smart Smoke and Carbon Monoxide Detector (3 units)
- Mounting Brackets (3 units)
- Screws and Drywall Anchors (sufficient quantity for 3 units)
- User Manual (this document)
4. Setup and Installation
4.1 Choosing a Location
For optimal safety, install detectors on every level of your home, including basements, and inside or near all sleeping areas. Ideal placement is on the ceiling or high on a wall, ensuring it is away from windows, doors, and vents that could disrupt sensor performance.
- Avoid installation near cooking appliances, fireplaces, or in areas prone to excessive dust, dirt, or grease.
- Do not install in locations with extreme temperatures (below 40°F / 4.4°C or above 100°F / 37.8°C) or high humidity.
- Maintain a minimum distance of 20 feet (6 meters) from any combustion sources.
4.2 Mounting the Detector
- Carefully select a suitable mounting location as per the guidelines above.
- Use the provided mounting bracket to mark the positions for screw holes on your chosen ceiling or wall surface.
- Drill pilot holes and insert drywall anchors if required for secure mounting.
- Securely fasten the mounting bracket using the provided screws.
- Align the detector with the mounting bracket and twist it clockwise until it firmly locks into place.
4.3 Battery Installation
The Siterlink detector operates on replaceable batteries. Ensure that the batteries are inserted correctly, observing the polarity markings (+ and -) inside the battery compartment.
 Image: The Siterlink Smart Smoke and Carbon Monoxide Detector is displayed alongside a smartphone showing its companion app interface. The app illustrates detected smoke and CO values, along with a log of past alarms.
4.4 Connecting to WiFi and Mobile App
The Siterlink detector connects to your smartphone via a 2.4GHz WiFi network. To manage the device and receive alerts, you will need to download and use the Tuya Smart app or a compatible smart home application.
- Download the "Tuya Smart" app from your mobile device's app store (available on iOS App Store and Google Play Store).
- Register for a new account or log in if you already have one.
- Ensure your smartphone is connected to a 2.4GHz WiFi network. If your router broadcasts both 2.4GHz and 5GHz bands, it may be necessary to temporarily disable the 5GHz band during the initial pairing process to ensure successful connection.
- Open the Tuya Smart app and tap "Add Device" or the "+" icon.
- Navigate to "Security & Video Surveillance" and select "Smoke Detector (Wi-Fi)" or "CO Detector (Wi-Fi)".
- Follow the in-app instructions to put the detector into pairing mode. This typically involves pressing the test/silence button three quick times until the indicator light begins to flash rapidly.
- Confirm that the indicator light on the detector is flashing rapidly within the app.
- Enter your WiFi network password accurately.
- Wait for the device to connect to your network. Once successfully connected, the app will provide a confirmation message.
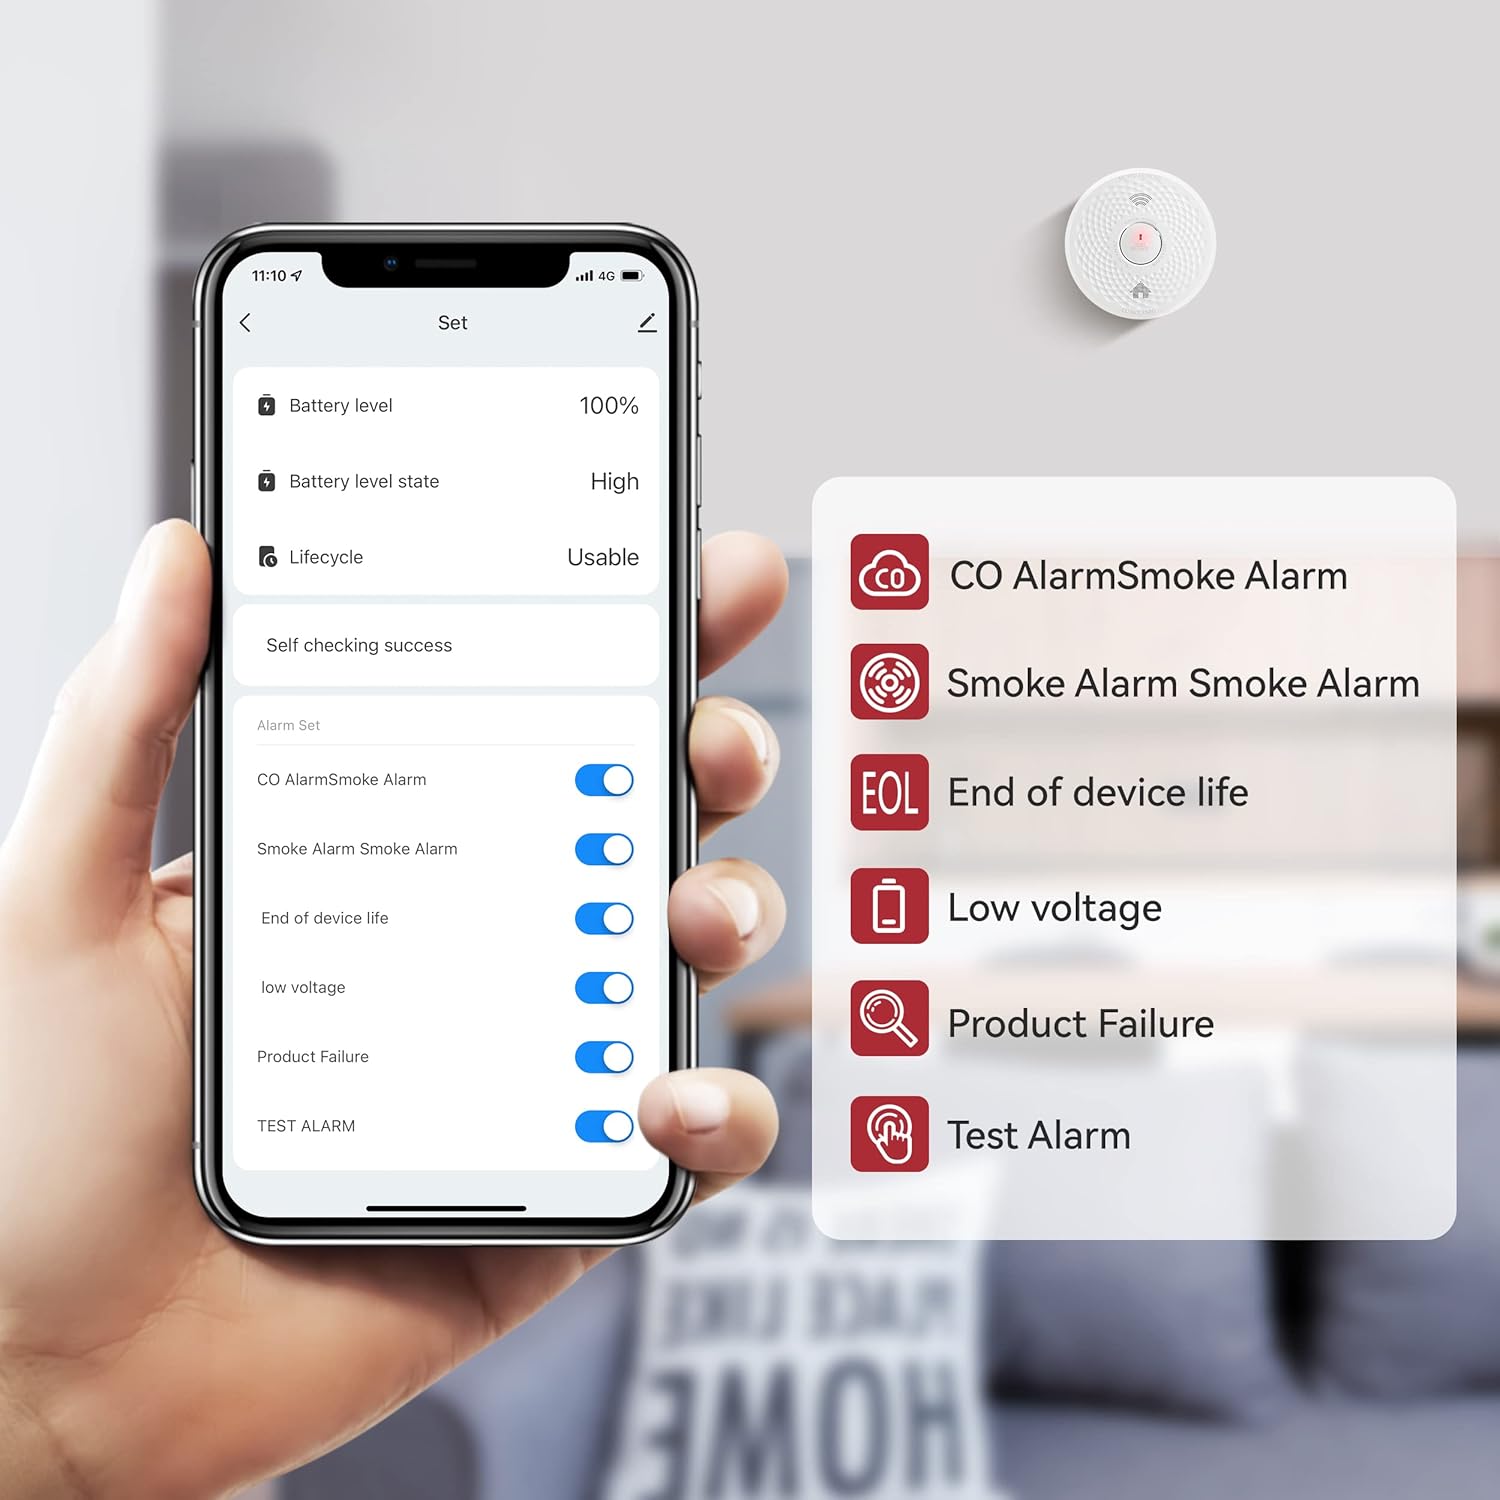 Image: A smartphone displaying the settings screen of the detector's companion app. This screen provides options and information such as battery level, device lifecycle status, and toggle switches for various alarm types and notifications, including CO alarm, smoke alarm, end of device life, low voltage, and product failure alerts.
5. Operating Instructions
5.1 Normal Operation
During normal operation, the green LED indicator on the detector will flash periodically (approximately every 80 seconds). This visual cue confirms that the unit is powered on, functioning correctly, and performing its routine self-check.
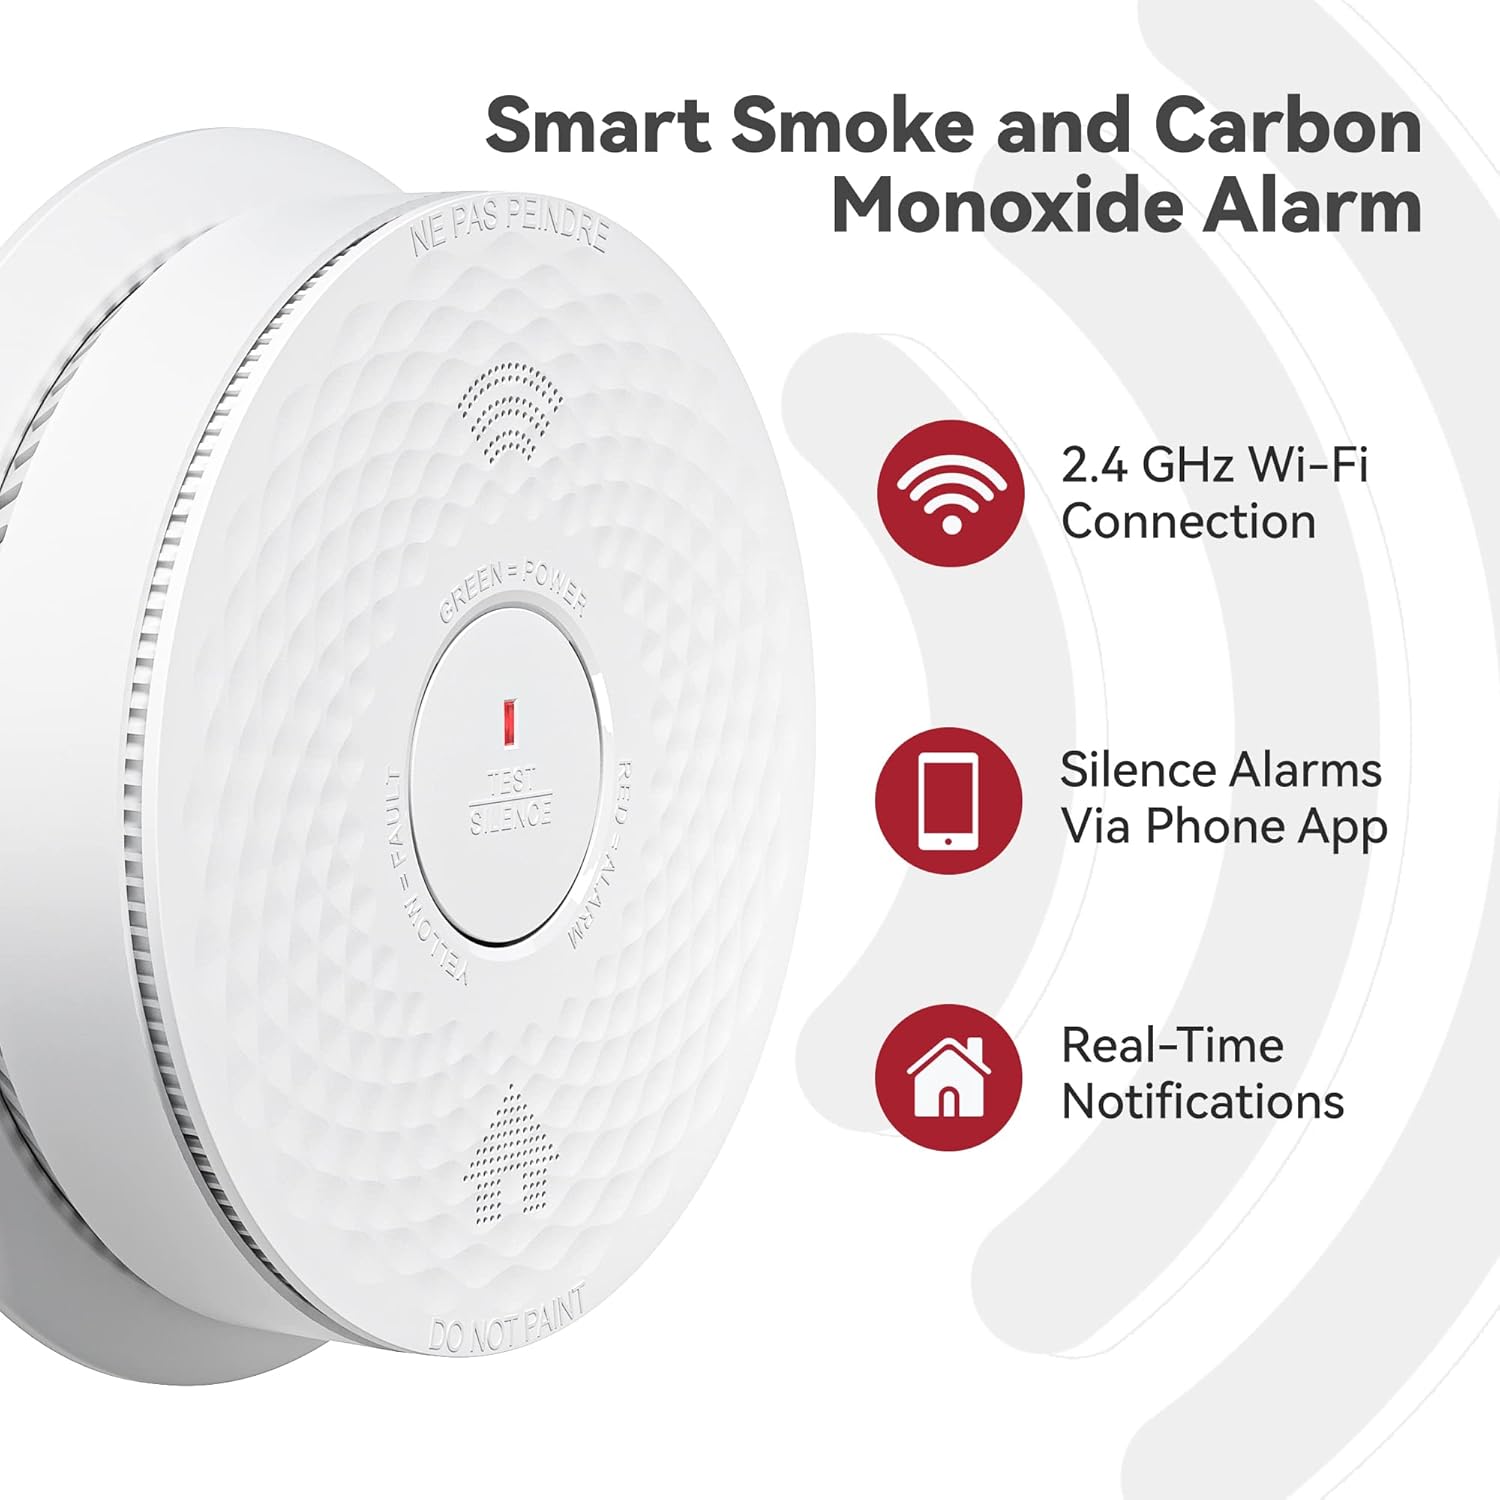 Image: A detailed close-up view of the Siterlink Smart Smoke and Carbon Monoxide Alarm. The image highlights its key functionalities, including 2.4 GHz Wi-Fi connectivity, the capability to silence alarms remotely through a smartphone application, and the provision of real-time notifications to the user.
5.2 Alarm Conditions
When smoke or carbon monoxide is detected, the alarm will activate with a loud audible signal, the red LED will flash rapidly, and a clear voice alert will be issued. The specific voice alert will precisely indicate the type of danger detected:
- Smoke Alarm: "Fire! Please leave the building and call 911 immediately."
- Carbon Monoxide Alarm: "Warning! Carbon Monoxide, evacuate."
Concurrently, you will receive a real-time notification on your smartphone through the connected mobile application, ensuring you are immediately aware of the situation.
 Image: A man is depicted walking outdoors while checking his smartphone. This visual represents the "Remote Reminder" feature of the detector, highlighting how users receive real-time notifications on their mobile devices, even when away from home.
5.3 Test Function
To perform a manual test of the detector, press and hold the "TEST/SILENCE" button on the unit for a few seconds. The alarm will sound, and the LEDs will flash, confirming that the device is operating properly. It is highly recommended to test your detectors weekly to ensure continuous functionality.
5.4 Silence/Mute Function
In the event of a false alarm, such as those caused by cooking fumes or steam, you can silence the alarm using one of the following methods:
- Press the "TEST/SILENCE" button directly on the detector.
- Utilize the mute function available within the connected mobile app. This feature is particularly convenient for elderly users or when the detector is installed in a hard-to-reach location.
 Image: A woman is shown pressing the silence button on the smoke detector, which is mounted on a wall. This action demonstrates the manual method to turn off an alarm, particularly useful for addressing false alarms.
6. Maintenance
6.1 Cleaning Your Detector
To ensure optimal performance and prevent false alarms, clean your detector at least once a month. Use a soft brush attachment on your vacuum cleaner to gently remove any accumulated dust and debris from the vents and cover. Do not use liquid cleaning solvents or sprays directly on the unit, as these can damage the sensors.
6.2 Battery Replacement
When the detector's battery level is low, the yellow LED will flash, and the unit will emit a periodic chirp. It is crucial to replace the batteries immediately with new ones of the specified type. Please refer to the "Specifications" section of this manual for the correct battery type and quantity.
6.3 End of Life Warning
Each detector has a designed service life. When the unit reaches its end of life, it will indicate this condition with a specific warning, which may include a distinct chirp pattern or a voice alert. Upon receiving this end-of-life warning, replace the unit immediately to ensure continued protection.
7. Troubleshooting
| Problem | Possible Cause | Solution |
|---|---|---|
| Detector chirps periodically (yellow light flashes). | Low battery. | Replace batteries immediately with new ones of the correct type. |
| False alarms (e.g., during cooking, showering). | Detector too close to cooking area, steam, or excessive fumes. | Use the silence function. Improve ventilation in the area. If false alarms persist, consider relocating the detector further from the source. |
| Detector not connecting to WiFi. | Incorrect WiFi band (must be 2.4GHz), incorrect password, or detector is too far from the router. | Ensure your phone is connected to a 2.4GHz WiFi network. Temporarily disable the 5GHz band on your router during pairing. Double-check and re-enter the WiFi password carefully. Move the detector closer to your WiFi router. Reset the detector and attempt the pairing process again. |
| No notifications received on phone. | App permissions not granted, app not running in background, or network connectivity issues. | Check and grant all necessary notification permissions for the app in your phone's settings. Ensure the app is allowed to run in the background. Verify that both your phone and the detector have a stable internet connection. |
| Detector continuously alarms (false positive). | Dust or debris obstructing the sensor, or a faulty unit. | Thoroughly clean the detector as per the maintenance instructions. If the problem persists after cleaning, the unit may be faulty and require replacement. |
8. Specifications
| Feature | Detail |
|---|---|
| Model Number | GS886W-C |
| Brand | Siterlink |
| Power Source | Battery Powered (AA batteries, quantity varies by model, check device compartment) |
| Connectivity | 2.4GHz WiFi |
| Sensor Type | Photoelectric (for Smoke), Electrochemical (for Carbon Monoxide) |
| Alarm Type | Audible (Voice Alert), Visual (LED Indicator) |
| Standards Compliance | UL 217, UL 2034 |
| Item Weight | Approximately 0.64 ounces (per unit) |
| UPC | 768481510035 |
9. Warranty and Support
Siterlink products are manufactured with a commitment to reliability and high performance. For detailed warranty information and technical support, please refer to the contact details provided with your product packaging or visit the official Siterlink website. It is important to retain your purchase receipt as proof of purchase for any warranty claims.
For assistance with common issues, please consult the troubleshooting section of this manual or refer to the Frequently Asked Questions (FAQ) section on the Siterlink support page.
10. Important Safety Information
- Never ignore any alarm. Always investigate the cause of an alarm immediately and thoroughly.
- Do not paint the detector. Paint can clog the sensing chambers and severely impair the unit's ability to detect smoke or carbon monoxide properly.
- Do not attempt to repair the detector yourself. All servicing and repairs should be referred to qualified personnel only.
- Test your detector weekly to ensure it is functioning correctly and providing continuous protection.
- Familiarize yourself and all household members with the sound of the alarm and the specific voice alerts for both smoke and carbon monoxide.
- Develop and regularly practice a home escape plan with all family members, ensuring everyone knows what to do in case of an emergency.
Ask a question about this manual
Ask about setup, troubleshooting, compatibility, parts, safety, or missing instructions. Manuals+ will review the question and use this page’s manual context to help answer it.