1. Introduction
This manual provides detailed instructions for the installation, operation, and maintenance of your SOGTICPS BL912-40A-WIFI MPPT Solar Charge Controller. This advanced charge controller is designed for off-grid solar applications, compatible with 12V/24V battery systems, including Gel, Flooded, and Lithium types. It features efficient MPPT tracking, an LCD display, dual USB outputs, and WiFi connectivity for remote monitoring.
Key Features:
- Innovative MPPT (Maximum Power Point Tracking) technology for up to 99% tracking efficiency.
- Automatic 12V/24V system voltage detection.
- Integrated LCD display for real-time monitoring of temperature, charge current, discharge current, and power generation.
- Comprehensive system protection: over-temperature, over-current, short-circuit, open-circuit, and reverse polarity.
- Compatibility with Gel, Flooded, and Lithium battery types.
- Dual 5V 2A USB outputs for charging mobile devices.
- WiFi communication for remote parameter adjustment and monitoring via a dedicated application.
- Industrial-grade main control chip with 16AD sampling precision.
- Two-way MOS tube anti-reverse circuit for high-power charging and low heat generation.
2. Safety Instructions
Please read all instructions carefully before installation and operation. Failure to follow these instructions may result in damage to the unit, personal injury, or property damage.
- Ensure all connections are tight and correct to avoid excessive voltage drop and potential hazards.
- Install the controller indoors, away from direct sunlight, high temperatures, and moisture.
- The controller generates heat during operation; ensure adequate ventilation.
- Connect the battery first, then the solar panel, and finally the load. Disconnect in the reverse order: load, solar panel, then battery.
- Do not connect any inverter directly to the load terminals of the controller.
- Ensure the solar panel's open-circuit voltage (Voc) does not exceed the controller's maximum input voltage.
- Use appropriate circuit breakers or fuses for the battery and solar panel circuits.
- Keep children away from the solar power system.
- Do not attempt to disassemble or repair the controller yourself. Contact qualified personnel for service.
3. Product Overview
The SOGTICPS BL912-40A-WIFI solar charge controller features a robust design with an intuitive LCD display and multiple connection points.

Image: Front view of the SOGTICPS BL912-40A-WIFI Solar Charge Controller, highlighting its security protection features such as short-circuit, overload, overcharge, under-voltage, and over-voltage protection.
Components:
- LCD Display: Shows real-time system status and parameters.
- Control Buttons: For navigating menus and setting parameters.
- Solar Panel Input Terminals: Connect to solar panels.
- Battery Terminals: Connect to the battery bank.
- Load Output Terminals: Connect to DC loads.
- Dual USB Ports (5V 2A): For charging external devices.
- WiFi Antenna: For wireless communication.
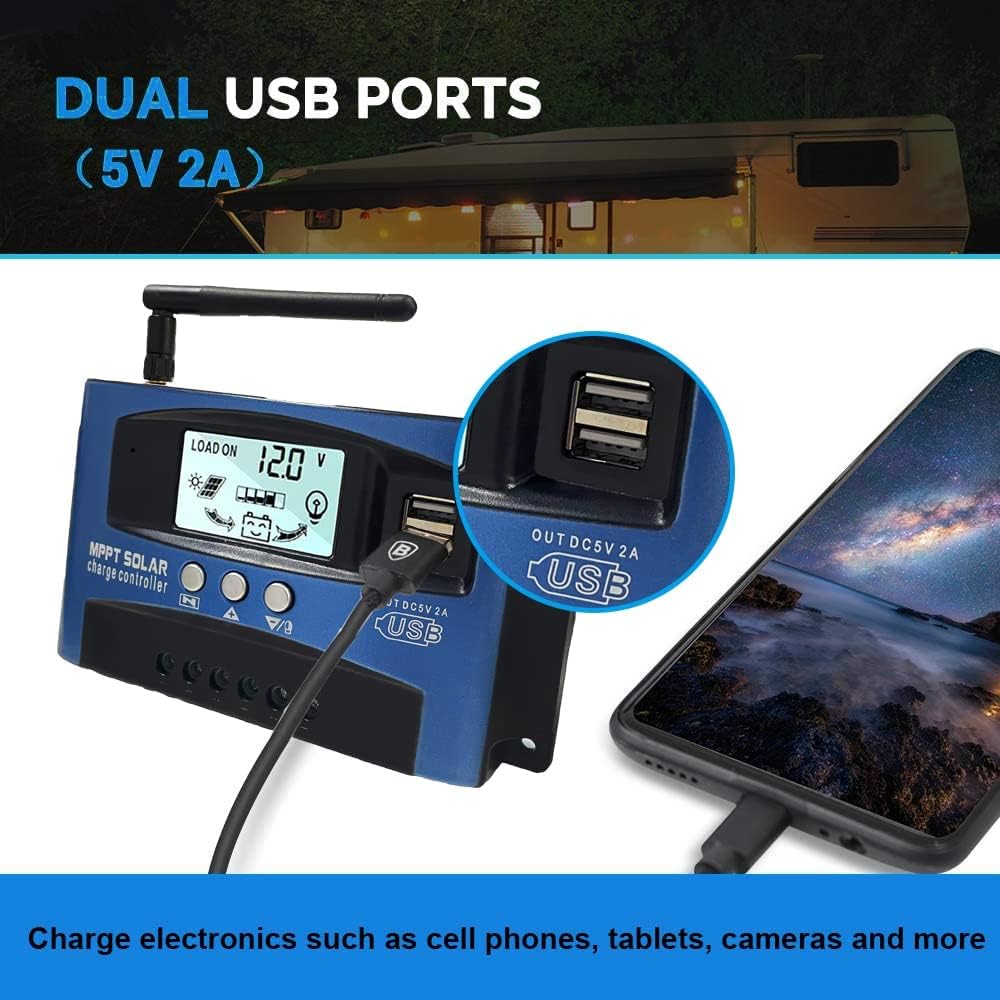
Image: Close-up view of the SOGTICPS BL912-40A-WIFI Solar Charge Controller, showing the dual 5V 2A USB ports in use, charging a smartphone.
4. Setup & Installation
Proper installation is critical for the safe and efficient operation of your solar charge controller. Follow the connection order precisely.
Connection Order:
- Connect the Battery First: Connect the battery to the charge controller's battery terminals. Ensure correct polarity (+ to + and - to -). The controller will automatically detect 12V or 24V system voltage.
- Connect Solar Panels: Connect the solar panels to the charge controller's solar input terminals. Again, observe correct polarity.
- Connect DC Load (Optional): Connect your DC loads to the load output terminals.
Important: When disconnecting, reverse the order: first disconnect the load, then the solar panels, and finally the battery. Failure to follow this order may damage the controller or other components.
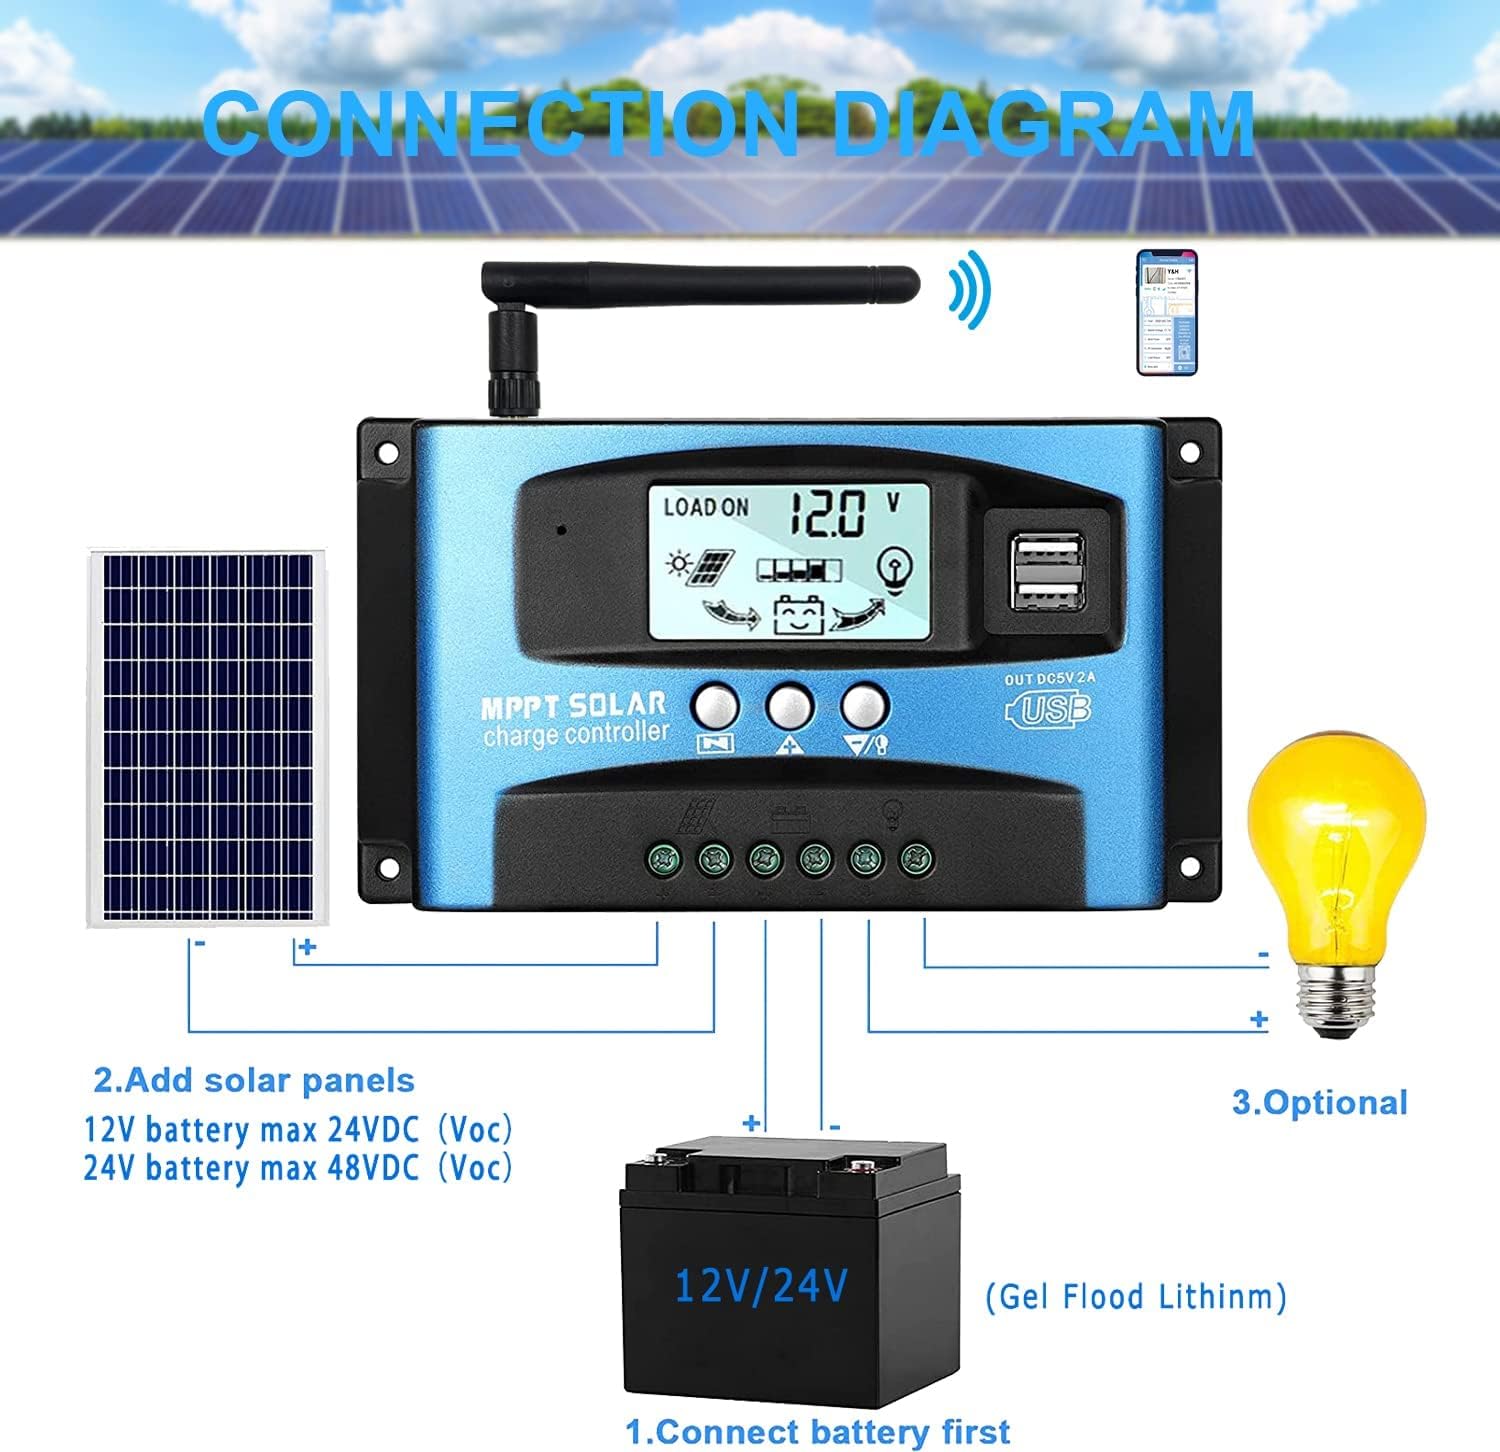
Image: A clear connection diagram illustrating the proper wiring sequence for the solar charge controller, connecting to a battery, solar panels, and an optional DC load. It emphasizes connecting the battery first.
Battery Compatibility:
The controller is compatible with various battery types, including Gel, Flooded (Lead-Acid), and Lithium batteries. Ensure the correct battery type is selected in the controller settings for optimal charging.

Image: Visual representation showing the SOGTICPS BL912-40A-WIFI Solar Charge Controller's compatibility with Gel, Flooded, and Lithium battery types, indicated by arrows pointing between battery icons and the controller.
5. Operating Instructions
LCD Display and Navigation:
The LCD provides real-time information about your solar system. Use the control buttons to navigate through the display interfaces and adjust parameters.

Image: A series of LCD screen captures demonstrating the browsing interface and parameter setting process for the SOGTICPS BL912-40A-WIFI Solar Charge Controller. It shows main display, float voltage, discharge reconnect, discharge stop, load work mode, battery type, and work parameter display.
- Browsing Interface: Press the MENU button to cycle through different display interfaces, showing information such as main display, float voltage, discharge reconnect voltage, discharge stop voltage, load work mode, battery type, and other work parameters.
- Setting Parameters: In interfaces 2-8, press the MENU button to enter the setting mode. Use the UP and DOWN buttons to adjust the values. Press MENU again to confirm and exit the setting mode.
WiFi Monitoring:
The controller supports WiFi connectivity, allowing you to monitor and control your solar system remotely via a smartphone application.

Image: The SOGTICPS BL912-40A-WIFI Solar Charge Controller shown alongside a smartphone displaying its monitoring application interface. This illustrates the wireless monitoring capability of the PV system.
- App Installation: Download the dedicated application for your smartphone (Android). Refer to the QR code or instructions provided with the product for app download.
- Connection: Follow the in-app instructions to connect your controller to your local WiFi network.
- Remote Monitoring: Once connected, you can view real-time data such as temperature, charge current, discharge current, accumulated power generation, battery voltage, and adjust charging modes from anywhere.
6. Maintenance
Regular maintenance ensures the longevity and optimal performance of your solar charge controller.
- Check Connections: Periodically inspect all wiring connections to ensure they are tight and free from corrosion.
- Clean Controller: Keep the controller clean and free from dust and debris. Use a dry cloth for cleaning.
- Ventilation: Ensure the installation area has adequate ventilation to prevent overheating.
- Battery Inspection: Regularly check battery terminals for corrosion and ensure battery fluid levels (for flooded batteries) are correct.
- System Monitoring: Use the LCD display or the WiFi app to monitor system performance and identify any anomalies early.
7. Troubleshooting
If you encounter issues with your solar charge controller, refer to the following common problems and solutions:
| Problem | Possible Cause | Solution |
|---|---|---|
| No display on LCD | Battery not connected or low voltage; reverse polarity. | Check battery connections and voltage. Ensure correct polarity. |
| Battery not charging | Solar panels not connected; insufficient sunlight; faulty solar panel; incorrect battery type setting. | Check solar panel connections and ensure adequate sunlight. Verify solar panel functionality. Confirm battery type setting. |
| Load not working | Load disconnected; battery low voltage protection; overload protection. | Check load connections. Charge battery. Reduce load or check for short circuits. |
| WiFi app issues (connection/language) | Incorrect WiFi setup; app region/language settings; firmware issues. | Ensure correct WiFi network and password. Check app settings for language. Contact support if issues persist. |
8. Specifications
| Parameter | Value |
|---|---|
| Model | BL912-40A-WIFI |
| Rated Charge Current | 40 A |
| System Voltage | 12V/24V Auto-detection |
| Max PV Input Power (12V) | 480 W |
| Max PV Input Power (24V) | 960 W |
| Recommended Solar Panel Voltage | 18V for 12V battery; 36V for 24V battery |
| Self-Consumption | <10 mA |
| Operating Temperature | -14 °F to 140 °F (-10 °C to 60 °C) |
| Display Type | LCD |
| USB Output | Dual 5V 2A |
| Communication | WiFi |
| Dimensions (Package) | 18 x 11 x 5 cm |
| Weight (Package) | 330 grams |
| Manufacturer Reference | 2-BL912-40A-WIFI-DE |
| UPC | 732246237116 |
9. Warranty and Support
For warranty information and technical support, please refer to the documentation included with your purchase or contact SOGTICPS customer service. Keep your purchase receipt as proof of purchase.


