1. Introduction
The VIHELM WT81 Illuminance Meter is a precision instrument designed for measuring light intensity (illuminance) in various environments. It provides accurate readings in Lux (Lx) or Foot-candles (FC) and includes temperature measurement capabilities. This manual provides essential information for the safe and effective use of your WT81 meter.
The WT81 is suitable for applications such as daily sunlight measurement, indoor lighting assessment, and stage lighting evaluation.

Image: The WT81 Illuminance Meter shown in use for daily sunlight measurement, indoor lighting measurement, and stage lighting measurement.
2. Safety Information
Please read and understand all safety instructions before operating the device. Failure to follow these instructions may result in electric shock, fire, or damage to the product.
- Do not attempt to open or modify the device. There are no user-serviceable parts inside.
- Keep the device away from water and other liquids to prevent electric shock or damage.
- Avoid exposing the device to extreme temperatures, direct sunlight for prolonged periods, or high humidity.
- Handle the photometer head with care. Avoid dropping or subjecting it to strong impacts.
- Remove batteries if the device will not be used for an extended period to prevent battery leakage.
- Dispose of batteries and the device according to local regulations.
3. Product Overview and Components
Familiarize yourself with the main components of your WT81 Illuminance Meter:
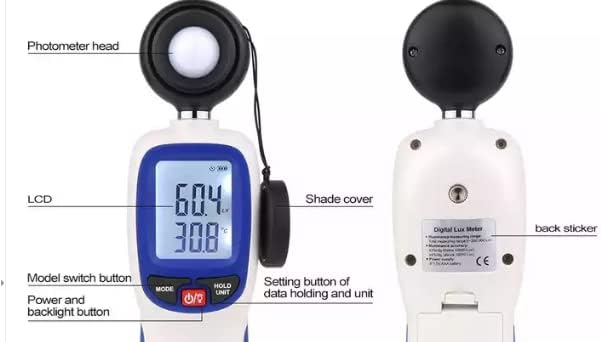
Image: Front and back view of the WT81 meter with key components labeled.
- Photometer Head: The light-sensitive sensor that measures illuminance. It consists of a photodiode, cosine corrector, and correction filter.
- LCD (Liquid Crystal Display): Displays illuminance readings, temperature, units, and other operational indicators.
- MODE Button: Used to switch between different measurement functions (e.g., difference value, max/min illumination).
- O/F (Power/Backlight) Button: Powers the device on or off. Also activates the LCD backlight.
- HOLD/UNIT Button: Used to hold the current reading on the display and to switch between illuminance and temperature units.
- Shade Cover: Protects the photometer head when not in use.
- Back Sticker: Contains product information and certifications.
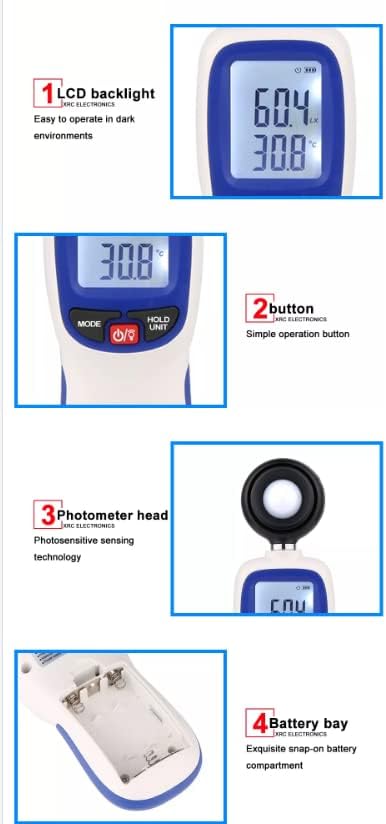
Image: Detailed views highlighting the LCD backlight, control buttons, photometer head, and the battery compartment.
4. Specifications
The following table details the technical specifications of the VIHELM WT81 Illuminance Meter:
| Feature | Description |
|---|---|
| Measuring function | Illumination and temperature, difference value, max value, min value of illumination |
| Main parts of photometer head | Photodiode + cosines corrector + correction filter |
| Temperature probe | NTC thermistor |
| Illuminance measuring range | Total measuring range: 0-200,000 Lux, into four ranges x1: 0-199.9 Lux x10: 200-1999.9 Lux x100: 2000-19999 Lux x1000: 20000-200000 Lux |
| Temperature measuring range | -9.9°C ~ 49.9°C |
| Illuminance accuracy | ±3%rdg (below 10000 Lux); ±4%rdg (above 10000 Lux) |
| Temperature accuracy | ±1.0°C |
| Units of illuminance and temperature | Four combinations of units are available Lux/°C Lux/°F FC/°C FC/°F |
| Storage of illumination data | Automatic storage: Max number of data groups is 1000, and storage cycle is set by APP Manual storage: Max number of data groups is 67, and whether to store data is decided by manual operation |
| Operating temperature/humidity | 0~40°C, 10~90%RH |
| Storage temperature/humidity | -10~50°C, 10~90%RH |
| LCD screen update | 2 times/s |
| Power source | 3 x 1.5V AAA batteries (Not included) |
| Battery life | About 200 hours (consecutive working time without turning on Bluetooth and backlight) |
Image: Detailed specifications table for the WT81 Illuminance Meter.
5. Setup: Battery Installation
The WT81 Illuminance Meter requires three (3) 1.5V AAA batteries (not included) for operation.
- Locate the battery compartment on the back of the device.
- Gently slide or unclip the battery compartment cover to open it.
- Insert three AAA batteries, ensuring the correct polarity (+ and -) as indicated inside the compartment.
- Close the battery compartment cover securely.
Note: Always use fresh batteries and remove them if the device will not be used for an extended period.
6. Operating Instructions
6.1 Power On/Off
- To turn on the device, press the O/F button. The LCD will illuminate.
- To turn off the device, press and hold the O/F button for approximately 2 seconds until the display turns off.
6.2 Taking Measurements
- Ensure the photometer head's shade cover is removed.
- Point the photometer head towards the light source or area where you wish to measure illuminance.
- The current illuminance and temperature readings will be displayed on the LCD. The device updates readings approximately twice per second.
6.3 Changing Units (Lux/FC, °C/°F)
- Press the HOLD/UNIT button briefly to cycle through the available unit combinations (Lux/°C, Lux/°F, FC/°C, FC/°F).
- The selected units will be displayed on the LCD.
6.4 Data Hold Function
- To hold the current reading on the display, press and hold the HOLD/UNIT button for approximately 2 seconds. The 'HOLD' indicator will appear on the screen.
- To release the data hold and resume live measurements, press and hold the HOLD/UNIT button again for 2 seconds.
6.5 LCD Backlight
- When the device is on, a short press of the O/F button will toggle the LCD backlight on or off. This is useful for operating in dark environments.
6.6 Mode Selection (Max/Min/Difference)
- Press the MODE button to cycle through different measurement modes, such as displaying the maximum illuminance, minimum illuminance, or difference value. Refer to the on-screen indicators for the active mode.
7. Maintenance
- Cleaning: Use a soft, dry cloth to clean the device. Do not use abrasive cleaners or solvents. Ensure the photometer head is kept clean and free of dust or smudges, as this can affect measurement accuracy.
- Storage: When not in use, store the device in a cool, dry place, away from direct sunlight and extreme temperatures. Always replace the shade cover on the photometer head.
- Battery Replacement: Replace batteries when the low battery indicator appears on the LCD to ensure continuous accurate operation.
8. Troubleshooting
- Device does not power on:
- Check if batteries are installed correctly with the right polarity.
- Replace with new AAA batteries.
- Inaccurate readings:
- Ensure the photometer head is clean and free from obstructions.
- Verify that the shade cover is removed during measurement.
- Confirm the device is within its operating temperature and humidity range.
- Display is dim or flickering:
- Replace batteries with new ones.
9. Warranty and Support
For warranty information and technical support, please refer to the documentation provided with your purchase or contact VIHELM customer service through their official channels. Keep your purchase receipt as proof of purchase.