KC-909
KC-909 Portable CD Player User Manual
Model: KC-909 | Brand: Generic
1. Introduction
Thank you for purchasing the KC-909 Portable CD Player. This multi-functional device supports CD playback, Bluetooth connectivity, FM radio, TF card, USB disk, and AUX input. It features a built-in speaker, dual 3.5mm headphone jacks, an LED display, and comes with a remote control. The player can be easily mounted on a wall or placed on a desktop, making it a versatile audio solution for various environments.
This manual provides detailed instructions for setting up, operating, and maintaining your KC-909 CD player. Please read it thoroughly before use to ensure proper functionality and to maximize your listening experience.
2. Safety Information
- Do not expose the device to rain, moisture, or extreme temperatures.
- Avoid placing the device near heat sources such as radiators, heat registers, stoves, or other apparatus (including amplifiers) that produce heat.
- Use only attachments/accessories specified by the manufacturer.
- Unplug this apparatus during lightning storms or when unused for long periods of time.
- Do not block any ventilation openings. Install in accordance with the manufacturer's instructions.
- Protect the power cord from being walked on or pinched, particularly at plugs, convenience receptacles, and the point where they exit from the apparatus.
- Refer all servicing to qualified service personnel. Servicing is required when the apparatus has been damaged in any way, such as power-supply cord or plug is damaged, liquid has been spilled or objects have fallen into the apparatus, the apparatus has been exposed to rain or moisture, does not operate normally, or has been dropped.
3. Package Contents
Please check the package contents upon opening to ensure all items are present and undamaged:
- 1 x KC-909 Portable CD Player
- 1 x 3.5mm Audio Cable
- 1 x Power Adapter
- 1 x Wall Mount Kit
- 1 x Desktop Stand
- 1 x Remote Control (2 x AAA batteries not included)
- 1 x Bag of Screws
- 1 x User Manual (EN/DE/FR/IT/ES/JP)
4. Product Overview
Familiarize yourself with the main components and controls of your KC-909 CD Player.

Figure 4.1: Front view of the KC-909 Portable CD Player, showing the CD compartment and integrated speakers.
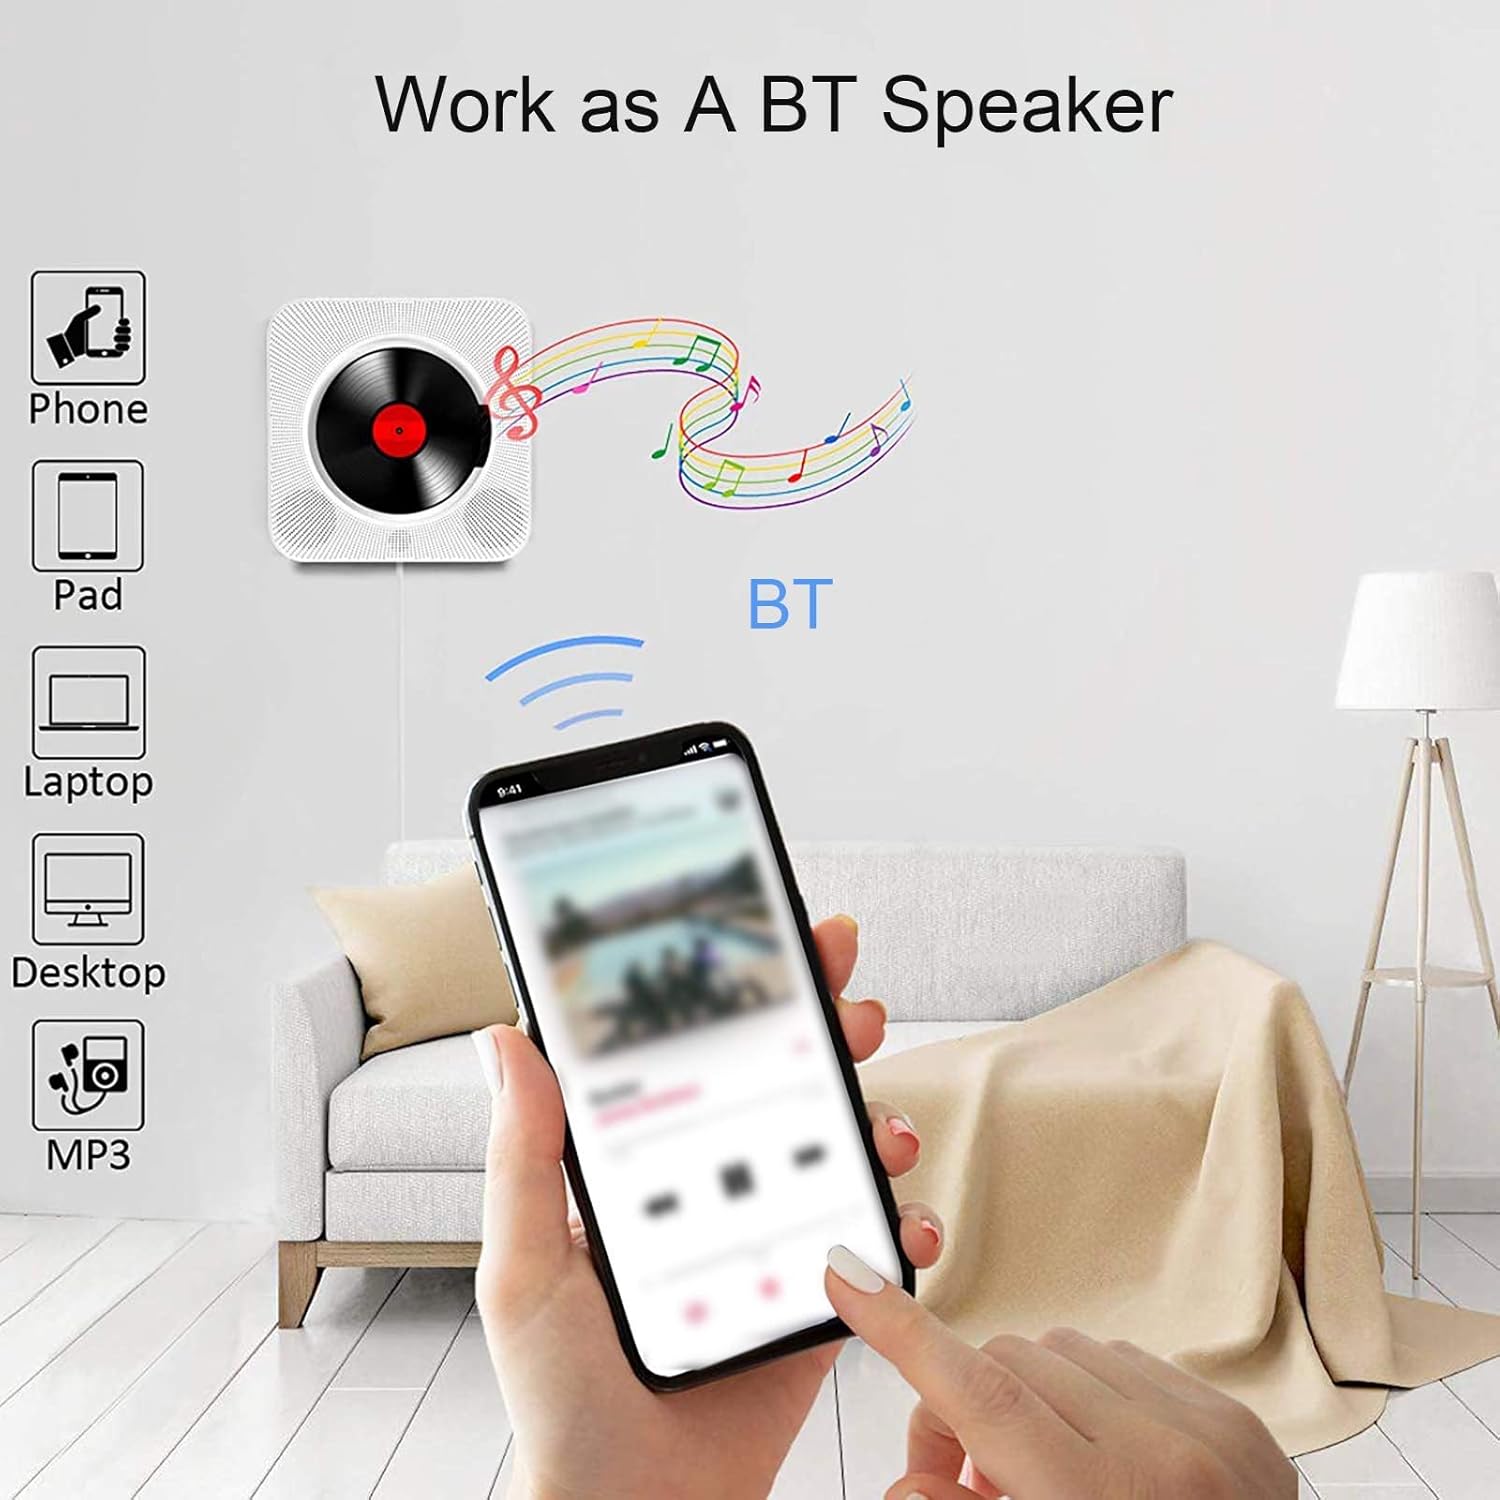
Figure 4.2: Detailed diagram of the KC-909 CD Player's controls and ports. This includes the Power Port, USB port, TF card slot, Audio output, LED screen, Volume controls, Next/Previous song buttons, Mode button, and the dust cover mechanism.
4.1. LED Display

Figure 4.3: The LED display provides status indicators for various operating modes such as CD, FM, USB disk, TF card, Bluetooth, and AUX audio input.
4.2. Media Ports and Dust Cover
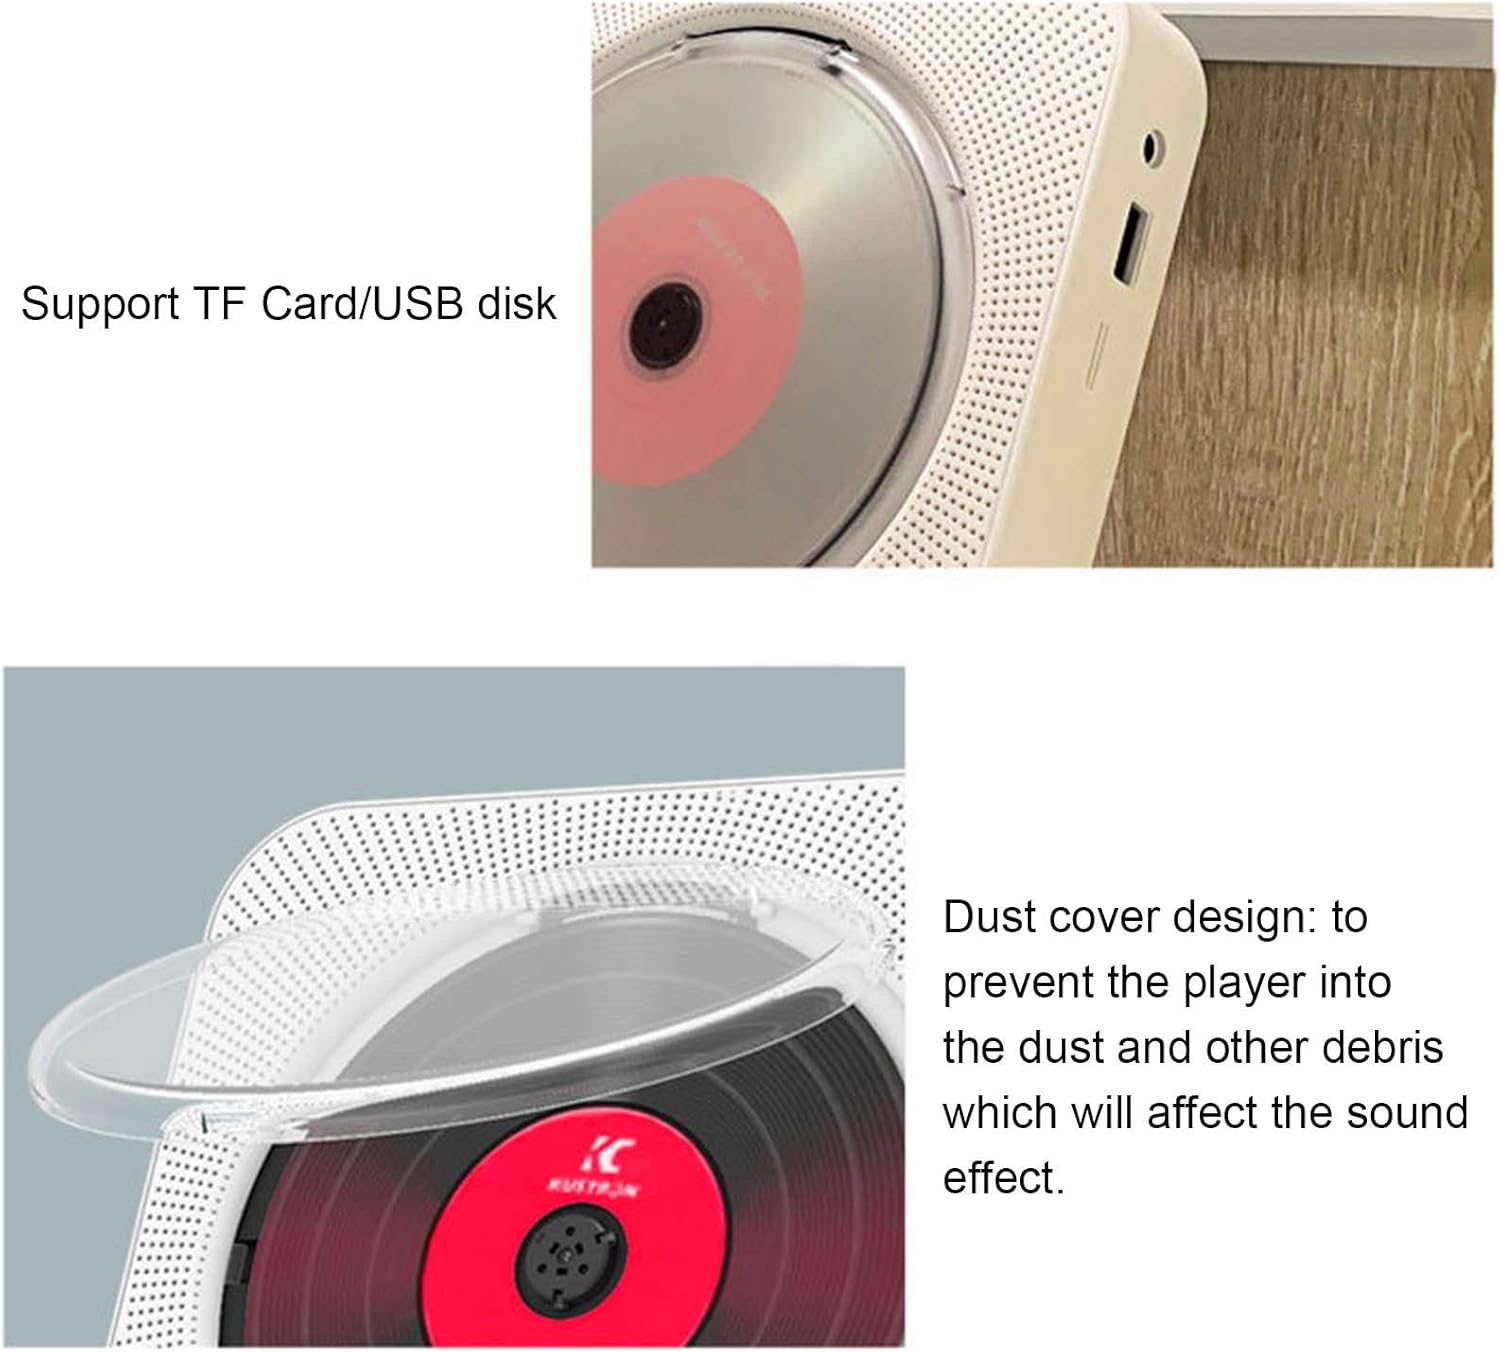
Figure 4.4: Close-up view of the TF Card slot and USB disk port on the side of the player, indicating support for external media.

Figure 4.5: The transparent dust cover designed to protect the CD mechanism from dust and debris, ensuring optimal sound quality and longevity.
5. Setup
5.1. Power Connection
Connect the provided power adapter to the "Power Port" on the device and plug it into a standard electrical outlet (AC 0-240V, 50-60Hz).
5.2. Wall Mounting
To mount the CD player on a wall:
- Choose a suitable location on a wall, ensuring it is sturdy and free from obstructions.
- Use the provided wall mount kit and screws. Mark the drilling points on the wall according to the mounting bracket.
- Drill holes and insert wall anchors if necessary.
- Secure the mounting bracket to the wall using the screws.
- Carefully slide the CD player onto the mounted bracket until it clicks into place.

Figure 5.1: The KC-909 CD Player elegantly mounted on a wall, demonstrating its space-saving design.
5.3. Desktop Placement
To place the CD player on a desktop or flat surface:
- Attach the provided desktop stand to the bottom of the CD player.
- Place the player on a stable, flat surface.
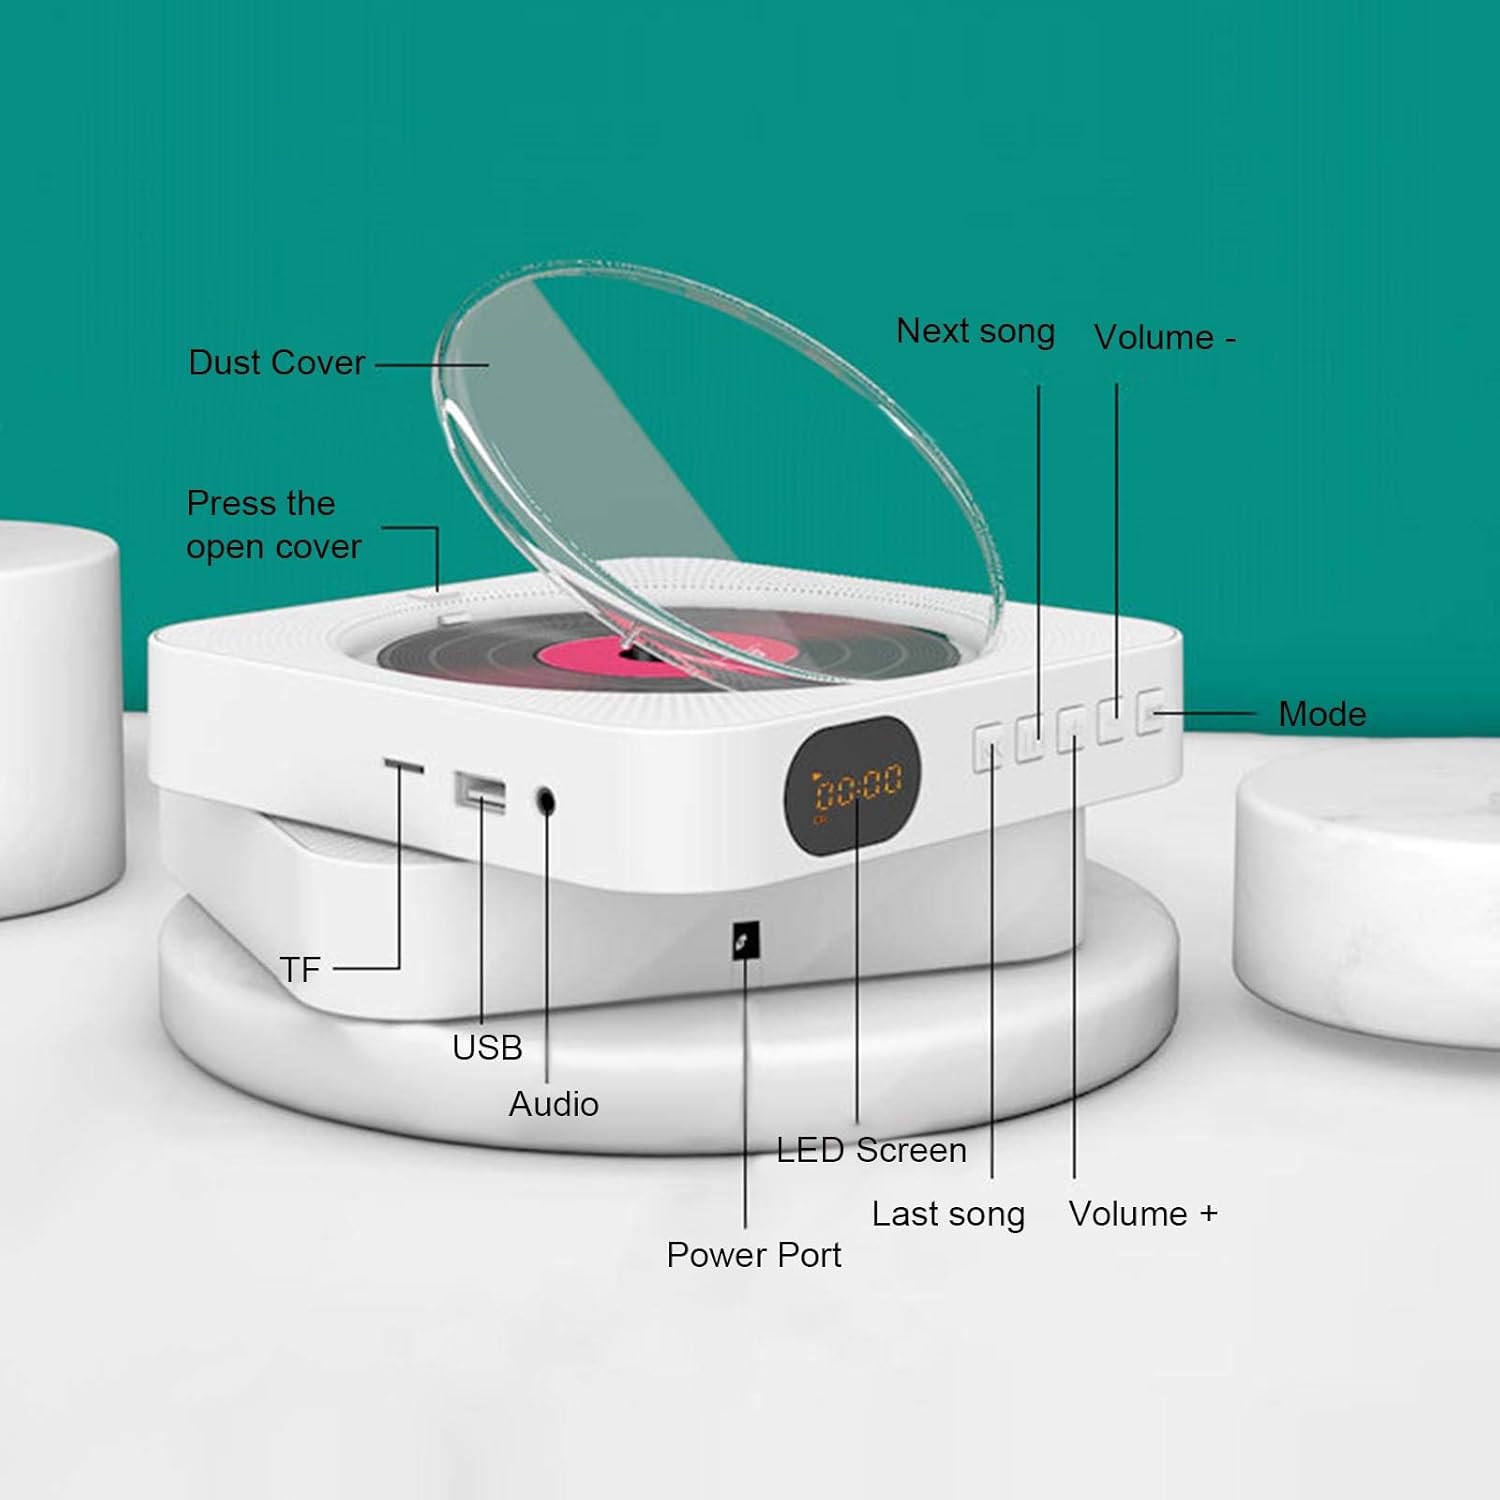
Figure 5.2: The KC-909 CD Player positioned on its desktop stand, suitable for tables and desks.
6. Operating Instructions
The KC-909 offers multiple playback modes. Use the "Mode" button on the device or remote control to switch between modes.
6.1. Power On/Off
- To power on, pull the power cable gently downwards.
- To power off, pull the power cable gently downwards again.
6.2. CD Playback Mode
The player supports CD, CD-R, CD-RW, MP3-CD, and WMA-CD formats.
- Open the dust cover.
- Place a CD onto the spindle with the label side facing up.
- Close the dust cover.
- Press the "Mode" button until "CD" is displayed on the LED screen.
- The CD will begin playing automatically. Use the "Next Song" and "Last Song" buttons to navigate tracks, and "Volume +" / "Volume -" to adjust volume.
6.3. Bluetooth (BT) Mode
Connect your Bluetooth-enabled devices to the KC-909 for wireless audio streaming.
- Press the "Mode" button until "BT" is displayed on the LED screen. The player will enter pairing mode.
- On your mobile device (phone, tablet, laptop), enable Bluetooth and search for available devices.
- Select "KC-909" from the list to pair. Once connected, the LED display will indicate a successful connection.
- You can now play audio from your device through the KC-909.
6.4. FM Radio Mode
Listen to your favorite FM radio stations.
- Press the "Mode" button until "FM" is displayed on the LED screen.
- Press the "Play/Pause" button (often combined with the power button or a dedicated button on the remote) to auto-scan and save available stations.
- Use the "Next Song" and "Last Song" buttons to switch between saved stations.
6.5. TF Card / USB Disk Playback
Play audio files directly from a TF card or USB flash drive.
- Insert a TF card into the TF card slot or a USB disk into the USB port.
- Press the "Mode" button until "TF" or "USB" is displayed on the LED screen.
- The player will automatically detect and begin playing audio files.
- Use the "Next Song" and "Last Song" buttons to navigate tracks.
6.6. AUX Input Mode
Connect external audio devices using the 3.5mm audio cable.
- Connect one end of the 3.5mm audio cable to the "Audio" port on the KC-909.
- Connect the other end to the headphone jack or audio output of your external device (e.g., smartphone, MP3 player).
- Press the "Mode" button until "AUX" is displayed on the LED screen.
- Audio from your external device will now play through the KC-909. Control playback from your external device.
6.7. Remote Control Usage
The infrared remote control allows convenient operation from a distance. Ensure 2 x AAA batteries are inserted correctly (not included).

Figure 6.1: The remote control provides access to various functions including CD, Bluetooth, FM, TF Card, 3.5mm Audio, USB disk, Timing set, Loop playback, and Repeat functions.
7. Specifications
Detailed technical specifications for the KC-909 Portable CD Player:
| Feature | Specification |
|---|---|
| Product Type | Portable CD Player |
| Model | KC-909 |
| Material | ABS |
| Color | White |
| Supported Disc Formats | CD/CDR/CD-RW/MP3-CD/WMA-CD |
| FM Radio Range | 76 MHz - 108 MHz |
| Rated Impedance | 4 Ohm |
| Speaker Output | 5W x 2 |
| AC Input | 0-240V, 50-60Hz |
| DC Input | 5V 1A |
| Product Dimensions (L x W x H) | Approx. 16.7 x 16.7 x 3 cm (6.57 x 6.57 x 1.18 inches) |
| Package Dimensions (L x W x H) | Approx. 19 x 18 x 6.5 cm (7.48 x 7.09 x 2.55 inches) |
| Package Weight | Approx. 724 g (25.54 oz) |
| Connectivity Technology | Wireless (Bluetooth) |
| Compatible Devices | Speaker, Headphone |
| Special Features | Portable |
| Power Source | Corded Electric |
| Surround Sound Channel Configuration | 2.0 |
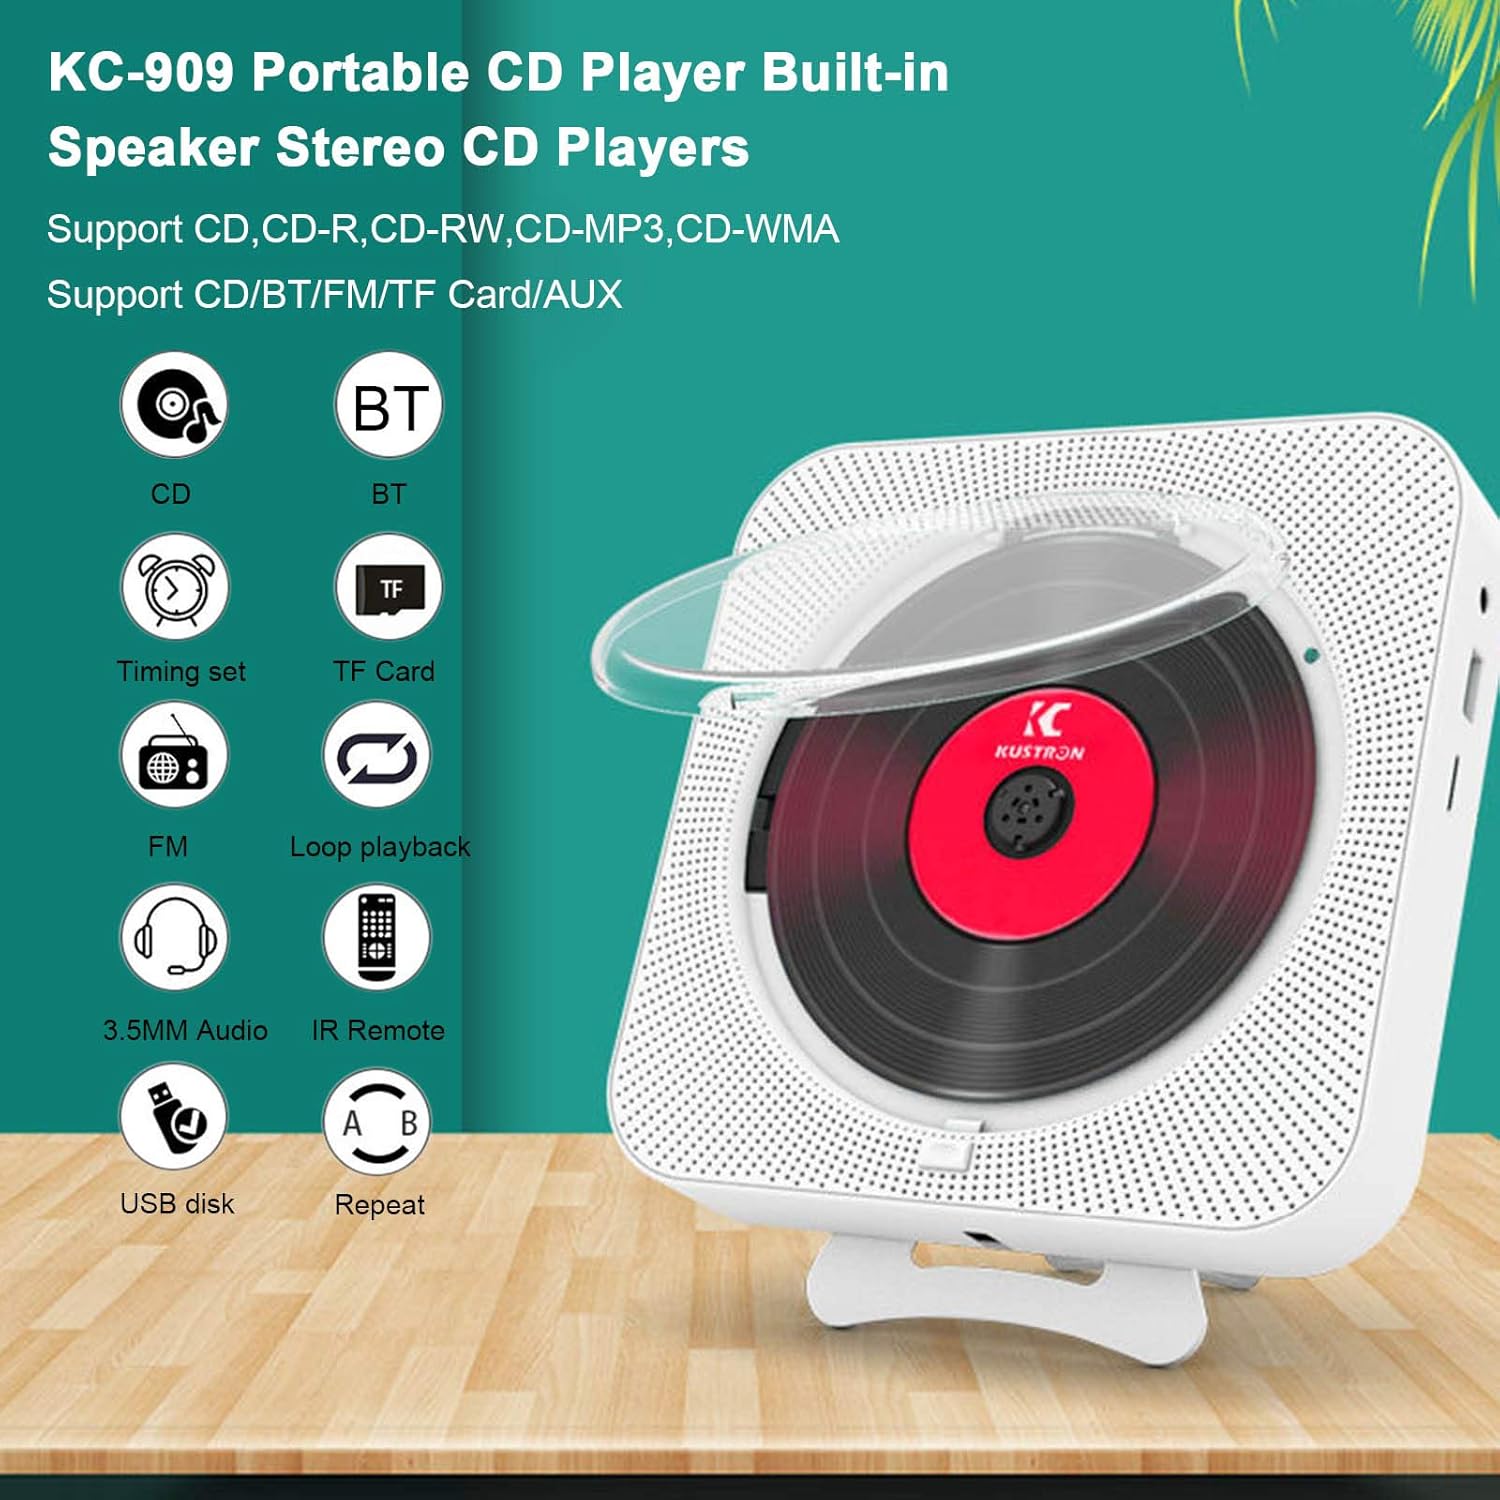
Figure 7.1: Visual representation of the KC-909 CD Player's approximate dimensions.
8. Maintenance
- Cleaning: Use a soft, dry cloth to clean the exterior of the player. For the CD lens, use a specialized CD lens cleaner. Do not use abrasive cleaners or solvents.
- Dust Cover: Keep the dust cover closed when not in use to prevent dust accumulation on the CD mechanism.
- Storage: If storing the player for an extended period, disconnect it from power and store it in a cool, dry place.
9. Troubleshooting
If you encounter issues with your KC-909 CD Player, refer to the following common problems and solutions:
| Problem | Possible Cause / Solution |
|---|---|
| No power |
|
| No sound |
|
| CD not playing / Disc error |
|
| Bluetooth not connecting |
|
| Remote control not working |
|
10. Warranty and Support
Warranty information for this product is not provided within this user manual. Please refer to the product packaging, the retailer's website, or contact the manufacturer directly for details regarding warranty coverage and customer support.
For technical assistance or further inquiries, please contact Generic customer support through their official channels.
Ask a question about this manual
Ask about setup, troubleshooting, compatibility, parts, safety, or missing instructions. Manuals+ will review the question and use this page’s manual context to help answer it.