Introduction
The Melnor AquaTimer Digital Hose Timer (Model 65138AMZ) is designed to automate your watering schedule, providing convenience and efficient water management for your garden. This 1-zone timer allows you to set specific start times, durations, and frequencies for watering, ensuring your plants receive the right amount of water without constant manual intervention. It also features a manual watering option and a rain delay function for added flexibility.

Figure 1: Front view of the Melnor AquaTimer Digital Hose Timer.
Setup
1. Battery Installation
The AquaTimer requires two (2) AA batteries (not included) for operation. To install:
- Locate the battery compartment on the back of the timer.
- Open the battery compartment cover.
- Insert two fresh AA batteries, ensuring correct polarity (+/-).
- Securely close the battery compartment cover.
2. Attaching the Timer to the Faucet
Before attaching, ensure the faucet is clean and free of debris.
- Screw the timer onto your outdoor faucet by hand until it is snug. Do not overtighten.
- Ensure the filter washer is properly seated in the timer's inlet to prevent debris from entering and to ensure a leak-free connection.
- Connect your garden hose to the outlet of the timer.

Figure 2: Timer installed on an outdoor faucet.
3. Initial Water Flow Check
Slowly turn on your faucet completely. The timer is designed to operate with full water pressure. Check for any leaks at the connections. If leaks occur, tighten connections or check the washers.
Setup Video Guide
Video 1: Official Melnor guide on how to set up and use the AquaTimer. This video demonstrates the basic functions and programming steps.
Operating Instructions
The AquaTimer features a large LCD screen and intuitive buttons for easy programming. The main dial positions are: SET CLOCK, START WATER, HOW LONG, HOW OFTEN, AUTO, and OFF.
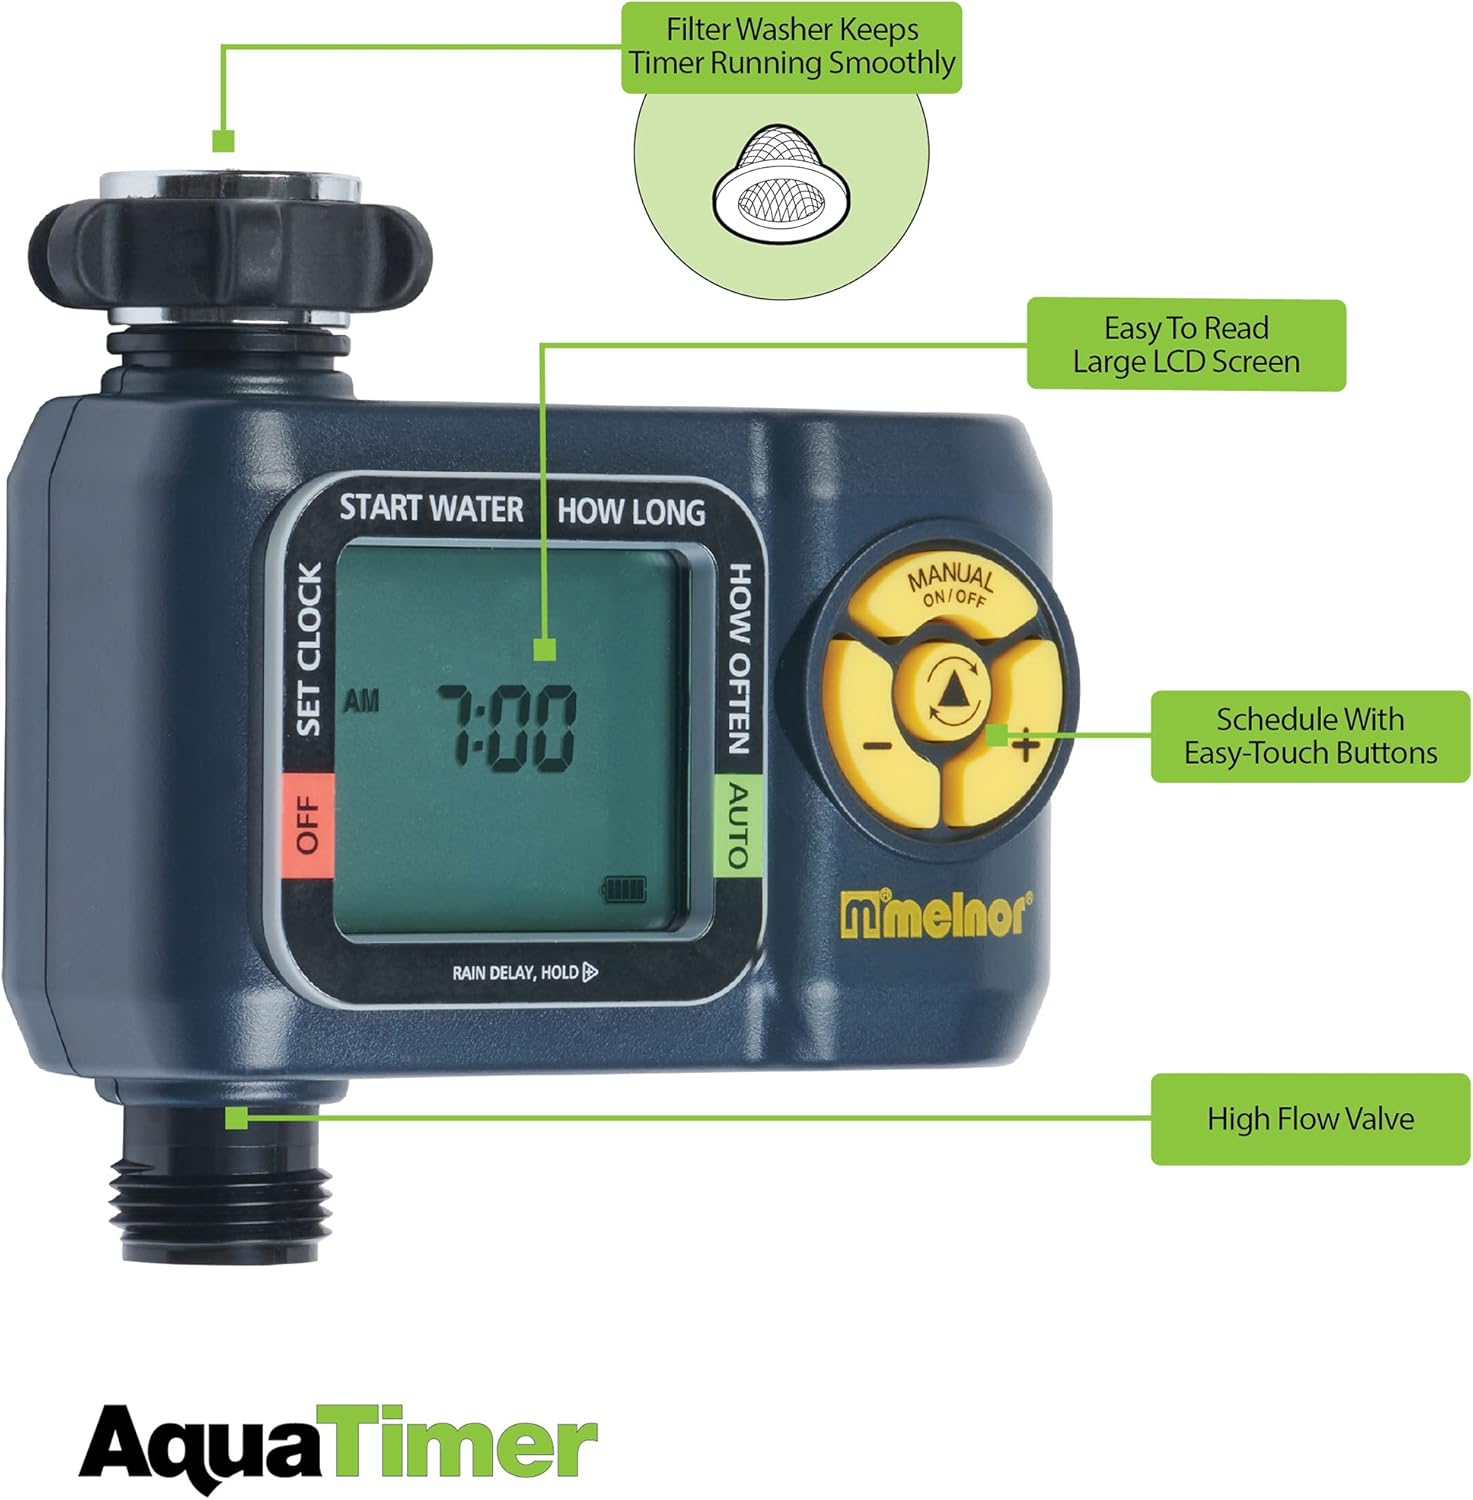
Figure 3: Key features of the AquaTimer, including the LCD screen and control buttons.
1. Setting the Clock
- Turn the dial to SET CLOCK.
- Use the + and - buttons to adjust the current time.
- Press the OK button to confirm the time.
2. Setting Start Water Time
- Turn the dial to START WATER.
- Use the + and - buttons to set the desired start time for your watering cycle.
- Press the OK button to confirm.
3. Setting Watering Duration (How Long)
- Turn the dial to HOW LONG.
- Use the + and - buttons to set the duration of each watering cycle (from 1 minute up to 6 hours).
- Press the OK button to confirm.
4. Setting Watering Frequency (How Often)
- Turn the dial to HOW OFTEN.
- Use the + and - buttons to set how often you want to water (from every hour up to once a week).
- Press the OK button to confirm.

Figure 4: Close-up of the timer's LCD screen.
5. Activating Automatic Watering
- Turn the dial to AUTO. The timer will now operate according to your programmed schedule.
6. Manual Watering
To manually water outside of the programmed schedule:
- Press the ON/OFF MANUAL button.
- The timer will begin watering immediately. To stop manual watering, press the ON/OFF MANUAL button again.
7. Rain Delay Function
To pause your watering schedule for a period due to rain or other reasons:
- While the dial is in the AUTO position, press and hold the + button for 3 seconds.
- The display will show
Ask a question about this manual
Ask about setup, troubleshooting, compatibility, parts, safety, or missing instructions. Manuals+ will review the question and use this page’s manual context to help answer it.