1. Introduction
Thank you for choosing the AddAcc D12 Rechargeable Camping Fan. This manual provides essential information for the safe and efficient operation of your fan. Please read it thoroughly before use and retain it for future reference.

Image 1.1: The AddAcc D12 Rechargeable Camping Fan, showcasing its main unit, remote control, and USB charging capability for a smartphone.
2. Safety Instructions
- Do not attempt to replace the built-in 20000mAh rechargeable battery.
- Keep the fan away from water and excessive moisture.
- Do not insert fingers or foreign objects into the fan grille.
- Ensure the fan is placed on a stable surface or securely hung to prevent falling.
- Use only the provided USB-C charge cable or a compatible 5V/3A adapter for charging.
- Store the fan in a cool, dry place when not in use.
3. Package Contents
- 1x AddAcc D12 20000mAh Rechargeable Camping Fan
- 1x USB-C Charge Cable
- 1x Remote Control
4. Product Overview
The AddAcc D12 fan features a robust design suitable for various environments. It includes a fan unit with integrated LED lights, a control panel on the base, and a remote control for convenient operation.

Image 4.1: Detailed view of the fan's control panel, indicating buttons for Sleep Mode, Oscillations, Speed, Light, and Timer settings.
5. Setup
5.1 Initial Charging
Before first use, fully charge the fan. Connect the provided USB-C cable to the fan's USB-C input port and a compatible power source (e.g., a 5V/3A adapter, not included). The four indicator lights on the base will show the charging progress. A full charge typically takes 8-10 hours.

Image 5.1: The fan connected to a power outlet via its USB-C input for charging. The image also highlights the USB-A output port for charging other devices.
5.2 Remote Control Battery Installation
The remote control requires batteries (included). Ensure correct polarity when inserting them.
6. Operating Instructions
6.1 Power On/Off
Press the power button on the fan's control panel or the remote control to turn the fan on or off.
6.2 Fan Speed Adjustment
The fan has 4 speed settings. Press the 'Speed' button on the control panel or the remote to cycle through the speeds (1-4).

Image 6.1: Illustration of the fan's four speed settings and their corresponding effective airflow distances, up to 18 feet.
6.3 Oscillation Control
Press the 'Oscillations' button on the control panel or remote to activate automatic oscillation. You can choose between 45-degree or 90-degree oscillation. The fan head can also be manually pivoted 270 degrees vertically.
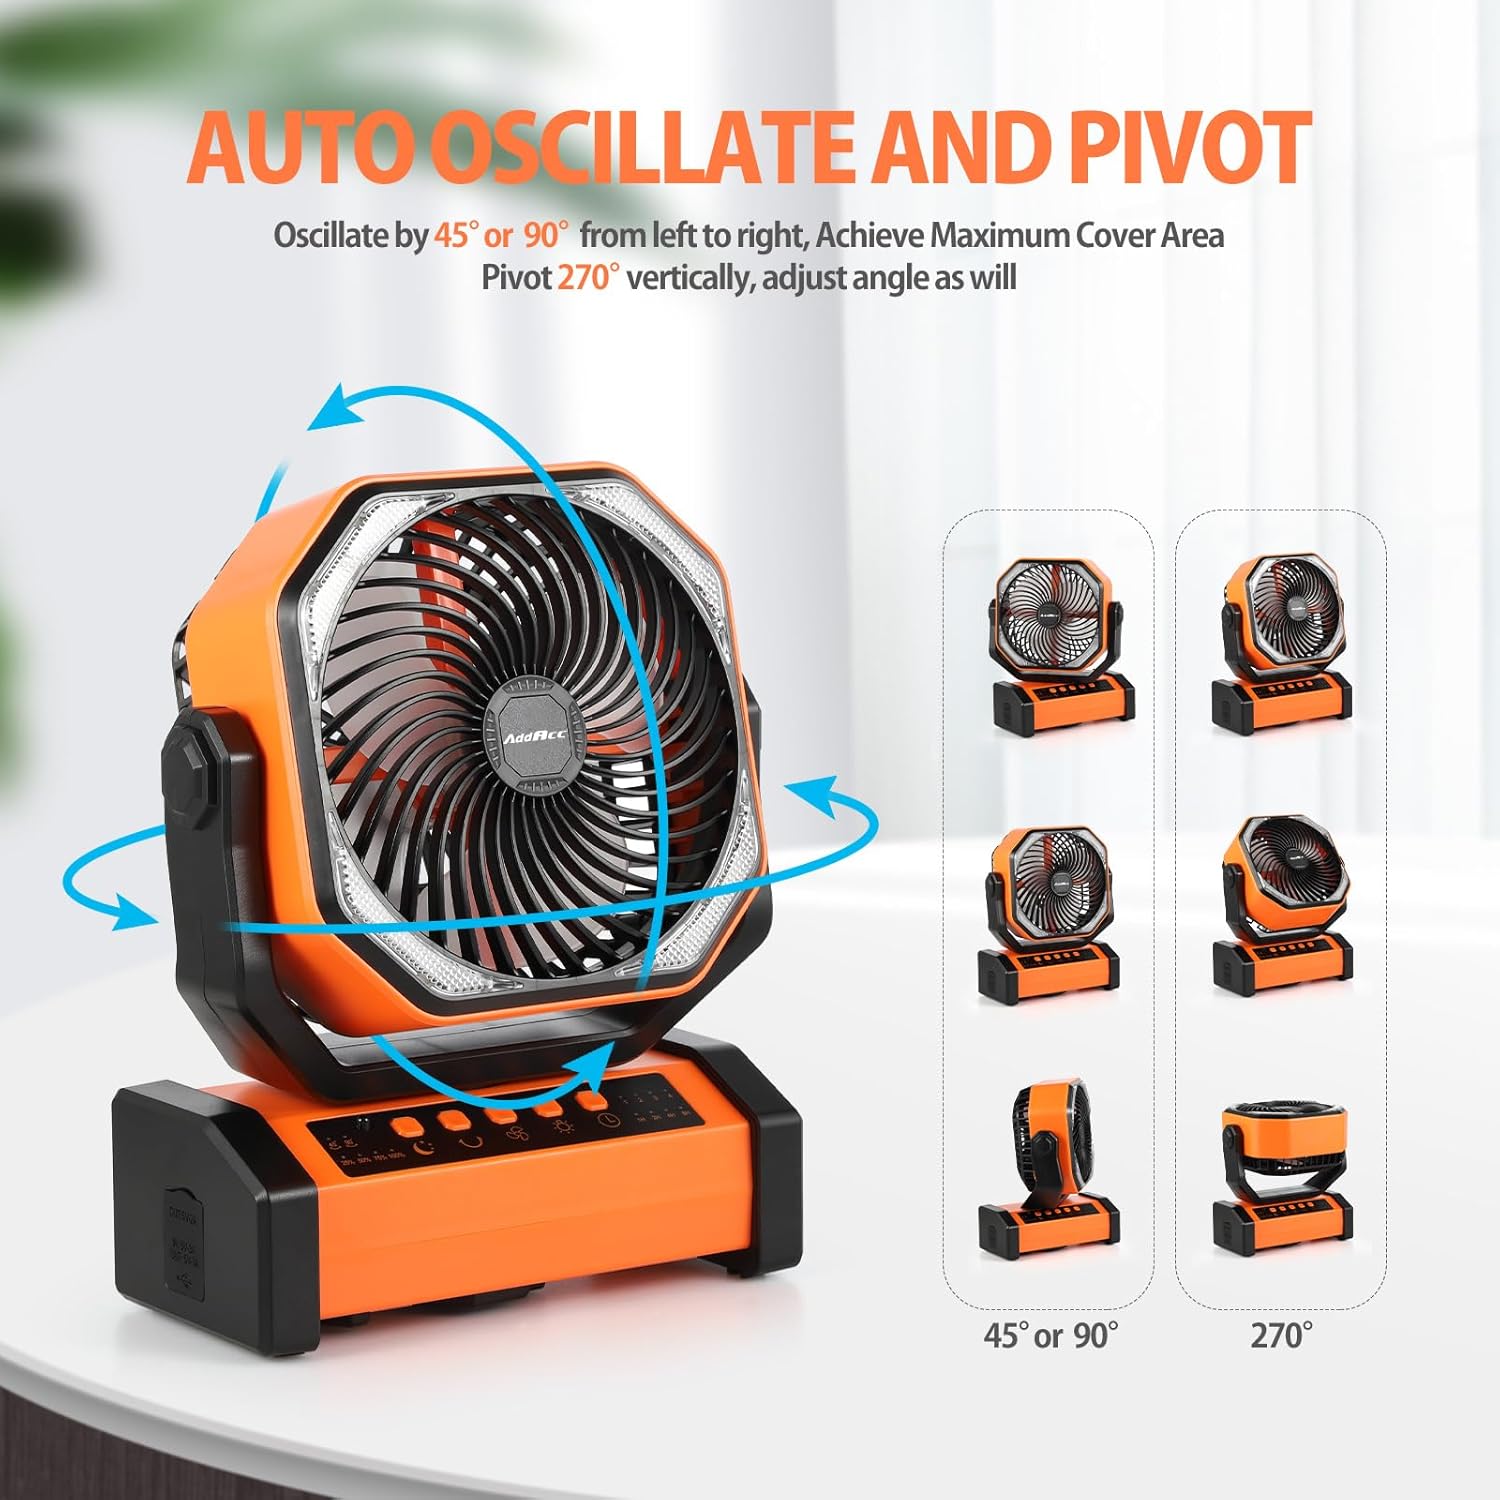
Image 6.2: The fan demonstrating its auto-oscillation feature (45° or 90°) and the ability to manually pivot the fan head 270° vertically.
6.4 Light Brightness Settings
The fan features built-in LED lights with 3 brightness settings. Press the 'Light' button on the control panel or remote to cycle through the brightness levels.

Image 6.3: The fan's integrated LED light demonstrating its three brightness settings (30%, 50%, 100%).
6.5 Timer Function
Set the fan to run for a specific duration using the 'Timer' button. Available settings are 1 hour, 2 hours, 4 hours, and 8 hours. The fan will automatically turn off after the selected time.
6.6 Sleep Mode
Activate 'Sleep Mode' by pressing the corresponding button on the control panel or remote. This mode turns off all indicator lights for undisturbed sleep.

Image 6.4: A person sleeping peacefully with the fan operating in Sleep Mode, highlighting its quiet operation and timer function.
6.7 Remote Control Usage
The remote control allows convenient operation of all fan functions from a distance. Ensure the remote is pointed towards the front of the fan for optimal response.

Image 6.5: A hand operating the fan using the remote control, illustrating the convenience of remote operation for various settings.
6.8 Power Bank Functionality
The fan's built-in 20000mAh battery can also serve as a power bank. Use the USB-A output port to charge other electronic devices such as smartphones.
Image 6.6: The fan acting as a power source, charging a smartphone via its USB-A output port.
6.9 Mounting and Placement
The fan can be used freestanding on a flat surface or hung using its integrated 360-degree rotatable hook. This allows for versatile placement in tents, on branches, or inside vehicles.

Image 6.7: The fan suspended from a tree branch using its 360-degree rotatable hook, demonstrating its hanging capability for outdoor use.
7. Maintenance
7.1 Cleaning
Ensure the fan is turned off and unplugged before cleaning. Use a soft, dry cloth to wipe the exterior surfaces. For the fan blades, carefully remove any dust or debris using a soft brush or compressed air. Do not use abrasive cleaners or immerse the fan in water.
7.2 Storage
When not in use for extended periods, store the fan in its original packaging or a protective cover in a cool, dry place. Ensure the battery is partially charged (around 50%) before storage to prolong its lifespan.
8. Troubleshooting
| Problem | Possible Cause | Solution |
|---|---|---|
| Fan does not turn on. | Battery is depleted. | Charge the fan using the USB-C cable. |
| Remote control not working. | Remote battery is low or incorrectly inserted. Obstruction between remote and fan. | Check/replace remote batteries. Ensure clear line of sight to the fan's front. |
| Fan oscillation is not smooth. | Obstruction or debris. | Ensure the fan is on a level surface and clear of obstructions. |
| Light is not working. | Light function is off. | Press the 'Light' button to turn on and adjust brightness. |
9. Specifications
- Model: D12
- Battery Capacity: 20000mAh (Non-replaceable)
- Run Time: Up to 60 hours (fan only, lowest speed)
- Light Run Time: Up to 200 hours (lowest brightness)
- Charging Input: USB-C (5V/3A recommended for faster charging)
- Power Output: USB-A (5V/2A)
- Fan Speeds: 4 levels
- Oscillation: Auto 45°/90°, Manual 270° vertical pivot
- LED Light: 3 brightness settings (up to 400 lumens)
- Timer Settings: 1h/2h/4h/8h
- Dimensions: 4.06"D x 8.58"W x 10.67"H
- Weight: 3.47 pounds
- Material: ABS (Drop-proof, Dirt/Sand Proof)
10. Warranty and Support
AddAcc offers a 360-day free return policy and 24-hour online service for product support. For any issues or inquiries, please contact AddAcc customer service through the platform where you purchased the product or visit the official AddAcc store for assistance.
AddAcc Store: Visit AddAcc Store on Amazon