
1. Introduction
This manual provides essential instructions for the safe and proper use of your TEAC TN-3B-SE Manual Belt-Drive Turntable. Please read this manual thoroughly before operating the unit and retain it for future reference. The TN-3B-SE is designed to deliver high-fidelity analog audio playback from vinyl records.
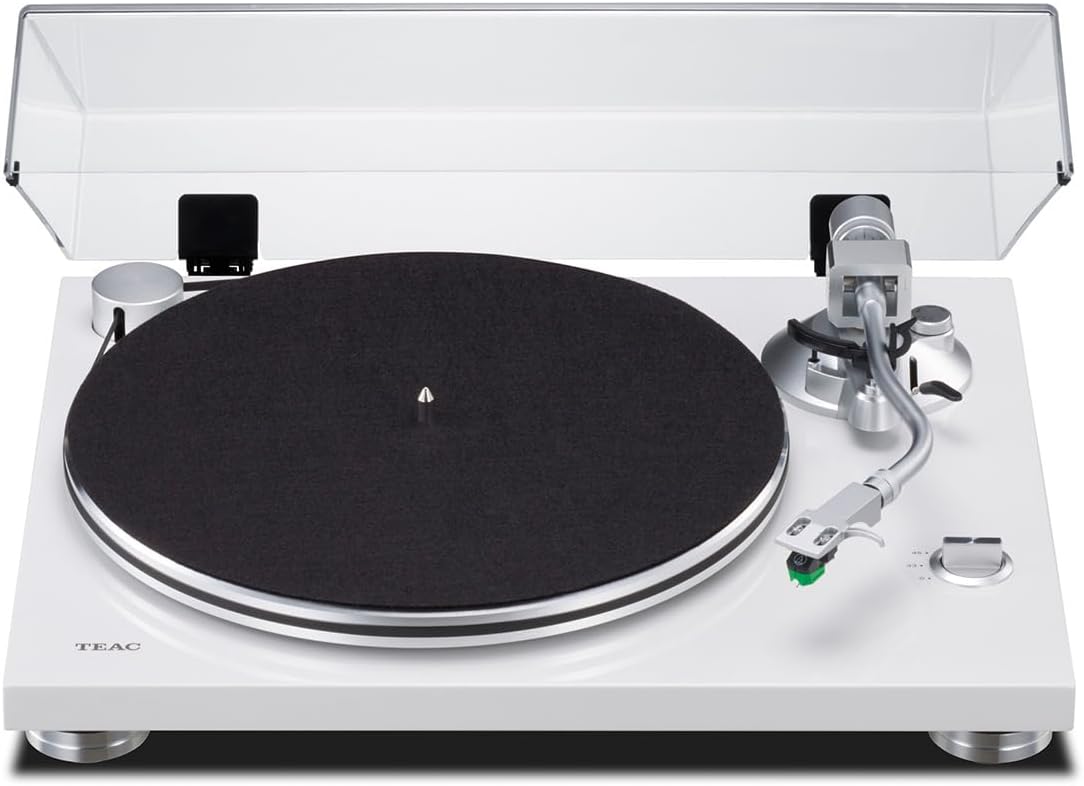
Image 1.1: Overview of the TEAC TN-3B-SE Manual Belt-Drive Turntable in white, featuring the platter, tonearm, and dust cover.
2. Safety Instructions
To ensure safe operation and prevent damage, observe the following precautions:
- Do not expose the unit to rain, moisture, dripping, or splashing.
- Do not place objects filled with liquids, such as vases, on the unit.
- Ensure proper ventilation. Do not block ventilation openings.
- Place the unit on a stable, level surface away from direct sunlight, heat sources, and excessive vibration.
- Use only the power adapter supplied with the unit.
- Do not attempt to disassemble or modify the unit. Refer all servicing to qualified personnel.
- Keep the unit clean by wiping with a soft, dry cloth. Avoid using abrasive cleaners.
3. Package Contents
Verify that all items listed below are included in the package:
- TEAC TN-3B-SE Turntable Unit
- Dust Cover
- Platter
- Drive Belt
- Felt Mat
- Counterweight
- Headshell with pre-installed AT-VM95E VM-type cartridge
- Power Adapter
- RCA Audio Cable (with ground wire)
- USB Cable
- User Manual (this document)
4. Setup
4.1 Unpacking and Placement
- Carefully remove all components from the packaging.
- Place the turntable on a stable, level surface, ensuring adequate space around the unit for ventilation and operation.
4.2 Platter and Belt Installation
- Place the platter onto the center spindle.
- Carefully loop the drive belt around the inner rim of the platter and then around the motor pulley. Ensure the belt is not twisted.
- Place the felt mat on top of the platter.

Image 4.1: Detailed view of the belt drive mechanism, showing the belt wrapped around the motor pulley and the platter's inner rim.
4.3 Dust Cover Installation
Insert the hinges of the dust cover into the corresponding slots on the rear of the turntable unit.
4.4 Tonearm Balance and Stylus Pressure Adjustment
The TN-3B-SE features a static-balanced S-shape tonearm with a knife-edge, pivot-point bearing for enhanced tracking and sound resolution.

Image 4.2: Close-up of the tonearm's knife-edge, pivot-point bearing, designed by SAEC, which allows for precise vertical movement and dynamic sound.
- Attach the counterweight to the rear of the tonearm.
- While holding the tonearm, rotate the counterweight until the tonearm is balanced horizontally (floating freely).
- Once balanced, set the tracking force ring to '0' without moving the counterweight.
- Rotate the counterweight (and the tracking force ring together) to the recommended stylus pressure for the AT-VM95E cartridge, which is typically 2.0 grams. Refer to the cartridge manufacturer's specifications for exact values.
- Adjust the anti-skating dial to match the set stylus pressure. This mechanism helps maintain accurate tracking across the record.

Image 4.3: Detailed view of the tonearm assembly, highlighting the anti-skating adjustment dial and the counterweight for precise tracking force.
4.5 Cartridge Installation
The TN-3B-SE comes with an Audio-Technica AT-VM95E VM-type cartridge with an elliptical stylus pre-installed on the headshell. If replacing the cartridge, ensure proper alignment and wiring according to the cartridge manufacturer's instructions.

Image 4.4: Close-up of the pre-installed Audio-Technica AT-VM95E VM-type cartridge with its elliptical stylus.
4.6 Connecting to an Audio System
The turntable features an integrated MM-type phono EQ amplifier, allowing direct connection to an amplifier or receiver without a dedicated PHONO input. A switch on the rear panel selects between PHONO EQ (internal pre-amp active) and THRU (internal pre-amp bypassed).
- Connect the RCA audio cables from the turntable's output jacks to an available line-level input (e.g., AUX, CD) on your amplifier/receiver.
- Connect the ground wire from the turntable to the ground terminal on your amplifier/receiver (if available).
- Set the PHONO EQ switch on the turntable's rear panel:
- PHONO EQ: Use if your amplifier/receiver does not have a PHONO input.
- THRU: Use if your amplifier/receiver has a dedicated PHONO input.

Image 4.5: Rear panel of the turntable showing RCA audio outputs, ground terminal, PHONO EQ switch, USB output, and power input.
4.7 USB Connection for Digital Archiving
The TN-3B-SE includes a USB port for connecting to a PC or Mac, enabling digital archiving of your vinyl collection at CD-quality resolution.
- Connect the USB cable from the turntable's USB port to an available USB port on your computer.
- Install appropriate audio recording software on your computer (not included).
- Configure your computer's sound settings to recognize the turntable as an audio input device.
5. Operating Instructions
5.1 Power On/Off
Connect the power adapter to the turntable and a wall outlet. Use the power switch on the rear panel to turn the unit on or off.
5.2 Playing a Record
- Place a vinyl record on the felt mat on the platter.
- Select the appropriate rotation speed (33 1/3 or 45 RPM) using the speed selector knob.
- Release the tonearm clamp.
- Gently lift the tonearm using the cueing lever.
- Position the tonearm over the desired starting groove of the record.
- Lower the tonearm slowly using the cueing lever. The stylus will descend onto the record and playback will begin.
- To stop playback, lift the tonearm using the cueing lever and return it to the tonearm rest. Secure the tonearm clamp.
5.3 Recording to PC/Mac
Follow the instructions provided with your audio recording software to capture the audio output from the turntable via the USB connection. Ensure the turntable is powered on and playing a record during the recording process.
6. Maintenance
6.1 Cleaning the Unit
- Wipe the turntable chassis and dust cover with a soft, dry, lint-free cloth.
- Avoid using chemical cleaners, waxes, or solvents as they may damage the finish.
6.2 Stylus Care
- Gently clean the stylus regularly using a soft brush designed for stylus cleaning, brushing from back to front.
- Replace the stylus when signs of wear are apparent (e.g., distorted sound, skipping). The recommended replacement stylus for the AT-VM95E cartridge is the Audio-Technica VMN95E.
7. Troubleshooting
If you experience issues with your turntable, consult the following table for potential solutions:
| Problem | Possible Cause | Solution |
|---|---|---|
| No sound or low volume |
|
|
| Distorted sound |
|
|
| Turntable speed incorrect |
|
|
| Humming noise |
|
|
If the problem persists after attempting these solutions, please contact TEAC customer support.
8. Specifications
| Feature | Specification |
|---|---|
| Model Name | TN-3B-SE |
| Drive System | Belt Drive |
| Motor Type | DC Motor |
| Rotation Speeds | 33 1/3, 45 RPM |
| Tonearm | Static-balanced S-shape, Knife-edge pivot-point bearing (SAEC) |
| Cartridge | Audio-Technica AT-VM95E (VM-type, elliptical stylus) |
| Phono Equalizer | Built-in MM-type (switchable PHONO EQ/THRU) |
| USB Output | Yes (for PC/Mac archiving) |
| Product Dimensions (W x D x H) | 16.5 x 14 x 4.6 inches (420 x 356 x 117 mm) |
| Item Weight | 15.97 pounds (7.24 kg) |
| Material | Engineered Wood, Plastic |
| Color | White |
9. Warranty and Support
For warranty information and customer support, please refer to the warranty card included with your product or visit the official TEAC website. Keep your proof of purchase for warranty claims.


