1. Introduction
This manual provides detailed instructions for the installation, operation, and maintenance of your Beok TDR89B-WIFI-WP Smart WiFi Thermostat. This thermostat is designed for water floor heating systems, offering programmable temperature control and smart connectivity via Wi-Fi. Please read this manual thoroughly before installation and use to ensure proper function and safety.
2. Safety Information
WARNING: Electrical shock hazard. Installation must be performed by a qualified electrician.
- Always disconnect power at the circuit breaker before installing or servicing the thermostat.
- Ensure all wiring complies with local electrical codes and regulations.
- Do not install the thermostat with wet hands or when standing on wet surfaces.
- Verify that the power supply voltage matches the thermostat's specifications (AC 100-240V 50/60Hz).
- Keep the device away from water and high humidity environments.
3. Product Overview
The Beok TDR89B-WIFI-WP thermostat features a modern design with a clear LCD display and touch controls. It is designed to integrate seamlessly into your smart home ecosystem.
Key Features:
- Wi-Fi Connectivity for remote control via smartphone app.
- Voice Control compatibility with Amazon Alexa and Google Home.
- Programmable heating schedules (5+2/6+1/7 modes).
- Touch screen interface for manual operation.
- Temperature accuracy of 0.5°C.
- Child lock function.
Display and Controls:
The thermostat's display provides essential information and allows for direct interaction.

Image: Overview of the Beok TDR89B-WIFI-WP thermostat display, showing time, Wi-Fi status, room temperature, set temperature, heating indicator, child lock, and mode icons.
The display typically shows the current time, Wi-Fi connection status, current room temperature, and the set target temperature. Icons indicate the current operating mode (e.g., manual, programmed), heating status, and whether the child lock is active.
4. Installation
The Beok TDR89B-WIFI-WP thermostat is designed for wall mounting. Professional installation is recommended due to electrical wiring requirements.
Dimensions:

Image: Diagram showing the dimensions of the Beok TDR89B-WIFI-WP thermostat, including front panel (86x86mm) and mounting depth (22mm, with 14mm protrusion).
The thermostat measures 86mm x 86mm on the front panel, with a mounting depth of 22mm and a 14mm protrusion from the wall.
Wiring Diagram (WP - Water Floor Heating):
This model (WP) is specifically for water floor heating systems. Ensure correct connections to the actuator or valve.

Image: Wiring diagrams for the WP model, showing connections for a Normally Open (NO) actuator and a valve. Power input is AC 100-240V. Terminals are labeled L, N, L1, N1, 1, 2, 3, 4, 5, 6, 7.
Wiring Steps:
- Turn off the main power supply before starting any wiring.
- Connect the Live (L) and Neutral (N) wires from your power supply to the corresponding L and N terminals on the thermostat.
- For actuators, connect the control wires to the 'NO actuator' or 'NC actuator' terminals as appropriate for your system.
- For valves, connect the valve control wires to the designated valve terminals.
- Securely mount the thermostat to the wall box.
- Restore power and test the installation.
5. Operating Instructions
The thermostat offers both manual and automatic (programmed) operating modes.
Manual Mode:
In manual mode, you can directly set the desired temperature using the touch controls on the thermostat or via the mobile app.
Video: Demonstrates adjusting the temperature setpoint directly on the thermostat's touch screen. The display shows the current temperature and the user-adjusted set temperature.
Use the + and - buttons on the thermostat to increase or decrease the target temperature. The thermostat will then work to maintain this set temperature.
Child Lock:
To prevent unintended changes, activate the child lock feature. This can typically be done through the mobile app settings or by a specific button combination on the thermostat (refer to the app for specific instructions).

Image: A close-up of the thermostat display showing the child lock icon, indicating the feature is active.
6. App Control and Voice Control
The Beok TDR89B-WIFI-WP thermostat can be controlled remotely using the Tuya Smart or Smart Life mobile applications, and integrated with voice assistants.
Connecting to the App:
- Download the "Tuya Smart" or "Smart Life" app from your smartphone's app store.
- Register or log in to your account.
- Ensure your thermostat is powered on and in pairing mode (usually indicated by a flashing Wi-Fi icon). Refer to the app for specific pairing instructions.
- In the app, select "Add Device" and follow the on-screen prompts to connect your thermostat to your home Wi-Fi network.
Video: Shows the process of pairing the thermostat with the mobile application, including entering Wi-Fi information and successful device addition.
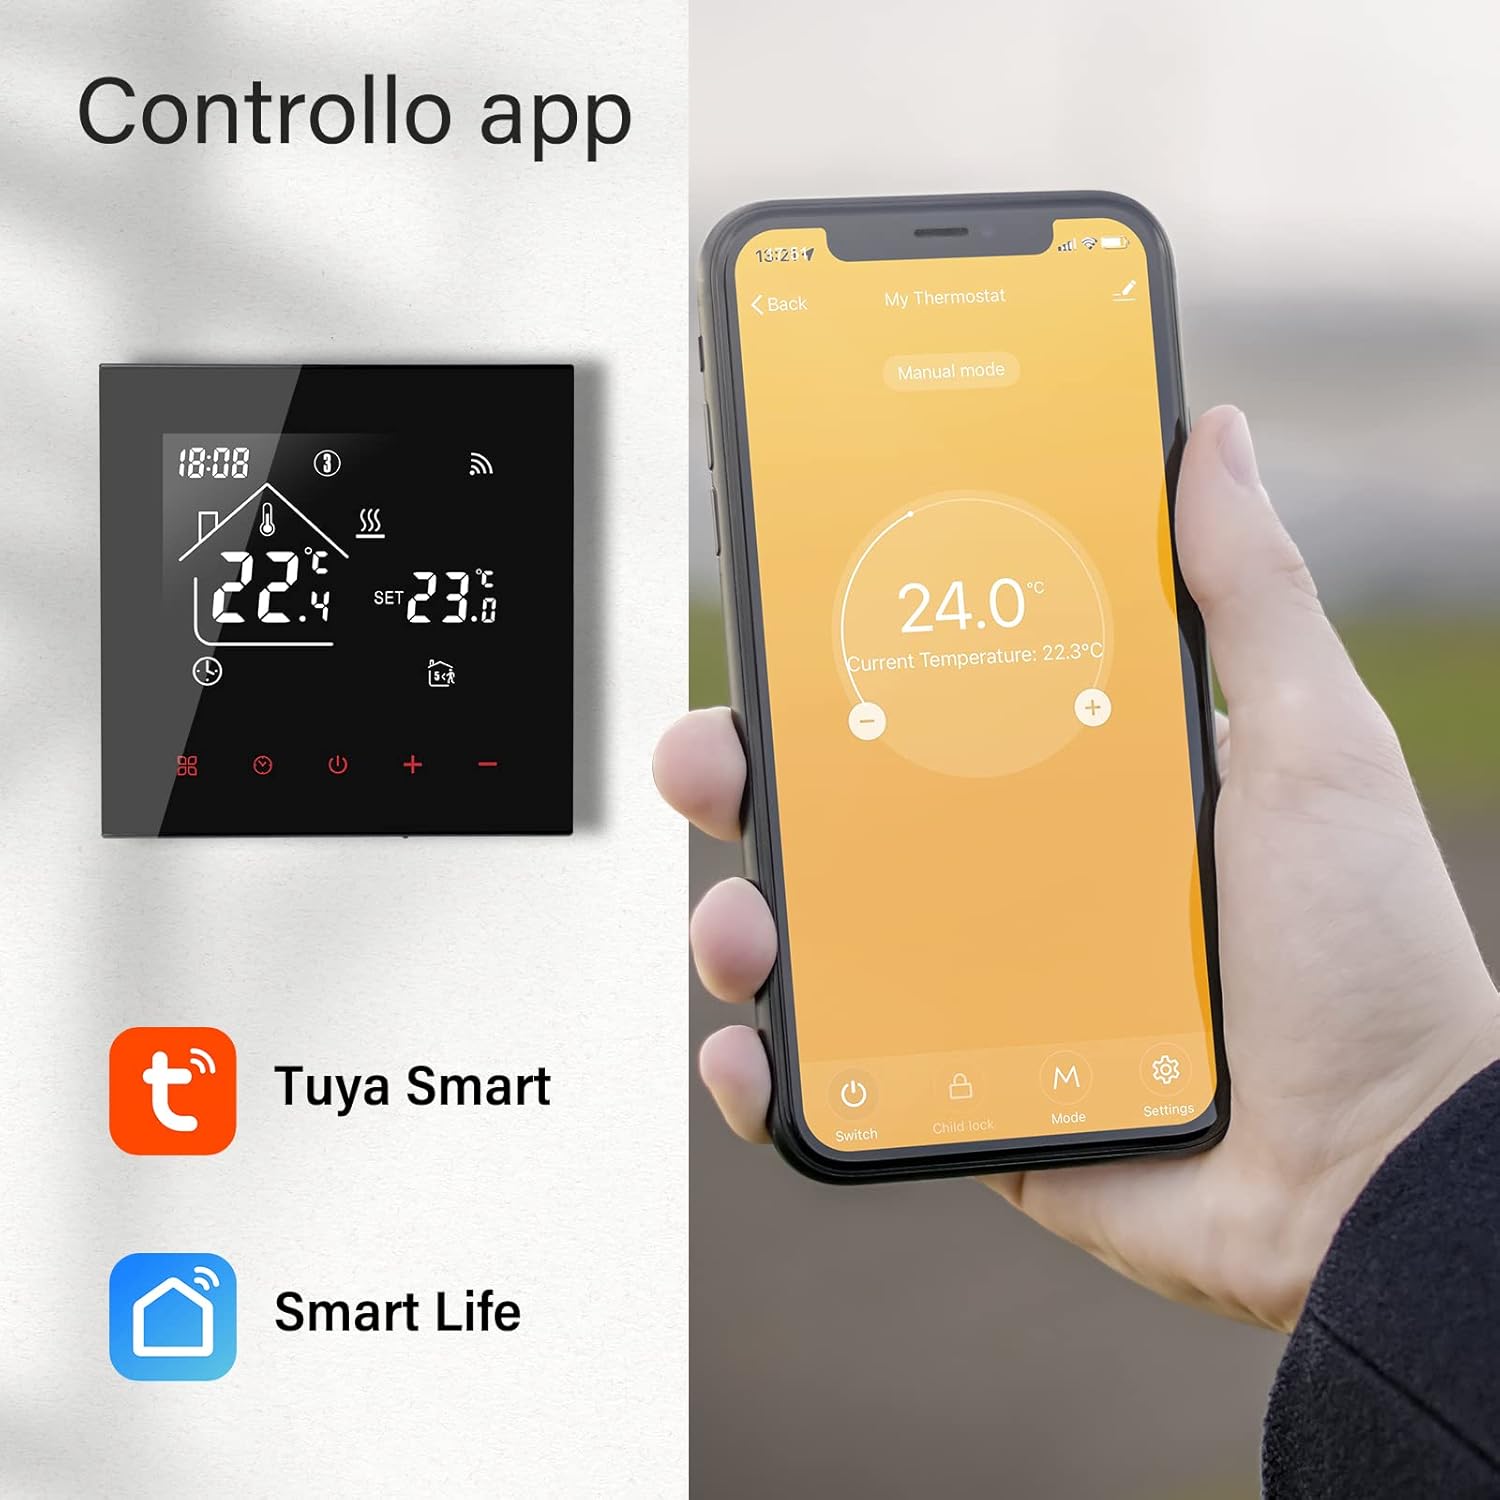
Image: A smartphone displaying the Tuya Smart app interface for controlling the thermostat, showing current and set temperatures, alongside the physical thermostat unit.
Voice Control:
The thermostat is compatible with Amazon Alexa and Google Home. Once connected to the Tuya Smart/Smart Life app, you can link your account to your voice assistant app (e.g., Alexa app, Google Home app) to enable voice commands.

Image: A person using an Amazon Echo device to control the thermostat via voice command, with icons for Google Home, Amazon Alexa, and Yandex Alice compatibility.
Example Voice Commands:
- "Alexa, set the thermostat to 23 degrees."
- "Hey Google, what is the temperature in the living room?"
- "Alexa, turn on the heating."
7. Programming
The thermostat supports weekly programming with 5+2, 6+1, or 7-day modes, allowing you to set different temperatures for up to 6 periods per day.

Image: A smartphone screen showing the app's interface for setting weekly heating programs, with multiple periods and corresponding temperatures.
To set a program:
- Open the Tuya Smart or Smart Life app.
- Navigate to the thermostat settings and find the "Weekly Programming" or "Schedule" option.
- Choose your preferred programming mode (5+2, 6+1, or 7 days).
- Set the desired time and temperature for each period of the day.
- Save your settings. The thermostat will now automatically adjust the temperature according to your schedule.
8. Maintenance
To ensure optimal performance and longevity of your Beok TDR89B-WIFI-WP thermostat, follow these simple maintenance guidelines:
- Clean the screen and exterior regularly with a soft, dry cloth. Avoid abrasive cleaners or solvents.
- Do not spray cleaning liquids directly onto the thermostat.
- Ensure the thermostat's vents are not obstructed to allow for accurate temperature sensing.
9. Troubleshooting
If you encounter issues with your thermostat, refer to the following common problems and solutions:
| Problem | Possible Cause | Solution |
|---|---|---|
| Thermostat not powering on | No power supply; incorrect wiring. | Check circuit breaker. Verify wiring connections (consult a qualified electrician). |
| No Wi-Fi connection | Incorrect Wi-Fi password; router too far; 5GHz network. | Ensure correct 2.4GHz Wi-Fi password. Move router closer. Thermostat only supports 2.4GHz Wi-Fi. |
| Temperature inaccurate | Sensor calibration needed; thermostat placed in direct sunlight/draft. | Calibrate the sensor via the app settings. Relocate thermostat if exposed to extreme conditions. |
| Heating not turning on/off | Incorrect wiring to heating system; system fault. | Verify wiring to actuator/valve. Check your heating system for faults. |
If the problem persists, please contact customer support for assistance.
10. Specifications
| Feature | Specification |
|---|---|
| Brand | BEOK CONTROLS |
| Model Name | TDR89B-WIFI-WP |
| Color | Black |
| Power Supply | AC 100-240V 50/60Hz |
| Temperature Range | 5-60°C |
| Temperature Accuracy | 0.5°C |
| Contact Capacity | 3A |
| Material | Plastic |
| Product Dimensions | 8.8 x 8.8 x 3.7 cm |
| Weight | 200 g |
| Special Features | Remote Control, Voice Assistant Integration, Advanced Programming |
| Controller Type | Amazon Alexa, Google Assistant, Tuya App |
11. Warranty and Support
Your Beok TDR89B-WIFI-WP Smart WiFi Thermostat comes with a standard manufacturer's warranty. Please refer to the warranty card included in your product packaging for specific terms and conditions.
For technical support, troubleshooting assistance, or warranty claims, please contact Beok Controls customer service through their official website or the contact information provided with your product.