VEVOR ULBOX50X50X15
VEVOR ULBOX50X50X15 Electrical Enclosure Instruction Manual
Model: ULBOX50X50X15
1. Introduction
This manual provides detailed instructions for the installation, operation, and maintenance of your VEVOR ULBOX50X50X15 Electrical Enclosure. Designed for optimal protection, this robust enclosure ensures consistent performance in various indoor and outdoor environments. Please read this manual thoroughly before installation and use to ensure proper functionality and safety.

Figure 1: VEVOR ULBOX50X50X15 Electrical Enclosure (closed)
2. Safety Information
Always adhere to local electrical codes and regulations during installation and maintenance. Only qualified personnel should perform electrical work. Failure to follow these safety guidelines may result in property damage, serious injury, or death.
- Disconnect Power: Ensure all power sources are disconnected before working on the enclosure or its contents.
- Grounding: The enclosure must be properly grounded to prevent electrical shock. Use the provided grounding wire and labels.
- Proper Tools: Use appropriate tools for installation and maintenance.
- Environmental Conditions: Ensure the enclosure is suitable for the intended environmental conditions (temperature, humidity, exposure to elements).
- Secure Mounting: Mount the enclosure securely to a stable surface to prevent it from falling.
3. Package Contents
Verify that all items listed below are included in your package. If any parts are missing or damaged, please contact VEVOR customer service.
- 1 x Electrical Enclosure (Main Unit)
- 1 x Guide Rail
- 1 x Rain Hood
- 4 x Hanging Lugs
- 1 x Gasket (for Enclosing Plate)
- 1 x Earth Wire
- 1 x Accessories Package (Fasteners, Earth Labels, Keys, Plugs)

Figure 2: Included Accessories
4. Specifications
| Feature | Specification |
|---|---|
| Model | ULBOX50X50X15 |
| Outer Dimensions (H x W x D) | 20'' x 20'' x 6'' (50 x 50 x 15 cm) |
| Inner Dimensions (H x W x D) | 19.6'' x 19.6'' x 5'' (49.7 x 49.7 x 12.7 cm) |
| Body Material | Cold-Rolled Carbon Steel (0.05 in / 0.12 cm thickness) |
| Inner Plate Material | Galvanized Plate (0.06 in / 0.15 cm thickness) |
| Finish | Powder Coating (Surface Pickling & Passivation) |
| Construction | Continuously Welded |
| Ratings | NEMA Type 4 |
| Protection Grade | IP65, IK10 |
| Gasket Material | Seamless Foam / Nylon (washer or plug) |
| Ambient Temperature | -40~55°C |
| Certification | TÜV CE, UL Listed |
| Item Weight | 36 pounds |
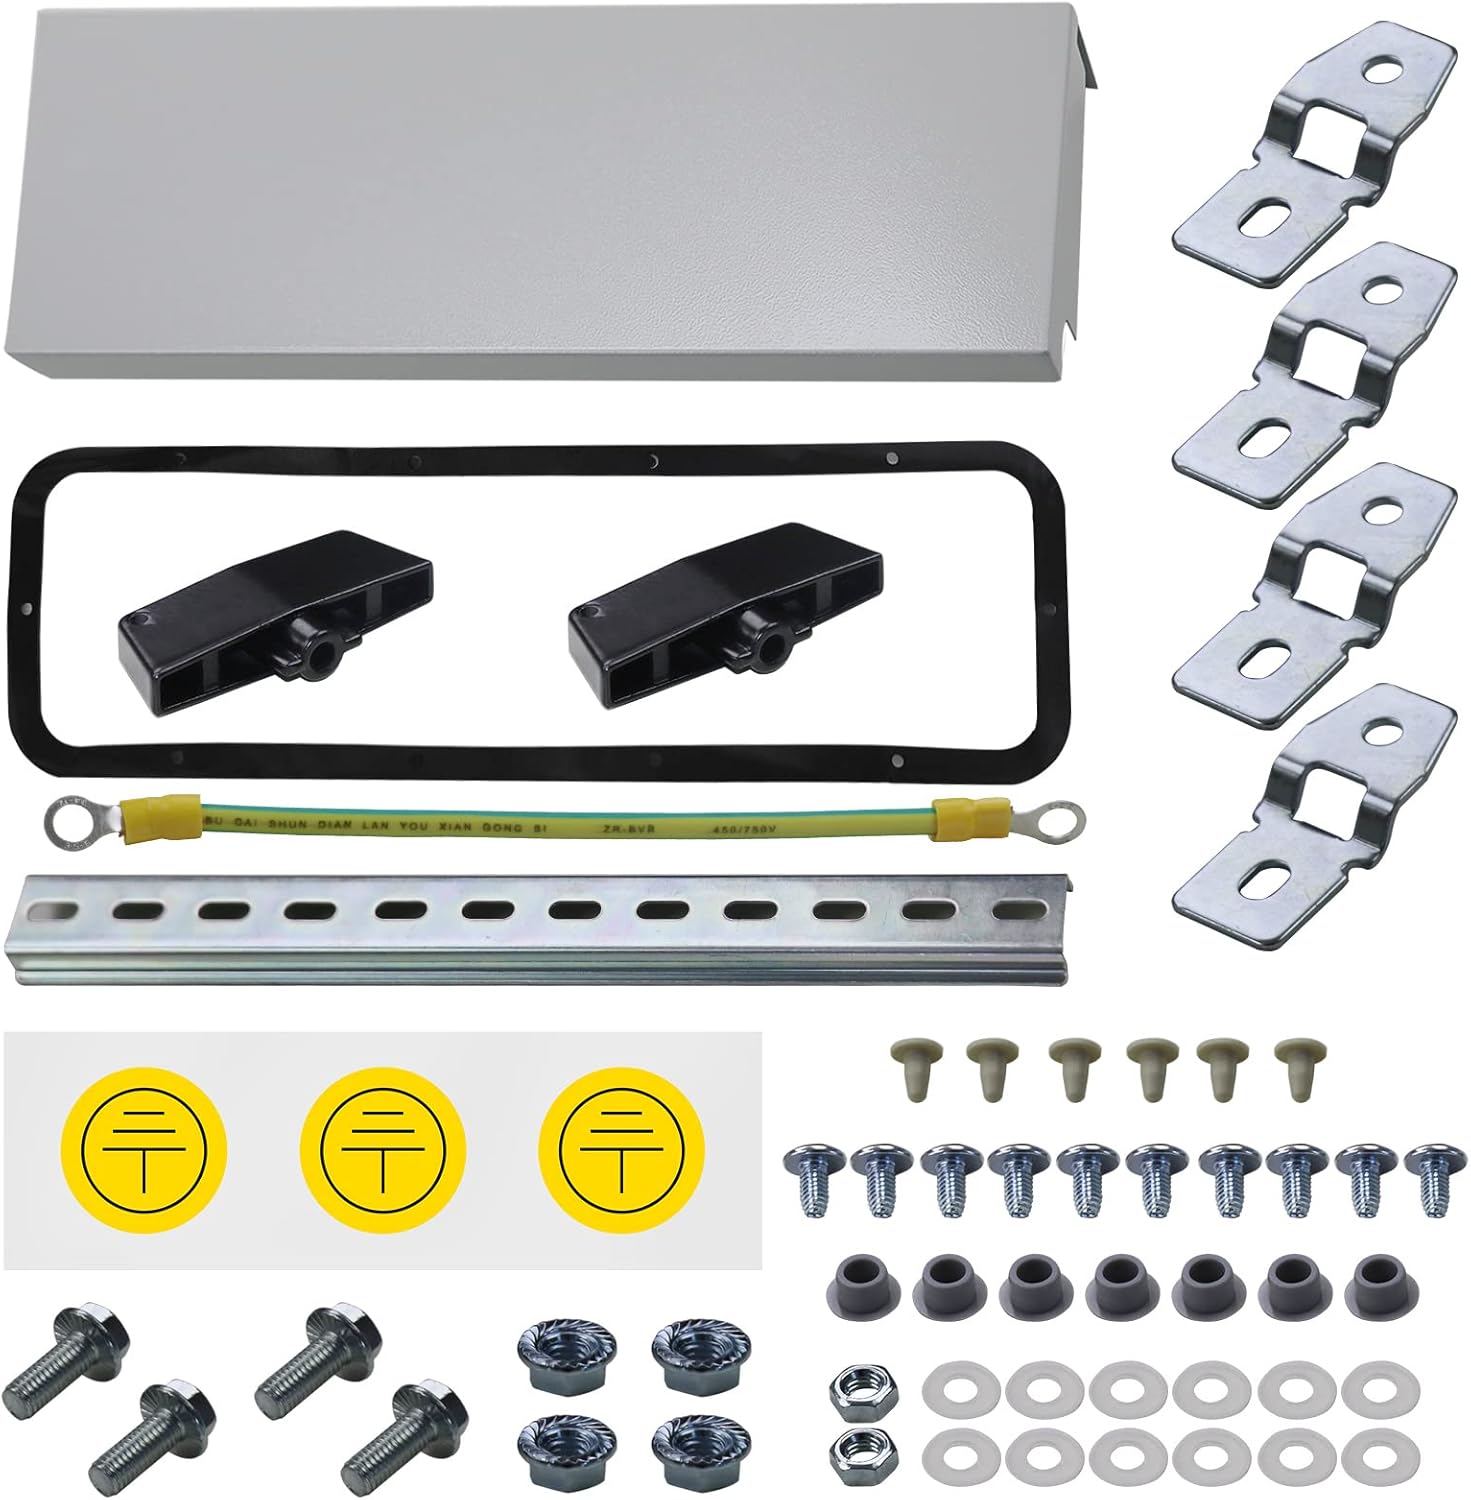
Figure 3: Product Dimensions
5. Setup and Installation
5.1 Mounting the Enclosure
The enclosure can be wall-mounted using the provided hanging lugs. The back of the enclosure features four pre-drilled holes for secure attachment.
- Attach the four hanging lugs to the back of the enclosure using the supplied fasteners.
- Mark the desired mounting location on the wall, ensuring it is a sturdy surface capable of supporting the enclosure's weight and contents.
- Drill appropriate holes in the wall and secure the enclosure using suitable wall anchors or screws (not included, depending on wall material).
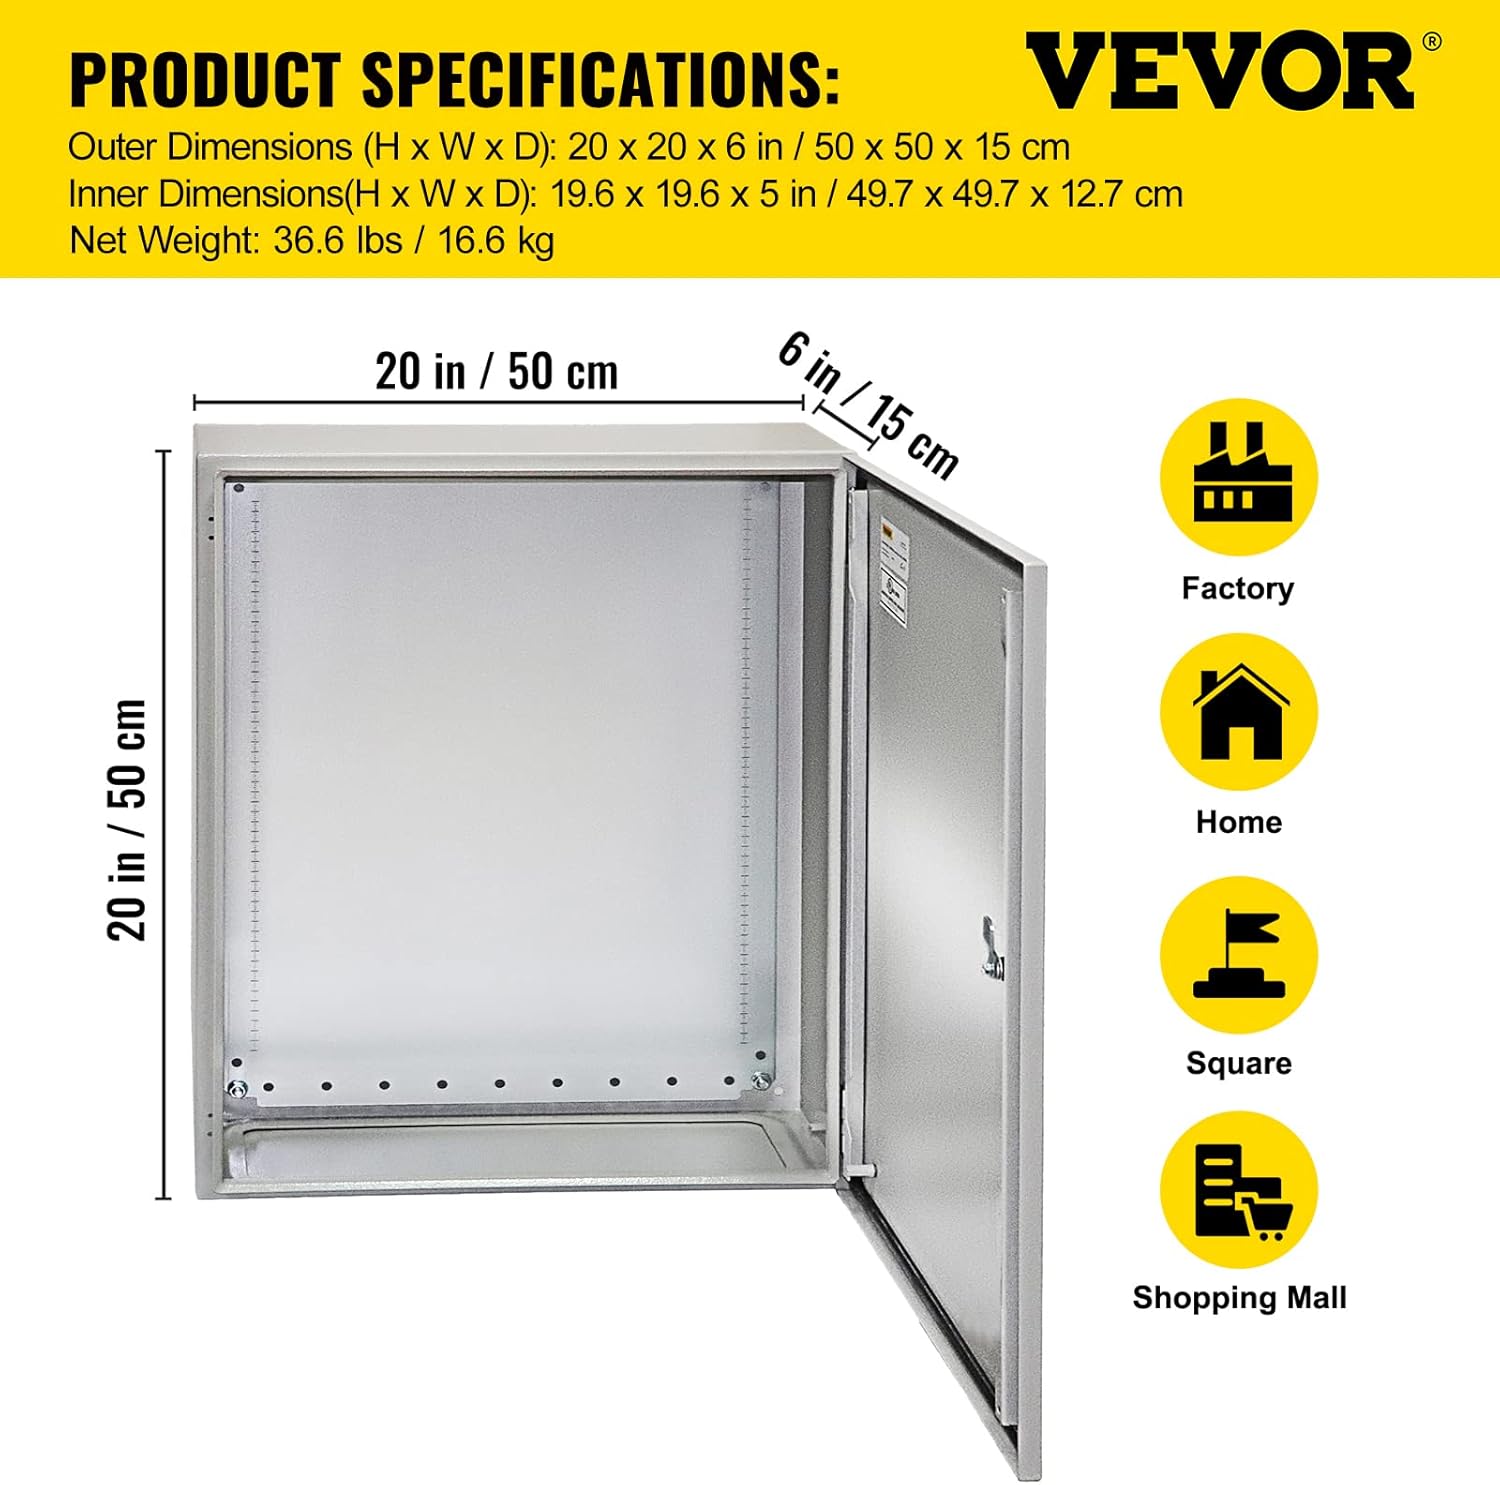
Figure 4: Wall-Mounted Installation
5.2 Rain Hood Installation
The rain hood provides additional protection against water and debris, especially when the door is opened. It is designed to be mounted on the top of the enclosure.
- Align the rain hood with the top edge of the enclosure.
- Secure the rain hood using the designated mounting points and fasteners.
5.3 Internal Component Installation
The enclosure features a detachable galvanized backplate and a guide rail for easy installation of electrical components.
- The galvanized backplate can be removed by unscrewing the four nuts and bolts. This allows for convenient pre-wiring or mounting of PCBs, terminals, or other components outside the enclosure.
- Install the provided guide rail onto the backplate or directly inside the enclosure as needed for DIN rail compatible components.
- Utilize the detachable outlet hole at the bottom for cable entry and exit. Ensure proper sealing with the provided gasket and plugs to maintain IP65 rating.
- Connect the provided earth wire to the designated grounding screw inside the enclosure and ensure the enclosure body is properly grounded.

Figure 5: Enclosure Interior with Detachable Backplate

Figure 6: Detailed Features (Hinge, Lock, Outlet, Ground Screw)
6. Operating Instructions
6.1 Opening and Closing the Door
The enclosure features a hinged door with a secure lock core to protect internal components.
- To Open: Insert the key into the lock core and turn to unlock. Pull the door open.
- To Close: Push the door firmly against the enclosure body until the gasket is compressed. Turn the key to lock the door. Ensure the door is fully latched to maintain the IP65 rating.
6.2 Maintaining Water and Dust Protection
The IP65 rating ensures protection against dust and water ingress. To maintain this rating:
- Always ensure the door is securely closed and locked.
- Use the provided plugs for any unused mounting holes or cable entries.
- Regularly inspect the sealing strip around the door for any damage or wear.
7. Maintenance
Regular maintenance helps ensure the longevity and continued protection offered by your VEVOR Electrical Enclosure.
- Periodic Inspection: Annually inspect the enclosure for any signs of corrosion, physical damage, or wear on the door gasket.
- Cleaning: Clean the exterior of the enclosure with a mild detergent and water. Avoid abrasive cleaners that could damage the powder coating.
- Fastener Check: Periodically check all mounting fasteners and internal component fasteners to ensure they are tight.
- Seal Integrity: Ensure the door gasket remains pliable and free from cracks or tears. Replace if necessary.
8. Troubleshooting
This section addresses common issues you might encounter with your electrical enclosure.
- Water Ingress: If water is found inside the enclosure, immediately disconnect power. Inspect the door gasket for damage, ensure the door is properly latched, and check all cable entries and unused holes for proper sealing with plugs.
- Door Not Latching: Ensure no obstructions are preventing the door from closing completely. Check the lock mechanism for any debris or damage. Apply firm pressure when closing to engage the gasket.
- Corrosion: While the enclosure is powder-coated for corrosion resistance, prolonged exposure to harsh conditions or physical damage can lead to rust. Address any surface damage promptly by cleaning and applying a suitable protective coating.
9. Warranty and Support
VEVOR products are designed for durability and performance. For warranty information, technical support, or to purchase replacement parts, please refer to the contact information provided with your product or visit the official VEVOR website.
Please retain your proof of purchase for any warranty claims.
Ask a question about this manual
Ask about setup, troubleshooting, compatibility, parts, safety, or missing instructions. Manuals+ will review the question and use this page’s manual context to help answer it.