Jesverty SPS-12003V
Jesverty SPS-12003V DC Power Supply User Manual
Model: SPS-12003V | Brand: Jesverty
1. Introduction
The Jesverty SPS-12003V is a variable DC power supply designed for precision and versatility in various applications, including laboratories, educational sites, factory manufacturing tests, maintenance repairs, battery charging, anodizing, and electronic DIY projects. This manual provides essential information for safe and effective operation of your device.
2. Product Overview
Familiarize yourself with the key components and controls of your DC power supply.

Figure 1: Front and rear view of the Jesverty SPS-12003V DC Power Supply with labeled components.
- Voltage Display: Shows the current output voltage.
- C.V. Mode Indicator: Indicates Constant Voltage mode.
- C.C. Mode Indicator: Indicates Constant Current mode.
- Current Display: Shows the current output amperage.
- OCP Status LED: Illuminates when Over-Current Protection is active.
- OPN Status LED: Illuminates when Output Power ON (OPN) function is enabled.
- Power Display: Shows the current output wattage.
- USB-C Quick-Charge Port: Type-C port for fast charging compatible devices (20W).
- USB-A Quick-Charge Port: Type-A port for fast charging compatible devices (20W).
- OCP Setting Button: Button to enable/disable Over-Current Protection.
- Output Control Button: Toggles the main output ON/OFF.
- Voltage Knob (Coarse): Adjusts the voltage value before the decimal point.
- Voltage Knob (Fine): Adjusts the voltage value after the decimal point.
- Current Knob (Coarse): Adjusts the current value before the decimal point.
- Current Knob (Fine): Adjusts the current value after the decimal point.
- Power Switch: Turns the unit ON/OFF.
- Output Terminal (Black): Negative output terminal.
- Grounding Terminal (Green): Ground connection.
- Output Terminal + (Red): Positive output terminal.
- Cooling Fan: Temperature-regulated cooling fan for heat dissipation.
- Input Selectable Switch: Selects between 115V and 230V AC input.
- AC Power Inlet: Connects to the main power cord.
- Fuse Box (Spare Fuse Inside): Contains the main fuse for protection.
3. Setup Instructions
- Unpacking: Carefully remove the power supply and all accessories from the packaging. Inspect for any damage.
- Voltage Selection: Locate the Input Selectable Switch on the rear panel. Ensure it is set to match your local AC power supply (115V or 230V). Note: Power cords and AC input settings may vary depending on the product's factory-shipment destination.
- Power Connection: Connect the provided power cord to the AC Power Inlet on the rear of the unit and then to a suitable wall outlet.
- Test Leads Connection: Connect the test leads to the Output Terminals (+ for red, - for black). The green terminal is for grounding. Note: The included test leads are for general use. For long-term high-current projects, use test leads with sufficient current capacity.
4. Operating Instructions
4.1 Basic Operation
- Power On: Press the Power Switch to turn on the unit. The LED display will illuminate.
- Setting Voltage: Use the Voltage Knob (Coarse) to set the integer part of the desired voltage and the Voltage Knob (Fine) to set the decimal part. The display resolution is up to 0.01V.
- Setting Current: Use the Current Knob (Coarse) to set the integer part of the desired current limit and the Current Knob (Fine) to set the decimal part. The display resolution is up to 0.001A.
- Output Control: Press the Output Control Button to enable or disable the main output. This allows you to adjust settings without disconnecting the load or turning off the power.
- OPN Function: The OPN function allows the unit to output voltage and current as soon as the power switch is turned on, without needing to press the "OUTPUT" button. Consult the included instruction manual for details on enabling/disabling this feature.
4.2 USB Charging Function
The power supply features dedicated USB-A and USB-C ports, both supporting 20W fast charging. These are convenient for charging smartphones or powering small electronic modules like Arduino UNO or Raspberry Pi.

Figure 2: USB-A and USB-C ports supporting 20W quick-charge.
5. Maintenance
- Cleaning: Regularly clean the exterior of the unit with a soft, dry cloth. Do not use abrasive cleaners or solvents.
- Ventilation: Ensure the cooling fan and ventilation slots are free from dust and obstructions to maintain proper airflow and prevent overheating.
- Storage: Store the power supply in a cool, dry place away from direct sunlight and excessive humidity when not in use.
6. Troubleshooting
- No Power: Check the power cord connection and ensure the Input Selectable Switch is set correctly for your region's voltage. Verify the fuse in the Fuse Box.
- No Output Voltage/Current: Ensure the Output Control Button is pressed (output ON). Check if the OCP Status LED is illuminated, indicating over-current protection.
- Over-Current Protection (OCP) Activation: If the OCP LED illuminates and output stops, it indicates that the current drawn by the load has exceeded the set current limit. Reduce the load or increase the current limit.
- Slight Voltage Discrepancy: Minor variations between the displayed voltage and an external multimeter reading can occur. This is often within acceptable tolerances for bench power supplies. If precise voltage is critical, use an external calibrated multimeter for verification and adjust the output accordingly.
- Delayed Output Shutdown: Due to internal capacitors, the output voltage may take a second or two to fully discharge and reach zero after the output button is turned off. This is normal operation.
7. Specifications
| Feature | Detail |
|---|---|
| Model Number | SPS-12003V |
| Package Dimensions | 10.87 x 8.19 x 5.08 inches |
| Item Weight | 3.52 pounds (1.6 Kilograms) |
| Connector Type | USB-A, USB-C |
| Output Wattage | 20 Watts (USB/Type-C) |
| Form Factor | Compact, Rack |
| Input Voltage Selectable | AC115V/230V |
| Display Resolution | 0.01V/0.001A/0.1W |
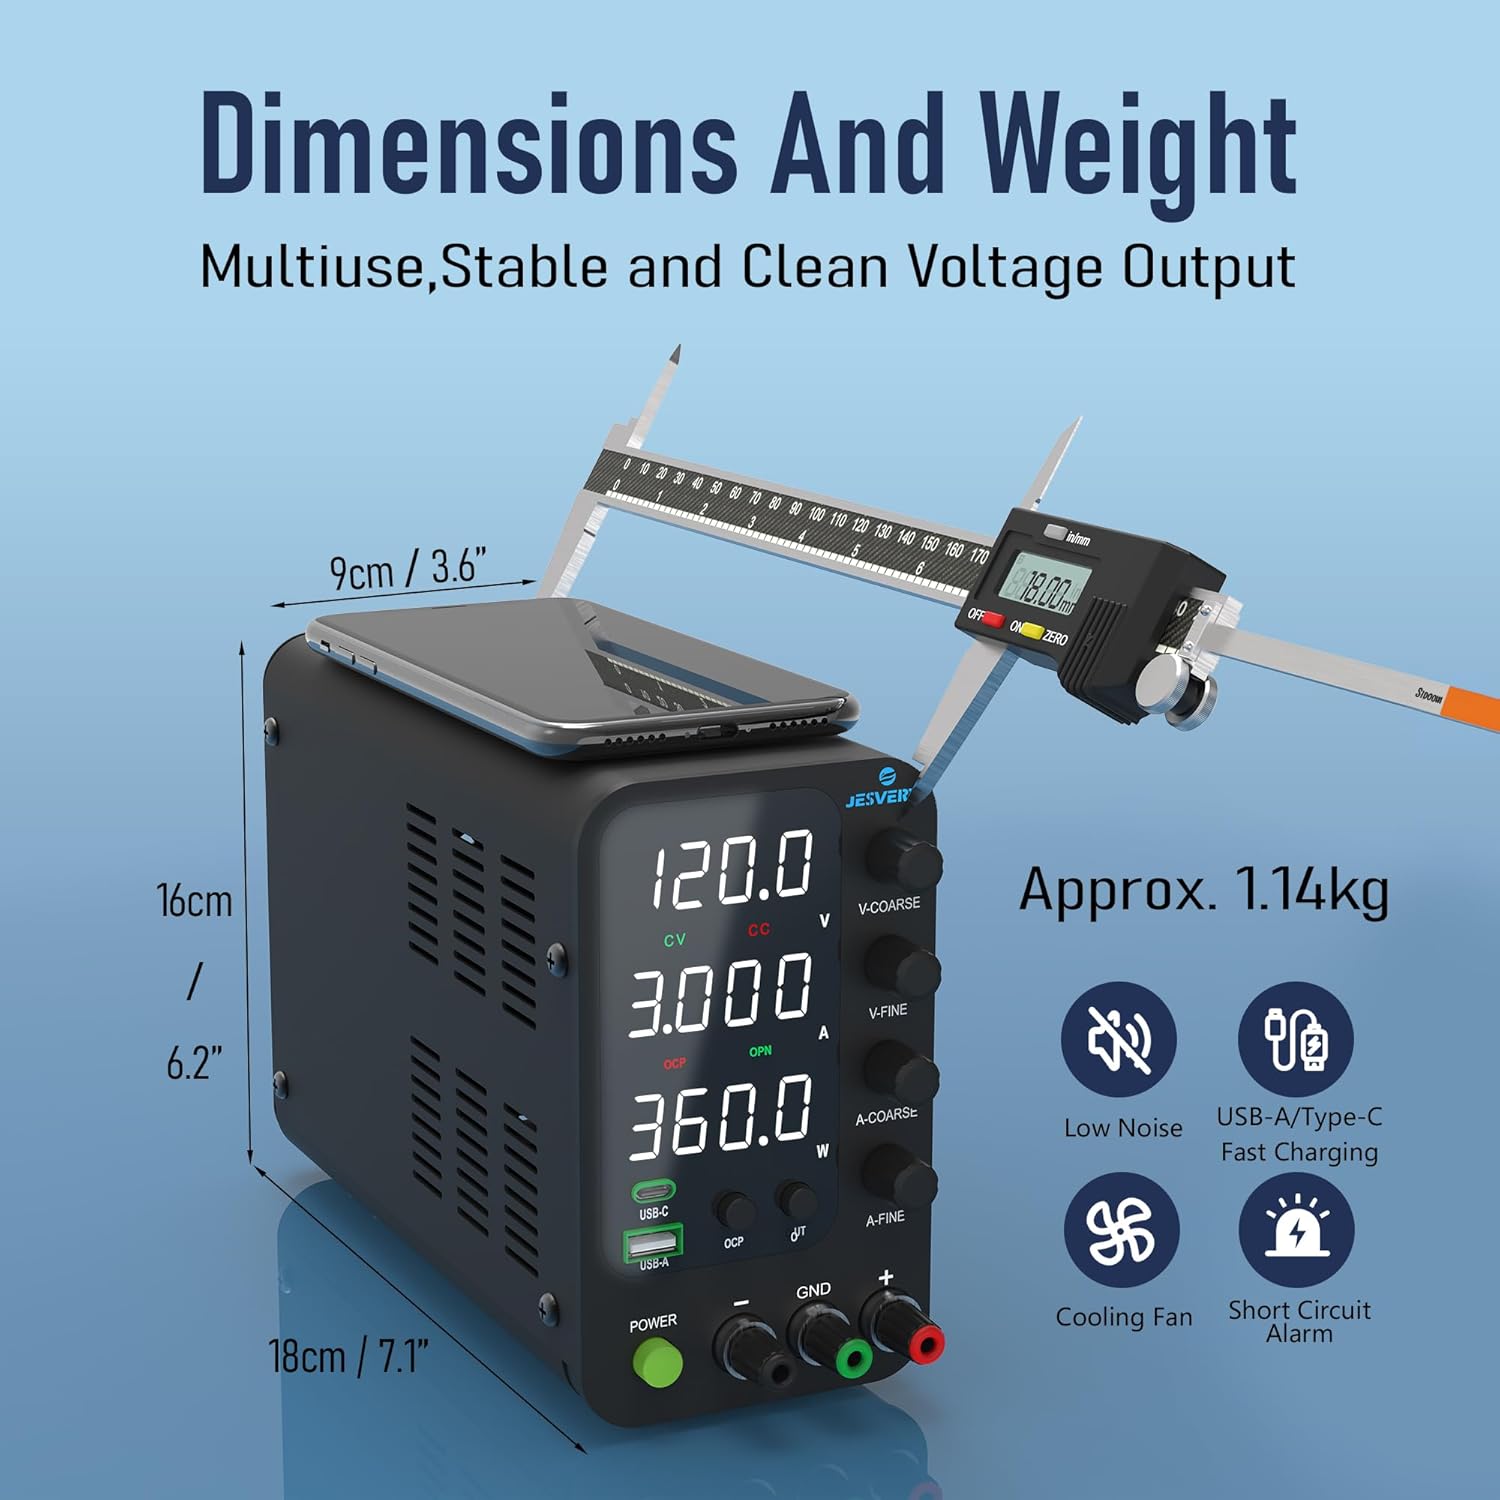
Figure 3: Dimensions and approximate weight of the unit.
8. What's in the Box
- 1 x SPS-V Unit
- 1 x Power Cord*
- 1 set of test leads*
- 1 x Instruction Manual (Contact information included)
*Note: Power cords and the AC input settings vary depending on the destination for the product at the factory-shipment. The test leads that come with the unit are merely a give-away; we recommend that you prepare test leads with sufficient current capacity if your project needs long-term use of high current.
9. Warranty and Support
Jesverty provides professional technical support for this product. Should you have any problems or questions about your order, please feel free to contact Jesverty Customer Service via Amazon message or email (contact information typically found on the back of the instruction manual).