1. Introduction
Thank you for choosing the CNBINGO Smart Touch Switch. This manual provides detailed instructions for the safe installation, operation, and maintenance of your new smart switch. Please read this manual thoroughly before installation and keep it for future reference.

Image 1.1: CNBINGO Smart Touch Switch with its mobile application interface.
2. Important Safety Information
WARNING: Electrical shock hazard. Installation must be performed by a qualified electrician or a person with a thorough understanding of electrical systems.
- Always disconnect power at the circuit breaker before installing or servicing the switch. Failure to do so may result in serious injury or death.
- A neutral wire is required for the operation of this smart switch. Most houses built before the mid-1980s may not have a neutral wire. Please confirm the presence of a neutral wire in your electrical box before purchase and installation.
- Do not touch the internal circuit board or test the switch before the glass panel is fully installed. Testing without the glass panel can affect the switch's calibration and functionality.
- The switch features a 4mm thick waterproof tempered glass wall plate, designed for safety and to prevent electric shock, even when touched with wet hands. However, always exercise caution around electricity.
- This is an ON/OFF switch and does not support dimming functions. Do not connect to dimmable lights if you intend to use dimming features.

Image 2.1: Essential pre-installation checks and warnings.
3. Specifications
| Feature | Specification |
|---|---|
| Model Number | W1-301 |
| Dimensions (L x W x H) | 8.6 x 8.6 x 3.6 cm |
| Weight | 230 grams |
| Operating Voltage | AC 90-250V |
| Load Power | 600W per gang |
| Wi-Fi Frequency | 2.4 GHz (5 GHz not supported) |
| Material | Tempered Glass Panel, Fire-retardant PC |
| Control Type | Touch, App, Voice |
| Circuit Type | 3-way (via multi-control association) |

Image 3.1: Standard dimensions and mounting box requirements for installation.
4. Setup and Installation
4.1 Wiring Instructions
The CNBINGO Smart Touch Switch requires a neutral wire for proper operation. Follow the wiring diagram carefully.

Image 4.1: Wiring diagram for the smart switch. Ensure correct connection of Live (L) and Neutral (N) wires, and load wires (L1, L2, L3).
- Disconnect Power: Before starting any wiring, turn off the main power at your circuit breaker to avoid electrical shock.
- Identify Wires: Locate the Live (L), Neutral (N), and load wires (L1, L2, L3 for a 3-gang switch) in your wall box.
- Connect Wires: Connect the corresponding wires from your wall box to the terminals on the back of the CNBINGO switch. The terminals are typically labeled L (Live), N (Neutral), and L1, L2, L3 (Load for each gang).
- Mount the Switch: Secure the switch module into a standard 60mm mounting wall box. Ensure the mounting box has a depth of at least 30mm.
- Attach Glass Panel: Once wiring is complete and the switch module is secured, gently slide the tempered glass panel onto the switch.
- Restore Power: Turn the main power back on at the circuit breaker.
4.2 Initial Pairing with Smart Life App
To connect your smart switch to your Wi-Fi network and control it via the Smart Life app:
- Download Smart Life App: Download the 'Smart Life' app from your smartphone's app store (available for iOS and Android).
- Enable Pairing Mode: After restoring power, the switch should automatically enter pairing mode, indicated by a rapidly flashing red light. If not, press and hold any touch button on the switch for 5 seconds until the light flashes rapidly.
- Add Device in App: Open the Smart Life app, register or log in, and tap 'Add Device' or the '+' icon. Select 'Electrical Switch' or 'Light Switch (Wi-Fi)'.
- Connect to Wi-Fi: Follow the in-app instructions to connect the switch to your 2.4 GHz Wi-Fi network. Ensure your Wi-Fi password is entered correctly and the signal is strong. Note: This switch only supports 2.4 GHz Wi-Fi. If your router uses both 2.4 GHz and 5 GHz, ensure your phone is connected to the 2.4 GHz network during pairing.
- Complete Setup: Once connected, you can rename the switch and assign it to a room within the app.
5. Operating Instructions
5.1 Touch Control
The switch features a responsive touch panel. Simply tap the desired touch area to turn the connected light ON or OFF. An LED indicator will show the current status (e.g., blue for OFF, red for ON, or as configured).
5.2 App Control (Smart Life)
The Smart Life app provides comprehensive control over your switch from anywhere with an internet connection.
- Remote Control: Turn lights ON/OFF remotely via the app.
- Scheduling & Timers: Set schedules or countdown timers for lights to turn ON/OFF automatically.
- Scene Creation: Create custom scenes to control multiple lights or smart devices simultaneously with a single tap.
- Device Sharing: Share control of the switch with family members through the app.

Image 5.1: App control features including scheduling and scene management.
5.3 Voice Control (Alexa & Google Assistant)
Integrate your CNBINGO Smart Touch Switch with Amazon Alexa or Google Assistant for hands-free voice control.
- Link Smart Life Account: In the Alexa or Google Home app, navigate to 'Skills & Games' (Alexa) or 'Works with Google' (Google Home) and search for 'Smart Life'. Link your Smart Life account.
- Discover Devices: Once linked, ask your voice assistant to 'Discover devices' or manually add the switch through the app.
- Voice Commands: You can now control your lights using voice commands such as:
- "Alexa, turn on the bedroom light."
- "Hey Google, turn off the kitchen light."

Image 5.2: Voice control with Amazon Alexa and Google Assistant.
5.4 Multi-Control Association
This switch supports 2-way or multi-way functionality through multi-control association within the Smart Life app, allowing it to work with other smart switches. This is achieved via software association, not traditional 2-way wiring.
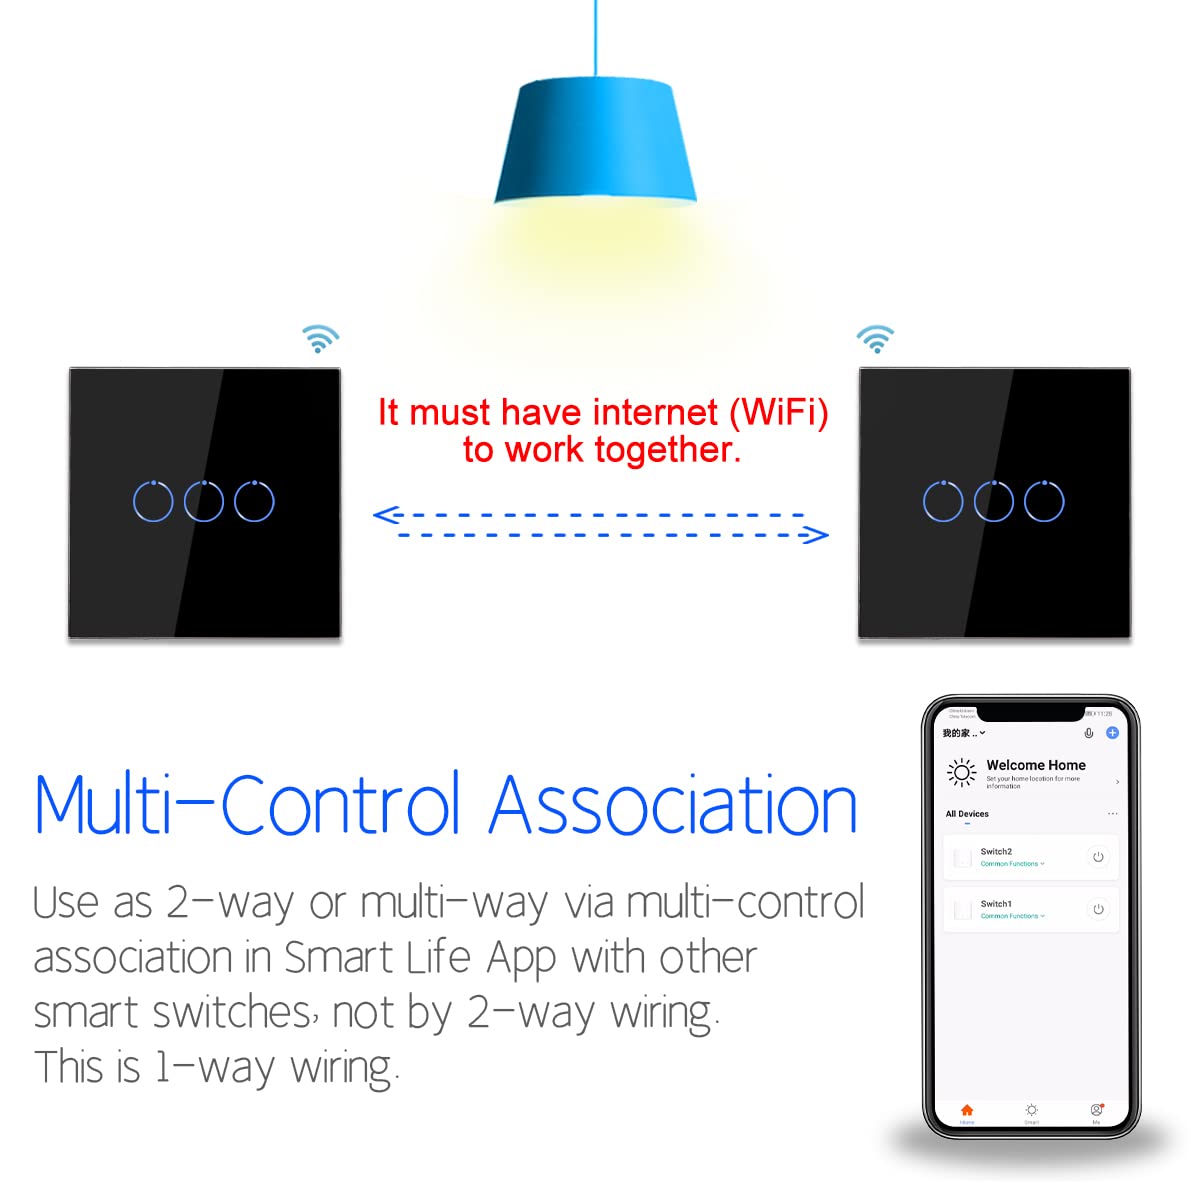
Image 5.3: Multi-control association setup via Wi-Fi.
6. Maintenance
The tempered glass panel of the CNBINGO Smart Touch Switch is easy to clean. Use a soft, damp cloth to wipe the surface. Avoid using abrasive cleaners or harsh chemicals that could damage the glass or internal components. Ensure the switch is dry before operating.


Image 6.1: The switch features a waterproof tempered glass panel and fire-retardant materials for durability and safety.
7. Troubleshooting
7.1 Switch Not Working After Glass Panel Installation
Problem: The switch worked during initial testing but stopped working after the glass panel was installed.
Solution: Turn off the main power at the circuit breaker. Gently remove the glass panel. Wait 5 to 10 minutes. Reinstall the glass panel. Turn the circuit breaker back on. Wait at least 3 minutes for the switch to reset before attempting to use it.
7.2 Cannot Connect Switch to Wi-Fi
Problem: The switch fails to connect to the Wi-Fi network.
Solution:
- Ensure the switch is in flashing red pairing state. If not, press and hold any touch button for 5 seconds until it flashes rapidly.
- Verify that you have entered the correct Wi-Fi password in the Smart Life app.
- Check that your Wi-Fi signal is strong enough at the switch's location.
- Confirm that your Wi-Fi network is 2.4 GHz. This switch does not support 5 GHz Wi-Fi. If your router broadcasts both, ensure your smartphone is connected to the 2.4 GHz network during the pairing process.
7.3 How to Reset the Switch
Problem: The switch is unresponsive or behaving unexpectedly.
Solution: To perform a hard reset, turn off the power to the switch at the circuit breaker for approximately 10 minutes. Then, restore power. The switch should reset and often resume normal operation.
7.4 Cannot Find Switch in Alexa/Google Home
Problem: The smart switch is not discoverable or controllable by your voice assistant.
Solution:
- Ensure the switch is successfully added and functioning within the Smart Life app first.
- In your Alexa or Google Home app, ensure the 'Smart Life' skill/service is enabled and linked to your Smart Life account.
- Ask your voice assistant to 'Discover devices' or manually initiate device discovery within the voice assistant's app.
8. Warranty and Support
The CNBINGO Smart Touch Switch comes with a 5-year free warranty from the date of purchase. This warranty covers manufacturing defects and malfunctions under normal use.
For technical support, troubleshooting assistance, or warranty claims, please contact CNBINGO OFFICIAL, the seller, through your purchase platform or their official support channels. Please have your model number (W1-301) and purchase details ready when contacting support.