1. Introduction
The Sensky BS010BW is a compact, dimmable Passive Infrared (PIR) motion sensor switch designed for DC 12V to 24V LED lighting applications. It detects human movement by sensing infrared radiation, providing automatic control for lights in various settings such as kitchen cabinets, wardrobes, and corridors. This manual provides detailed instructions for installation, operation, and maintenance of your device.

Image 1.1: Overview of the Sensky BS010BW Motion Sensor Switch features, including PIR motion sensing, time-delay adjustment, light level adjustment, day/night mode, and button design for easy setting.
2. Product Overview
Key Features:
- PIR Motion Activated: Detects human movement via infrared rays to automatically control lighting.
- Easy to Operate: Features push-button adjustments for light intensity, delay time, and light sensor settings, eliminating the need for tools like screwdrivers.
- Dimmable Settings: Adjustable light intensity from 15% to 100% (default 100%).
- Adjustable Delay Time: Configurable delay times from 15 seconds to 30 minutes (default 15s).
- Light Sensor Control: Offers ON/OFF modes. In ON mode, the sensor activates only when ambient brightness is ≤ 35 Lux and motion is detected. In OFF mode, it activates whenever motion is detected, regardless of ambient light.
- Wide Application: Suitable for 12V/24V DC constant voltage LED lights and LED strips.
Components:
The device consists of a compact sensor unit with integrated control buttons and connecting cables for power input and LED output.
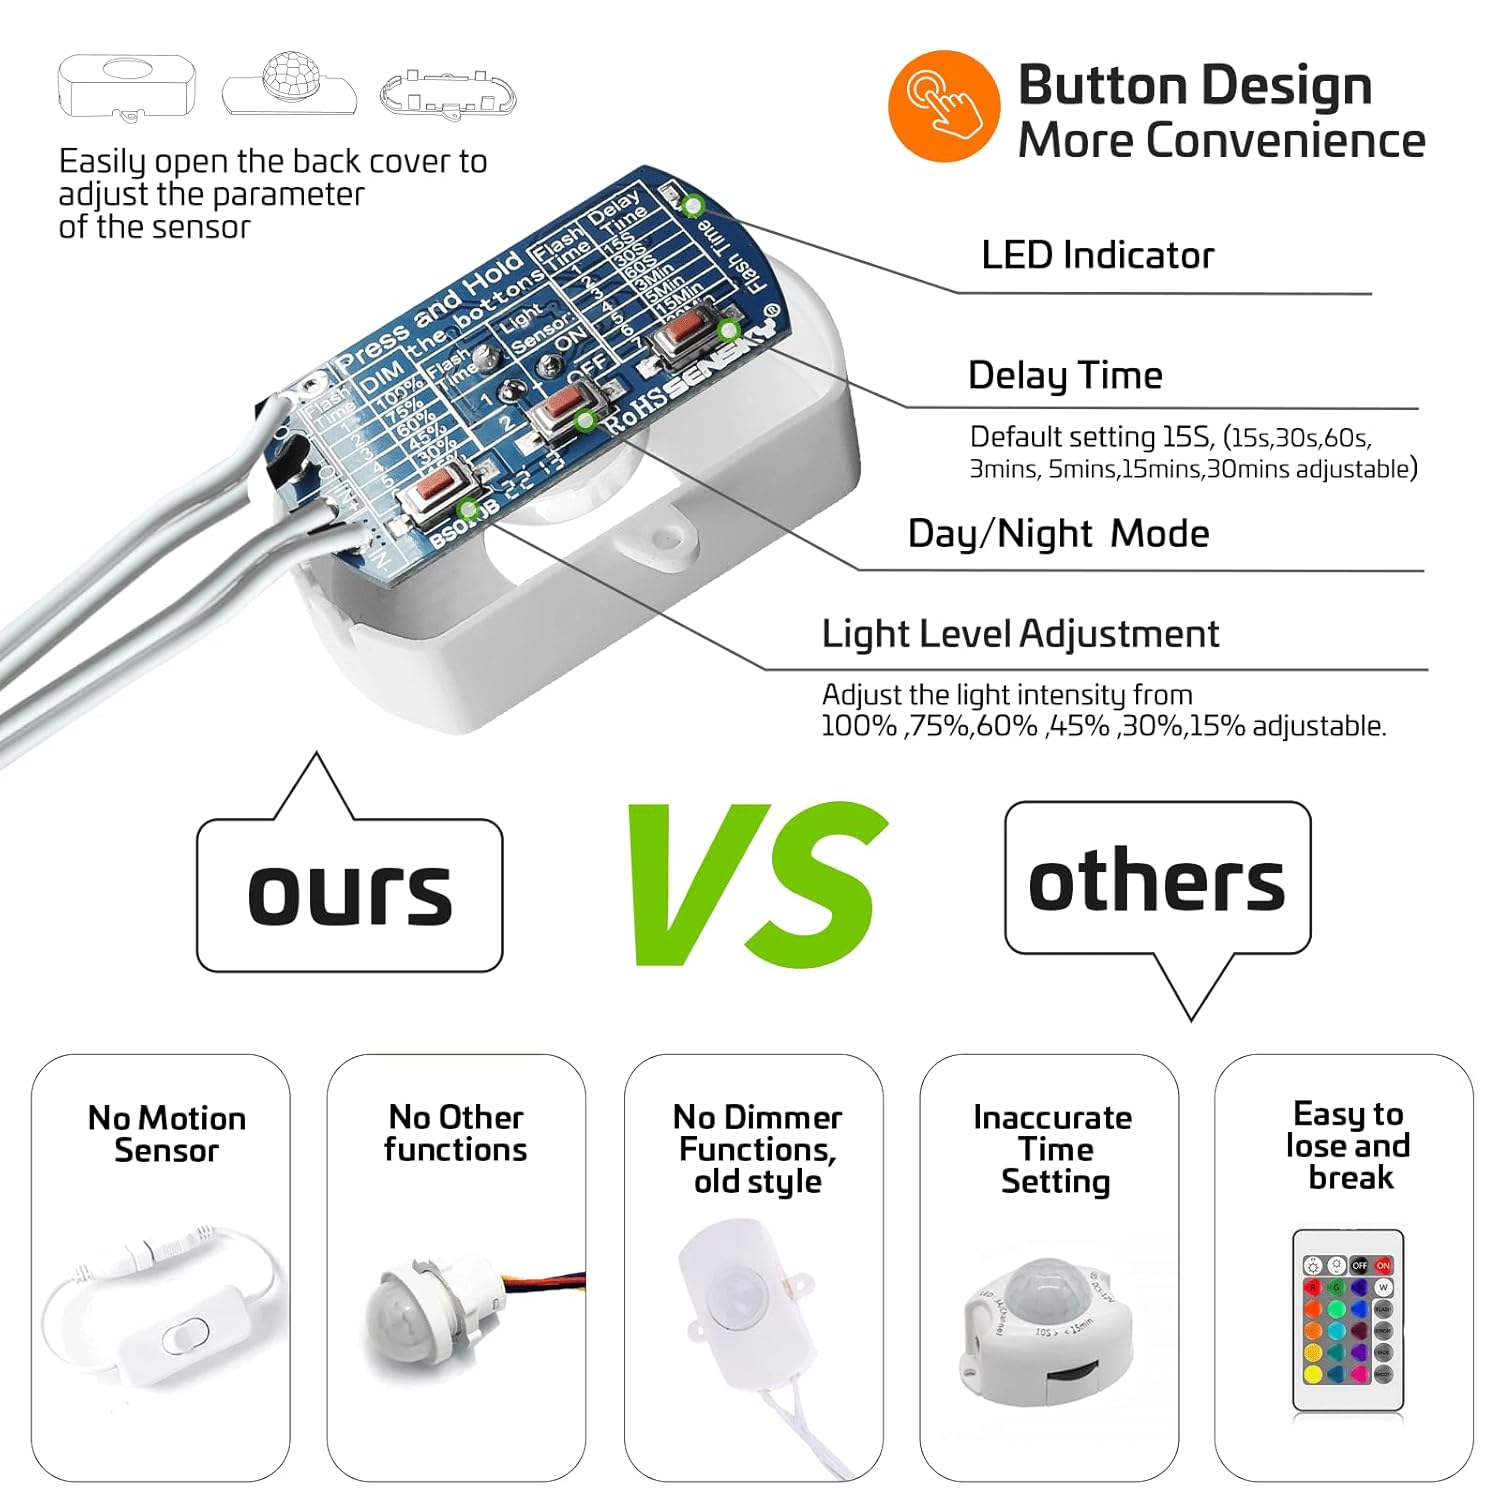
Image 2.1: Detailed view of the internal circuit board showing the DIM, Light Sensor, and Delay Time buttons, along with a diagram explaining their functions and flash indicators.
3. Setup and Installation
Before installation, ensure the power supply is disconnected. This device is designed for DC 12V-24V systems. Connect the sensor between your DC power supply and the LED lighting.
Wiring Diagram:
- Connect the input cable (typically with a male DC connector) to your 12V/24V DC power adapter.
- Connect the output cable (typically with a female DC connector) to your LED light strip or fixture.
- Ensure all connections are secure to prevent short circuits.
Placement Considerations:
- Mount the sensor in a location where it has an unobstructed view of the area where motion is expected.
- Avoid placing the sensor near direct sunlight, strong winds, heaters, or air conditioners, as these can interfere with its performance.
- Do not fix it at a place where there are obstructing materials (e.g., glass, dense clothes) which infrared cannot penetrate.
- Ensure the sensor is not in a strong shock or vibration environment.

Image 3.1: Examples of typical installation locations for the motion sensor switch, including wardrobes, corridors, and stairs, demonstrating its versatility.
4. Operating Instructions
The Sensky BS010BW features three internal buttons for adjustment: DIM (light intensity), Light Sensor, and Delay Time. To access these buttons, gently open the back cover of the sensor unit.
Adjusting Light Intensity (DIM):
- Press and hold the DIM button.
- The indicator light will flash 1 to 6 times, corresponding to different brightness levels:
- 1 flash: 100% brightness
- 2 flashes: 75% brightness
- 3 flashes: 60% brightness
- 4 flashes: 45% brightness
- 5 flashes: 30% brightness
- 6 flashes: 15% brightness
- Release the button when the desired brightness level is indicated.

Image 4.1: Visual representation of light level adjustment in a kitchen setting, showing the difference between 100% and 45% brightness.
Adjusting Delay Time:
- Press and hold the Delay Time button.
- The indicator light will flash 1 to 7 times, corresponding to different delay durations:
- 1 flash: 15 seconds
- 2 flashes: 30 seconds
- 3 flashes: 60 seconds
- 4 flashes: 3 minutes
- 5 flashes: 5 minutes
- 6 flashes: 15 minutes
- 7 flashes: 30 minutes
- Release the button when the desired delay time is indicated.
Adjusting Light Sensor Mode:
- Press and hold the Light Sensor button.
- The indicator light will flash:
- 1 flash: Light Sensor ON mode (activates only when ambient brightness ≤ 35 Lux and motion is detected).
- 2 flashes: Light Sensor OFF mode (activates whenever motion is detected, regardless of ambient light).
- Release the button when the desired mode is indicated.

Image 4.2: Illustration of the light sensor's ON and OFF modes, showing how it responds to ambient light conditions and motion.
How the Motion Sensor Works:
The PIR sensor detects motion within a range of 5-7 meters (16.4 feet) and a 110-degree angle. When motion is detected, the lights turn on automatically. After the set delay time expires and no further motion is detected, the lights will turn off.

Image 4.3: Visual explanation of the motion sensor's operation, including detection range and automatic light activation/deactivation.
Video Guide: Adjusting Settings
Video 4.1: Official video demonstrating how to adjust the dimming, light sensor, and delay time settings for the Sensky BS010BW motion sensor switch.
5. Maintenance
The Sensky BS010BW motion sensor switch requires minimal maintenance. Keep the sensor lens clean and free from dust or obstructions to ensure optimal performance. Use a soft, dry cloth for cleaning. Do not use abrasive cleaners or solvents.
6. Troubleshooting
- Lights not turning on:
- Check power connections to ensure they are secure.
- Verify the light sensor mode. If in ON mode, ensure ambient light is below 35 Lux.
- Ensure the sensor has an unobstructed view of the detection area.
- Allow for a 'warm-up' time (approximately 10 seconds to 1 minute) after power-up for the sensor to stabilize.
- Lights staying on too long or not turning off:
- Check the delay time setting and adjust if necessary.
- Ensure there is no continuous motion within the sensor's detection range.
- Verify the sensor is not exposed to factors like direct sunlight, heat sources, or strong air currents that might trigger it.
- Inconsistent detection:
- Relocate the sensor to a position with a clearer line of sight.
- Ensure the sensor is not in an environment with strong shock or vibration.
7. Specifications
| Model Number | BS010BW |
| Brand | Sensky |
| Power Source | DC 12V to 24V |
| Max Current | 3A |
| Motion Sensor Size | 48.0 x 14.0 x 25.0 mm |
| Cable Length | 300 mm |
| Connector Size | 5.5mm x 2.1mm |
| Item Weight | 0.03 Kilograms (approx. 1.13 ounces) |
| Mounting Type | Wall Mount |
| Color | White |

Image 7.1: Diagram illustrating the physical dimensions of the Sensky BS010BW motion sensor switch.
8. Warranty and Support
For any questions, technical support, or warranty inquiries regarding your Sensky BS010BW motion sensor switch, please contact the manufacturer directly. Refer to the product packaging or the official Sensky website for contact information.