MTS01A
MTS01A Table Saw User Manual
Model: MTS01A
Brand: Generic
1. Safety Instructions
Always observe basic safety precautions when using electrical tools to reduce the risk of fire, electric shock, and personal injury. Read all instructions carefully before operating this table saw.
- Eye Protection: Always wear safety goggles or safety glasses with side shields.
- Hearing Protection: Use ear protection during operation to prevent hearing damage.
- Respiratory Protection: Wear a dust mask, especially when cutting materials that produce fine dust.
- Work Area: Keep the work area clean and well-lit. Cluttered or dark areas invite accidents.
- Electrical Safety: Ensure the power supply matches the tool's requirements. Do not expose power tools to rain or wet conditions.
- Blade Guard: Always ensure the blade guard is in place and functioning correctly before operation.
- Push Stick: Use the provided push stick for feeding small workpieces or when your hands are close to the blade. Never use your hands to push material directly into the blade.
- Stability: Ensure the table saw is stable and securely placed on a level surface before use.
- Unplug: Disconnect the plug from the power source before making any adjustments, changing accessories, or storing the tool.
- Material: Only cut materials suitable for a table saw. Do not attempt to cut metal or masonry.
2. Product Overview
The MTS01A Table Saw is a powerful and versatile tool designed for precise cutting of various wood materials. It features a robust 2000W motor, an extendable aluminum table, and adjustable cutting angles.
2.1 Key Features
- Powerful Motor: Equipped with a 2000W pure copper motor, providing 4800 RPM for high cutting capacity.
- Extendable Table: Die-cast aluminum table extends from 64.3 cm x 72 cm to 64.3 cm x 92 cm, accommodating larger workpieces.
- Bevel Cutting: Offers inclined cuts from -45° to +45° for versatile applications.
- Adjustable Cutting Depth: Cutting depth ranges from 50 mm at 45° to 72 mm at 90°.
- Dust Collection Port: Features a connector for attaching a vacuum cleaner, improving visibility and maintaining a clean workspace.
- Safety Push Rod: Included to prevent hand contact with the blade during operation.
- Parallel Guide: Ensures uniform and precise cuts.
- Blade: Comes with a 254mm (24T) blade, compatible with other standard blades.
2.2 Labeled Diagram

This diagram illustrates the primary components of the MTS01A Table Saw, including the protection guard, on-board storage, power switch, lock button, angle guide, cutting height adjustment, table extension button, and chassis mounting points. Understanding these parts is crucial for safe and effective operation.
3. Package Contents
Carefully unpack all items and ensure all components are present and undamaged. If any items are missing or damaged, contact customer support immediately.
- 1 x MTS01A 2000W Table Saw Unit
- 1 x Small External Hex Wrench (Opposite Side 6)
- 1 x Large External Hex Wrench (Opposite Side 6)
- 1 x Square Assembly
- 1 x Bar Set
- 1 x Push Rod
- 1 x Blade Protector
- 1 x User Manual

This image displays the main table saw unit along with all the accessories and tools provided for assembly and operation, including the wrenches, push rod, and other essential parts.
4. Setup and Assembly
Follow these steps to assemble and prepare your table saw for operation.
4.1 Assembling the Stand
- Attach the legs to the main table unit using the provided bolts and nuts. Ensure all connections are tight and secure.
- Verify the stand is stable and level on your workspace.
4.2 Installing the Saw Blade
- Ensure the saw is unplugged from the power source.
- Remove the blade guard.
- Use the provided wrenches to loosen the arbor nut.
- Carefully place the 254mm saw blade onto the arbor, ensuring the teeth are oriented correctly for cutting (pointing towards the front of the saw).
- Tighten the arbor nut securely with the wrenches.
- Reinstall the blade guard, ensuring it moves freely and covers the blade properly.
4.3 Attaching Accessories
- Parallel Guide: Slide the parallel guide onto the rails on either side of the table. Secure it using the lock button. Ensure it slides smoothly and locks firmly.
- Miter Gauge: Insert the miter gauge into the T-slot on the table.
- Dust Collection: Connect a vacuum cleaner hose to the dust collection port located at the rear of the saw.
5. Operating Instructions
Familiarize yourself with the controls and functions before beginning any cutting operation.
5.1 Powering On/Off
- To turn the saw ON, press the green "ON" button.
- To turn the saw OFF, press the red "OFF" button.
- Always allow the blade to reach full speed before beginning a cut.
5.2 Adjusting Cutting Height
The cutting height can be adjusted to suit the thickness of your workpiece.
- Rotate the handwheel on the front of the saw to raise or lower the blade.
- For straight cuts (90°), the maximum cutting depth is 72 mm.
- For bevel cuts (45°), the maximum cutting depth is 50 mm.

This image illustrates the saw set up for a straight cut, showing the blade at a 90-degree angle to the table, capable of cutting material up to 72mm thick.

This image shows the saw configured for a bevel cut, with the blade tilted to a 45-degree angle, allowing for cuts up to 50mm thick.
5.3 Adjusting Bevel Angle
The blade can be tilted for bevel cuts from -45° to +45°.
- Loosen the bevel locking knob.
- Adjust the blade angle using the angle guide and scale.
- Tighten the bevel locking knob to secure the angle.

This image highlights the miter gauge and the mechanism for adjusting the blade's bevel angle, enabling precise cuts between -45 and +45 degrees.
5.4 Using the Parallel Guide
The parallel guide ensures straight and consistent rip cuts.
- Position the parallel guide to the desired width using the scale on the table.
- Lock the guide firmly in place using the locking mechanism.
- Feed the workpiece against the guide for a straight cut.

This image demonstrates the use of the parallel guide, which is essential for achieving accurate and consistent rip cuts by keeping the workpiece aligned with the blade.
5.5 Using the Push Rod
Always use the push rod when cutting small pieces or when your hands are close to the blade to maintain safety.
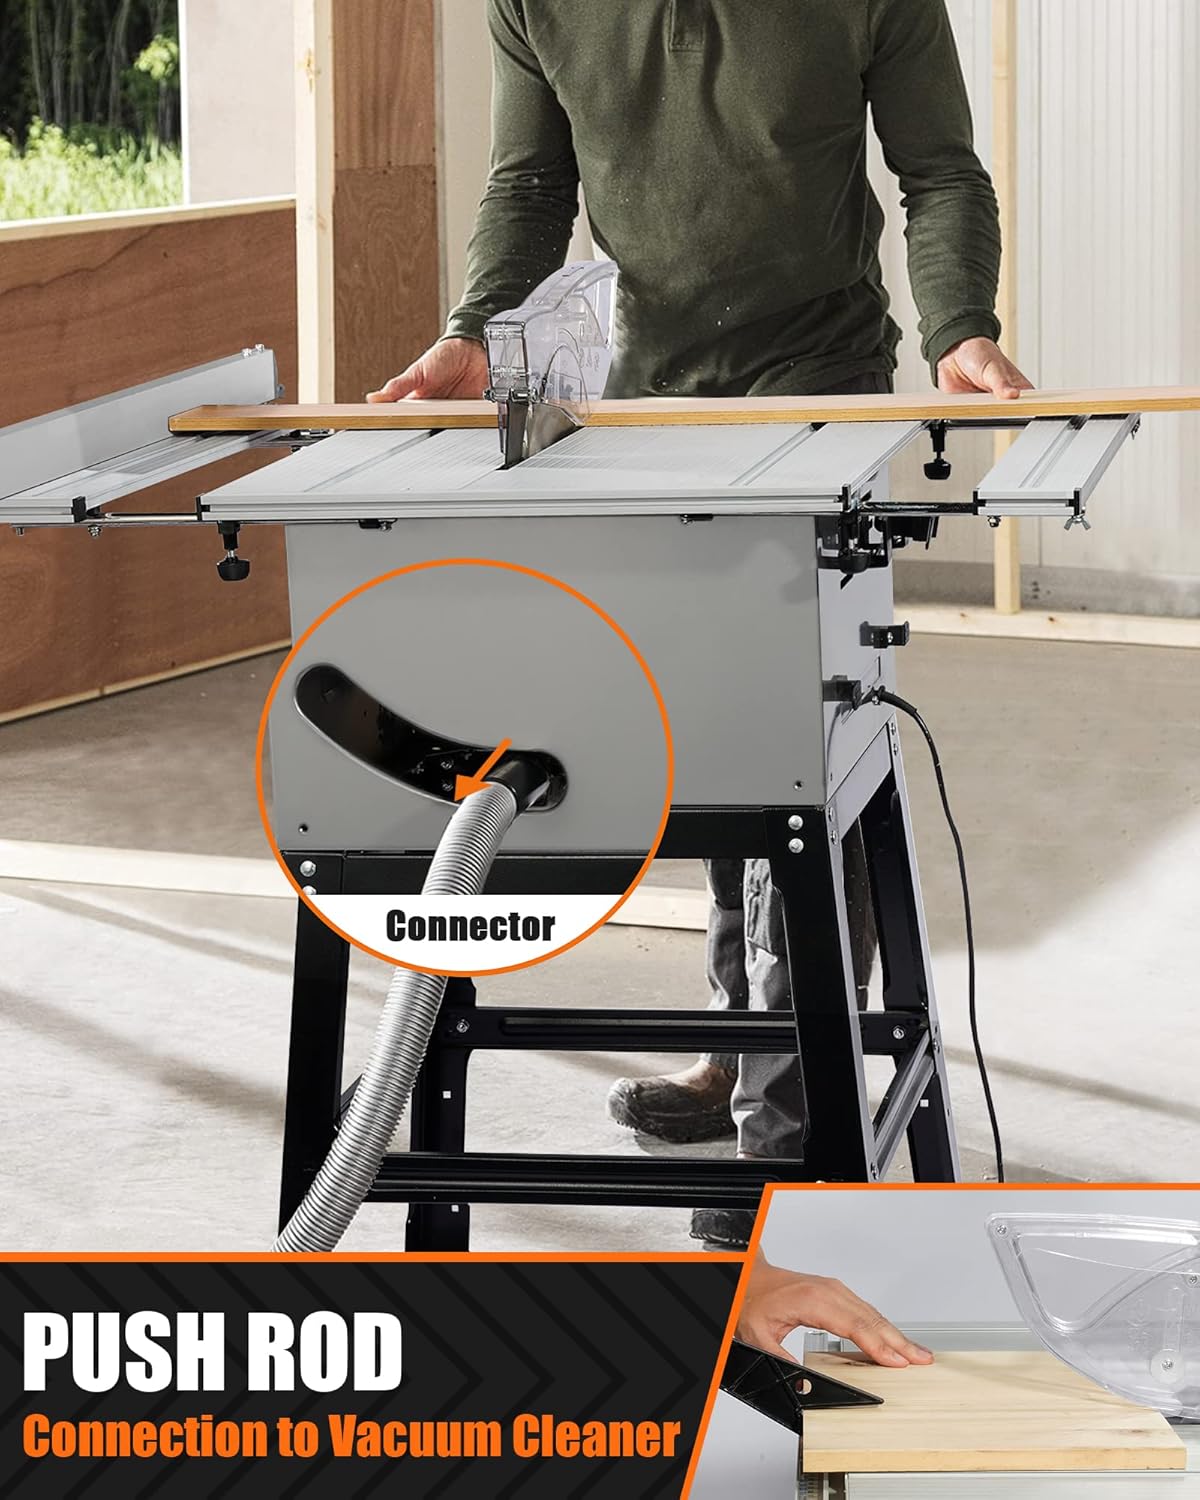
This image illustrates the push rod, a critical safety accessory used to feed material through the saw without placing hands near the blade. It also shows the dust collection port for connecting a vacuum cleaner.
5.6 Dust Collection
Connect a shop vacuum to the dust collection port to minimize sawdust and maintain a clear view of your workpiece.
6. Maintenance
Regular maintenance ensures the longevity and safe operation of your table saw.
- Cleaning: After each use, unplug the saw and clean off sawdust and debris from the table, blade guard, and motor vents. Use a brush or compressed air.
- Blade Inspection: Regularly inspect the saw blade for sharpness, damage, or missing teeth. Replace dull or damaged blades promptly.
- Blade Replacement: Follow the blade installation steps (Section 4.2) in reverse to remove the old blade, and then install a new one.
- Lubrication: Periodically lubricate moving parts such as the height adjustment mechanism and bevel adjustment with a suitable lubricant.
- Power Cord: Check the power cord for any signs of damage. Do not use the saw if the cord is frayed or damaged.
7. Troubleshooting
This section addresses common issues you might encounter with your table saw.
| Problem | Possible Cause | Solution |
|---|---|---|
| Saw does not start. | No power supply; ON/OFF switch faulty; motor overload. | Check power connection; inspect switch; allow motor to cool down. |
| Blade not cutting smoothly or burning wood. | Dull or dirty blade; incorrect blade for material; feeding too fast. | Replace or clean blade; use appropriate blade; reduce feeding speed. |
| Excessive vibration. | Loose blade; unstable saw stand; damaged blade. | Tighten blade arbor nut; ensure stand is stable; replace damaged blade. |
| Dust collection ineffective. | Dust port clogged; vacuum cleaner not connected or insufficient power. | Clear dust port; ensure vacuum is properly connected and powered. |
8. Specifications
Detailed technical specifications for the MTS01A Table Saw.
| Feature | Specification |
|---|---|
| Model Number | MTS01A |
| Power Input | 2000 W |
| No-Load Speed | 4800 RPM |
| Voltage | 230 Volts |
| Blade Diameter | 254 mm (10 inches) |
| Blade Bore | 30 mm |
| Max. Cutting Depth at 90° | 72 mm |
| Max. Cutting Depth at 45° | 50 mm |
| Bevel Angle Range | 0° to 45° |
| Table Dimensions (Extended) | 64.3 cm x 92 cm |
| Product Dimensions | 72.9 x 60 x 36.2 cm (approx. assembled) |
| Weight | 24 Kg |
| Power Source | Corded Electric |
| Cord Length | 2 Meters |
9. Warranty and Support
This product comes with a standard manufacturer's warranty against defects in materials and workmanship. For warranty claims, technical support, or replacement parts, please contact your retailer or the manufacturer's customer service department.
Please retain your proof of purchase for warranty purposes.
Ask a question about this manual
Ask about setup, troubleshooting, compatibility, parts, safety, or missing instructions. Manuals+ will review the question and use this page’s manual context to help answer it.