1. Introduction
Thank you for choosing the OFFTV Fingerprint Smart Door Lock. This advanced keyless entry system offers multiple unlocking methods including fingerprint, passcode, and mechanical key, providing enhanced security and convenience for your home, office, hotel, or apartment. This manual provides detailed instructions for installation, operation, and maintenance to ensure optimal performance and longevity of your smart door lock.

Figure 1: OFFTV Fingerprint Smart Door Lock Overview
2. Product Features
- Large Area Fingerprint Sensor: Features an upgraded 160x160 resolution sensor, 35% larger than ordinary 120x120 sensors, ensuring accurate and stable recognition in just 1 second.
- Multiple Unlocking Modes: Supports fingerprint (up to 100), anti-privacy virtual password (up to 50 sets), and mechanical key for versatile access.
- Easy Installation: Designed to fit standard US doors with 2-3/8" (60mm) and 2-1/8" (70mm) back panels, and door thickness from 1-1/8" to 2-1/8" (30mm-55mm). No wiring or drilling required. Suitable for both left and right-handed doors.
- Emergency Charging: Operates on 4 AAA batteries (not included) with a low battery alarm function. Includes a USB port for emergency charging if batteries deplete.
- Anti-Privacy Virtual Password: Allows entry of random numbers before or after the correct password to prevent snooping.
- Automatic/Manual Locking: Offers flexible locking options, including an auto-lock feature after 5 seconds.
- Silent Mode: The keypad can be set to silent mode for quiet operation.
- Anti-Theft Locking: The system automatically locks for 3 minutes if an incorrect fingerprint or password is entered 8 times consecutively.

Figure 2: Key Features of the Smart Door Knob
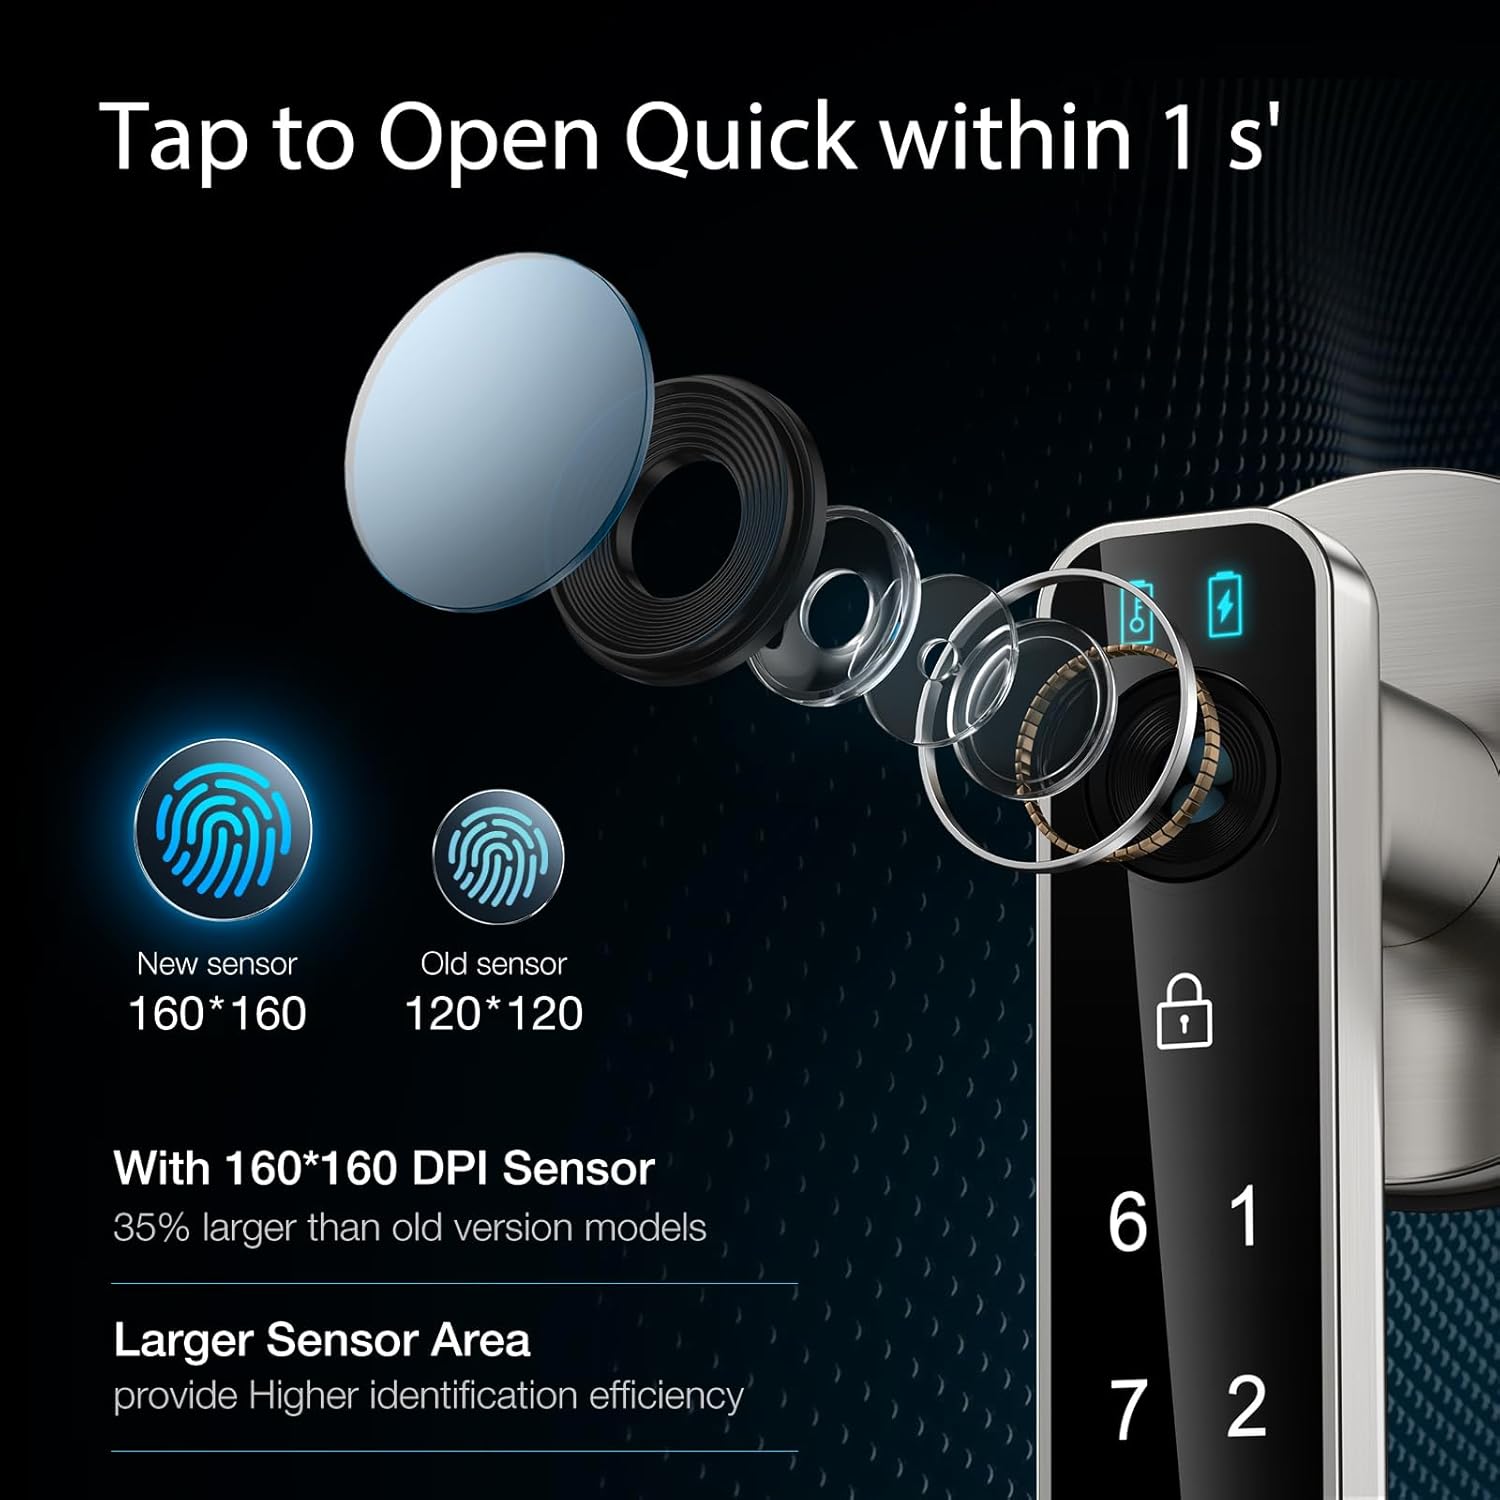
Figure 3: Enhanced Fingerprint Sensor (160x160 DPI)
3. Components and What's in the Box
The OFFTV Fingerprint Smart Door Lock package includes the following components:
- Fingerprint combination lock (Front and Rear Handles)
- Instruction Manual
- Spare Keys (2)
- Adjustable Latch
- Mounting Screws and Accessories
4. Setup and Installation
Follow these steps for proper installation of your smart door lock. Ensure your door meets the specified dimensions (thickness from 1-1/8" to 2-1/8" (30mm-55mm), back panels 2-3/8" (60mm) or 2-1/8" (70mm)).
- Prepare the Door: Ensure the existing door hardware is removed and the door is clean.
- Install the Latch: Insert the adjustable latch into the door edge and secure it with screws. Ensure the latch is oriented correctly for your door's swing.
- Connect Handles: Thread the power cord from the front handle through the latch mechanism and connect it to the rear handle's circuit board. Carefully align the square bar.
- Secure Handles: Fasten the front and rear handles together using the provided locking screws.
- Install Batteries: Open the battery cover on the rear handle and insert 4 AAA batteries (not included), ensuring correct polarity. Close the battery cover.

Figure 4: Door Compatibility and Latch Installation

Figure 5: Rear Handle Battery Compartment
Installation Video Tutorial:
Video 1: Fingerprint Lock Installation Tutorial. This video demonstrates the step-by-step process of installing the smart door lock, including preparing the door, installing the latch, connecting the handles, and inserting batteries.
5. Operating Instructions
5.1. Initial Setup and Administrator Registration
- Register First Fingerprint/Passcode (Administrator):
- Press the '1' key on the keypad.
- Press the setting button (located on the rear handle or side). The blue light will flash.
- For fingerprint: Place your finger on the sensor 4 times until a long beep is heard and the green light is on.
- For passcode: Enter a 6-8 digit password, press the set key, re-enter the password, and press the set key again. A long beep and green light indicate success.
The first registered fingerprint or passcode will automatically be set as the administrator.
5.2. Adding User Fingerprints/Passcodes
- Add Fingerprint:
- Press the '1' key.
- Verify with an existing administrator fingerprint or passcode.
- Place the new user's finger on the sensor 4 times until a long beep is heard.
- Add Passcode:
- Press the '1' key.
- Verify with an existing administrator fingerprint or passcode.
- Enter a new 6-8 digit password, press the set key, re-enter the password, and press the set key again.
5.3. Deleting User Fingerprints/Passcodes
- Delete All User Data:
- Press '666' on the keypad.
- Press the set key. The red light will flash.
- Verify with the administrator's fingerprint. The green light will be on, and two beeps will confirm deletion.
Note: This will delete ALL user fingerprints and passcodes, but not the administrator data.
5.4. Unlocking the Door
- Fingerprint Unlock: Place your registered finger on the sensor. The green light will illuminate, and the lock will unlock.
- Passcode Unlock: Enter your registered 6-8 digit passcode on the keypad. The green light will illuminate, and the lock will unlock.
- Mechanical Key Unlock: Insert the mechanical key into the hidden keyhole (located at the bottom of the handle) and turn to unlock.

Figure 6: Fingerprint Unlocking
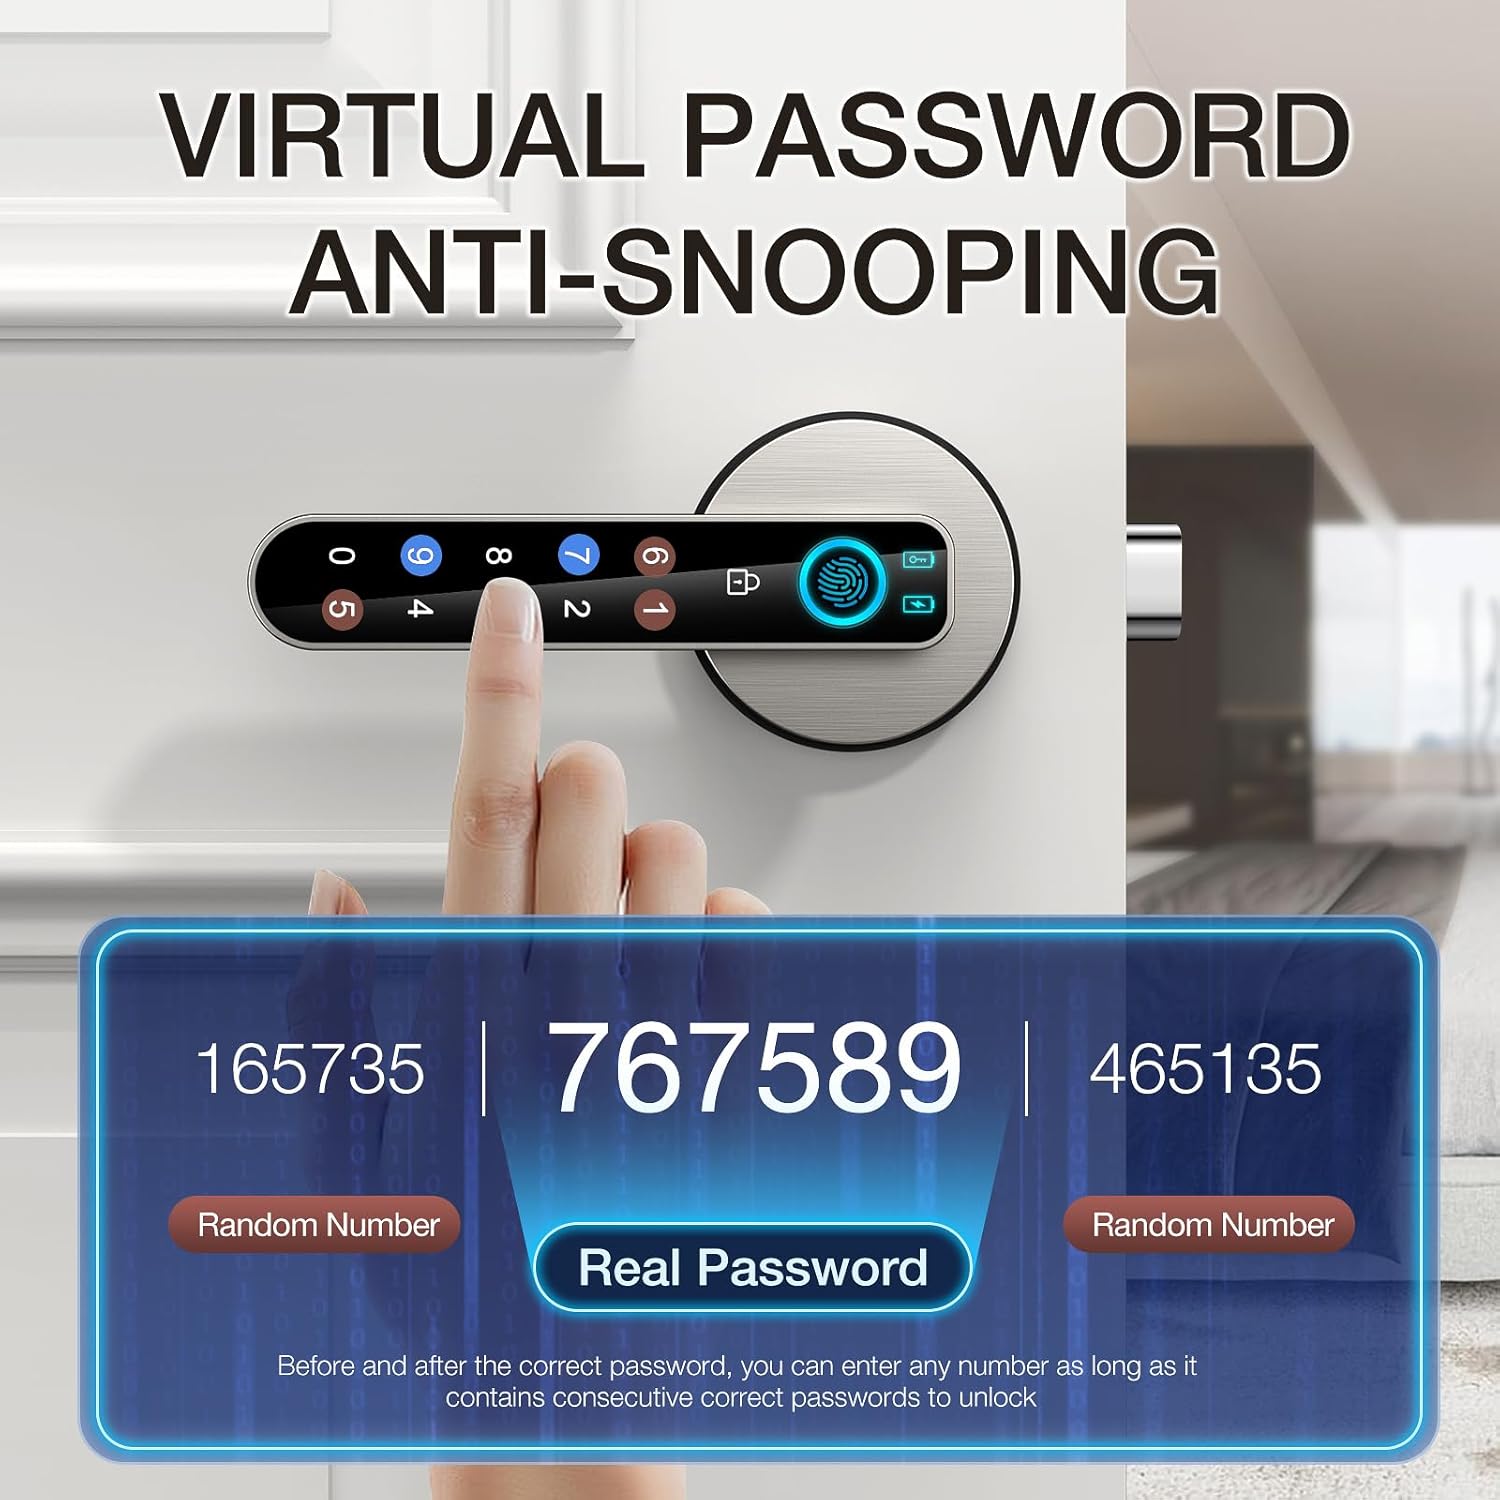
Figure 7: Virtual Password Anti-Snooping Feature
5.5. Advanced Modes
- Passage Mode:
- Press '555' on the keypad.
- Press the set key. The purple light will flash.
- Verify with the administrator's fingerprint. The green light will be on with a "beep" sound. The lock will remain unlocked for frequent access.

Figure 8: Passage Mode for Convenient Access
- Silent Mode:
- Press '333' on the keypad.
- Press the set key. The purple light will flash.
- Verify with the administrator's fingerprint. The green light will be on with a "beep" sound. This toggles the silent mode on/off.

Figure 9: Silent Mode for Discreet Use
- Automatic Locking: The lock will automatically engage after 5 seconds of being unlocked.
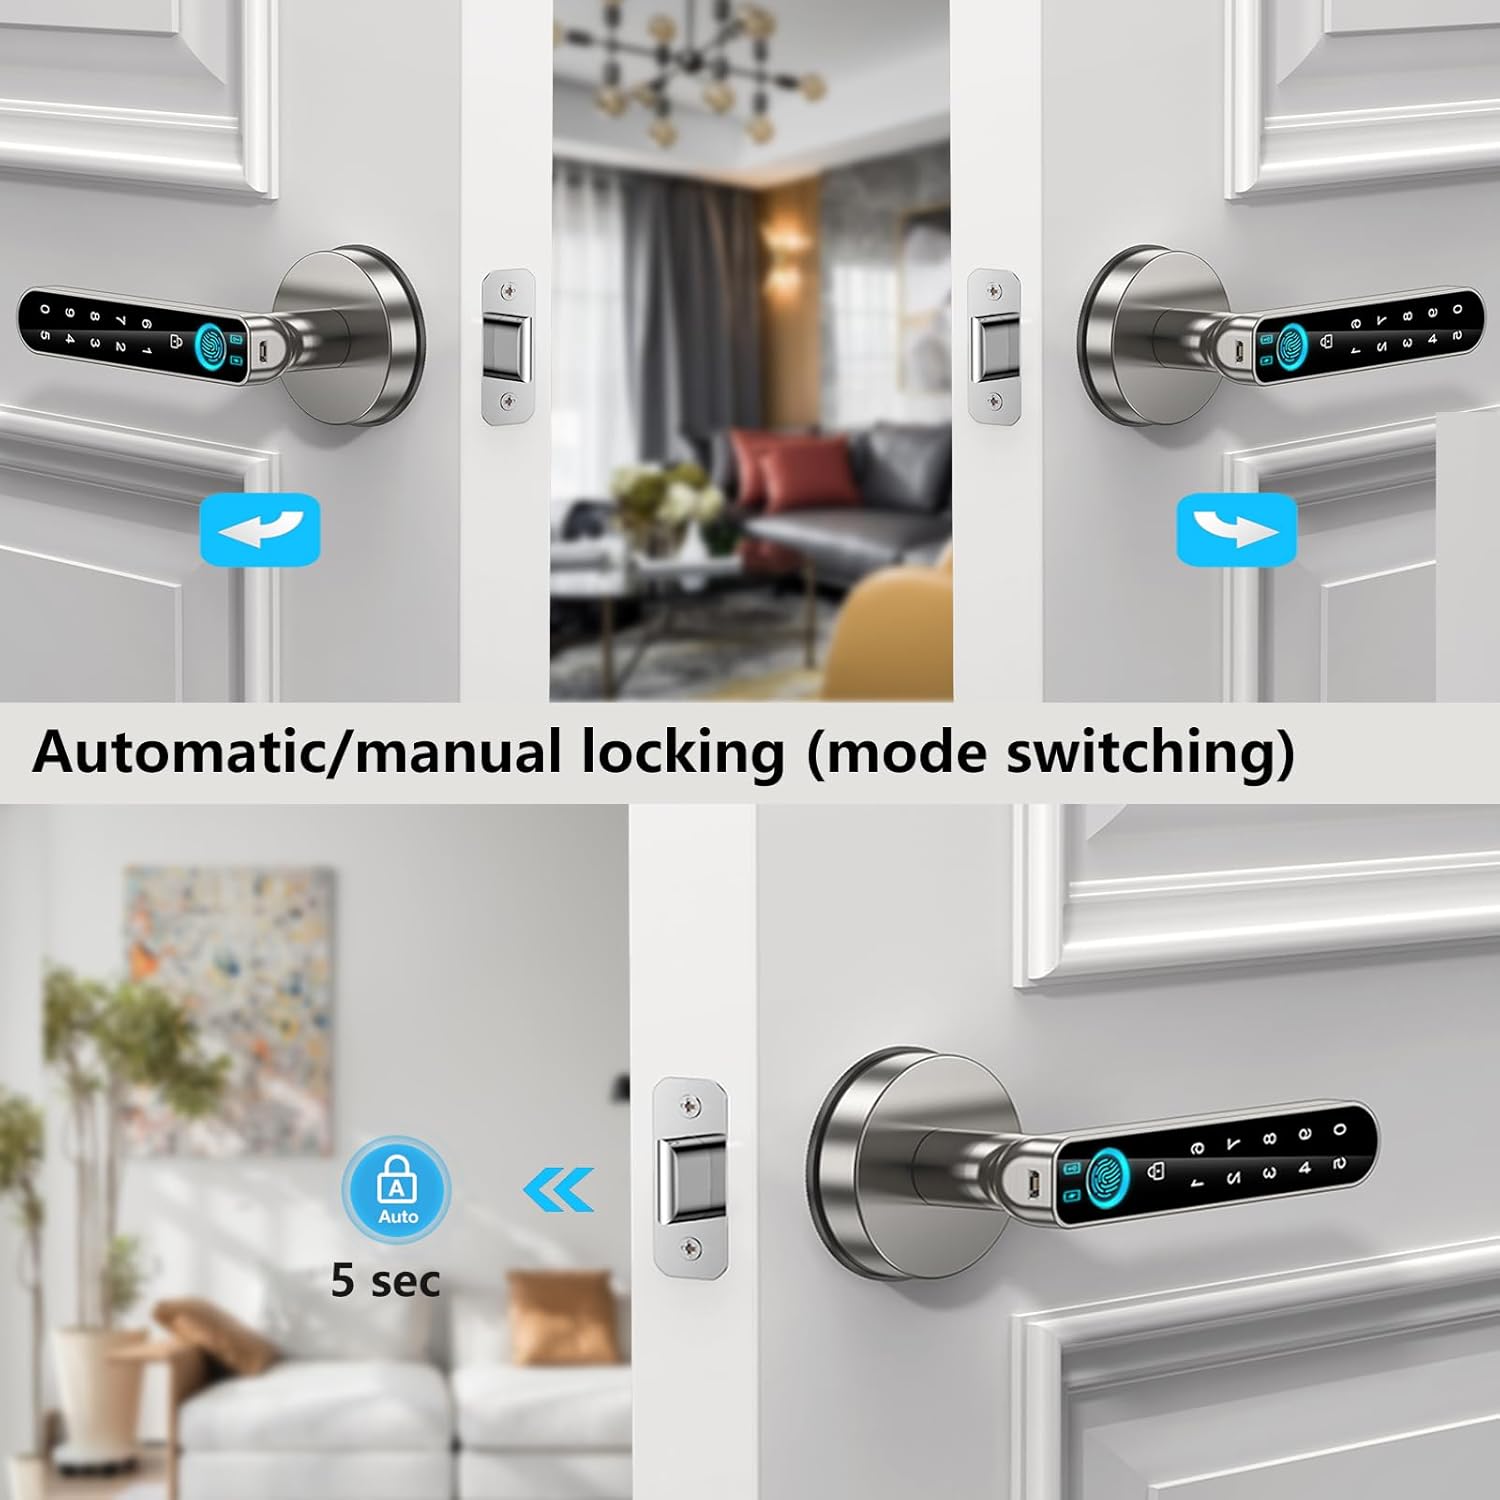
Figure 10: Automatic Locking for Added Security
Operation Video Tutorials:
Video 2: Fingerprint Lock Setting User Tutorial. This video guides you through setting up user fingerprints and passcodes.
Video 3: Fingerprint Door Lock Overview. This video provides a general overview of the lock's functions and features.
6. Maintenance
- Battery Replacement: The lock requires 4 AAA batteries. Replace them when the low battery alarm sounds.
- Emergency Power: If the batteries die completely, use a power bank connected to the USB port on the handle for emergency power to unlock the door.
- Cleaning: Use a soft, dry cloth to clean the lock surface. Avoid abrasive cleaners or solvents.
- Fingerprint Sensor Care: Keep the fingerprint sensor clean and dry for optimal performance.

Figure 11: Emergency Charging Option
7. Troubleshooting
- Lock not responding: Check battery levels and replace if necessary. Use the emergency USB power or mechanical key.
- Fingerprint not recognized: Ensure your finger is clean and dry. Try re-registering your fingerprint if the issue persists. Ensure the sensor is clean.
- Passcode not working: Double-check the entered passcode. Ensure the keypad is clean and responsive.
- Lock beeps continuously: This may indicate low battery. Replace batteries immediately.
- Lock automatically locks after incorrect attempts: This is an anti-theft feature. Wait for 3 minutes for the lock to reset before trying again.
8. Specifications
| Feature | Detail |
|---|---|
| Brand | OFFTV |
| Model Number | 709690842210 |
| Lock Type | Biometric |
| Special Feature | Fingerprint |
| Material | Zinc |
| Color | Silver |
| Item Dimensions (L x W x H) | 6.5 x 2.8 x 2.4 inches |
| Item Weight | 16 ounces (1 pound) |
| Power Source | 4 AAA batteries (not included) |
| Control Method | Touch |
| Connectivity Protocol | Bluetooth |
| Recommended Uses | Home, Office, Hotel, Apartment |
9. Warranty and Support
OFFTV is committed to providing high-quality products and excellent customer service. Your Fingerprint Smart Door Lock comes with:
- 30-Day Money-Back Guarantee: If you are not satisfied with your purchase.
- 12-Month Warranty: Covers manufacturing defects and malfunctions.
- Lifespan Technical Support: Our responsive customer service team is available to assist you with any questions or issues.
For support, please contact us directly. We aim to provide a response within 24 hours.