1. Introduction
This manual provides detailed instructions for the installation, operation, and maintenance of your Geloo Universal LCD Digital Motorcycle Tachometer Odometer, Model GJ010. Please read this manual thoroughly before installation and use to ensure proper function and safety.

Image 1.1: Geloo Universal LCD Digital Motorcycle Tachometer Odometer with included sensor and mounting hardware.
2. Safety Information
- Always disconnect the motorcycle battery before performing any electrical work.
- Ensure all wiring connections are secure and properly insulated to prevent short circuits.
- Mount the tachometer securely to avoid obstruction of view or control during operation.
- Consult a qualified motorcycle technician if you are unsure about any installation steps.
3. Package Contents
Verify that all items are present in the package:
- Geloo LCD Digital Motorcycle Tachometer Odometer Unit
- Speed Sensor
- Mounting Hardware (nuts, washers, clips)
- Wiring Harness

Image 3.1: Speed sensor and mounting hardware components.
4. Product Overview and Features
The Geloo Model GJ010 is a universal LCD digital instrument designed for motorcycles. It offers multiple functions and is built for durability.
Key Features:
- Universal Compatibility: Suitable for 1, 2, and 4-cylinder motorcycles.
- Speed Display: Range of 0 to 199 km/h (or mph), switchable.
- Odometer: Displays total distance from 0 to 9999 kilometers (or miles).
- Trip Meter: Displays trip distance up to 999.9 kilometers (or miles).
- Tachometer: RPM display range from 0 to 12,000 RPM.
- Gear Indicator: Supports 1 to 6 gears and Neutral (N) gear.
- Fuel Level Indicator: Displays current fuel tank level.
- Clock: Integrated time display.
- Backlight: LCD with backlight for clear visibility day and night.
- Waterproof: IP67 rated for robust performance in various weather conditions.

Image 4.1: Diagram highlighting key features of the tachometer.

Image 4.2: The tachometer's IP67 waterproof design, shown on a motorcycle in rainy conditions.
5. Setup and Installation
Installation requires basic electrical knowledge. If you are not confident, seek professional assistance.
5.1 Mounting the Unit
- Choose a suitable location on your motorcycle's handlebar or dashboard that does not obstruct your view or controls.
- Use the provided mounting hardware to securely attach the tachometer unit.

Image 5.1: Example of the tachometer installed on a motorcycle handlebar.
5.2 Wiring Connections
The tachometer comes with a wiring harness. Refer to the diagram below for typical connections. Wire colors may vary; always verify with your motorcycle's wiring diagram.
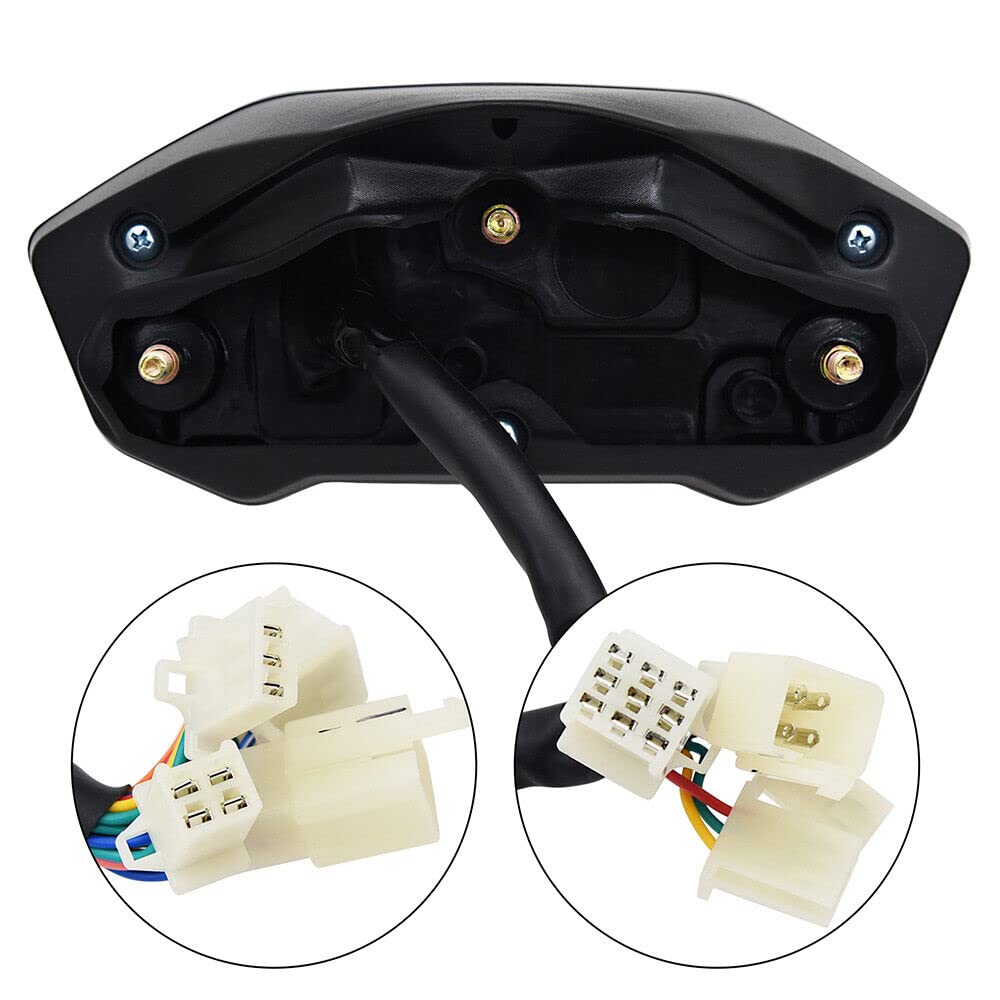
Image 5.2: Close-up view of the tachometer's wiring connectors.
- Power (Red): Connect to a switched 12V power source (e.g., ignition).
- Ground (Black): Connect to the motorcycle chassis ground.
- Ignition Signal (Yellow/Blue): Connect to the ignition coil signal wire for RPM reading.
- Speed Sensor (Green/White): Connect to the speed sensor.
- Neutral Gear (Light Green/Red): Connect to the neutral gear indicator wire.
- Gear 1-6 (Various Colors): Connect to respective gear indicator wires.
- Turn Signals (Light Blue/Orange): Connect to left and right turn signal wires.
- High Beam (Dark Blue): Connect to the high beam indicator wire.
- Fuel Level (Blue/White): Connect to the fuel level sensor wire.
Note: The RPM function is not compatible with electric fuel injection (EFI) engines. If your motorcycle has a full electronic fuel injection (EFI) engine, the RPM function will not operate correctly. Other functions will work as intended.
5.3 Speed Sensor Installation
- Mount the speed sensor near a rotating part of the wheel (e.g., brake disc bolts) using the provided hardware.
- Ensure the sensor is positioned to detect the rotation accurately.
- Route the sensor cable safely, away from moving parts and heat sources.
Image 5.3: The included speed sensor with its cable length indicated.
6. Operating Instructions
The tachometer features two buttons, typically labeled 'SEL' (Select) and 'SET' (Set), for navigation and configuration.
6.1 Power On
Once correctly wired, turn the motorcycle ignition key to the ON position. The display will illuminate and perform a self-check.
6.2 Switching Between km/h and mph
Press and hold the 'SEL' button for a few seconds to toggle the speed unit between kilometers per hour (km/h) and miles per hour (mph).
6.3 Trip Odometer Reset
While the trip odometer is displayed, press and hold the 'SET' button to reset the trip distance to zero.
6.4 Clock Adjustment
To adjust the clock, typically you will press and hold 'SEL' and 'SET' simultaneously to enter time setting mode. Use 'SEL' to change values and 'SET' to move to the next digit or exit.
6.5 Cylinder Setting
This unit supports 1, 2, and 4-cylinder engines. The cylinder setting is usually configured during initial setup or through a specific button combination. Refer to the quick start guide for your specific model for this procedure.
7. Maintenance
- Keep the display clean using a soft, damp cloth. Avoid abrasive cleaners.
- Regularly check all wiring connections for corrosion or looseness.
- Ensure the speed sensor is free from debris and properly aligned.
- The unit is IP67 waterproof, but avoid direct high-pressure water jets on the display.
8. Troubleshooting
8.1 RPM Function Not Working (EFI Engines)
As noted in the product features, the RPM function is not compatible with motorcycles equipped with full electronic fuel injection (EFI) engines. This is a design limitation, and other functions of the tachometer should operate correctly.
8.2 Incorrect Speed Reading
- Check the speed sensor for proper installation and alignment.
- Ensure the sensor cable is not damaged or pinched.
- Verify the wheel circumference setting (if adjustable on your model) is correct.
8.3 Display Not Illuminating
- Check the power and ground connections.
- Verify the motorcycle's battery has sufficient charge.
- Inspect the fuse for the instrument cluster circuit.
9. Specifications
| Specification | Value |
|---|---|
| Brand | Geloo |
| Model Number | GJ010 |
| Material | Plastic |
| Product Dimensions (L x W x H) | 21 x 14 x 11 cm |
| Item Weight | 580 grams |
| Speed Display Range | 0-199 km/h (or mph) |
| RPM Display Range | 0-12,000 RPM |
| Odometer Display Range | 0-9999 km (or miles) |
| Trip Distance Display Range | 0-999.9 km (or miles) |
| Cylinder Compatibility | 1, 2, 4 cylinders |
| Waterproof Rating | IP67 |
10. Warranty and Support
Specific warranty information is not provided in the product details. For warranty claims or technical support, please contact the seller or manufacturer directly through your purchase platform.