1. Introduction
This user manual provides comprehensive instructions for the installation, operation, and maintenance of your JUWEIAT AT4PW 100A Tuya WiFi Din Rail Smart Switch. This device is designed for monitoring and controlling electrical parameters such as voltage, current, power, energy consumption (kWh), frequency, and power factor. It features a 2.4-inch TFT HD color display and supports remote control via the Tuya/Smart Life mobile application, offering convenience and detailed energy management.
2. Safety Information
Please read and understand all safety instructions before installing or operating this device. Failure to follow these instructions may result in electric shock, fire, or serious injury.
- Electrical Hazard: Installation and wiring must be performed by a qualified electrician in accordance with all local and national electrical codes.
- Power Disconnection: Always disconnect power at the main circuit breaker before performing any installation, wiring, or maintenance.
- Voltage Compatibility: Ensure the operating voltage of your electrical system matches the specifications of this device (AC 110V/220V).
- Current Rating: Do not exceed the maximum current rating of 100 Amps. Overloading can cause damage to the device and pose a fire risk.
- Proper Grounding: Ensure proper grounding for safe operation.
- Indoor Use Only: This device is intended for indoor use in dry environments. Do not expose to moisture or extreme temperatures.
3. Product Overview
The AT4PW Smart Switch is a compact device designed for DIN rail mounting, featuring a clear 2.4-inch TFT HD color display for real-time monitoring of electrical parameters. It integrates WiFi connectivity for remote control and data logging via a mobile application.

Figure 3.1: Front view of the AT4PW Smart Switch, displaying real-time electrical parameters such as voltage (Vol), current (Cur), power (Pwr), energy (Ene), frequency (Fre), and power factor (Factor). The display also shows AQI, PM2.5, Humidity, and Air Temp readings, along with WiFi and Bluetooth indicators.

Figure 3.2: Detailed view of the AT4PW Smart Switch's display and control buttons. It highlights the Power Indicator, Bluetooth signal indicator, WiFi signal indicator, and the functions of the '+' and '-' buttons for ON/OFF control and navigating test windows. The 'M' button is used to set parameters and enter the background menu.
4. Features
- 2.4-inch TFT HD Color Display: Provides clear, real-time display of various electrical parameters.
- Multi-parameter Measurement: Monitors Voltage (V), Current (A), Power (W), Energy (kWh), Frequency (Hz), and Power Factor (PF).
- WiFi Connectivity: Enables remote control and monitoring via the Tuya/Smart Life mobile application.
- Scheduling Program: Set timers and schedules for automatic ON/OFF operations.
- Energy Monitor: Track historical energy consumption data.
- Protective Functions: Includes features for security and protection (e.g., over-voltage, under-voltage, over-current protection).
- Voice Control: Compatible with voice assistants (via Tuya app integration).
- Data Sharing: Share device control and data with multiple users.
- DIN Rail Mounting: Easy installation on standard 35mm DIN rails.
5. Specifications
| Parameter | Value |
|---|---|
| Model Number | AT4PW |
| Operating Voltage | AC 110V / 220V (as per product variant) |
| Current Rating | 100 Amps |
| Display Panel | 2.4 inches TFT-LCD HD Display (240x320 RGB Dot-matrix) |
| Operation Mode | ON-OFF-ON |
| Contact Type | Normally Open |
| Connector Type | Clamp |
| Terminal | Screw |
| Circuit Type | 1-way |
| Actuator Type | Push Button |
| Contact Material | Plastic |
| Mounting | 35mm DIN Rail |
| Manufacturer | ATORCH |
| Country of Origin | China |
6. Package Contents
Please check the package for the following items:
- 1 x JUWEIAT AT4PW Smart Switch
- 1 x User Manual (this document)
7. Setup and Installation
The AT4PW Smart Switch is designed for easy installation on a standard 35mm DIN rail. No screws are required for mounting the device to the rail itself.
7.1 Physical Installation
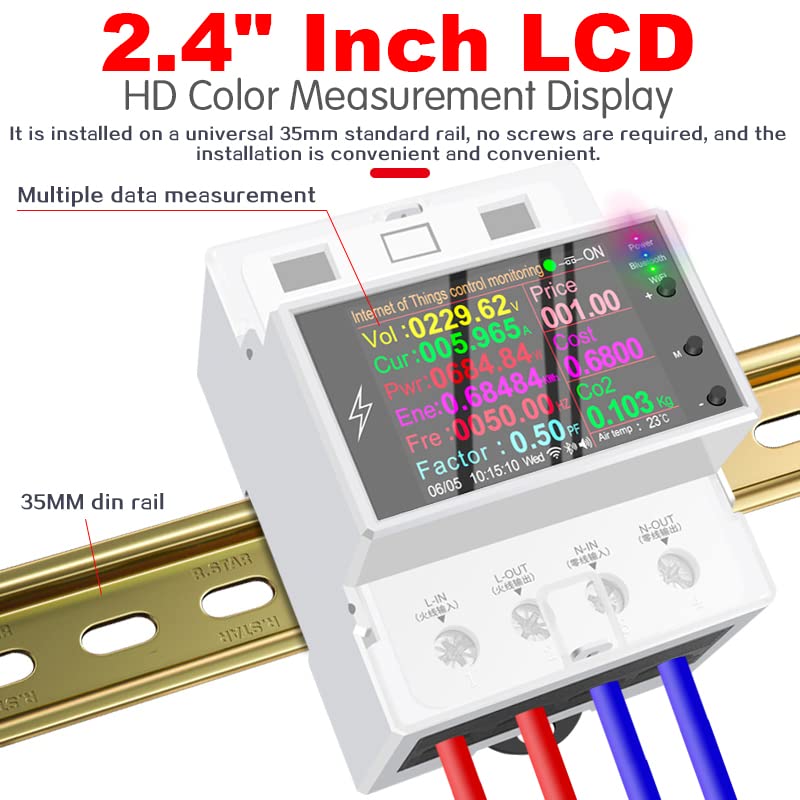
Figure 7.1: The AT4PW Smart Switch installed on a universal 35mm standard DIN rail. The image emphasizes the convenience of its screw-less installation.
- Ensure all power to the circuit is disconnected at the main breaker.
- Locate a suitable position on your 35mm DIN rail within your electrical panel.
- Align the clips on the back of the AT4PW Smart Switch with the DIN rail.
- Press firmly until the device clicks securely into place on the rail.
7.2 Wiring Diagram
Follow the wiring diagram carefully. Incorrect wiring can damage the device or pose a safety hazard.

Figure 7.2: Product wiring diagram illustrating the connections for the AT4PW Smart Switch. It shows the input (L-IN, N-IN) and output (L-OUT, N-OUT) terminals, indicating simple and easy installation.
- Connect the Live (L) input wire to the 'L-IN' terminal.
- Connect the Neutral (N) input wire to the 'N-IN' terminal.
- Connect the Live (L) output wire to the 'L-OUT' terminal.
- Connect the Neutral (N) output wire to the 'N-OUT' terminal.
- Ensure all screw terminals are tightened securely to prevent loose connections.
- Once wiring is complete, restore power to the circuit. The device display should light up.
8. Operating Instructions
8.1 Device Button Functions
The device features three buttons: '+', '-', and 'M'.
- '+' Button: Single click to turn the device ON or OFF. Long press to enter the next test window.
- '-' Button: Single click to turn the device ON or OFF. Long press to enter the next test window.
- 'M' Button: Short press to set parameters. Long press to enter the background menu.
8.2 Understanding the Display
The 2.4-inch color display provides real-time data. You can cycle through different display screens using the '+' or '-' buttons (long press).

Figure 8.1: Angled view of the AT4PW Smart Switch, showcasing its vibrant 2.4-inch LCD display. The screen presents multiple data points including voltage, current, power, energy consumption, frequency, power factor, price, CO2 emissions, and environmental metrics like air temperature.
Commonly displayed parameters include:
- Vol: Voltage (V)
- Cur: Current (A)
- Pwr: Real Power (W)
- Ene: Energy Consumption (kWh)
- Fre: Frequency (Hz)
- Factor: Power Factor (PF)
- AQI: Air Quality Index
- PM2.5: Particulate Matter 2.5 concentration (ug/m³)
- Humidity: Relative Humidity (%)
- Air Temp: Air Temperature (°C)
9. Mobile App Integration (Tuya/Smart Life)
The AT4PW Smart Switch can be controlled and monitored remotely using the Tuya Smart or Smart Life application, available for both Android and iOS devices.
9.1 App Download and Account Setup
- Download the "Smart Life" or "Tuya Smart" app from Google Play Store (Android) or Apple App Store (iOS).
- Register a new account or log in with an existing one.
9.2 Device Pairing
Before pairing, ensure your mobile phone is connected to a 2.4GHz WiFi network. The device's WiFi LED should be blinking, indicating it's in pairing mode.

Figure 9.1: Step-by-step guide for connecting the AT4PW Smart Switch to the mobile app. This includes adding the device, discovering devices, entering WiFi credentials, successful pairing confirmation, and accessing the device interface within the app.
- Power on the meter. The WiFi LED should blink rapidly. If not, long press the 'M' button to enter the background menu and find the WiFi pairing option.
- Open the "Smart Life" app.
- Tap "Add Device" or the '+' icon in the top right corner.
- The app may automatically discover the device. If not, manually select "Electrical" > "Smart Switch" or "Energy Meter".
- Confirm the WiFi LED is blinking rapidly.
- Enter your 2.4GHz WiFi network password.
- Wait for the device to connect. Once connected, the WiFi LED will become solid, and the device will appear in your app.
9.3 Remote Control and Monitoring
Once paired, you can control and monitor your AT4PW Smart Switch from anywhere with an internet connection.
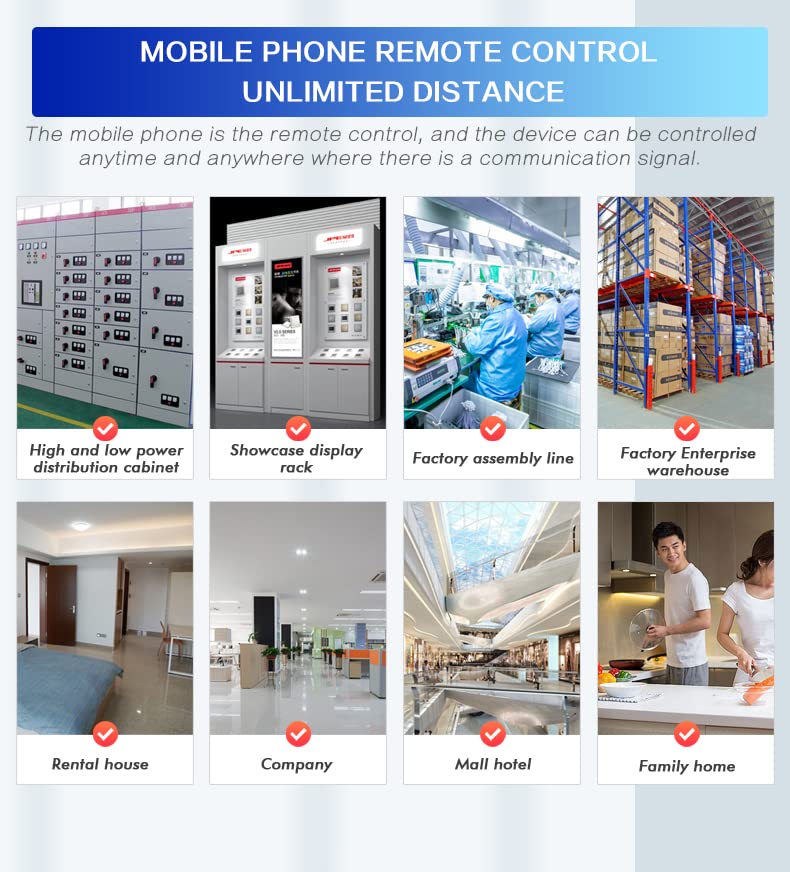
Figure 9.2: The AT4PW Smart Switch offers mobile phone remote control with unlimited distance, allowing control anytime and anywhere with a communication signal. This image depicts various application environments such as high and low power distribution cabinets, showcase display racks, factory assembly lines, factory enterprise warehouses, rental houses, companies, mall hotels, and family homes.
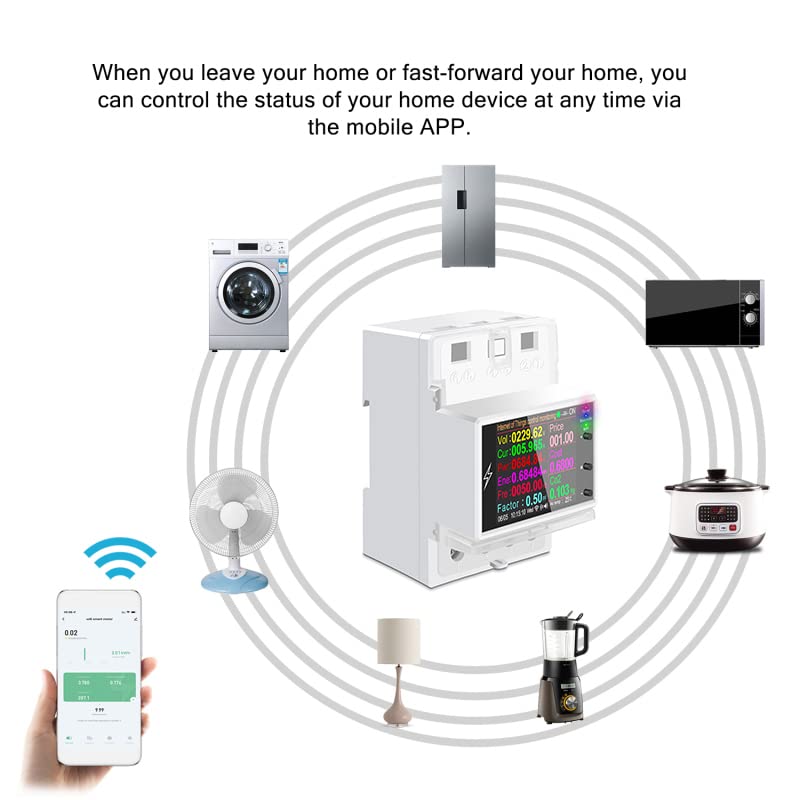
Figure 9.3: This diagram illustrates how the AT4PW Smart Switch can control and monitor the status of various home devices, such as washing machines, refrigerators, microwaves, rice cookers, blenders, lamps, and fans, remotely via the mobile application.
- Remote ON/OFF: Toggle the power supply to connected devices from the app.
- Real-time Data: View live voltage, current, power, and energy consumption data.
- Historical Data: Access graphs and reports of past energy usage.
- Scheduling: Set countdown timers, schedules, and loop timers for automated control.
- Expense Settings: Configure electricity tariffs to estimate costs.
- System Settings: Adjust device parameters and view device information.
10. Maintenance
To ensure optimal performance and longevity of your AT4PW Smart Switch, follow these maintenance guidelines:
- Cleaning: Use a soft, dry cloth to clean the device. Do not use abrasive cleaners, solvents, or liquids that could damage the display or internal components.
- Connection Check: Periodically check the wiring terminals to ensure they remain tight and secure. Loose connections can lead to overheating or malfunction.
- Firmware Updates: Check the Tuya/Smart Life app regularly for any available firmware updates for your device. Updates can improve performance and add new features.
- Environmental Conditions: Ensure the device is operated within its specified temperature and humidity ranges to prevent damage.
11. Troubleshooting
If you encounter issues with your AT4PW Smart Switch, refer to the following common problems and solutions:
- Device not powering on:
- Check if the main circuit breaker is ON.
- Verify that the input wires (L-IN, N-IN) are correctly connected and secure.
- Ensure the voltage supply is within the device's operating range.
- WiFi LED not blinking/Device not pairing:
- Ensure your mobile phone is connected to a 2.4GHz WiFi network (5GHz networks are not supported).
- Make sure the device is in pairing mode (WiFi LED blinking rapidly). If not, long press the 'M' button to reset WiFi or enter pairing mode.
- Check your WiFi signal strength at the device's location.
- Ensure correct WiFi password is entered in the app.
- Remote control not working:
- Verify that the device is connected to WiFi and shows online in the app.
- Check your internet connection on your mobile device.
- Ensure the app is updated to the latest version.
- Inaccurate readings:
- Ensure all wiring connections are secure and correct according to the diagram.
- Verify that the current load does not exceed the device's maximum rating.
- Device turns off unexpectedly:
- Check for over-current, over-voltage, or under-voltage conditions that might trigger protective shutdowns.
- Review the device's protection settings in the mobile app.
If the problem persists, please contact customer support.
12. Warranty
This product comes with a standard manufacturer's warranty. Please refer to the product packaging or contact your retailer for specific warranty terms and conditions. The warranty typically covers defects in materials and workmanship under normal use.
13. Support
For technical assistance, troubleshooting, or product inquiries, please contact JUWEIAT customer support through the retailer's platform or the contact information provided on the product packaging. You may also find additional resources and FAQs on the manufacturer's official website.