Spopal B0B7HVK2RM
Spopal Combination Lock Latch Instruction Manual
Brand: Spopal | Model: B0B7HVK2RM
Introduction
Thank you for choosing the Spopal Combination Lock Latch. This manual provides detailed instructions for the proper installation, operation, and maintenance of your new lock. Please read this manual thoroughly before use to ensure optimal performance and security.
Product Overview
The Spopal Combination Lock Latch is a keyless, 4-digit security solution designed for various applications. Its robust construction ensures durability and resistance to harsh weather conditions.
Key Features
- Keyless Sliding Bolt Lock: Offers high security with 10,000 possible combinations, eliminating the need for keys.
- Robust and Weatherproof: Constructed from zinc alloy with a strong lock cylinder and rust-resistant coating, designed to withstand harsh weather and violent attempts.
- Easy Installation: Comes with 6 one-way anti-theft screws for secure mounting.
- Wide Applications: Suitable for indoor and outdoor use on gates, fences, cabinets, sheds, closet doors, windows, bedrooms, garages, and barn doors.
Package Contents
- 1 x Spopal Combination Lock Latch
- 1 x Screwdriver
- 6 x Mounting Screws (one-way)
- 1 x Latch Plate
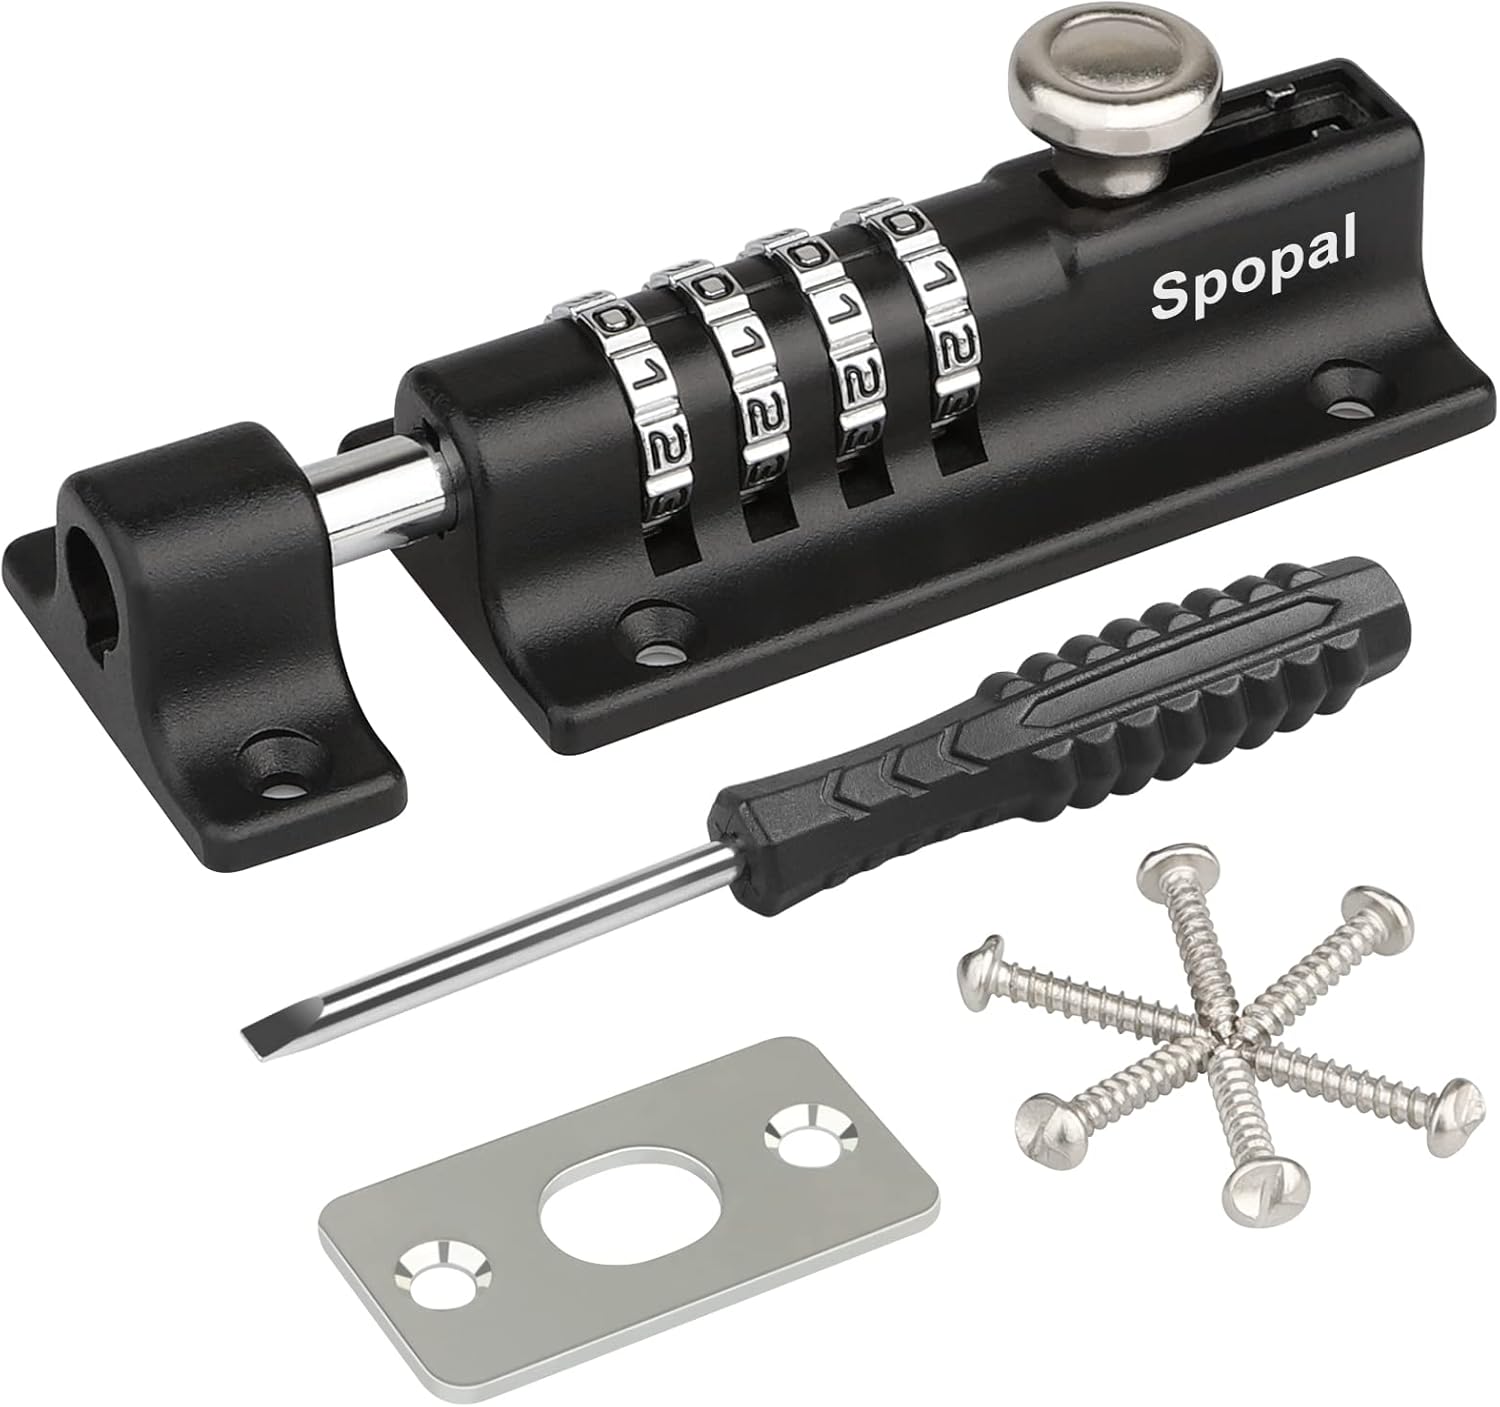
Image: Spopal Combination Lock Latch and its components.

Image: Labeled components of the lock latch.
Setup: Installation Guide
The lock latch is designed for straightforward installation. Please ensure you confirm the installation position before drilling, as the one-way screws cannot be easily removed once installed.
Tools Required
- Included Screwdriver
- Drill (for pilot holes, if needed)
- Pencil or Marker
Mounting Instructions
- Positioning: Determine the desired mounting location on your door, cabinet, or gate. Ensure the lock body and the latch plate align correctly when the door is closed.
- Marking: Use a pencil or marker to mark the screw hole positions for both the main lock body and the latch plate.
- Drilling (Optional): If necessary, drill small pilot holes at the marked positions.
- Mounting the Lock Body: Place the main lock body over the marked holes and secure it with the provided one-way screws using the included screwdriver. Tighten firmly.
- Mounting the Latch Plate: Align the latch plate with the lock bolt and secure it to the adjacent surface using the remaining one-way screws.
- Test: Once installed, test the sliding bolt mechanism to ensure smooth operation.
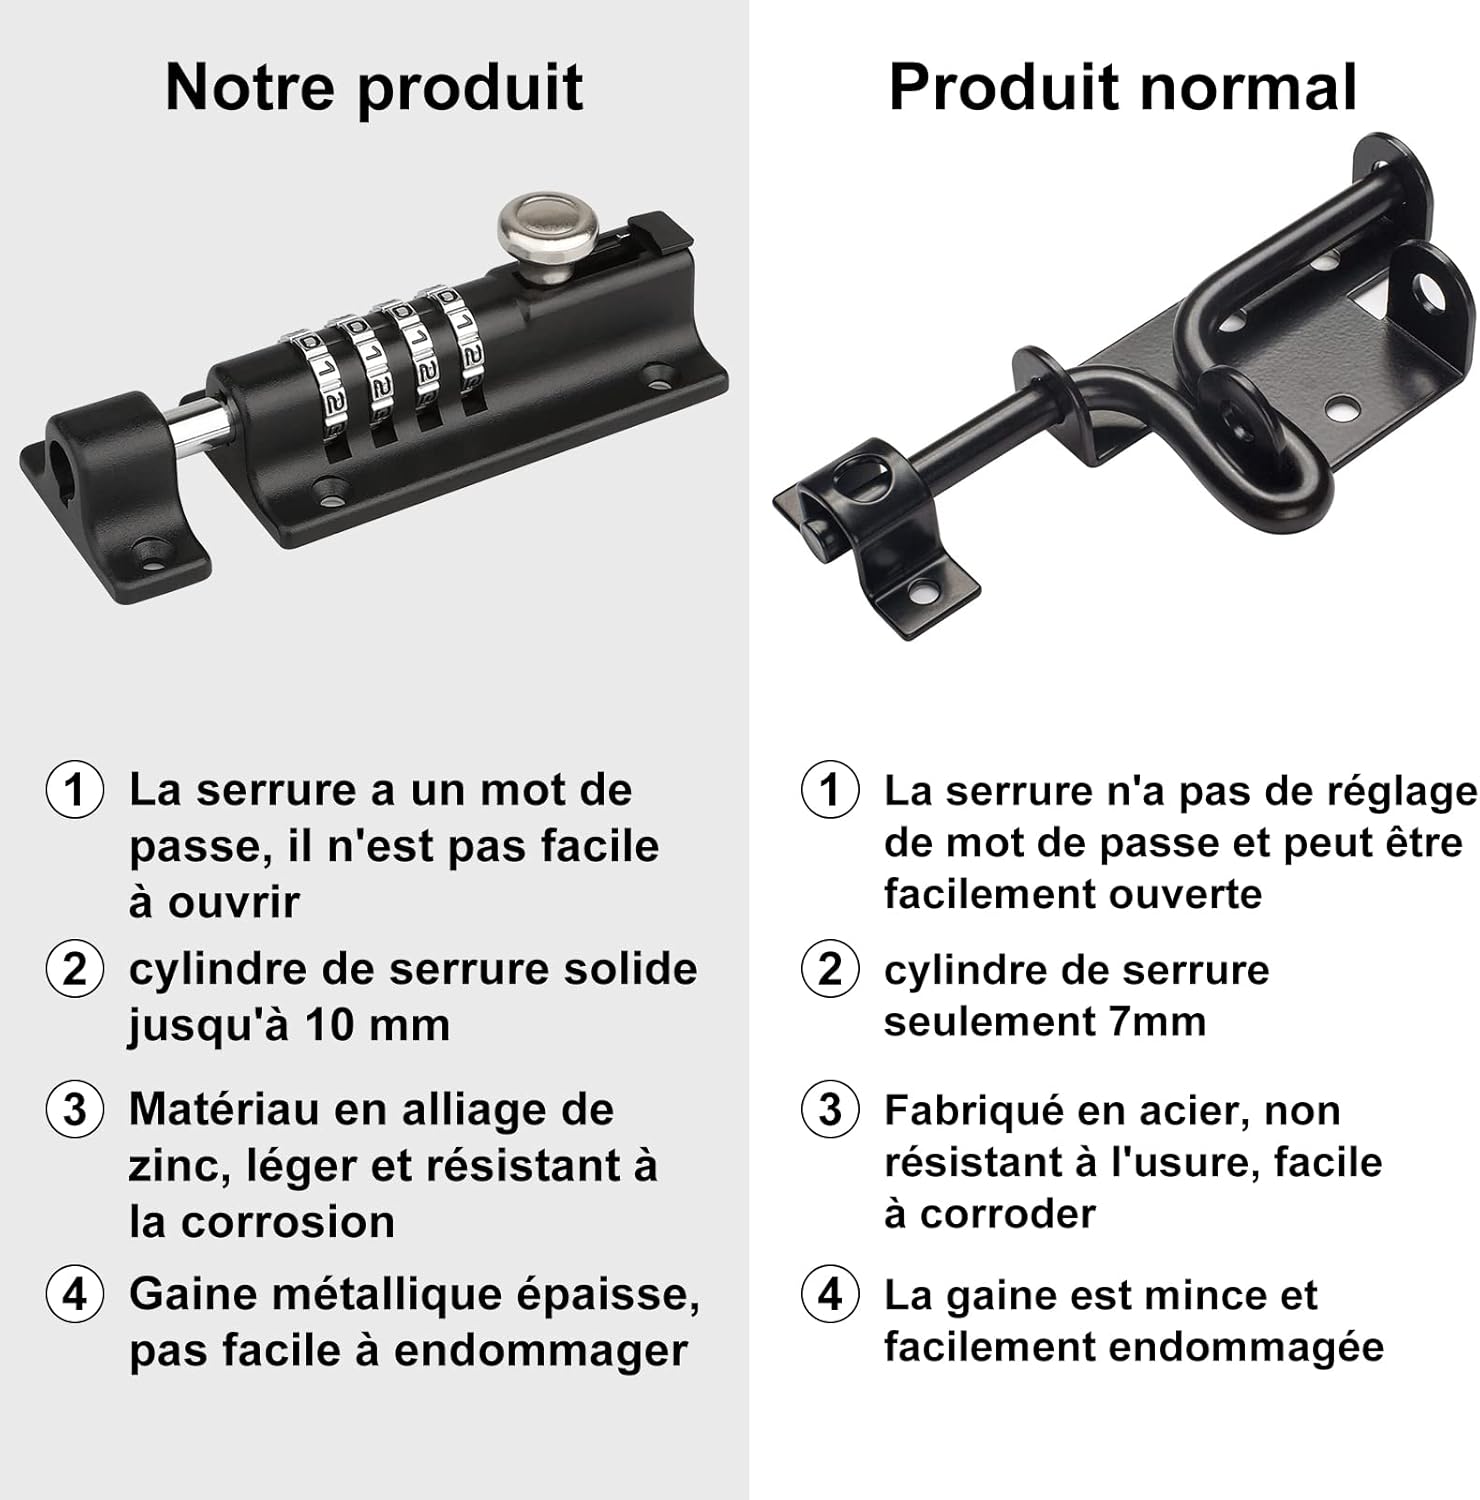
Image: Examples of two installation methods.
Operating Instructions
Default Combination
The factory default combination for your Spopal Combination Lock Latch is 0-0-0-0.
Setting Your Personal Combination
You must set a new personal combination for the first use. Please choose a memorable 4-digit code.
- Step 1: Rotate the code wheels to the current combination (default is 0-0-0-0).
- Step 2: Pull the knob outwards and lift it upwards to the code escape area (refer to point B in the image). Ensure you pull it outwards first, then lift it up.
- Step 3: While the knob is in the lifted position, rotate each code wheel one by one to your desired new combination. Align the numbers precisely with the indicator line.
- Step 4: Pull the knob outwards again and move it downwards from the code escape area to the sliding area. The new combination is now set.
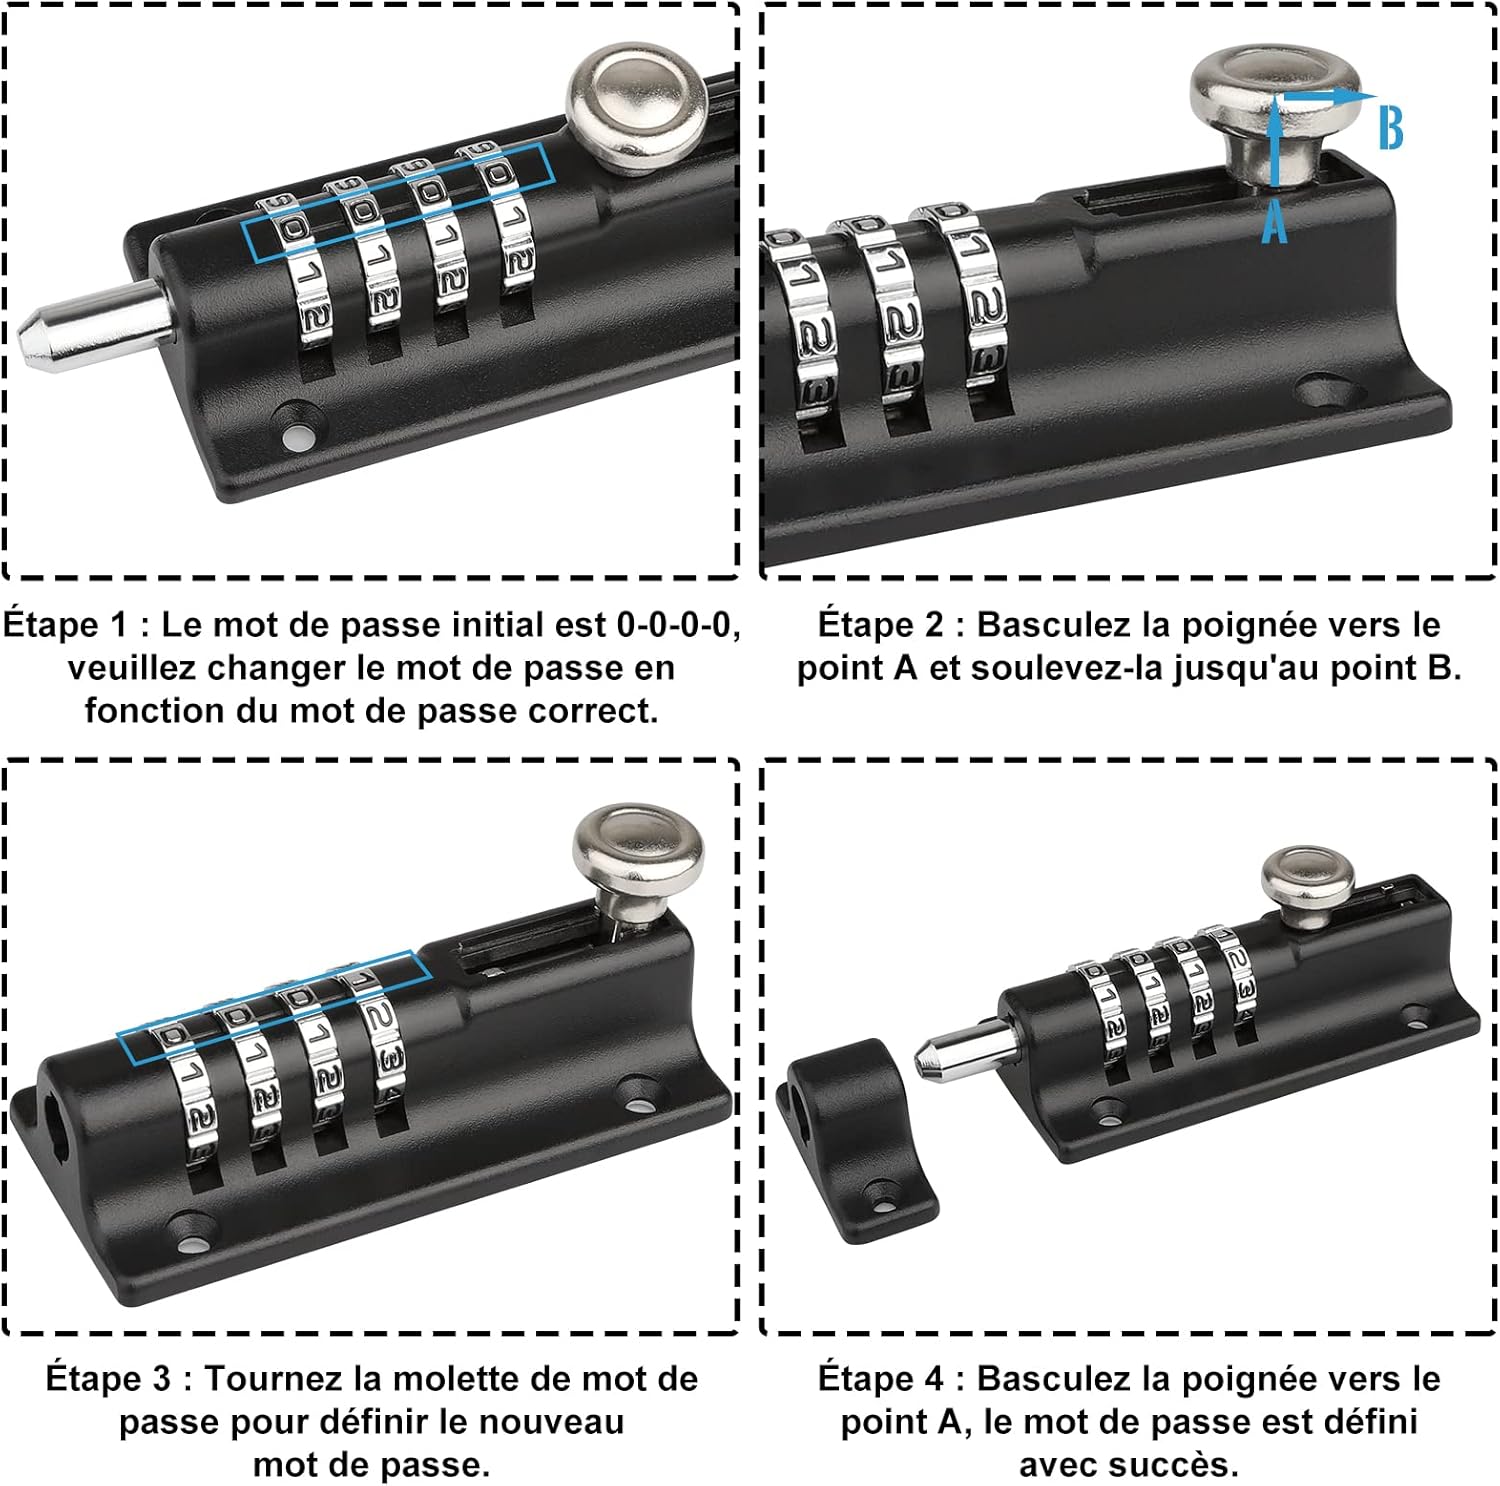
Image: Visual guide for setting the combination.

Image: Detailed steps for combination setting.
Locking and Unlocking
- To Unlock: Dial your set combination. Pull the knob upwards to retract the bolt and open the product.
- To Lock: With the bolt extended, dial your set combination. Move the knob downwards, insert the bolt into the latch plate hole, then scramble the combination wheels. The product is now locked.
Maintenance and Care
To ensure the longevity and smooth operation of your Spopal Combination Lock Latch, follow these simple maintenance guidelines:
- Cleaning: Wipe the lock body regularly with a soft, damp cloth to remove dust and grime. Avoid abrasive cleaners or solvents that could damage the finish.
- Lubrication: Periodically apply a small amount of silicone-based lubricant to the sliding bolt mechanism and the combination wheels to ensure smooth movement. Do not use oil-based lubricants as they can attract dirt.
- Inspection: Routinely check the mounting screws for tightness. If any screws appear loose, tighten them carefully. Inspect the lock for any signs of wear or damage.
- Weather Exposure: While weatherproof, prolonged exposure to extreme conditions may require more frequent cleaning and lubrication.
Troubleshooting
If you encounter issues with your Spopal Combination Lock Latch, refer to the following common problems and solutions:
| Problem | Possible Cause | Solution |
|---|---|---|
| Cannot unlock with the correct combination. | Combination wheels not perfectly aligned; incorrect combination entered; internal mechanism obstruction. | Ensure each number is precisely aligned with the indicator line. Double-check the combination. If still stuck, try wiggling the knob gently while entering the code. |
| Difficulty in sliding the bolt. | Lack of lubrication; dirt/debris in the mechanism; misalignment during installation. | Clean the bolt and apply silicone lubricant. Check if the latch plate is perfectly aligned with the bolt. Re-adjust if necessary. |
| Cannot set a new combination. | Knob not fully lifted to the code escape area; incorrect initial combination. | Ensure the knob is pulled outwards and lifted completely to the correct position (point B). Verify you are using the current correct combination before attempting to change it. |
Technical Specifications
| Attribute | Detail |
|---|---|
| Manufacturer | Spopal |
| Product Dimensions (L x W x H) | 14 x 5.5 x 5.5 cm |
| Weight | 380 grams |
| Color | Black |
| Material | Stainless Steel (Handle), Zinc Alloy (Lock Body) |
| Finish | Polished |
| Lock Type | Combination Lock |
| Number of Pieces | 1 (lock unit) |
| Special Features | Door latches and locks, for garden sheds, home reinforcement, workshops |
| Usage | Indoor/Outdoor; Professional; Widely used on doors, windows, boxes, cabinets, equipment, yachts, bathrooms, kitchens, dorms, gardens, farms, truck compartments, warehouses, etc. |

Image: Product dimensions.
Warranty and Support
Please note that manufacturer warranty information for this product is not available. Information regarding the availability of spare parts is also not provided.
For any product-related inquiries, technical assistance, or support, please contact the seller directly through the platform where you purchased the product. They will be able to provide the most current and relevant support information.
Ask a question about this manual
Ask about setup, troubleshooting, compatibility, parts, safety, or missing instructions. Manuals+ will review the question and use this page’s manual context to help answer it.