1. Introduction
Thank you for choosing the SHALL Cordless 2-in-1 Grass Shear and Hedge Trimmer. This versatile and lightweight tool is designed for efficient garden maintenance, offering both grass trimming and hedge pruning capabilities. Please read this manual carefully before use to ensure safe and optimal operation.

Image 1.1: The SHALL 2-in-1 Grass Shear and Hedge Trimmer, showcasing its dual functionality for grass and hedge trimming, along with the included pruning shears.
2. Safety Instructions
Always follow basic safety precautions to reduce the risk of fire, electric shock, and personal injury.
- Read All Instructions: Familiarize yourself with the controls and proper use of the tool.
- Wear Eye Protection: Always wear safety glasses or goggles when operating the trimmer.
- Keep Hands Clear: Never touch the blades while the tool is running. Keep hands, hair, and clothing away from moving parts.
- Secure Work Area: Ensure the area is clear of debris, children, and pets before operation.
- Avoid Wet Conditions: Do not operate the trimmer in wet grass or damp conditions.
- Use Both Hands: Maintain a firm grip with both hands for better control.
- Unplug When Not in Use: Disconnect the battery or charger when not in use, before cleaning, or when changing accessories.
- Store Safely: Store the tool in a dry, secure place out of reach of children.
3. Package Contents
Verify that all items are present in the package:
- SHALL Cordless 2-in-1 Grass Shear and Hedge Trimmer unit
- Grass Shear Blade (82mm cutting width)
- Hedge Trimmer Blade (140x60mm cutting capacity)
- Pruning Shears with Sheath
- USB-C Charging Cable
- Power Adapter
- Security Key
- User Manual

Image 3.1: Overview of the complete package contents, including the main unit, two interchangeable blades, pruning shears, charger, and security key.

Image 3.2: Close-up of the included pruning shears and their protective sheath.
4. Setup
4.1 Charging the Battery
The tool is equipped with a 2000 mAh Li-ion battery. For optimal performance, fully charge the battery before first use.
- Connect the USB-C charging cable to the charging port on the tool.
- Plug the power adapter into a standard electrical outlet.
- The charging LED indicator will show the charging status:
- Green: Fully charged / High battery power
- Red: Charging / Low battery power
- Orange: Medium battery power
- A full charge takes approximately 1 hour.

Image 4.1: Diagram illustrating the charging LED indicator and its color codes for battery status.

Image 4.2: An internal view showing the battery cells within the trimmer handle, indicating its power source.
4.2 Attaching/Changing Blades
The SHALL trimmer features a quick blade change mechanism.
- Ensure the tool is turned OFF and the security key is removed.
- Press the blade release button (usually located near the blade attachment point).
- Carefully remove the current blade.
- Align the desired blade (grass shear or hedge trimmer) with the attachment points.
- Push the blade firmly until it clicks into place. Ensure it is securely fastened before use.
5. Operating Instructions
5.1 Powering ON and OFF
The tool incorporates a dual safety mechanism.
- To Power ON:
Step 1: Insert the security key into the socket at the rear of the handle. (Refer to Fig. 8 in Image 5.1)
Step 2: Press and hold the safety lock (located on the side), then depress the ON/OFF switch. After approximately 2 seconds, the switch will engage. Release the safety lock while operating. (Refer to Fig. 9 in Image 5.1) - To Power OFF: Release the ON/OFF switch.
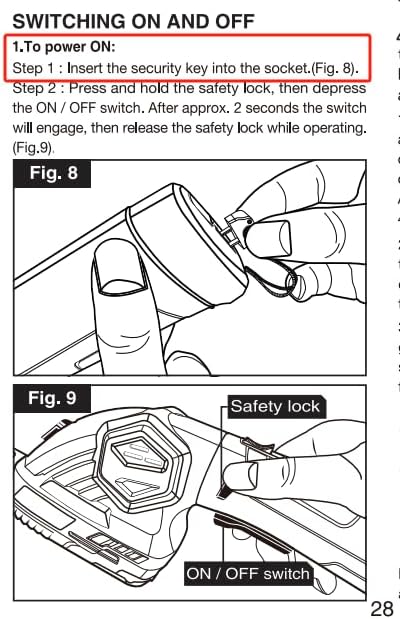
Image 5.1: Detailed diagrams (Fig. 8 and Fig. 9) illustrating the insertion of the security key and the activation sequence using the safety lock and ON/OFF switch.

Image 5.2: An illustration emphasizing the double security features of the trimmer, including the safety lock and the removable security key.
5.2 Using the Grass Shear Blade
Attach the grass shear blade for precise trimming of lawn edges and small grass areas. The cutting width is 82mm.
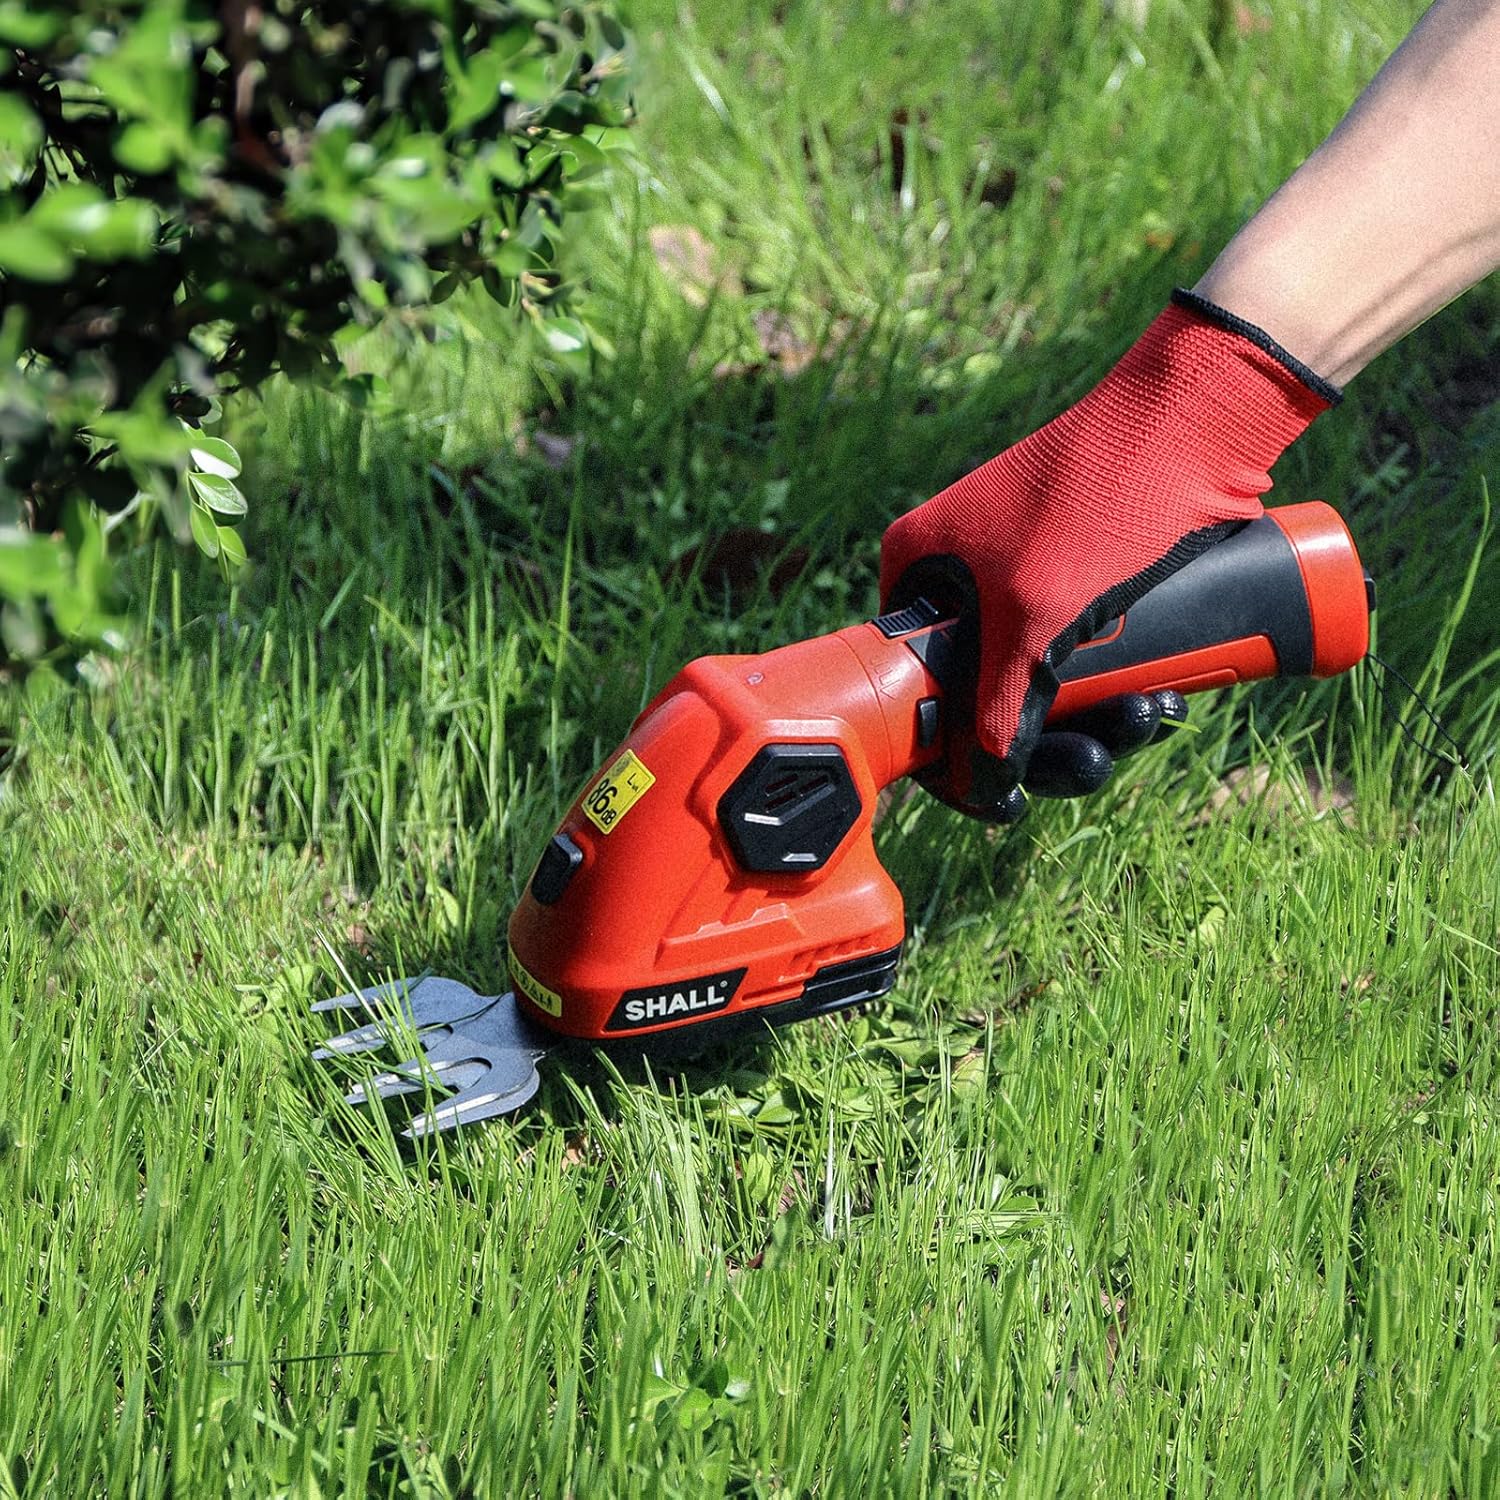
Image 5.3: A user demonstrating the grass shear blade in action, trimming grass along an edge.
5.3 Using the Hedge Trimmer Blade
Attach the hedge trimmer blade for shaping and pruning hedges and shrubs. The cutting capacity is 140x60mm.

Image 5.4: A user demonstrating the hedge trimmer blade in action, pruning a shrub.
5.4 Rotating the Head (180° Rotary Head)
The trimmer features a 180° rotary head for cutting at different angles, reducing hand fatigue and improving access to difficult areas.
- Ensure the tool is turned OFF.
- Locate the slide switch for head rotation (refer to Image 5.5).
- Slide the switch to unlock the head.
- Rotate the head to the desired angle.
- Slide the switch back to lock the head in position before resuming operation.

Image 5.5: A visual guide demonstrating the 180° rotary head, allowing for easy adjustment of the cutting angle.
6. Maintenance
6.1 Cleaning the Blades
Regular cleaning extends blade life and maintains cutting efficiency.
- Always ensure the tool is OFF and the security key is removed before cleaning.
- Remove the blade from the unit.
- Use a stiff brush or cloth to remove grass clippings, sap, and debris from the blades.
- For stubborn residue, a mild detergent solution can be used, followed by thorough drying.
- Apply a light coat of machine oil to the blades to prevent rust and ensure smooth operation.
6.2 Storage
When not in use, store the trimmer properly.
- Ensure the tool is clean and dry.
- Store the trimmer and its blades in a dry, secure location, away from moisture and extreme temperatures.
- Keep out of reach of children and unauthorized persons.
7. Troubleshooting
If you encounter issues, refer to the following common problems and solutions:
| Problem | Possible Cause | Solution |
|---|---|---|
| Tool does not start | Battery not charged Security key not inserted Safety lock not engaged correctly | Charge the battery Insert security key fully Press safety lock and ON/OFF switch simultaneously |
| Blades not cutting effectively | Blades are dull or dirty Incorrect blade for material | Clean and sharpen blades or replace if necessary Ensure the correct blade (grass shear or hedge trimmer) is used for the task |
| Reduced runtime | Battery not fully charged Battery aging | Ensure battery is fully charged before use Consider battery replacement if performance significantly degrades |
| Head rotation is stiff | Debris in mechanism Mechanism needs lubrication | Clean any visible debris Apply a small amount of lubricant to the rotating mechanism |
8. Specifications
| Feature | Specification |
|---|---|
| Model Number | SH112001EU |
| Power Source | Battery Powered (7.2V) |
| Battery Type | 2 Lithium-ion (included) |
| Battery Capacity | 2000 mAh |
| Charging Time | Approx. 1 hour |
| Runtime | Approx. 100 minutes |
| Speed | 1100 RPM |
| Grass Shear Blade Width | 82 mm (3.25 inches) |
| Hedge Trimmer Blade Length | 140 mm |
| Hedge Trimmer Blade Width | 60 mm |
| Pruning Shear Opening | 42 mm |
| Blade Material | Alloy Steel |
| Product Dimensions (L x W x H) | 12.24 x 8.07 x 3.86 cm |
| Item Weight | 1.32 kg (2.9 lbs) |
| Material | Plastic |
| Color | Red |
| Country of Origin | China |
9. Warranty and Support
For warranty information or technical support, please refer to the documentation included with your purchase or contact SHALL customer service directly. Specific warranty details and contact information may vary by region.
Please visit the official SHALL website or your retailer's support page for the most up-to-date information.