
Introduction
This manual provides detailed instructions for the installation, operation, and maintenance of your Hengweili Single Din Car Stereo, Model KH6610. Please read this manual thoroughly before using the product to ensure proper function and to prevent damage. Keep this manual for future reference.
Package Contents
Upon opening the package, please verify that all the following items are included:
- Hengweili Single Din Car Stereo Unit
- Remote Control
- Power Cables
- Release Keys & Blot (Mounting Hardware)
- Instruction Manual
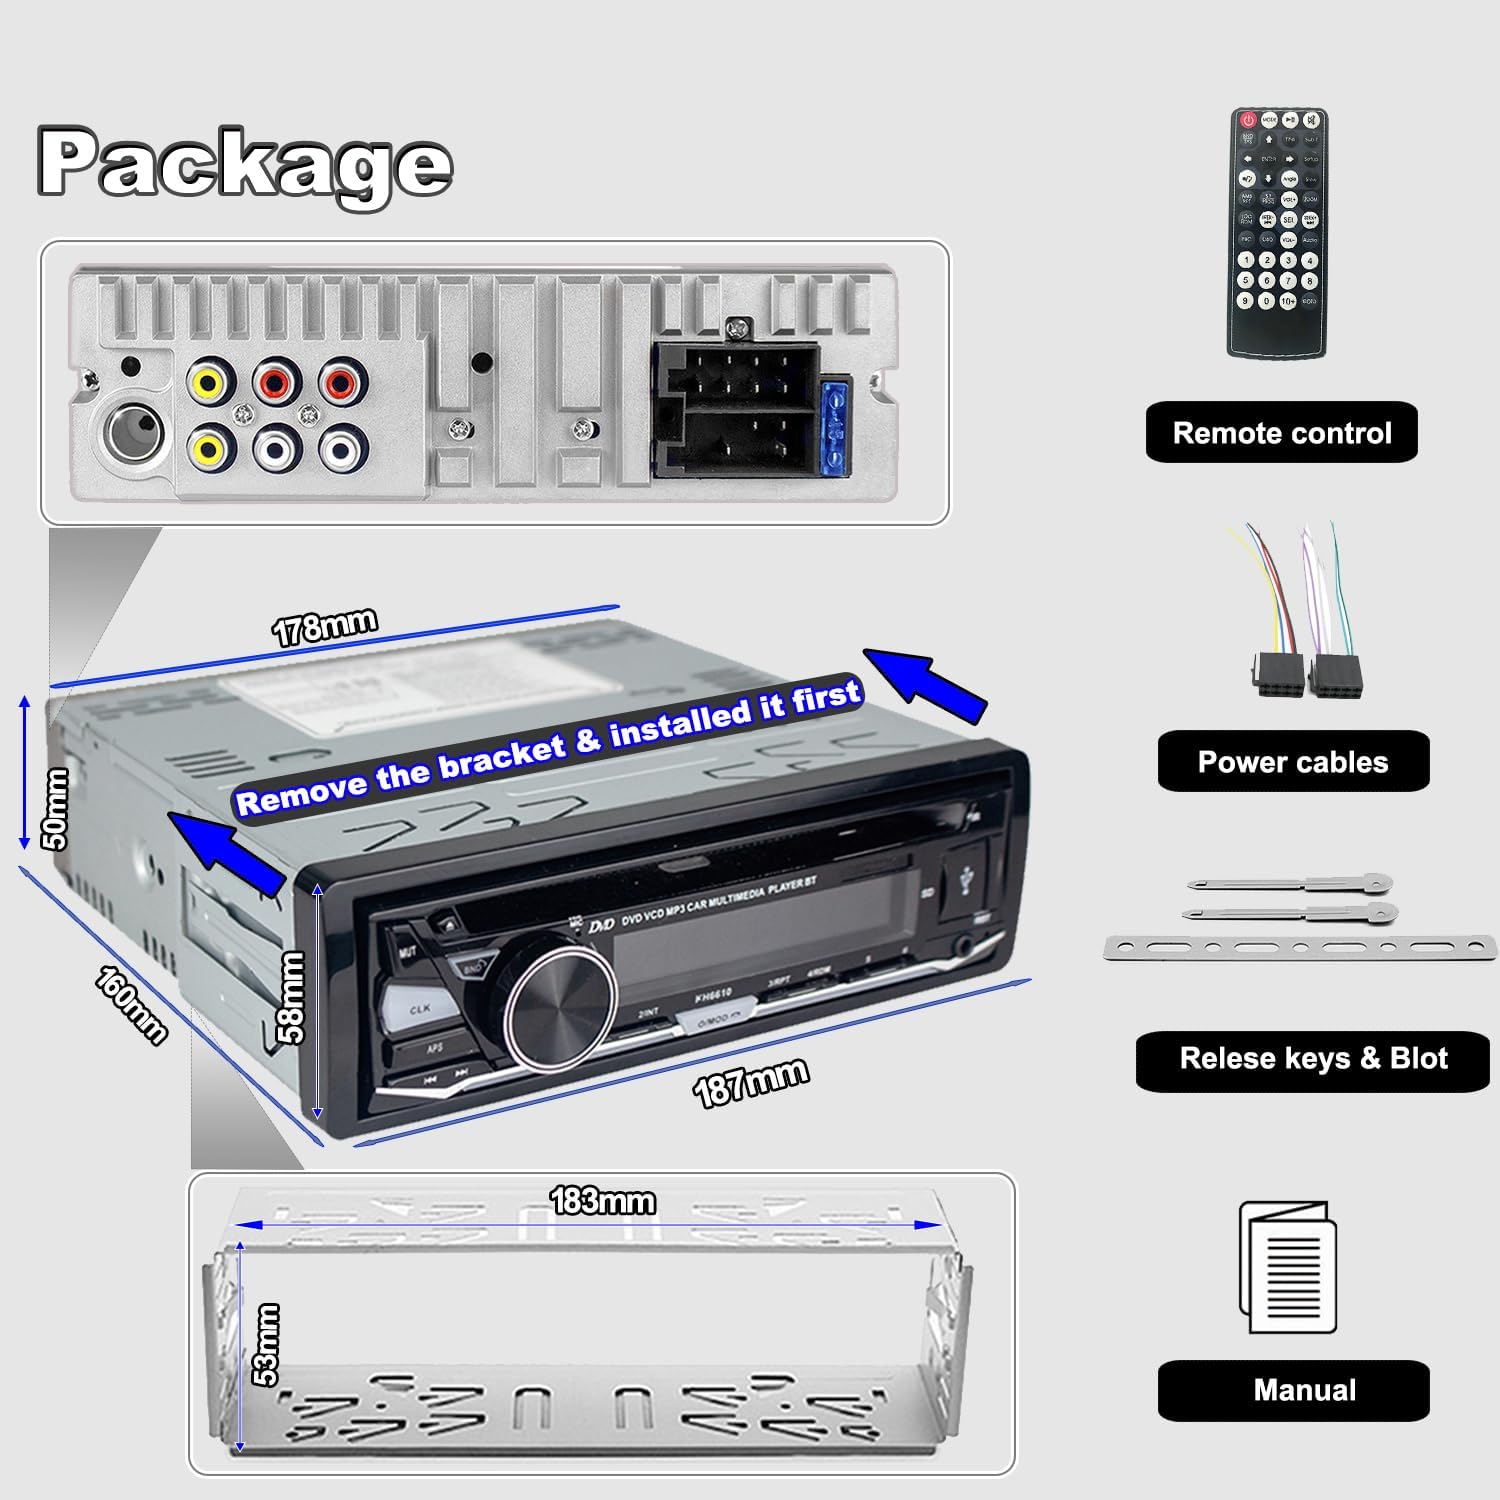
Image showing the car stereo unit, remote control, power cables, mounting hardware, and the instruction manual included in the package.
Safety Information
- Always ensure the vehicle is parked and the engine is off before attempting installation or maintenance.
- Incorrect wiring can cause damage to the unit or the vehicle's electrical system. If unsure, consult a qualified technician.
- Do not operate the unit in a way that distracts you from driving.
- Keep the unit away from water and excessive moisture.
- Use only the specified power supply (12V DC).
Setup and Installation
Wiring Diagram
Refer to the following diagram for correct wiring connections. Ensure all connections are secure and insulated to prevent short circuits.

Rear view of the car stereo unit with a detailed wiring diagram indicating connections for power, speakers, and auxiliary inputs/outputs.
- Yellow Wire: Constant 12V (Battery Positive)
- Red Wire: ACC (Ignition Switch)
- Black Wire: Ground (Chassis Ground)
- Blue Wire: Auto Antenna / Amplifier Remote
- Speaker Wires: Connect to corresponding vehicle speakers (e.g., White/White-Black for Front Left, Grey/Grey-Black for Front Right, Green/Green-Black for Rear Left, Violet/Violet-Black for Rear Right).
- RCA Outputs: For external amplifier connections.
- Video Output: For connecting an external display for DVD playback.
Physical Installation
The unit is a standard single DIN size. Before installation, ensure the mounting bracket is properly secured in your vehicle's dashboard opening. Remove any transport screws from the unit before inserting it into the bracket.
Diagram illustrating the dimensions of the car stereo unit and the installation bracket, with an arrow indicating to remove the bracket and install it first.
- Carefully remove the existing car stereo from your vehicle.
- Install the provided metal mounting sleeve into the dashboard opening. Bend the tabs to secure it.
- Connect all necessary wiring harnesses to the rear of the new stereo unit.
- Slide the stereo unit into the mounting sleeve until it clicks into place.
- Ensure the unit is flush with the dashboard.
Operating Instructions
Front Panel Controls
Familiarize yourself with the buttons and controls on the front panel of your car stereo:

A detailed diagram highlighting each button and knob on the car stereo's front panel, with labels for their respective functions.
| Control | Function (Short Press) | Function (Long Press) |
|---|---|---|
| Knob | Volume Adjust / EQ / Radio Area | RDS Setting (TA/AF/PTY) |
| MUTE | Mute/Unmute Audio | N/A |
| CLK | Display Clock | Clock Setting |
| BND/AM/FM | Band Selection (FM1/FM2/FM3/AM1/AM2) | Answer Call (Bluetooth Mode) |
| APS | Auto Search Station | N/A |
| ◄◄ / ►► | Last/Next Song / Seek Station | N/A |
| ►II / INT | Play/Pause / Intro Scan | N/A |
| O/MOD ↺ | Mode Change / Power On | Power Off (Press 2s) / End Call (Bluetooth Mode) |
| 1-6 Buttons | Change Station (Radio) / Track Selection (Media) | Save Station (Radio, Press 3s) |
| Eject | Eject CD/DVD | N/A |
| RST | Reset Unit (Use a pointed object) | N/A |
| AUX Port | Connect External Audio Device | N/A |
| TF/USB Port | Insert TF Card / USB Drive | N/A |
Basic Operation
- Power On/Off: Long press the O/MOD ↺ button for 2 seconds to turn the unit on or off.
- Volume Control: Rotate the main knob to adjust the volume level.
- Mode Selection: Short press the O/MOD ↺ button to cycle through available modes (Radio, CD/DVD, USB, SD, AUX, Bluetooth).
Radio Operation (AM/FM/RDS)

The car stereo display showing an FM radio frequency (101.25) and indicating RDS mode is active.
- Band Selection: Press the BND/AM/FM button to switch between FM1, FM2, FM3, AM1, and AM2 bands.
- Automatic Search: Long press the APS button to automatically scan and save strong stations.
- Manual Tuning: Use the ◄◄ / ►► buttons for manual frequency adjustment.
- Preset Stations: Short press buttons 1-6 to select a saved station. Long press buttons 1-6 (for 3 seconds) to save the current station to that preset number.
- RDS Functions: Long press the main knob to access RDS settings (AF, TA, PTY).
CD/DVD Playback

The car stereo unit with a disc inserted, demonstrating CD/DVD playback capability, and showing a connected external monitor for video output.
- Insert Disc: Gently insert a CD or DVD into the disc slot with the label side facing up. The unit will automatically begin playback.
- Supported Formats: The unit supports DVD, MPEG-4, VCD, SVCD, MP3, CD, and JPEG picture CD formats.
- Eject Disc: Press the Eject button to remove the disc.
- Video Output: Connect an external monitor to the video output port on the rear of the unit for DVD video display.
Bluetooth Function

An in-car perspective showing the car stereo unit and a smartphone mounted, indicating active Bluetooth connection for hands-free calling and music streaming.
- Pairing: Activate Bluetooth on your mobile device. Search for available devices and select 'Hengweili' (or similar name). Enter '0000' if a PIN is required.
- Hands-Free Calling: When a call comes in, press the BND/AM/FM button to answer. Press the O/MOD ↺ button to end the call.
- Music Streaming: Once paired, you can play audio from your phone through the car stereo. Use the ◄◄ / ►► buttons to skip tracks.
USB/SD/AUX Playback
The car stereo unit highlighting the TF Card slot, AUX input, and USB port for connecting various external media devices.
- USB/SD Card: Insert a USB flash drive or TF (Micro SD) card into the respective port. The unit will automatically switch to USB/SD mode and begin playback. Supported audio formats include MP3, WMA, WAV, MPE. Maximum capacity for TF card is 32GB.
- AUX Input: Connect an external audio device (e.g., smartphone, MP3 player) to the 3.5mm AUX input jack using an audio cable. Select AUX mode on the stereo.
APP Control

A smartphone displaying the user interface of the dedicated application for controlling the car stereo, showing various functions like radio, music, and settings.
- Download App: Search for the official control app (refer to product packaging or manufacturer website for app name) on your smartphone's app store.
- Connect: Ensure your phone is connected to the car stereo via Bluetooth. Open the app and follow the on-screen instructions to establish a connection.
- Control: Use the app to control various functions of the stereo, including mode selection, volume, track skipping, and radio tuning.
Remote Control

The infrared remote control unit for the car stereo, featuring various buttons for playback, volume, mode, and other functions.
- Point the remote control towards the IR sensor on the car stereo's front panel.
- The remote allows control over functions such as power, volume, mode, track selection, and radio presets.
- Ensure the remote has working batteries.
Maintenance
- Cleaning: Use a soft, dry cloth to clean the front panel. Do not use abrasive cleaners or solvents.
- Disc Care: Handle CDs and DVDs by their edges. Keep them clean and free of scratches.
- Avoid Extreme Temperatures: Do not expose the unit to direct sunlight for extended periods or to extreme cold.
Troubleshooting
| Problem | Possible Cause | Solution |
|---|---|---|
| No power | Incorrect wiring; Blown fuse; Loose connection | Check power and ground wiring. Inspect vehicle's fuse box and the unit's fuse. Ensure all connections are secure. |
| No sound | Volume too low; Mute activated; Incorrect speaker wiring | Increase volume. Deactivate mute. Check speaker connections. |
| Disc not playing | Disc inserted incorrectly; Damaged disc; Unsupported format | Re-insert disc correctly. Try a different disc. Ensure disc format is supported. |
| Bluetooth not connecting | Bluetooth not enabled on phone; Unit not in pairing mode; Interference | Ensure phone's Bluetooth is on. Put unit in Bluetooth mode. Try re-pairing. Move closer to the unit. |
| Poor radio reception | Antenna not connected; Weak signal area; Damaged antenna | Check antenna connection. Try tuning to a stronger station. Inspect antenna for damage. |
| Remote control not working | Dead batteries; Obstruction to IR sensor; Remote malfunction | Replace batteries. Ensure clear line of sight to IR sensor. |
Specifications
| Feature | Detail |
|---|---|
| Product Dimensions | 7.01 x 7.24 x 1.97 inches |
| Item Weight | 3.21 pounds |
| Item Model Number | KH6610 |
| Brand | Hengweili |
| Connectivity Technology | USB, Bluetooth, AUX |
| Controller Type | Hand Control (Remote) |
| Special Feature | RDS |
| Compatible Devices | Speakers, Smartphones, USB Drives, SD Cards |
| Connector Type | RCA, 3.5mm AUX, USB, SD |
| Audio Output Mode | Stereo |
| Surround Sound Channel Configuration | 5.1 (via RCA outputs to compatible system) |
| Video Encoding | MPEG-4 (for DVD playback) |
| Color | Black |
| Supported Disc Formats | DVD, MPEG-4, VCD, SVCD, MP3, CD, JPEG |
| Supported Audio Formats (USB/SD) | MP3, WMA, WAV, MPE |
| TF Card Max Capacity | 32 GB |
| Power Supply | 12V DC |
| FM Frequency Range | 87.5-108 MHz |
| AM Frequency Range | 522-1620 KHz |
Warranty and Support
This product is covered by a manufacturer's warranty. Please refer to the warranty card included in your package for specific terms and conditions. For technical support or warranty claims, please contact Hengweili customer service through the retailer where the product was purchased or visit the official Hengweili website for contact information.