AVPLAY KSA100MKII
AVPLAY KSA100MKII Class A Power Amplifier User Manual
Model: KSA100MKII
1. Introduction
This user manual provides detailed instructions for the setup, operation, and maintenance of your AVPLAY KSA100MKII Class A Power Amplifier. Please read this manual thoroughly before using the product to ensure proper functionality and safety.
2. Important Safety Instructions
To reduce the risk of electric shock, fire, or damage to the unit, always follow these basic safety precautions:
- Do not expose this appliance to rain or moisture.
- Do not block any ventilation openings. Install in accordance with the manufacturer's instructions.
- Do not install near any heat sources such as radiators, heat registers, stoves, or other apparatus (including amplifiers) that produce heat.
- Protect the power cord from being walked on or pinched, particularly at plugs, convenience receptacles, and the point where they exit from the apparatus.
- Only use attachments/accessories specified by the manufacturer.
- Unplug this apparatus during lightning storms or when unused for long periods of time.
- Refer all servicing to qualified service personnel. Servicing is required when the apparatus has been damaged in any way, such as power-supply cord or plug is damaged, liquid has been spilled or objects have fallen into the apparatus, the apparatus has been exposed to rain or moisture, does not operate normally, or has been dropped.
3. Package Contents
Please check the package carefully to ensure all items are present and in good condition:
- AVPLAY KSA100MKII Class A Power Amplifier Unit
- Power Cord
- User Manual (this document)
4. Product Overview
4.1 Front Panel

Figure 4.1: Front view of the AVPLAY KSA100MKII Class A Power Amplifier. The front panel features a central volume knob, a power button with an indicator light, and the "A2" logo on the left, with "Made by Breeze Audio" on the right.
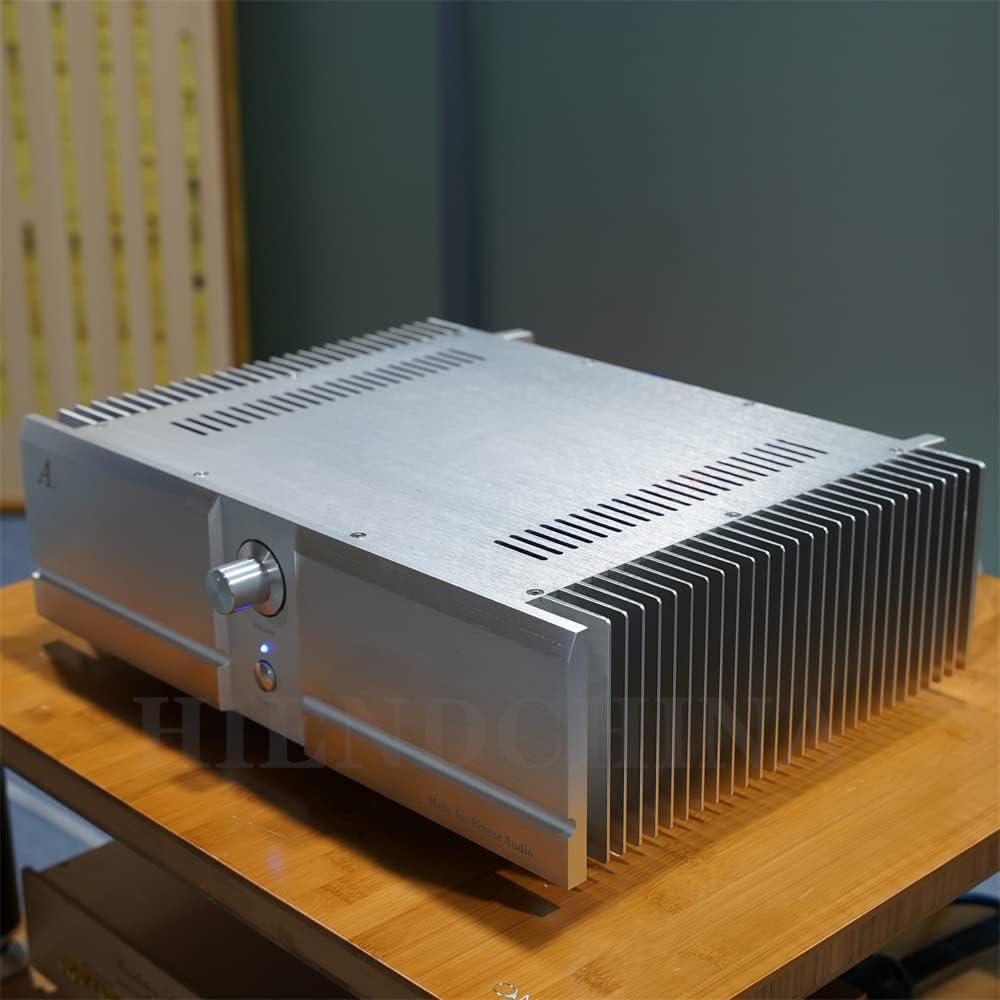
Figure 4.2: Angled front-right view of the amplifier, showcasing the robust heatsinks on the side, essential for dissipating heat generated by Class A operation.
4.2 Internal Components
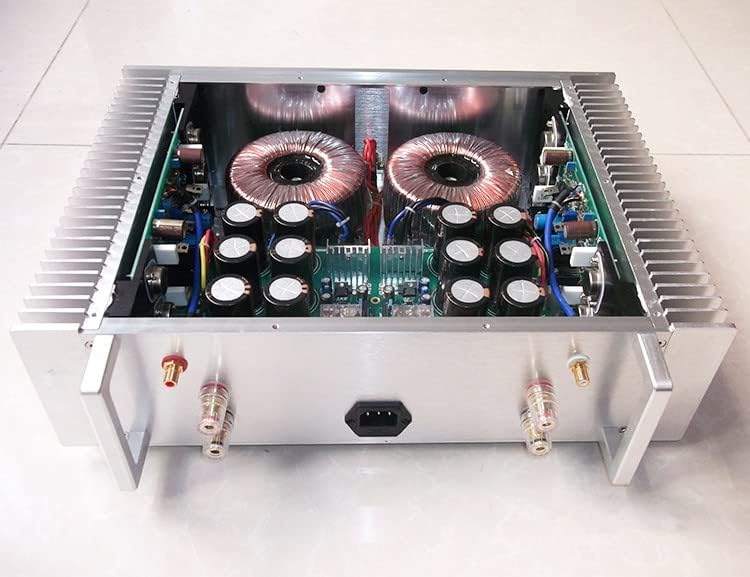
Figure 4.3: Top-down view of the amplifier's internal layout, revealing two large toroidal transformers and multiple high-capacity filter capacitors, indicating a robust power supply design. The rear panel shows speaker terminals and the AC inlet.
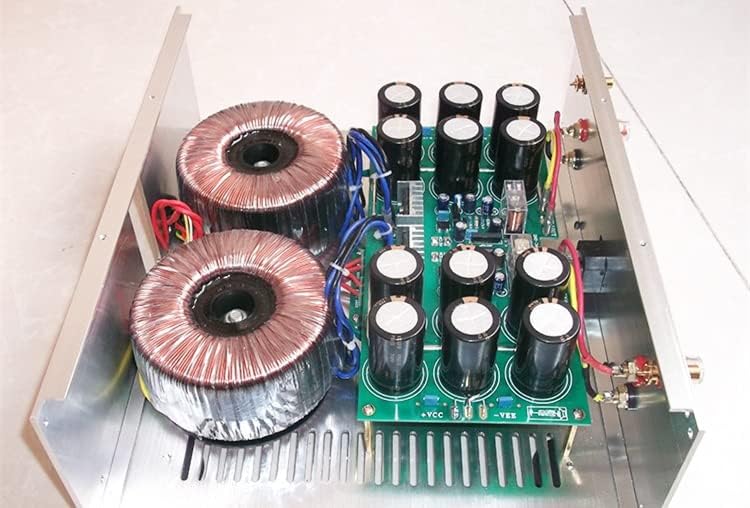
Figure 4.4: A closer look at the internal components, highlighting one of the toroidal transformers and a section of the main circuit board with several large capacitors, demonstrating the quality of internal construction.

Figure 4.5: An alternative top-down perspective of the amplifier's interior, providing a comprehensive view of the dual toroidal transformers, capacitor banks, and the overall symmetrical layout of the audio circuitry.
5. Setup Guide
Follow these steps to set up your AVPLAY KSA100MKII amplifier:
- Placement: Place the amplifier on a stable, level surface with adequate ventilation. Ensure there is sufficient space around the unit for airflow, especially around the heatsinks. Avoid placing it near heat sources or in direct sunlight.
- Power Connection: Ensure the amplifier's power switch is in the OFF position. Connect the supplied power cord to the AC inlet on the rear of the amplifier and then to a suitable wall outlet.
- Speaker Connection: Connect your speakers to the amplifier's speaker terminals on the rear panel. Ensure correct polarity (+ to + and - to -) for each speaker. Use high-quality speaker cables for optimal performance.
- Input Connection: Connect your audio source (e.g., preamplifier, DAC) to the amplifier's input terminals using appropriate RCA cables.
6. Operating Instructions
- Power On: After all connections are made, turn on your audio source first. Then, press the power button on the front panel of the amplifier. The indicator light will illuminate.
- Volume Adjustment: Slowly turn the volume knob clockwise to increase the sound level. Turn it counter-clockwise to decrease the volume. Start with a low volume setting to avoid sudden loud sounds.
- Power Off: To turn off the amplifier, press the power button again. It is recommended to turn off the amplifier before turning off your audio source.
Note: This is a Class A amplifier, which operates at a higher temperature than typical Class AB amplifiers. The heatsinks will become warm during operation. This is normal and indicates proper functioning.
7. Maintenance
Proper maintenance ensures the longevity and optimal performance of your amplifier:
- Cleaning: Use a soft, dry cloth to clean the exterior of the amplifier. Do not use liquid cleaners or aerosol sprays, as they may damage the finish or internal components.
- Ventilation: Regularly check that the ventilation openings are not obstructed by dust or debris.
- Connections: Periodically check all cable connections to ensure they are secure.
- Storage: If storing the amplifier for an extended period, disconnect it from the power outlet and store it in a cool, dry place, away from direct sunlight and extreme temperatures.
8. Troubleshooting
| Problem | Possible Cause | Solution |
|---|---|---|
| No power | Power cord not connected; Power outlet faulty; Amplifier power switch off. | Ensure power cord is securely connected; Try a different outlet; Turn amplifier power switch on. |
| No sound | Input cables not connected; Speaker cables not connected or incorrect polarity; Volume too low; Audio source not playing. | Check all input and speaker cable connections; Ensure correct speaker polarity; Increase volume; Verify audio source is active. |
| Distorted sound | Input signal too strong; Speaker impedance mismatch; Faulty cables. | Reduce input signal level from source; Ensure speakers match amplifier's impedance range; Replace faulty cables. |
| Unit gets very hot | Normal for Class A amplifier; Insufficient ventilation. | Ensure adequate airflow around the unit; Do not block ventilation openings. If overheating persists or unit shuts down, contact support. |
9. Specifications
The following are the technical specifications for the AVPLAY KSA100MKII Class A Power Amplifier:
- Dimensions (W x H x D): 430 mm x 120 mm x 312 mm
- Output Power: 150 watts @ 8 ohms; 230 watts @ 4 ohms
- Frequency Response: 20Hz~20kHz (±0.5dB); 3Hz~150kHz (±3dB)
- Total Harmonic Distortion (THD): 0.05%
- Signal-to-Noise Ratio (SNR): 110 dB
- Weight: 19 KG
10. Warranty and Support
For warranty information or technical support, please refer to the documentation provided at the time of purchase or contact your retailer. Keep your proof of purchase for warranty claims.
Ask a question about this manual
Ask about setup, troubleshooting, compatibility, parts, safety, or missing instructions. Manuals+ will review the question and use this page’s manual context to help answer it.