1. Introduction
This document provides instructions for the installation and proper handling of the OEM LCD Screen and Touch Screen Digitizer Full Assembly with Frame, designed for Asus Memo Pad HD7, ME173X, and ME173 K00B tablet models. This replacement part is intended to restore display and touch functionality to your device.

Figure 1.1: The product is typically shipped in a protective cardboard box.
2. Important Safety Information
Please read and understand all safety precautions before proceeding with installation. Failure to follow these guidelines may result in damage to the product, your device, or personal injury.
- Professional Installation Recommended: Installation of this component requires specialized tools and technical expertise. Professional installation is highly recommended. The manufacturer is not responsible for damages incurred during self-installation.
- Static Electricity Precautions: Before attempting any repair, ensure you are properly grounded using an ESD (electrostatic discharge) strap. Static electricity can severely damage electronic components.
- Eye Protection: Always wear eye protection during the installation process to guard against glass splinters or other debris.
- Handle with Care: The screen assembly is a very fragile product. Avoid applying excessive force or bending.
- Cable Management: Do not over-bend the LCD cable. Bending it beyond 90 degrees can cause a black display or other malfunctions.
3. Setup and Installation
Follow these steps carefully for proper installation. It is crucial to test the component before fully installing it into the device.
3.1 Pre-Installation Testing
Before removing any protective films or tags, and prior to final installation, perform a simulated test:
- Disassemble Device: Carefully disassemble your Asus Memo Pad HD7 / ME173X / ME173 K00B tablet to access the motherboard and display connectors.
- Connect New Screen: Connect the new LCD screen and digitizer assembly's flex cables to the corresponding ports on the tablet's motherboard. Do not install the screen into the frame yet.
- Power On and Test: Power on the tablet. Verify that the display functions correctly, the touch screen responds accurately, and there are no visual defects (e.g., dead pixels, lines, discoloration).
- Troubleshooting During Test: If the screen does not display or exhibits issues during this test, power off the device, disconnect, and re-connect the cables to ensure a secure connection. If problems persist, contact customer support immediately. Do not proceed with full installation.

Figure 3.1: Front view of the replacement LCD screen and digitizer assembly with frame.
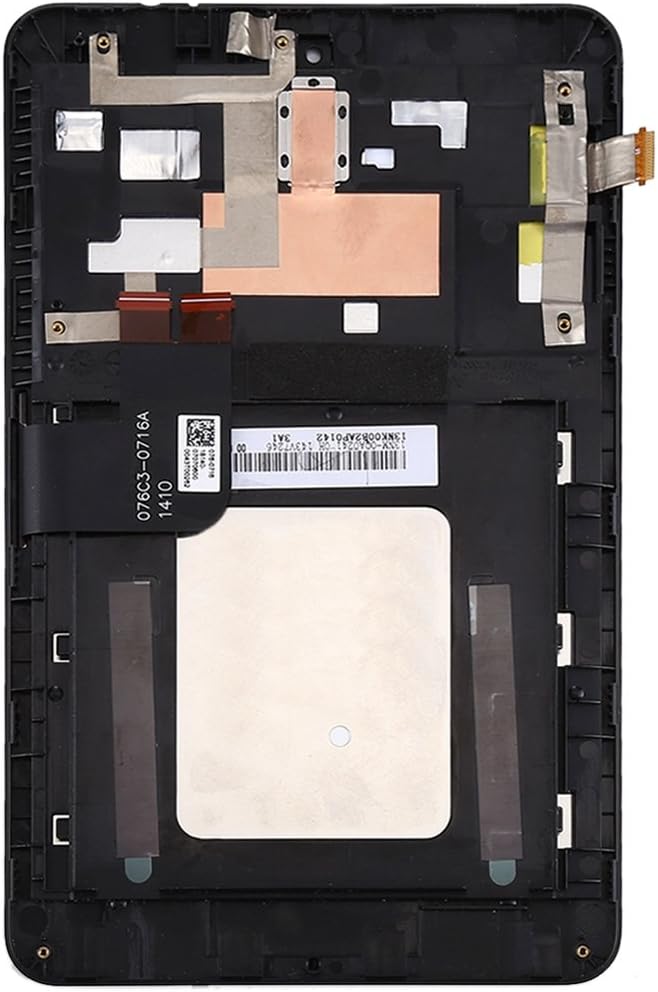
Figure 3.2: Rear view of the assembly, illustrating the integrated frame and flex cable connections.

Figure 3.3: Detailed view of the flex cable, which must be connected carefully to the motherboard. Avoid bending this cable excessively.
3.2 Final Installation
Once pre-installation testing is successful:
- Remove Protective Films: Carefully remove all protective films and tags from the new screen assembly.
- Secure Assembly: Place the new screen assembly into the tablet's chassis, ensuring it aligns correctly with all mounting points.
- Reassemble Device: Reconnect any remaining components and carefully reassemble your tablet, ensuring all screws and clips are properly secured.
- Final Test: Power on the device and perform a final functional test to confirm everything is working as expected.
4. Operating Instructions
After successful installation, the new LCD screen and digitizer assembly will function identically to the original component. Operate your Asus Memo Pad HD7 / ME173X / ME173 K00B tablet as usual, utilizing the touch screen for navigation and interaction with the device's operating system and applications.
- Touch Sensitivity: The digitizer provides responsive touch input. If you experience any inconsistencies, ensure the screen surface is clean.
- Display Quality: The LCD screen should provide clear and vibrant visuals. Adjust display settings through your tablet's operating system if needed.
5. Maintenance
Proper maintenance helps prolong the life and performance of your screen assembly.
- Cleaning the Screen: Use a soft, lint-free microfiber cloth to gently wipe the screen. For stubborn smudges, slightly dampen the cloth with water or a screen-specific cleaning solution. Avoid harsh chemicals, abrasive materials, or excessive moisture.
- Protection: Consider using a screen protector to prevent scratches and minor impacts.
- Avoid Pressure: Do not place heavy objects on the tablet or apply excessive pressure to the screen, as this can cause damage.
- Temperature Extremes: Avoid exposing the tablet to extreme temperatures, which can affect screen performance and longevity.
6. Troubleshooting
If you encounter issues after installation, refer to the following common troubleshooting steps:
- No Display / Black Screen:
- Ensure all flex cables are securely connected to the motherboard.
- Check if the LCD cable was over-bent during installation (bending beyond 90 degrees can cause permanent damage).
- Verify the tablet is powered on and has sufficient battery charge.
- Unresponsive Touch Screen:
- Clean the screen surface to remove any dirt or debris.
- Ensure the digitizer flex cable is properly connected.
- Restart the tablet.
- Display Anomalies (Lines, Discoloration, Dead Pixels):
- These often indicate a faulty screen or damage during installation. Re-check cable connections.
- If issues persist after re-checking connections, the screen may be defective.
For persistent issues not resolved by these steps, please contact customer support.
7. Specifications
| Feature | Specification |
|---|---|
| Product Type | LCD Screen + Touch Screen Digitizer Full Assembly with Frame |
| Compatibility | Asus Memo Pad HD7 / ME173X / ME173 K00B |
| Item Weight | 9.9 ounces |
| Manufacturer | HUANGYUNCHAO |
| Date First Available | July 21, 2022 |
8. Warranty and Support
For any questions, technical assistance, or warranty inquiries regarding this product, please contact the seller or manufacturer directly. Refer to your purchase documentation for specific contact information and warranty terms.


