1. Introduction
Thank you for choosing the Kitsure Large Extendable Dish Drying Rack. This manual provides essential information for the proper assembly, operation, and maintenance of your new dish drainer. Designed for versatility and durability, this rack features an extendable design, anti-slip silicone caps, and rust-resistant materials to keep your kitchen counter organized and dry.
2. Components
Before assembly, ensure all components are present and undamaged. The Kitsure Large Extendable Dish Drying Rack includes the following parts:
- Main Metal Rack (Extendable)
- Drain Board (Plastic)
- Cutlery Holder with Knife Slots (Plastic with Wooden Insert)
- Cup Holders (Wire, attachable)
- Anti-Slip Silicone Caps (for feet)
- Drain Spout (Adjustable)
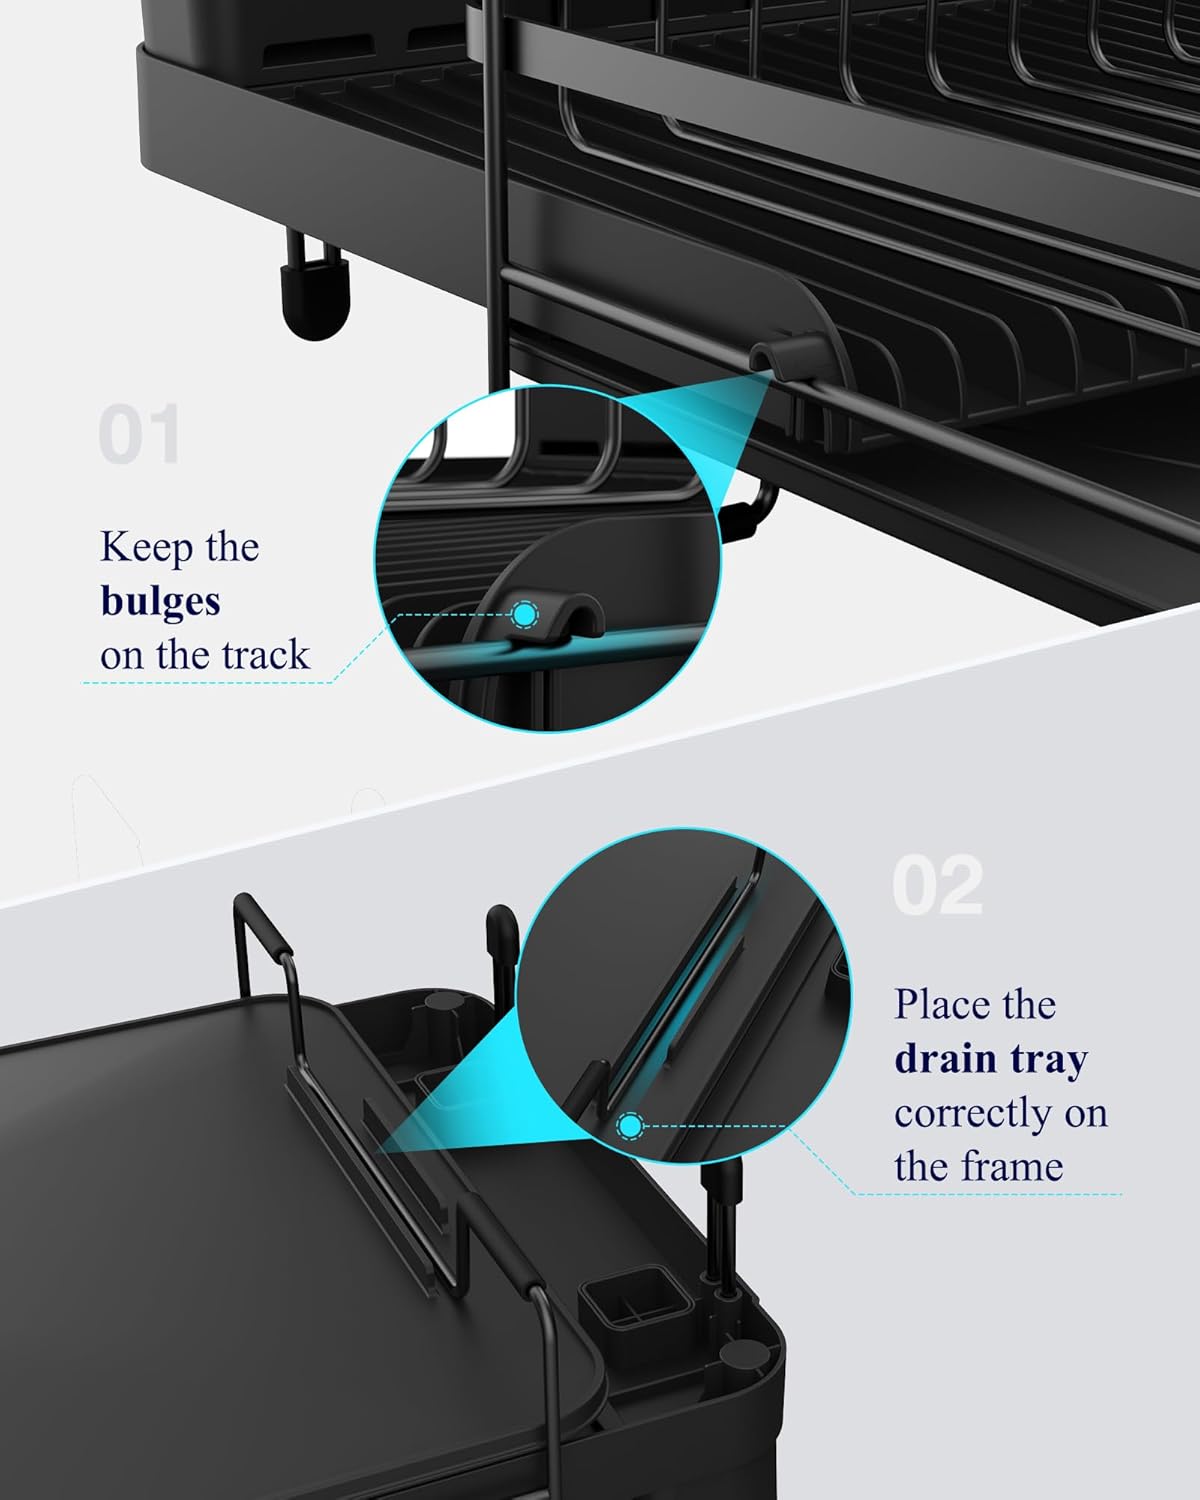
Image: Exploded view of the Kitsure dish drying rack components, showing the metal rack, plastic drain board, and cutlery holder.
3. Setup Instructions
Follow these steps to assemble your Kitsure dish drying rack:
- Attach Anti-Slip Silicone Caps: Securely place the four anti-slip silicone caps onto the bottom feet of the main metal rack. This prevents slipping and protects your countertop.
- Insert Drain Spout: Locate the drain hole on the underside of the plastic drain board. Attach the adjustable drain spout by snapping it into place. Ensure it is firmly connected.
- Position Drain Board: Place the plastic drain board onto the base of the metal rack. Ensure the bulges on the drain board align with the tracks on the metal frame for proper seating.
- Attach Cutlery Holder: The cutlery holder can be placed on either side of the main rack. Slide it onto the designated slots on the side of the drain board. The wooden knife insert can be placed into the cutlery holder.
- Attach Cup Holders: The wire cup holders can be hooked onto the outer frame of the metal rack, allowing cups to hang over the sink for efficient drying.
- Adjust Length: Gently pull the extendable section of the metal rack to your desired length, accommodating your countertop space. The rack can extend from 19.2 inches to 26.7 inches.

Image: Detailed view of how to correctly place the drain tray onto the frame and align the bulges on the track.
Video: This video demonstrates the assembly process of the Kitsure dish drying rack, including attaching the drain spout and extending the rack.
4. Operating Instructions
The Kitsure dish drying rack is designed for efficient and convenient dish drying. Here’s how to use its features:
- Placing Dishes: Arrange plates, bowls, and other dishware on the main metal rack. The design allows for optimal airflow for faster drying.
- Using Cutlery Holder: Place forks, spoons, and other utensils in the designated compartments of the cutlery holder. Use the wooden insert for knives to keep them secure and separate.
- Drying Cups: Hang cups and mugs on the wire cup holders. Position them so excess water drips directly into the sink.
- Extend/Retract Functionality: Adjust the length of the rack as needed to accommodate varying loads of dishes or to fit different counter sizes. Simply slide the extendable section in or out.
- Efficient Drainage: Ensure the adjustable drain spout is positioned directly over your sink to allow water to drain continuously, preventing water accumulation on your countertop.

Image: The Kitsure dish drying rack fully extended on a kitchen counter, holding various dishes, pots, and cutlery.
Video: This video highlights the extendable feature of the dish drying rack, demonstrating how it can be adjusted to fit different counter sizes and accommodate more dishes.
5. Maintenance
To ensure the longevity and hygiene of your Kitsure dish drying rack, regular cleaning is recommended:
- Daily Cleaning: After each use, ensure all water has drained through the spout. Wipe down the drain board and metal rack with a soft cloth to prevent water spots and residue buildup.
- Deep Cleaning: Periodically disassemble the rack (as shown in the setup section) for a thorough cleaning. Wash all components with warm, soapy water. The drain board and cutlery holder are easy to clean due to their waterproof coating.
- Addressing Hard Water Stains: For hard water spots, use a solution of white vinegar and water. Apply to affected areas, let it sit for a few minutes, then scrub gently and rinse thoroughly.
- Rust Prevention: The rack is made of rust-resistant material. However, to maintain its condition, avoid using abrasive cleaners or scourers that could damage the protective coating.
Video: This video demonstrates how to clean the dish drying rack, including disassembling the drain board and wiping down components.
6. Troubleshooting
If you encounter any issues with your Kitsure dish drying rack, refer to the following common problems and solutions:
- Water Not Draining Smoothly:
Possible Cause: Drain spout is not positioned correctly over the sink or is clogged.
Solution: Ensure the drain spout is extended and angled directly into the sink. Check the spout and drain board for any food debris or buildup and clean if necessary. If your sink edge is above the counter, water may not drain smoothly. - Rack Feels Unstable:
Possible Cause: Anti-slip silicone caps are missing or not properly installed.
Solution: Verify that all four anti-slip silicone caps are securely attached to the feet of the rack. Ensure the rack is placed on a flat, stable surface. - Difficulty Extending/Retracting:
Possible Cause: Debris in the sliding mechanism or misalignment.
Solution: Check the sliding tracks for any obstructions. Ensure the drain board is correctly seated within the metal frame. Clean the tracks if needed. - Rust Appears on Metal Parts:
Possible Cause: Damage to the rust-resistant coating or prolonged exposure to harsh chemicals.
Solution: While designed to be rust-resistant, extreme conditions or damage can affect it. Avoid using abrasive cleaners. For minor rust, a rust remover designed for kitchen use may be applied carefully, followed by thorough rinsing and drying.
7. Specifications
| Feature | Detail |
|---|---|
| Material | Metal, Plastic |
| Product Dimensions (Extended) | 12.9"D x 26.7"W x 7.2"H |
| Product Dimensions (Retracted) | 12.9"D x 19.2"W x 7.2"H |
| Color | Black |
| Recommended Uses | Dishware, Cutlery, Cups |
| Mounting Type | Countertop Mount |
| Item Weight | 5.02 Pounds |
| Special Features | Adjustable, Anti-slip, Expandable, Rust Resistant |
| Assembly Required | Yes |
| Dishwasher Compatible | No |
8. Warranty & Support
Kitsure products are manufactured with quality and customer satisfaction in mind. For specific warranty information, please refer to the product packaging or contact Kitsure customer support directly. If you have any questions, require assistance with assembly, or need troubleshooting help, please reach out to our customer service team. Contact details can typically be found on our official website or product packaging.