AVPLAY AD-2PRO
Tone Winner AD-2PRO Integrated Amplifier User Manual
Model: AD-2PRO
Brand: AVPLAY
Introduction
This manual provides comprehensive instructions for the setup, operation, and maintenance of your Tone Winner AD-2PRO HI-END Class A Integrated Amplifier. Please read this manual thoroughly before using the product to ensure proper functionality and longevity.
The Tone Winner AD-2PRO is a high-fidelity integrated amplifier featuring a Class A design, 200W output, digital audio support, a phono amplifier, and an ES9038 decoder. It supports a voltage range of 110V-220V.
Product Overview

Figure 1.1: Front view of the Tone Winner AD-2PRO amplifier. This image highlights the sleek silver and black design, the central digital display, the large volume knob, and various input/mode selection buttons located at the bottom front panel.

Figure 1.2: Front view of the amplifier placed on an audio stand, with various audio cables (RCA and XLR) depicted in the background, illustrating potential connectivity options.

Figure 1.3: Side angle view of the Tone Winner AD-2PRO amplifier, emphasizing the robust heat sinks on both sides, essential for dissipating heat generated by the Class A operation.

Figure 1.4: Rear view of the amplifier with several audio cables already connected to its input and output terminals, demonstrating a typical setup.

Figure 1.5: Detailed view of the rear panel, clearly showing the array of input and output ports, including analog (RCA, XLR), digital (Coaxial, Optical), phono inputs, and speaker terminals.
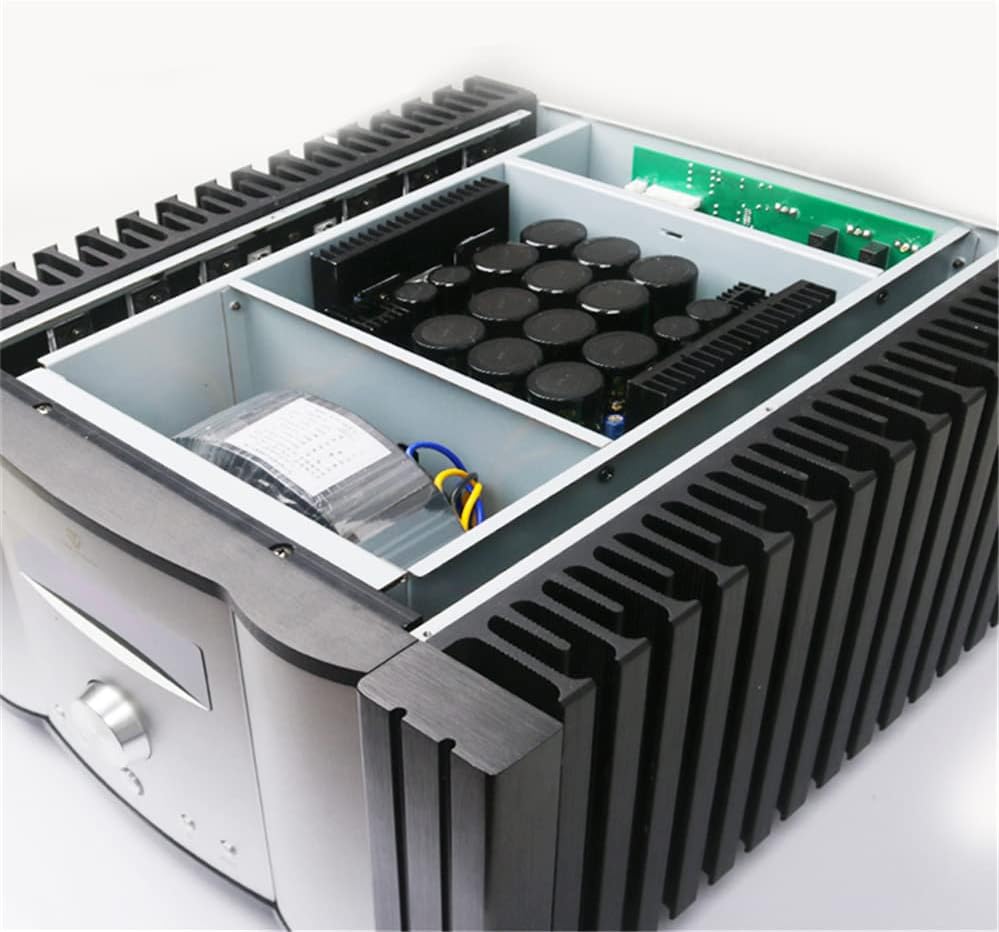
Figure 1.6: Internal view of the amplifier, revealing the high-quality components such as large power supply capacitors and neatly arranged circuit boards, indicative of its robust design.
Safety Instructions
To prevent fire, electric shock, and damage to the unit, please observe the following safety precautions:
- Do not expose this unit to rain or moisture.
- Do not place objects filled with liquids, such as vases, on the unit.
- Do not block ventilation openings. Ensure adequate space around the unit for proper airflow.
- Do not install near any heat sources such as radiators, heat registers, stoves, or other apparatus (including amplifiers) that produce heat.
- Protect the power cord from being walked on or pinched, particularly at plugs, convenience receptacles, and the point where they exit from the unit.
- Only use attachments/accessories specified by the manufacturer.
- Unplug this unit during lightning storms or when unused for long periods of time.
- Refer all servicing to qualified service personnel. Servicing is required when the unit has been damaged in any way, such as power-supply cord or plug is damaged, liquid has been spilled or objects have fallen into the unit, the unit has been exposed to rain or moisture, does not operate normally, or has been dropped.
Setup
Unpacking
Carefully remove the amplifier from its packaging. Retain all packaging materials for future transport or storage. Inspect the unit for any signs of damage. If damage is found, contact your dealer immediately.
Placement
Place the amplifier on a stable, level surface away from direct sunlight, heat sources, and excessive dust or moisture. Ensure there is sufficient ventilation space around the unit, especially around the heat sinks on the sides.
Connections
Before making any connections, ensure the amplifier is turned off and unplugged from the power outlet.
- Speaker Connections: Connect your speakers to the speaker output terminals on the rear panel. Ensure correct polarity (+ to + and - to -) for each speaker. The AD-2PRO supports 8Ω rated load impedance.
- Analog Audio Inputs: Connect your audio sources (CD player, streamer, etc.) to the analog input terminals (RCA or XLR) on the rear panel. For balanced connections, use the XLR inputs.
- Digital Audio Inputs: For digital sources, connect via Coaxial or Optical inputs. The built-in ES9038 decoder will process the digital audio signal.
- Phono Input: If you are connecting a turntable, use the dedicated Phono input. Ensure your turntable has a compatible output level.
- Power Connection: Once all audio connections are made, connect the power cord to the amplifier's AC inlet and then to a suitable wall outlet (110V-220V).
Operating Instructions
Powering On/Off
Press the power button on the front panel to turn the amplifier on or off. The display will illuminate when the unit is powered on.
Input Selection
Use the "INPUT" button on the front panel or the remote control to cycle through the available audio inputs (Analog, Digital, Phono).
Volume Control
Rotate the large central knob on the front panel clockwise to increase volume and counter-clockwise to decrease it. The current volume level will be shown on the display.
Mode Selection (Class A / Class A+B)
The AD-2PRO supports both pure Class A and Class A+B operation. Use the "MODE" button to switch between these modes. Note that Class A operation consumes more power and generates more heat (260W-320W static power consumption) compared to Class A+B (70W-110W static power consumption).
Mute Function
Press the "MUTE" button to temporarily silence the audio output. Press it again to restore the sound.
Speaker A/B Selection
If your amplifier is connected to two sets of speakers, use the "SPEAKER A/B" button to select which set is active.
Maintenance
- Cleaning: Use a soft, dry cloth to clean the exterior of the amplifier. Do not use liquid cleaners or aerosol sprays, as they may damage the finish or internal components.
- Ventilation: Regularly check that the ventilation openings are clear of dust and debris to ensure proper heat dissipation.
- Storage: If storing the unit for an extended period, unplug it from the power outlet and store it in a cool, dry place, preferably in its original packaging.
Troubleshooting
| Problem | Possible Cause | Solution |
|---|---|---|
| No power | Power cord not connected; Power outlet not active; Unit in standby mode. | Ensure power cord is securely connected. Check power outlet with another device. Press power button to turn on. |
| No sound output | Incorrect input selected; Volume too low; Mute function active; Speaker cables not connected properly. | Select correct input. Increase volume. Deactivate mute. Check speaker cable connections and polarity. |
| Distorted sound | Input signal too strong; Speaker impedance mismatch; Damaged cables. | Reduce input source volume. Ensure speakers are 8Ω. Check and replace damaged cables. |
| Unit gets excessively hot | Insufficient ventilation; Operating in Class A mode for extended periods. | Ensure adequate space around the unit. Consider switching to Class A+B mode if not critical. |
Specifications
| Parameter | Value |
|---|---|
| Signal to Noise Ratio (A weighting) | ≥108dB |
| Frequency Response | 15Hz~100KHz (+1/-3dB) |
| Distortion (1KHz, normal working conditions) | ≤0.01% |
| Output Power (THD=1%, 1KHz, 8Ω single channel) | 200W |
| Rated Load Impedance | 8Ω |
| Machine Gain | 39dB±1dB |
| Class A Static Power Consumption | 260W~320W |
| Class A and B Static Power Consumption | 70W~110W |
| Standby Power Consumption | <0.5W |
| Net Weight | 35.9Kg |
| Machine Size (W×D×H) | 444mm × 460mm × 254mm |
| Amplifier Circuit | Fully balanced transmission amplifier circuit (similar to AD-1PA): fully symmetrical, fully balanced, differential input to BTL (bridged) Class A power output. |
Warranty and Support
For warranty information and technical support, please refer to the documentation provided with your purchase or contact your authorized AVPLAY dealer. Keep your proof of purchase for warranty claims.
Manufacturer: Queenway(Qinhuai) Century Technology Co., Ltd.
Related Documents - AD-2PRO
 |
Tone Winner AD-7300PA+ 7-Channel Audio Power Amplifier User Manual This user manual provides detailed information on the Tone Winner AD-7300PA+ 7-Channel Audio Power Amplifier, covering its features, specifications, operation, safety precautions, and warranty. |
 |
TONE WINNER AD-66D PRO Integrated Hi-Fi Stereo Amplifier User Manual Comprehensive user manual for the TONE WINNER AD-66D PRO Integrated Hi-Fi Stereo Amplifier, detailing its features, operation, specifications, and safety guidelines for optimal audio performance. |
 |
HiFi ROSE RA180 Integrated Amplifier: Features, Specifications, and User Guide Discover the HiFi ROSE RA180 Integrated Amplifier, powered by advanced Gallium Nitride (GaN) FET technology for exceptional audio performance. This comprehensive guide details its Hi-Res audio capabilities, versatile connectivity including MM/MC phono input, multiple speaker output options, tone controls, and essential operational instructions. |
 |
DCCconcepts Cobalt AD-2fx Stall Motor Decoder Owner's Manual & Installation Guide Comprehensive guide to installing, wiring, and configuring the DCCconcepts Cobalt AD-2fx Stall Motor Decoder for model railway DCC and DC layouts. Features include setup, address setting, feedback explanation, and special software commands. |
 |
EDECOA Sincore Series Inverter Technical Specifications and Troubleshooting Guide Comprehensive technical specifications, product appearance details, and troubleshooting guide for EDECOA Sincore series inverters, covering model numbers, operating parameters, fault codes, and problem solutions. |
 |
ToneWinner AD-1PA Audio Power Amplifier User Manual Comprehensive user manual for the ToneWinner AD-1PA Audio Power Amplifier, covering setup, operation modes (Class A/AB/Auto), technical specifications, and safety instructions. |
Ask a question about this manual
Ask about setup, troubleshooting, compatibility, parts, safety, or missing instructions. Manuals+ will review the question and use this page’s manual context to help answer it.