1. Introduction
This manual provides detailed instructions for the installation, operation, and troubleshooting of your Teday WiFi 6E PCIE Adapter. This adapter integrates an Intel AX210 chip, offering advanced Wi-Fi 6E (802.11ax) connectivity across 2.4GHz, 5GHz, and 6GHz bands, alongside Bluetooth 5.3 technology. Designed for desktop PCs, it aims to enhance wireless network performance and Bluetooth capabilities.

Image 1.1: The Teday WiFi 6E PCIE Adapter, featuring a red heatsink and two detachable 10DBi antennas.

Image 1.2: Overview of the adapter's key features, including high-speed Wi-Fi 6E, Intel AX210 chipset, Bluetooth 5.3, and 10DBi antennas for strong signal.
2. Package Contents
Verify that all items are present in the package:
- 1x Teday 10DB Antennas WiFi 6E PCIE Adapter (Model: PCIE-AX210 PRO)
- 2x 10DBi High-Gain Antennas
- 1x Bluetooth Connection Cable (for motherboard 9-pin USB header)
- 1x Driver CD (may not be included in all packages, drivers can be downloaded online)
- 1x Low-Profile Bracket (for small form factor PCs)
3. System Requirements
- Operating System: Microsoft Windows 10 (64-bit), Windows 11, or Linux. (Windows 7/8/8.1 are not supported).
- Available Slot: One available PCI Express (PCIe) x1, x4, x8, or x16 slot on the motherboard.
- Bluetooth Functionality: An available 9-pin USB header on the motherboard for Bluetooth connectivity.

Image 3.1: The adapter is compatible with Windows 10 (64-bit), Windows 11, and Linux operating systems.
4. Setup and Installation
Follow these steps to install the Teday WiFi 6E PCIE Adapter into your desktop computer:
- Prepare Your Computer:
- Power off your computer and unplug the power cord from the wall outlet.
- Open the computer case. Refer to your computer's manual for instructions on how to safely open the case.
- Install the PCIE Adapter:
- Locate an available PCI Express (PCIe) slot (x1, x4, x8, or x16) on your motherboard.
- Carefully insert the adapter into the chosen PCIe slot, ensuring it is fully seated. Secure the adapter with a screw if your case requires it.
- Connect Bluetooth Cable:
- Connect one end of the provided Bluetooth connection cable to the 9-pin header on the PCIE adapter.
- Connect the other end of the cable to an available 9-pin USB header on your motherboard. This connection is essential for Bluetooth functionality.
- Attach Antennas:
- Screw the two 10DBi high-gain antennas onto the connectors on the back of the PCIE adapter. Adjust their orientation for optimal signal reception.
- Close Case and Power On:
- Close your computer case, plug in the power cord, and power on your computer.

Image 4.1: Visual guide for the installation process, from inserting the adapter to driver installation and network connection.

Image 4.2: Illustration emphasizing the critical connection of the Bluetooth cable to the motherboard's 9-pin USB header for Bluetooth functionality.
5. Operating Instructions
5.1 Driver Installation
After physical installation, drivers must be installed for the adapter to function correctly.
- Automatic Installation: For Windows 10/11, the operating system may automatically detect and install the necessary drivers upon startup. Check Device Manager to confirm.
- Manual Installation (from CD): If an automatic installation does not occur, insert the provided driver CD into your computer's optical drive and follow the on-screen instructions.
- Manual Installation (from Intel Website): If you do not have an optical drive or prefer the latest drivers, download them directly from the Intel website. Search for "Intel Wi-Fi 6E AX210 drivers" and "Intel Bluetooth AX210 drivers".
- Verification: After installation, open Device Manager (Right-click Start button > Device Manager). Under "Network adapters," you should see "Intel Wi-Fi 6E AX210" or similar. Under "Bluetooth," you should see "Intel Wireless Bluetooth" or similar.
5.2 Connecting to Wi-Fi
Once drivers are installed, you can connect to a wireless network:
- Click the Wi-Fi icon in the system tray (bottom-right corner of the screen).
- Select your desired Wi-Fi network from the list of available networks.
- Click "Connect" and enter the network security key (password) if prompted.
- Your computer should now be connected to the Wi-Fi network.
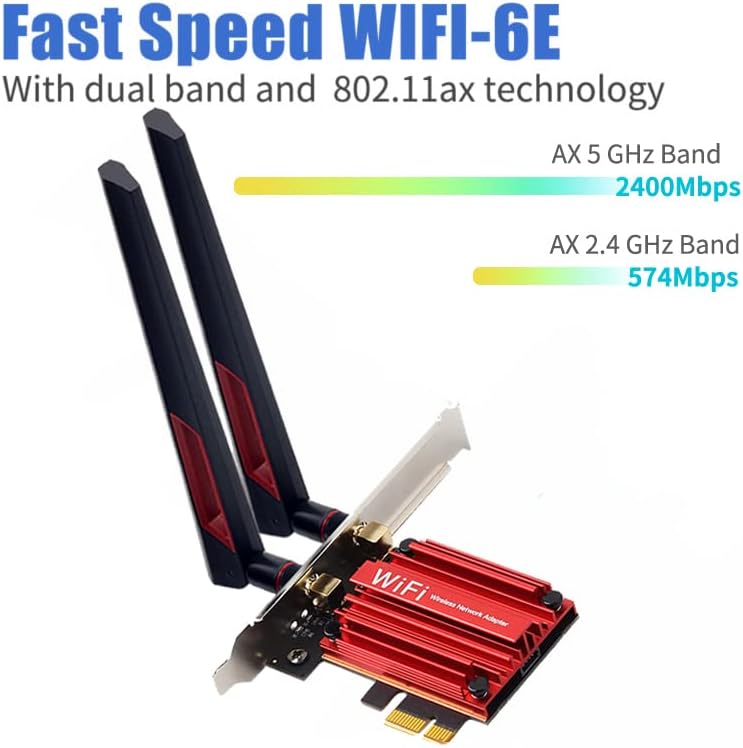
Image 5.1: The adapter supports high speeds across 2.4 GHz and 5 GHz bands, leveraging Wi-Fi 6E technology.

Image 5.2: The adapter utilizes advanced MU-MIMO technology to improve network efficiency and capacity, allowing multiple devices to connect simultaneously without significant speed degradation.
5.3 Bluetooth Pairing
Ensure the Bluetooth cable is correctly connected to your motherboard's 9-pin USB header for Bluetooth functionality.
- Go to Windows Settings > Devices > Bluetooth & other devices.
- Ensure Bluetooth is turned "On".
- Click "Add Bluetooth or other device" and select "Bluetooth".
- Put your Bluetooth device (e.g., headphones, keyboard) into pairing mode.
- Select your device from the list and follow any on-screen prompts to complete pairing.
6. Specifications
| Feature | Description |
|---|---|
| Model | PCIE-AX210 PRO |
| Chipset | Intel AX210NGW |
| Wi-Fi Standard | IEEE 802.11ax (Wi-Fi 6E), backward compatible with 802.11a/b/g/n/ac |
| Frequency Bands | 2.4GHz, 5GHz, 6GHz (Tri-Band) |
| Max Wi-Fi Speed | Up to 5374Mbps (2.4GHz: 600Mbps, 5GHz: 2400Mbps, 6GHz: 2400Mbps) |
| Bluetooth Version | Bluetooth 5.3 |
| Antennas | 2x 10DBi High-Gain External Antennas |
| Interface | PCI Express (PCIe) x1/x4/x8/x16 |
| Supported OS | Windows 10 (64-bit), Windows 11, Linux |
| Features | OFDMA, AX MU-MIMO, 160MHz Broadband Channel |

Image 6.1: The Intel AX210 chipset is the core component, enabling high-speed Wi-Fi 6E and Bluetooth 5.3 connectivity.
7. Troubleshooting
If you encounter issues with your Teday WiFi 6E PCIE Adapter, refer to the following common problems and solutions:
- No Wi-Fi Signal or Adapter Not Detected:
- Ensure the adapter is securely seated in the PCIe slot.
- Verify that the antennas are properly attached and oriented.
- Check Device Manager to see if the "Intel Wi-Fi 6E AX210" adapter is listed without any error symbols. If not, reinstall the drivers.
- Ensure your operating system is supported (Windows 10 64-bit, Windows 11, or Linux).
- Bluetooth Not Working:
- Confirm that the Bluetooth connection cable is correctly plugged into both the adapter and an available 9-pin USB header on your motherboard. This cable is mandatory for Bluetooth functionality.
- Check Device Manager to see if "Intel Wireless Bluetooth" is listed without error. If not, reinstall the Bluetooth drivers.
- Ensure Bluetooth is enabled in your Windows settings.
- Slow Wi-Fi Speeds:
- Ensure your router supports Wi-Fi 6E and is configured for 160MHz channel width for maximum speeds.
- Check antenna orientation and position for optimal signal.
- Update your Wi-Fi drivers to the latest version from the Intel website.
- Minimize interference from other wireless devices or obstacles.
- Intermittent Connection:
- Ensure drivers are up to date.
- Check for physical obstructions or sources of interference.
- Test with a different Wi-Fi network if possible to rule out router issues.
8. Maintenance
The Teday WiFi 6E PCIE Adapter requires minimal maintenance. Keep the following in mind:
- Driver Updates: Periodically check the Intel website for updated Wi-Fi and Bluetooth drivers to ensure optimal performance and security.
- Physical Inspection: Occasionally check that the adapter is securely seated in its PCIe slot and that the antennas are firmly attached.
- Cleaning: If necessary, gently clean any dust accumulation on the adapter's heatsink using compressed air. Ensure the computer is powered off and unplugged before cleaning.
9. Warranty and Support
This product is covered by a standard manufacturer's warranty. For specific warranty terms and conditions, please refer to the documentation provided with your purchase or contact the retailer. For technical support, driver downloads, or further assistance, please visit the official Teday support website or the Intel support website for the AX210 chipset.
For general inquiries, you may also contact your point of purchase.