Introduction
This manual provides comprehensive instructions for the DEWENWILS Sprinkler Timer 3 Zone (Model HDWT03A). This automatic watering device is designed to simplify garden and lawn irrigation, offering multiple programmable procedures for up to three independent watering zones. Please read this manual thoroughly before operation to ensure proper setup and optimal performance.

Figure 1: Front view of the DEWENWILS Sprinkler Timer 3 Zone, showing the large LCD screen, control buttons, and three hose outlets.
Key Features
The DEWENWILS Sprinkler Timer offers a range of features designed for efficient and convenient watering:
- Easy to Program & Setup: Features a 3.4" large, easy-to-read LCD screen and 5 program buttons for intuitive settings.
- Upgraded Leakproof Design: Incorporates a pure zinc integrated tap connector to prevent water leakage and an ABS plastic shell for outdoor durability. Withstands water pressure up to 120 psi.
- 12 Programs for 3 Independent Zones: Control up to three zones independently, each with up to 4 watering cycles per day.
- Multiple Functions: Includes ECO Mode for water conservation, Rain Delay Mode to prevent over-watering, and Manual Mode for temporary watering needs.
- Hassle-free on Vacation: Battery-powered with a low battery indicator. Retains previous watering schedules when power is restored.
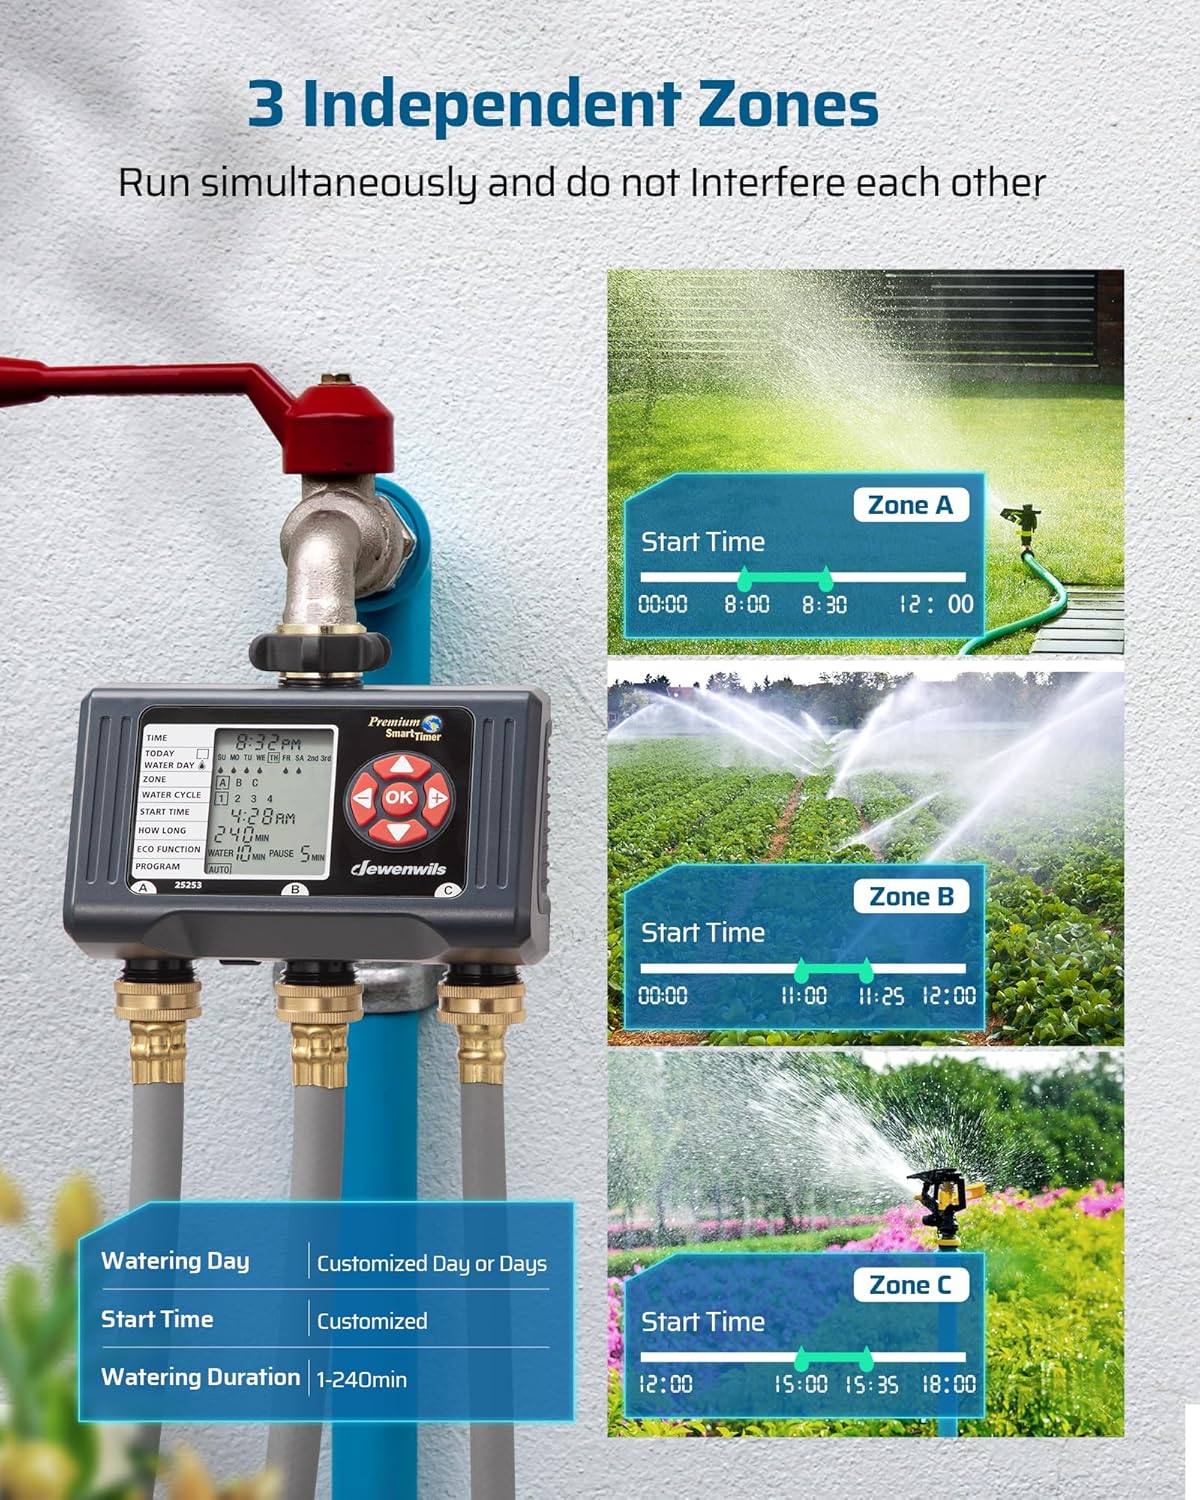
Figure 2: Illustration of the 3 independent watering zones, allowing simultaneous operation without interference.
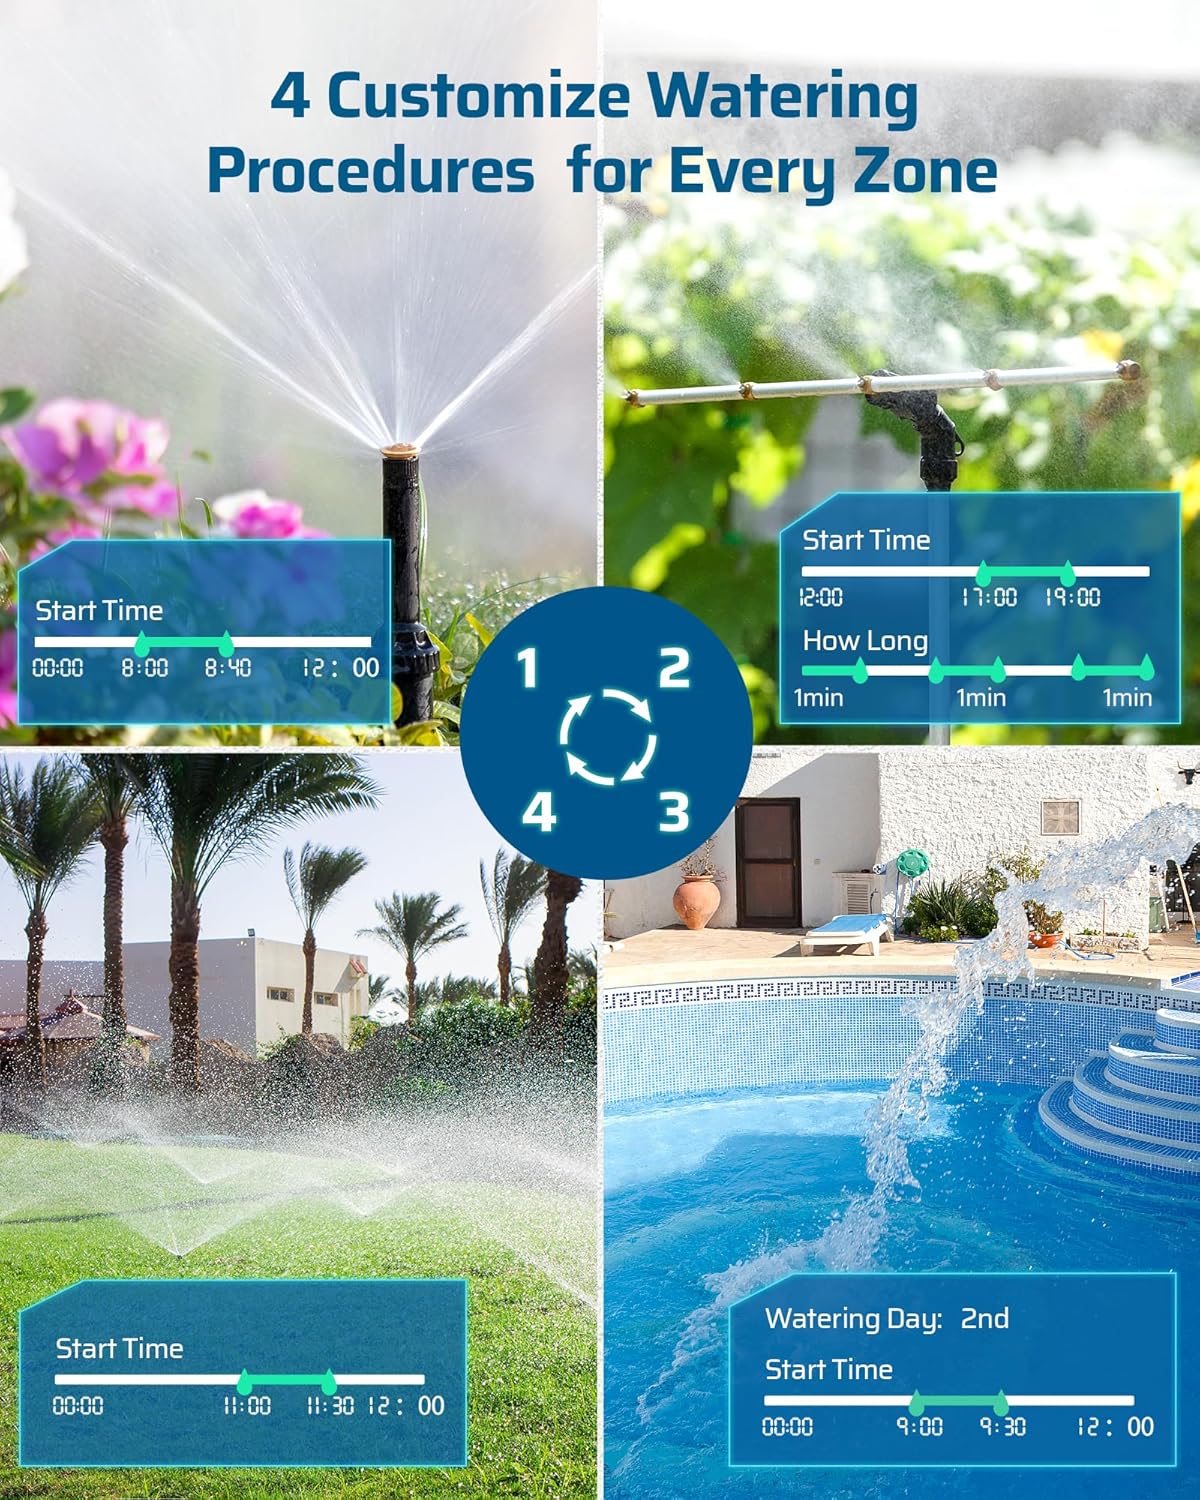
Figure 3: Depiction of four customizable watering procedures available for each zone, showing different start times and durations.

Figure 4: Visual representation of the ECO function for intermittent watering, Rain Delay for skipping watering during rain, and Manual Mode for on-demand watering.
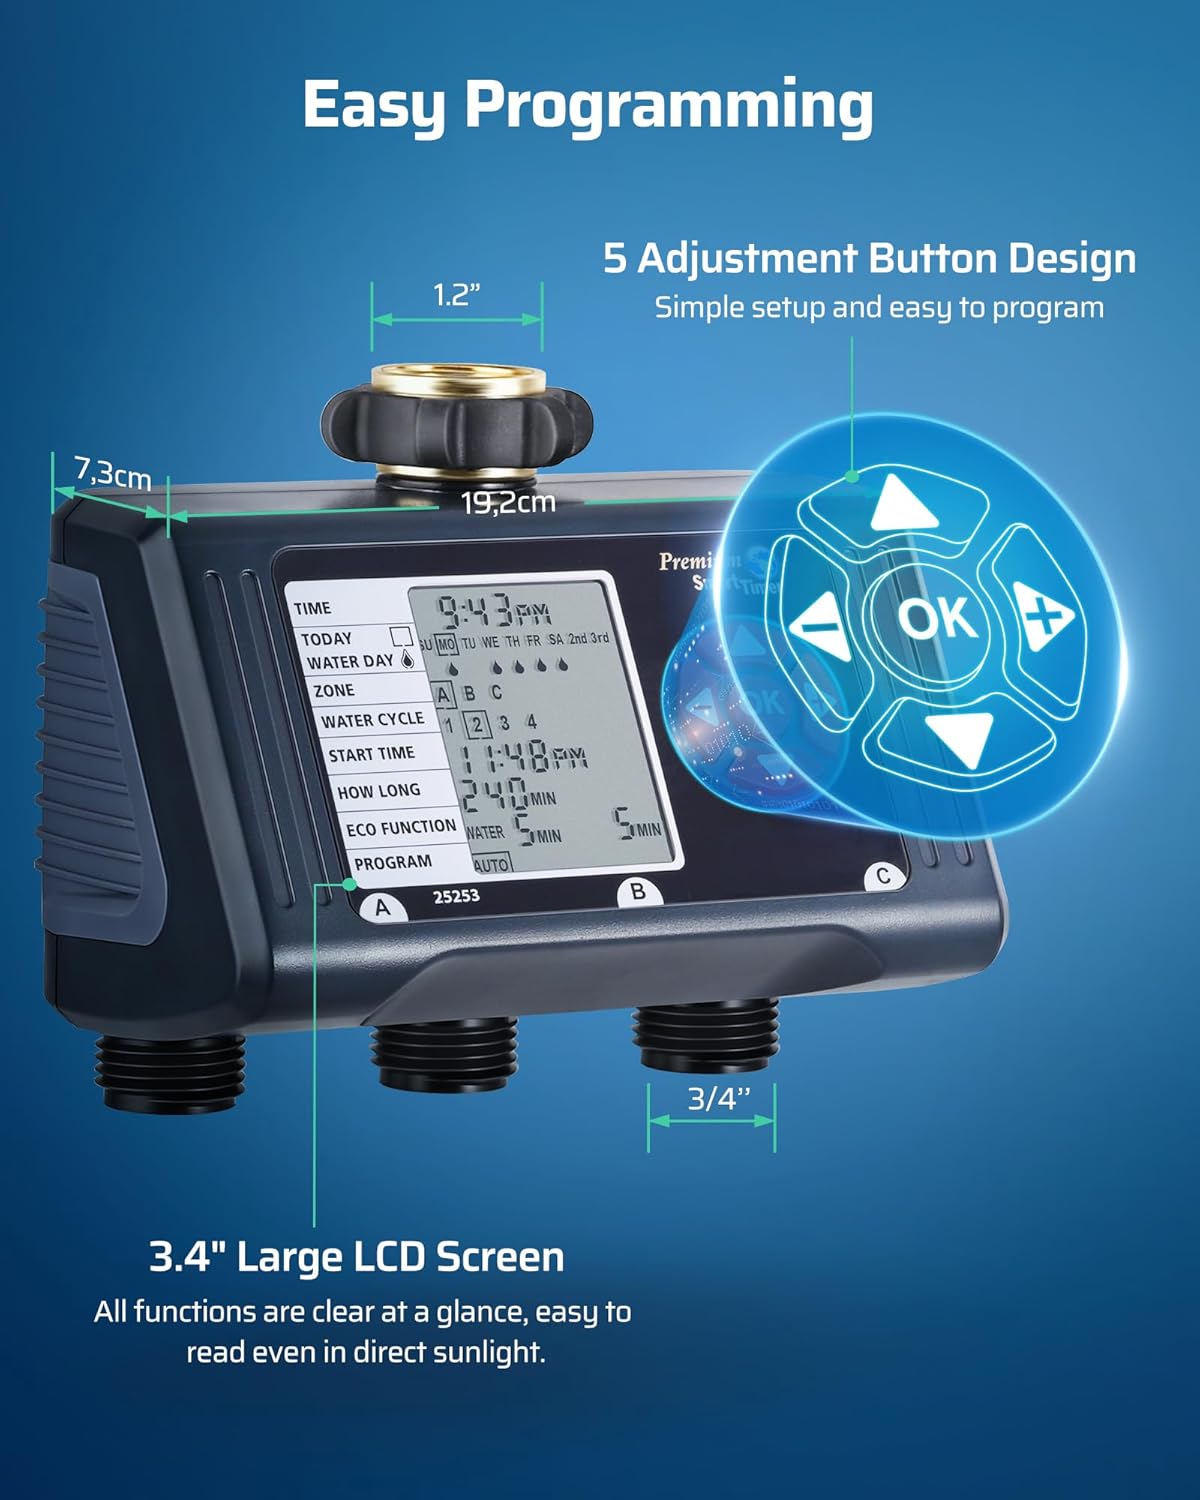
Figure 5: Close-up of the 3.4-inch large LCD screen, highlighting its readability and the 5 adjustment buttons for easy programming.
Product Overview Video
Video 1: An official DEWENWILS video demonstrating the key features and overall functionality of the Sprinkler Timer 3 Zone.
Setup and Installation
Follow these steps to properly set up and install your DEWENWILS Sprinkler Timer:
1. Battery Installation
- Locate the battery compartment on the back of the timer.
- Slide open the battery cover.
- Insert two 1.5V AA batteries (not included), ensuring correct polarity.
- Securely close the battery cover to ensure a waterproof seal.

Figure 6: Details of the timer's durability features, including the battery compartment with sealing ring and the pure zinc metal leak-proof interface.
2. Attaching to Faucet
- Ensure your outdoor water faucet is a standard 3/4 inch size.
- Screw the timer's top connector onto the faucet. Hand-tighten only; do not overtighten. The integrated pure zinc metal connector is designed for a secure, leak-proof fit.
- Ensure the timer is securely attached and stable.

Figure 7: Step-by-step visual guide for installing the sprinkler timer onto a faucet and connecting hoses.
3. Connecting Hoses
- Connect your garden hoses to the three independent outlets (A, B, C) at the bottom of the timer.
- Ensure all connections are tight to prevent leaks.
Operation and Programming
The DEWENWILS Sprinkler Timer features a user-friendly interface for setting up your watering schedules. The large LCD screen displays all necessary information clearly.
1. Setting Current Time
- Press the "TIME" button to enter time setting mode.
- Use the arrow buttons (Up/Down/Left/Right) to adjust the current time.
- Press "OK" to confirm and move to the next setting.
2. Programming Watering Schedules (Auto Mode)
The timer allows for up to 4 watering cycles per day for each of the 3 zones (A, B, C). You can customize watering days, start times, and durations.
- Select Zone: Use arrow buttons to select Zone A, B, or C.
- Select Water Cycle: Choose from 1 to 4 cycles for the selected zone.
- Set Start Time: Adjust the start time for the current water cycle using arrow buttons.
- Set How Long: Define the watering duration in minutes for this cycle.
- Set Water Day: Select specific days of the week for watering, or choose options like "Every 2nd Day" or "Every 3rd Day".
- Repeat for all desired zones and cycles.
3. ECO Mode
ECO Mode enables intermittent watering, which is beneficial for deep root watering and water conservation. It allows for a "Water" duration followed by a "Pause" duration, repeated throughout the scheduled period.
- In programming mode, navigate to "ECO FUNCTION".
- Set the desired "Water" duration (e.g., 5 minutes).
- Set the desired "Pause" duration (e.g., 15 minutes).
- This cycle will repeat until the total scheduled watering duration for that cycle is met.
4. Rain Delay Mode
To prevent over-watering during rainy periods, use the Rain Delay function:
- Press the "DELAY" button.
- Use arrow buttons to select the delay duration (1-6 days).
- The timer will pause all scheduled watering for the selected period and resume automatically afterward.
5. Manual Mode
For immediate, temporary watering without affecting your programmed schedules:
- Press the "MANUAL" button.
- Select the zone(s) you wish to water manually.
- Set the desired duration for manual watering.
- Press "OK" to start manual watering. It will stop automatically after the set duration.
Maintenance
Regular maintenance ensures the longevity and optimal performance of your sprinkler timer:
- Cleaning: Periodically clean the filter screen located in the faucet connector to prevent debris buildup and ensure proper water flow. Use a soft brush and rinse with water.
- Battery Replacement: The low battery indicator will alert you when batteries need replacement. Replace with two fresh 1.5V AA batteries. It is recommended to replace batteries at the beginning of each watering season.
- Winter Storage: Before the first frost, disconnect the timer from the faucet and hoses. Remove batteries and store the timer in a dry, frost-free location.
Troubleshooting
If you encounter issues with your DEWENWILS Sprinkler Timer, refer to the table below for common problems and solutions:
| Problem | Possible Cause | Solution |
|---|---|---|
| No water flow from outlets. | Faucet is off; low water pressure; clogged filter; incorrect programming. | Ensure faucet is fully open. Check water pressure (must be above 1 psi). Clean the filter screen. Verify programming settings (start time, duration, active zones). |
| Timer display is blank or dim. | Low or dead batteries. | Replace with new 1.5V AA batteries. |
| Water leakage from connections. | Loose connections; worn washers; non-standard thread type. | Ensure all connections are hand-tight. Check and replace rubber washers if worn. Verify compatibility with local faucet threads (standard 3/4 inch NPT is typical for this model). |
| Timer not following programmed schedule. | Incorrect time setting; program not activated; Rain Delay active; battery issue. | Check and correct current time. Ensure program is set to "AUTO". Deactivate Rain Delay if not needed. Check battery level. |
| One zone not watering. | Zone not enabled in program; hose kinked; outlet clogged. | Verify the specific zone is activated in its watering cycle. Check for kinks or blockages in the hose connected to that zone. Inspect the outlet for any obstructions. |
Product Specifications
| Specification | Detail |
|---|---|
| Brand | DEWENWILS |
| Model Number | HDWT03A |
| Color | Black |
| Material | Plastic, Acrylonitrile Butadiene Styrene |
| Item Weight | 1.12 pounds (506 Grams) |
| Number of Settings | 4 (Water Cycles per Zone) |
| Screen Size | 3.4 Inches |
| Max Water Pressure | 120 psi |
| Power Source | 2 x 1.5V AA Batteries (not included) |
| Country of Origin | China |
Warranty and Support
DEWENWILS products are designed for reliability and performance. This product comes with a standard manufacturer's warranty. For specific warranty details, claims, or technical support, please refer to the warranty information provided with your product packaging or visit the official DEWENWILS website.
For further assistance, you may also contact DEWENWILS customer service through their official channels.