1. Introduction
This manual provides essential information for the proper installation, operation, and maintenance of your Siterlink GS828C-D Carbon Monoxide (CO) Detector. Please read this manual thoroughly before using the device and retain it for future reference. Carbon monoxide is a colorless, odorless, and tasteless gas that can be fatal. This detector is designed to alert you to the presence of CO, providing an early warning to help protect your family.
2. Important Safety Information
- This CO detector is designed for indoor use only. Do not expose it to rain or moisture.
- Do not paint the detector. Paint can clog the sensor openings and interfere with the detector's ability to detect CO.
- Regularly test the detector as instructed in this manual to ensure proper operation.
- This device is not intended to detect smoke, fire, or other gases.
- Never ignore a CO alarm. Refer to the 'Alarm Conditions and Actions' section immediately.
- The detector should be installed by a competent person.
3. Product Overview

Figure 1: Front view of the Siterlink GS828C-D Carbon Monoxide Detector, showing the LCD screen, LED indicators, and the Test/Silence button.
The Siterlink GS828C-D Carbon Monoxide Detector features a clear LCD digital display, intuitive LED indicators, and a convenient Test/Silence button. It is designed for continuous monitoring of CO levels in your home.
4. Key Features
- 10-Year Product Life: Provides continuous protection for a decade.
- Replaceable Batteries: Powered by 2 AA alkaline batteries, ensuring operation even during power outages. Includes low battery warning.
- LCD Digital Display: Clearly shows real-time carbon monoxide concentration in parts per million (PPM).
- 3 LED Indicators: Flashes red (alarm), green (power), or yellow (fault) for quick status checks.
- Advanced Electrochemical Sensor: Provides high accuracy and reliability in detecting CO.
- Loud 85 dB Alarm: Delivers a clear and audible warning in case of CO detection.
- Test/Silence Button: Allows for weekly testing of the alarm and silencing during an alarm event.
- Compact and Versatile Design: Can be wall-mounted or used freestanding.

Figure 2: The detector features a 10-year product life and uses replaceable AA batteries.

Figure 3: Wide coverage of CO detection with specified alarm thresholds.

Figure 4: Internal components highlighting the advanced electrochemical sensor.

Figure 5: The three-color LED indicator system for status at a glance.
5. Package Contents
Verify that all items are present upon unpacking:
- Siterlink GS828C-D Carbon Monoxide Detector
- AA Alkaline Batteries (2)
- Mounting Hardware (screws and anchors)
- User Manual
6. Setup and Installation
6.1 Battery Installation
- Open the battery compartment cover on the back of the detector.
- Insert two (2) AA alkaline batteries, ensuring correct polarity (+ and -).
- Close the battery compartment cover securely. The detector will emit a short beep and the green LED will flash, indicating it is powered on.
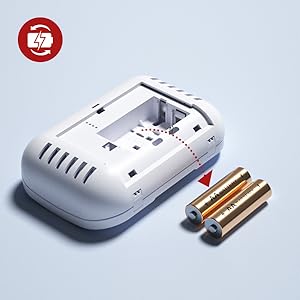
Figure 6: Correct battery insertion.
6.2 Mounting Location
For optimal protection, install CO detectors in the following locations:
- On every level of your home, including basements.
- Near or within each sleeping area.
- In rooms where fuel-burning appliances are located.
- At least 5 feet (1.5 meters) from any fuel-burning appliance to avoid false alarms during startup.
Avoid installing the detector in areas with:
- Excessive dust, dirt, or grease.
- High humidity (e.g., bathrooms).
- Direct sunlight or extreme temperatures.
- Obstructions that could block the alarm or sensor.
6.3 Mounting the Detector
The detector can be wall-mounted or placed freestanding on a flat surface.
- Wall-Mounting: Use the provided screws and anchors to secure the mounting bracket to a wall. Slide the detector onto the bracket until it clicks into place.
- Freestanding: Place the detector on a stable, flat surface where it will not be easily knocked over. Ensure the sensor openings are not obstructed.

Figure 7: Installation options: wall-mounted or freestanding.

Figure 8: Examples of suitable installation locations within a home.
7. Operating Instructions
7.1 Power-Up
After battery installation, the detector will perform a self-test. The green LED will flash, and the LCD will display '0 PPM' or the current CO level. The detector is now operational.
7.2 LCD Display
The LCD displays the current carbon monoxide concentration in parts per million (PPM). If no CO is detected, it will typically show '0 PPM'. It also displays a low battery icon when batteries need replacement.

Figure 9: Clear LCD display showing CO levels and battery status.
7.3 LED Indicators
- Green LED: Flashes once every 30 seconds, indicating normal operation.
- Yellow LED: Flashes, indicating a fault or low battery. Refer to troubleshooting.
- Red LED: Flashes rapidly along with an audible alarm, indicating CO detection.
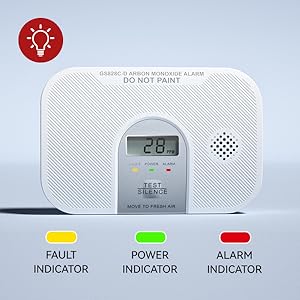
Figure 10: LED indicator meanings.
7.4 Test/Silence Button
Press and hold the 'TEST/SILENCE' button to:
- Test the Alarm: The detector will sound a loud alarm and the red LED will flash, confirming the alarm is functional. Release the button to stop the test.
- Silence the Alarm: During a CO alarm, pressing this button will temporarily silence the audible alarm for a short period (e.g., 5-10 minutes), allowing you to investigate the source. The red LED will continue to flash. If CO levels remain high, the alarm will reactivate.

Figure 11: Using the Test/Silence button.
8. Alarm Conditions and Actions
8.1 Carbon Monoxide Alarm
The detector will sound a loud 85 dB alarm and the red LED will flash when CO levels reach dangerous concentrations. The alarm thresholds are:
- 30 PPM: No alarm before 30 days.
- 70 PPM: Alarm between 60 to 240 minutes.
- 150 PPM: Alarm between 10 to 50 minutes.
- 400 PPM: Alarm between 4 to 15 minutes.
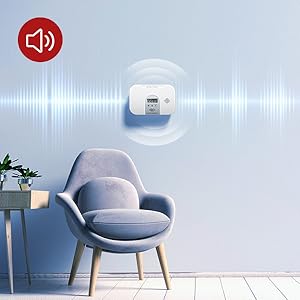
Figure 12: The detector emits a loud alarm when CO is detected.
If the CO Alarm Sounds:
- Immediately move to fresh air outdoors or open all doors and windows to ventilate the area.
- Do a head count to check that all persons are accounted for.
- Do not re-enter the premises until the CO has dissipated and the alarm has stopped.
- Call your emergency services, fire department, or a qualified technician to investigate the source of the carbon monoxide.
8.2 Low Battery Warning
When the batteries are low, the detector will chirp periodically (e.g., every 30-60 seconds) and the yellow LED will flash, along with a low battery icon on the LCD. Replace the batteries immediately.
8.3 Fault Indication
If the detector experiences a fault, the yellow LED will flash and the LCD may display an error code. This indicates a malfunction. Refer to the troubleshooting section or contact customer support.
9. Maintenance
9.1 Weekly Testing
Test your CO detector weekly by pressing and holding the 'TEST/SILENCE' button until the alarm sounds. This confirms the alarm's circuitry, sensor, and battery are functioning correctly.
9.2 Battery Replacement
Replace the batteries when the low battery warning sounds. Use only two (2) new AA alkaline batteries.
- Open the battery compartment cover.
- Remove the old batteries.
- Insert two new AA alkaline batteries, observing correct polarity.
- Close the battery compartment cover. The detector will perform a self-test.
9.3 Cleaning
Clean the detector regularly (e.g., monthly) to prevent dust buildup. Use a soft, damp cloth to wipe the exterior. Do not use cleaning agents or solvents. Do not spray air fresheners, hair spray, or other aerosols near the detector.
10. Troubleshooting
| Problem | Possible Cause | Solution |
|---|---|---|
| Detector does not power on. | Batteries incorrectly installed or dead. | Check battery polarity. Replace with new AA alkaline batteries. |
| Detector chirps periodically, yellow LED flashes. | Low battery warning. | Replace batteries immediately. |
| Detector sounds alarm, red LED flashes. | Carbon monoxide detected. | Follow 'Alarm Conditions and Actions' (Section 8.1). Evacuate and call emergency services. |
| Yellow LED flashes, LCD shows error. | Detector fault. | Press Test/Silence button. If fault persists, replace detector. |
| False alarms. | Improper placement (near vents, high humidity, strong fumes). | Relocate the detector to an appropriate area as per Section 6.2. Clean the detector. |
11. Specifications
| Specification | Detail |
|---|---|
| Model Number | GS828C-D |
| Power Source | 2 x AA Alkaline Batteries |
| Sensor Type | Electrochemical |
| Alarm Loudness | 85 dB at 1 meter |
| Product Dimensions | 1.4"D x 3.14"W x 4.7"H (3.7cm D x 8cm W x 12cm H) |
| Item Weight | 6.7 ounces (approx. 190g) |
| Operating Temperature | Not specified (typical range 0°C to 40°C) |
| Operating Humidity | Not specified (typical range 10% to 95% RH non-condensing) |
| Certification | UL2034 |
| UPC | 768481665698 |

Figure 13: Product dimensions.
12. Warranty and Customer Support
Siterlink provides a 36-month warranty for this carbon monoxide detector, covering defects in materials and workmanship under normal use. Additionally, 24-hour customer service is available to assist with any inquiries or issues.
For warranty claims or technical support, please refer to the contact information provided with your purchase or visit the official Siterlink store: Siterlink Store