CWI Lighting 1606P33-37-101
CWI Lighting Olinda 37-Light Integrated LED Chandelier Instruction Manual
Model: 1606P33-37-101 | Brand: CWI Lighting
Introduction
Thank you for choosing the CWI Lighting Olinda 37-Light Integrated LED Chandelier. This manual provides essential information for the safe installation, operation, and maintenance of your new lighting fixture. Please read these instructions thoroughly before beginning installation and retain them for future reference.
Important Safety Information
WARNING: Risk of Electric Shock. Disconnect power at the fuse box or circuit breaker before installation or servicing.
- All electrical connections must be in accordance with local codes and ordinances, National Electric Code (NEC), and ANSI/NFPA 70-1999.
- Consult a qualified electrician if you are unsure about wiring.
- This fixture is intended for indoor use only (Dry Location). Do not expose to water or moisture.
- Do not install this fixture on a ceiling that is not structurally sound to support its weight (36 pounds).
- Use only with compatible dimmer switches as specified.
- Proposition 65 Warning: This product may contain chemicals known to the State of California to cause cancer and birth defects or other reproductive harm.
Package Contents
Carefully unpack your chandelier and inspect all components for damage. Keep all packaging materials until you are certain all parts are present and in good condition.
- Olinda 37-Light LED Integrated Metal Chandelier (Black Finish)
- Mounting Hardware Kit
- Instruction Manual
Note: LED bulbs are integrated and not user-replaceable. No separate bulbs are included or required.
Installation Instructions
1. Pre-Installation
- Tools Required (Not Included): Phillips screwdriver, flathead screwdriver, wire strippers, electrical tape, safety glasses, ladder.
- Ensure the power supply to the installation area is turned OFF at the circuit breaker or fuse box.
- Review the technical drawing for dimensions and ensure the installation location is suitable.

Figure 1: Technical drawing showing the dimensions of the Olinda Chandelier (Model 1606P33-37-101). Dimensions are approximately 33"L x 33"W x 130"H, with a canopy diameter of 33" and a minimum hanging height of 45".
2. Mounting the Fixture
- Attach the mounting bracket to the junction box in the ceiling using the provided screws. Ensure the bracket is securely fastened and can support the chandelier's weight.
- Carefully lift the chandelier and connect the electrical wires. Connect the black wire from the fixture to the black (Live) wire from the junction box, the white wire from the fixture to the white (Neutral) wire from the junction box, and the ground wire from the fixture to the ground wire from the junction box. Secure connections with wire nuts and electrical tape.
- Tuck the wires neatly into the junction box.
- Secure the chandelier canopy to the mounting bracket using the canopy screws. Ensure the canopy is flush with the ceiling.

Figure 2: Detail of the chandelier's top plate, illustrating the connection points for the individual pendant wires and the main electrical connection. This view helps in understanding the wiring and assembly process.
3. Adjusting Pendant Lengths (Optional)
The Olinda chandelier features adjustable pendant cables. If desired, you can adjust the length of individual pendants by carefully pushing the cable into the canopy or pulling it out from the canopy. Ensure all adjustments are made before restoring power.

Figure 3: A close-up view of several individual pendants, showcasing the black finish and clear glass diffusers. This image highlights the design of the light sources.
4. Final Steps
- Once installation is complete, restore power at the circuit breaker.
- Test the chandelier to ensure all lights function correctly.
Operating Instructions
Power On/Off
The Olinda Chandelier is controlled by a standard wall switch. Flip the switch to turn the fixture on or off.
Dimming Functionality
This chandelier is compatible with most standard dimmer switches. To adjust the brightness, use a compatible dimmer switch (not included) installed on your wall circuit. The integrated LEDs produce a warm white light.
Control Method
The primary control methods are a wall switch (Standard Switch Type) and a compatible dimmer switch (Controller Type: Remote Control, Control Method: Touch, referring to the dimmer's functionality).
Care and Maintenance
- Cleaning: To clean the fixture, ensure power is off. Use a soft, dry cloth to wipe down the metal and glass surfaces. Do not use abrasive cleaners, solvents, or polishes as they may damage the finish.
- LEDs: The LEDs are integrated and designed for long life. They are not user-replaceable.
- Inspection: Periodically check all connections and mounting hardware to ensure they remain secure.
Troubleshooting
| Problem | Possible Cause | Solution |
|---|---|---|
| Fixture does not light up. |
|
|
| Lights flicker or dim inconsistently. |
|
|
| Fixture hums. |
|
|
Specifications
| Model Number | 1606P33-37-101 |
| Brand | CWI Lighting |
| Material | Metal |
| Color | Black |
| Light Source | Integrated LED |
| Number of Light Sources | 37 |
| Light Color | Warm White |
| Wattage | 74 Watts |
| Brightness | 3848 Lumens |
| Efficiency | 52.03 lumens per watt |
| Dimensions (L x W x H) | 33"L x 33"W x 130"H (Maximum) |
| Item Weight | 36 Pounds |
| Mounting Type | Ceiling Mount |
| Indoor/Outdoor Usage | Indoor Only (Dry Location) |
| Certification | ETL, BACL certified |
| Required Assembly | Yes |
Warranty and Support
Warranty Information
This CWI Lighting fixture comes with a 3-year limited warranty against manufacturer defects. This warranty covers defects in materials and workmanship under normal use. Please retain your proof of purchase for warranty claims.
Customer Support
For technical assistance, missing parts, or warranty inquiries, please contact CWI Lighting customer support. Refer to the product packaging or the official CWI Lighting website for current contact information.
Product Visuals

Figure 4: The CWI Lighting Olinda 37-Light Integrated LED Chandelier in its full form, showcasing the tiered pendant design and black finish.

Figure 5: An illustrative view of the Olinda Chandelier installed, demonstrating its visual impact and scale within a space.

Figure 6: Another perspective of the Olinda Chandelier, highlighting the arrangement of the 37 individual pendants.
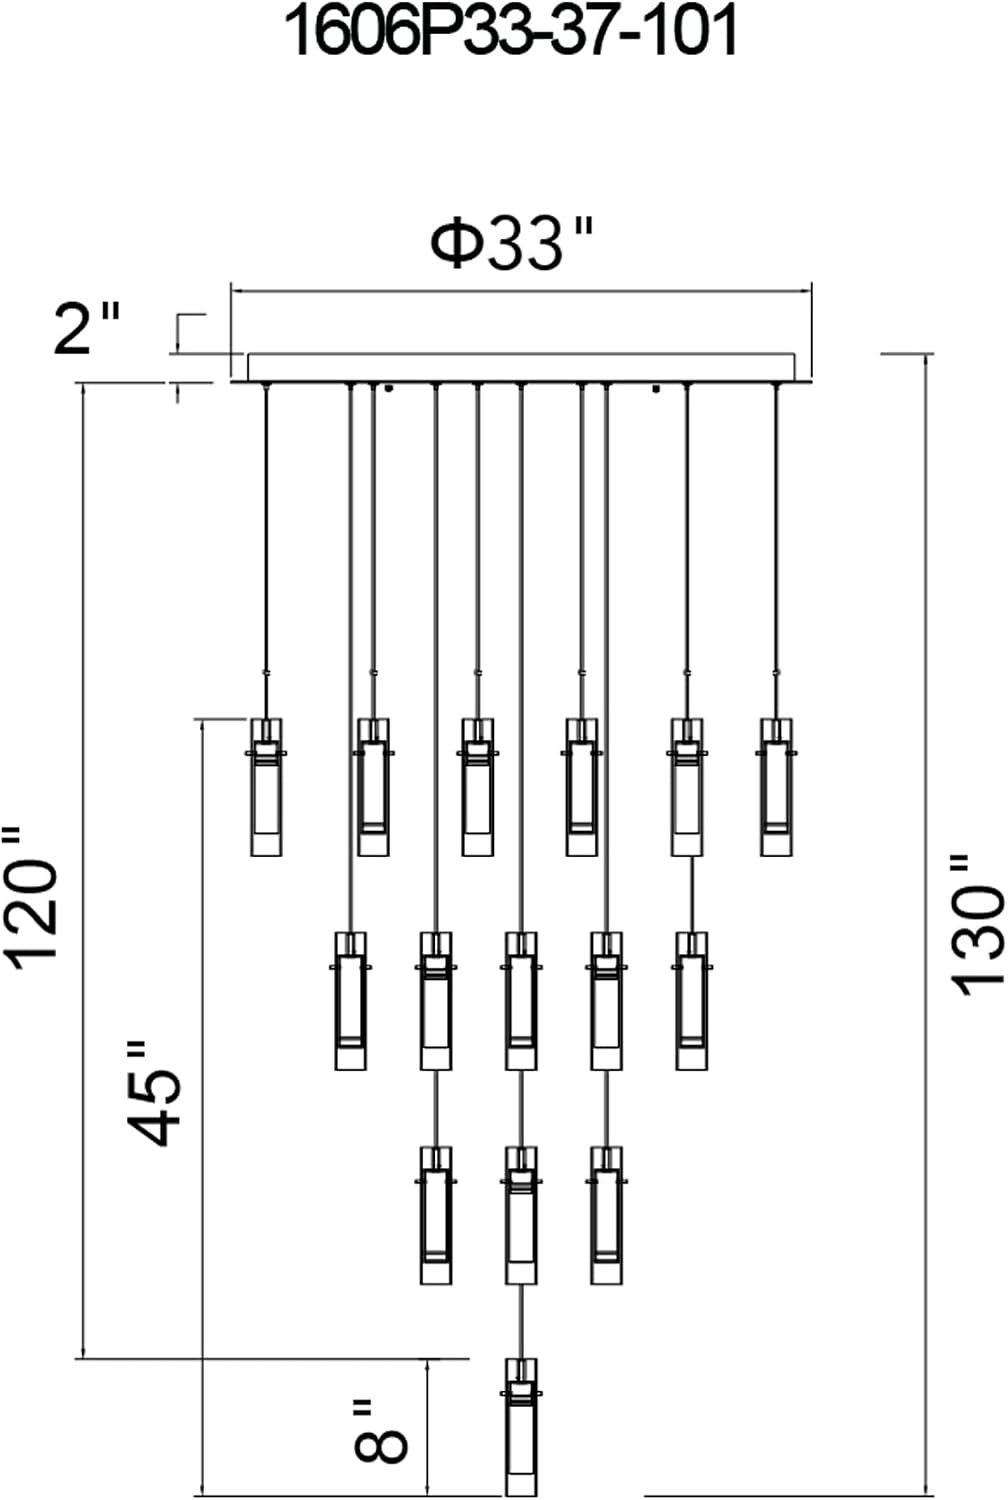
Figure 7: A detailed shot of a single pendant, showing the integrated LED light source and the clear glass outer cylinder.

Figure 8: Another close-up of a pendant, emphasizing the sleek black finish and the warm glow of the integrated LED.

Figure 9: A grouping of three pendants, providing a clearer view of their individual construction and the light emitted.

Figure 10: Scan this QR code to view the Olinda Chandelier in a virtual room environment. (Link to virtual view)
NOTE: "THIS IS A RENDER ONLY, PLEASE REFER TO THE SPECS FOR MORE DETAILS"
Ask a question about this manual
Ask about setup, troubleshooting, compatibility, parts, safety, or missing instructions. Manuals+ will review the question and use this page’s manual context to help answer it.