Tiptiper B-L
Tiptiper LED Queen Bed Frame with Charging Station and Headboard Storage (Model B-L)
Instruction Manual
Introduction
This manual provides detailed instructions for the assembly, operation, and maintenance of your Tiptiper LED Queen Bed Frame with Charging Station and Headboard Storage, Model B-L. Please read all instructions carefully before assembly and use to ensure safe and proper operation.
Important Safety Information
Failure to follow these safety instructions could result in injury or damage to the product.
- Do not exceed the weight limit of 880 pounds.
- Be cautious of sharp edges and small parts; keep them out of reach of children.
- Always follow the assembly instructions carefully to prevent instability or collapse.
- Always unplug the charging station before making any adjustments or moving the bed frame.
Product Overview
The Tiptiper LED Queen Bed Frame (Model B-L) features an upholstered headboard with integrated storage and a charging station. It includes LED lighting and is designed for a Queen-sized mattress.

Figure 1: Fully assembled Tiptiper LED Queen Bed Frame, showcasing the headboard storage, LED lighting, and charging station.
Specifications
| Feature | Detail |
|---|---|
| Brand | Tiptiper |
| Model Number | B-L |
| Size | Queen |
| Product Dimensions | 84"L x 62.2"W x 47.7"H |
| Weight Capacity | 880 lbs (Maximum) |
| Special Feature | LED Lights, Charging Station, Headboard Storage |
| Material | Metal, Linen, Wood |
| Included Components | Bed Frame, Storage Headboard, LED Light Strip, Remote Control, Power Wood Slats, Assembly Kit |
| Assembly Required | Yes |
| Compatible Mattress Size | Queen |
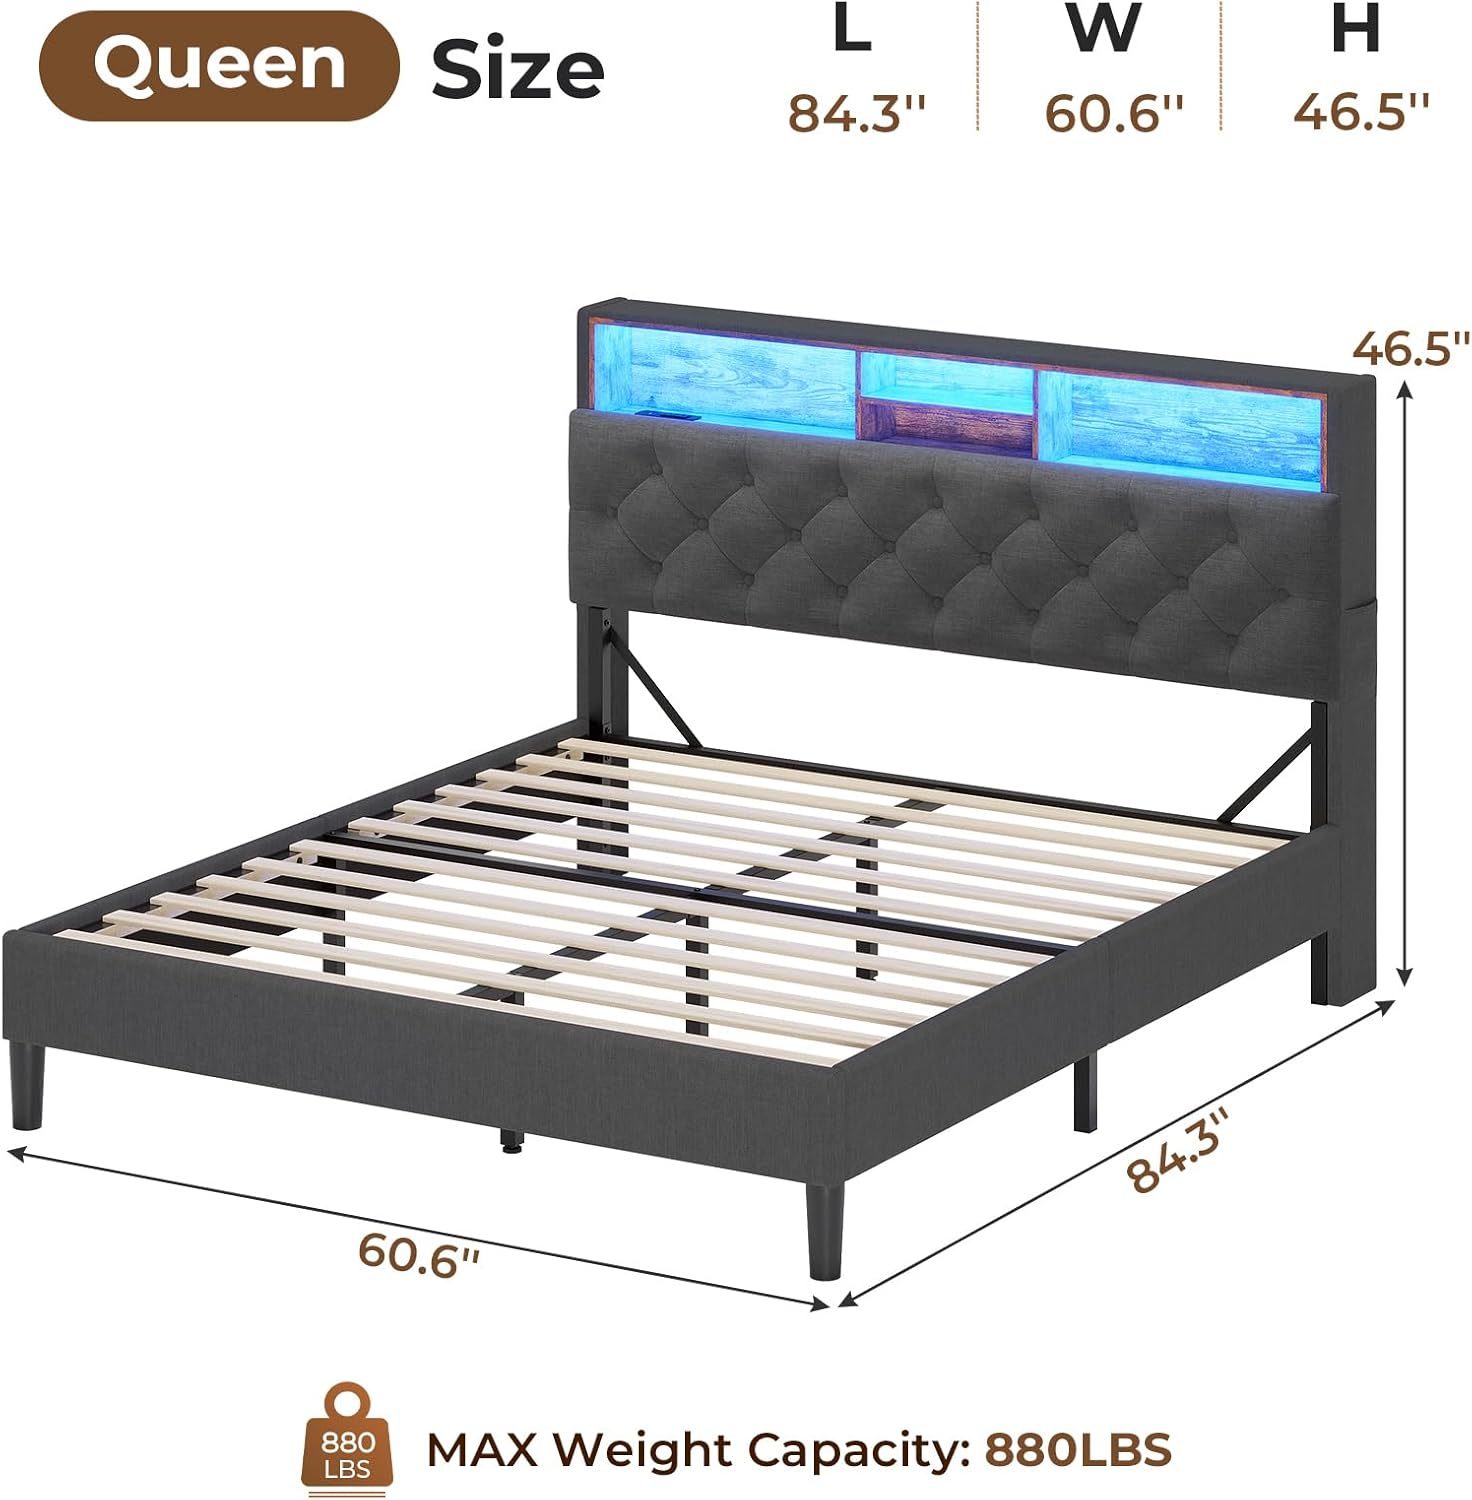
Figure 2: Detailed dimensions and maximum weight capacity of the Queen-sized bed frame.
Setup and Assembly
Assembly of the Tiptiper LED Bed Frame requires careful attention to detail. It is recommended to have two people for assembly. All necessary tools and components are included in the assembly kit.
General Assembly Steps:
- Unpack Components: Carefully unpack all parts and verify against the included parts list. Ensure no components are missing or damaged.
- Assemble Headboard: Follow the specific instructions for assembling the headboard structure, including the storage shelves and charging station.
- Construct Bed Frame: Assemble the main bed frame rails and support legs. Ensure all connections are secure.
- Attach Headboard to Frame: Securely attach the assembled headboard to the bed frame.
- Install Slats: Place the wooden slats onto the bed frame. The slats are designed for quick setup, often using Velcro for secure placement and noise reduction.
- Connect LED Lights and Charging Station: Connect the LED light strip and charging station power cables. Ensure all connections are firm and routed safely.
- Final Check: Double-check all screws and connections to ensure they are tightened and the frame is stable.

Figure 3: An illustration showing the assembly process of the bed frame, including the slat installation and support legs.
Video 1: This video demonstrates the assembly process for an LED bed frame with outlets and USB ports, similar to the Tiptiper Model B-L. It provides a visual guide to the steps involved in setting up the frame and connecting the electrical components.
Operating Instructions
LED Lighting System:
The integrated LED lighting system can be controlled via a remote control or a smartphone application. It offers over 60,000 colors, dynamic modes, music sync, microphone mode, and a timing function.
- Remote Control: Use the provided remote to power on/off, change colors, adjust brightness, and select various lighting modes.
- App Control: Download the compatible smartphone application (refer to the quick start guide for app details) to access advanced features like custom color settings, music synchronization, and scheduling.

Figure 4: The LED lighting system can be controlled via a remote or a smartphone app, offering a wide range of colors and dynamic modes.
Charging Station:
The headboard features a convenient charging station with 2 AC outlets (125V/12A), 1 USB-A port (5V/2.1A), and 1 USB-C port (5V/2.1A).
- Power Connection: Ensure the bed frame's power cord is securely plugged into a functional wall outlet.
- Device Charging: Connect your electronic devices to the appropriate AC outlets or USB ports for charging.

Figure 5: Close-up of the integrated charging station with AC outlets and USB ports for convenient device charging.
Storage Features:
The headboard includes open storage shelves and hidden compartments. Small storage pockets are also located on both sides of the headboard.
- Headboard Shelves: Utilize the open shelves for items like books, alarm clocks, or decorative pieces.
- Hidden Storage: Access the hidden storage space by lifting the upholstered panel of the headboard.
- Side Pockets: Use the small pockets on either side of the headboard for remote controls, phones, or other small essentials.
- Underbed Storage: The bed frame design allows for approximately 6.3 inches of clearance for underbed storage containers.

Figure 6: Overview of the headboard's storage capabilities, including open shelves, hidden compartments, and side pockets.

Figure 7: Illustration demonstrating the available underbed storage space, measuring approximately 6.3 inches.
Maintenance
- Cleaning: The upholstered parts of the bed frame should be dry cleaned only. For general cleaning, use a soft, dry cloth to wipe down surfaces.
- Regular Checks: Periodically inspect all screws and connections to ensure they remain tight. Re-tighten if necessary to maintain stability.
- Electrical Components: Ensure the charging station and LED light connections are free from dust and debris. Unplug the unit before cleaning electrical components.
- Slat Integrity: Check wooden slats for any signs of damage or wear. Replace any broken or cracked slats promptly to ensure proper mattress support and prevent injury.
Troubleshooting
| Problem | Possible Cause | Solution |
|---|---|---|
| Bed frame feels unstable or wobbly. | Loose screws or connections. | Inspect all assembly points and tighten any loose screws using the provided Allen wrench. Ensure all support legs are properly adjusted and making contact with the floor. |
| LED lights are not turning on or functioning correctly. | Power connection issue, remote control battery, or LED strip damage. | Check if the power adapter is securely plugged into a working outlet and the bed frame. Ensure all LED strip connections are firm. Replace the remote control battery if necessary. If using the app, ensure Bluetooth is enabled and the app is correctly paired. |
| Charging station is not providing power. | Power connection issue, or device compatibility. | Verify the bed frame's main power cord is plugged in. Test the outlets/USB ports with a different device to confirm functionality. Ensure your device is compatible with the charging station's specifications (125V/12A for AC, 5V/2.1A for USB). |
| Slats are breaking or making noise. | Excessive weight, improper mattress support, or damaged slats. | Ensure the total weight on the bed does not exceed 880 lbs. Verify the mattress is evenly distributed. Replace any broken or cracked slats immediately. Consider adding additional support if frequently exceeding the weight limit or if slats are consistently failing. |
| LED remote control interferes with other LED lights in the room. | Common issue with universal IR remotes. | This can occur if other LED systems use similar IR frequencies. Try to operate the bed's LED lights from a closer distance or block the remote's signal to other devices. Using the smartphone app for control may also help mitigate this issue. |
Warranty and Support
For warranty information or technical support regarding your Tiptiper LED Queen Bed Frame (Model B-L), please refer to the warranty card included with your purchase or contact Tiptiper customer service directly. Contact details can typically be found on the product packaging or the official Tiptiper website.