1. Introduction
Thank you for choosing the Acmount P110 Car Jump Starter. This device is designed to provide a powerful and reliable solution for starting vehicles with dead batteries, as well as serving as a portable power bank and emergency light source. Please read this manual thoroughly before use to ensure safe and optimal operation.

Image 1.1: The Acmount P110 Car Jump Starter demonstrating its 6000A peak current for starting vehicles up to 10.0L gas or 8.0L diesel engines.
2. Safety Information
Always observe the following safety precautions to prevent injury or damage to the device or vehicle:
- Do not attempt to jump start a frozen battery.
- Ensure proper polarity connection (red clamp to positive, black clamp to negative) to avoid sparks and damage.
- Do not connect the positive and negative clamps together.
- Keep the device away from children.
- Do not expose the device to extreme temperatures or moisture.
- If the device becomes excessively hot during use, discontinue operation immediately.
- Refer to your vehicle's owner's manual for specific jump-starting procedures.

Image 2.1: The Acmount P110 features 10 protection technologies for safe operation, including spark-proof, reverse-charge, high/low-temp, over-charge, short-circuit, reverse-polarity, AI-software monitoring, over-current, over-voltage, and over-load protection.
3. Package Contents
Verify that all items are present in the package:
- Acmount P110 Jump Starter
- Smart Jump Cables (with integrated battery and intelligent clamps)
- USB Type-C Charging Cable
- Storage Case
- User Manual

Image 3.1: All components included in the Acmount P110 Car Jump Starter package.
4. Product Features and Components
Familiarize yourself with the main parts of your Acmount P110 Jump Starter:
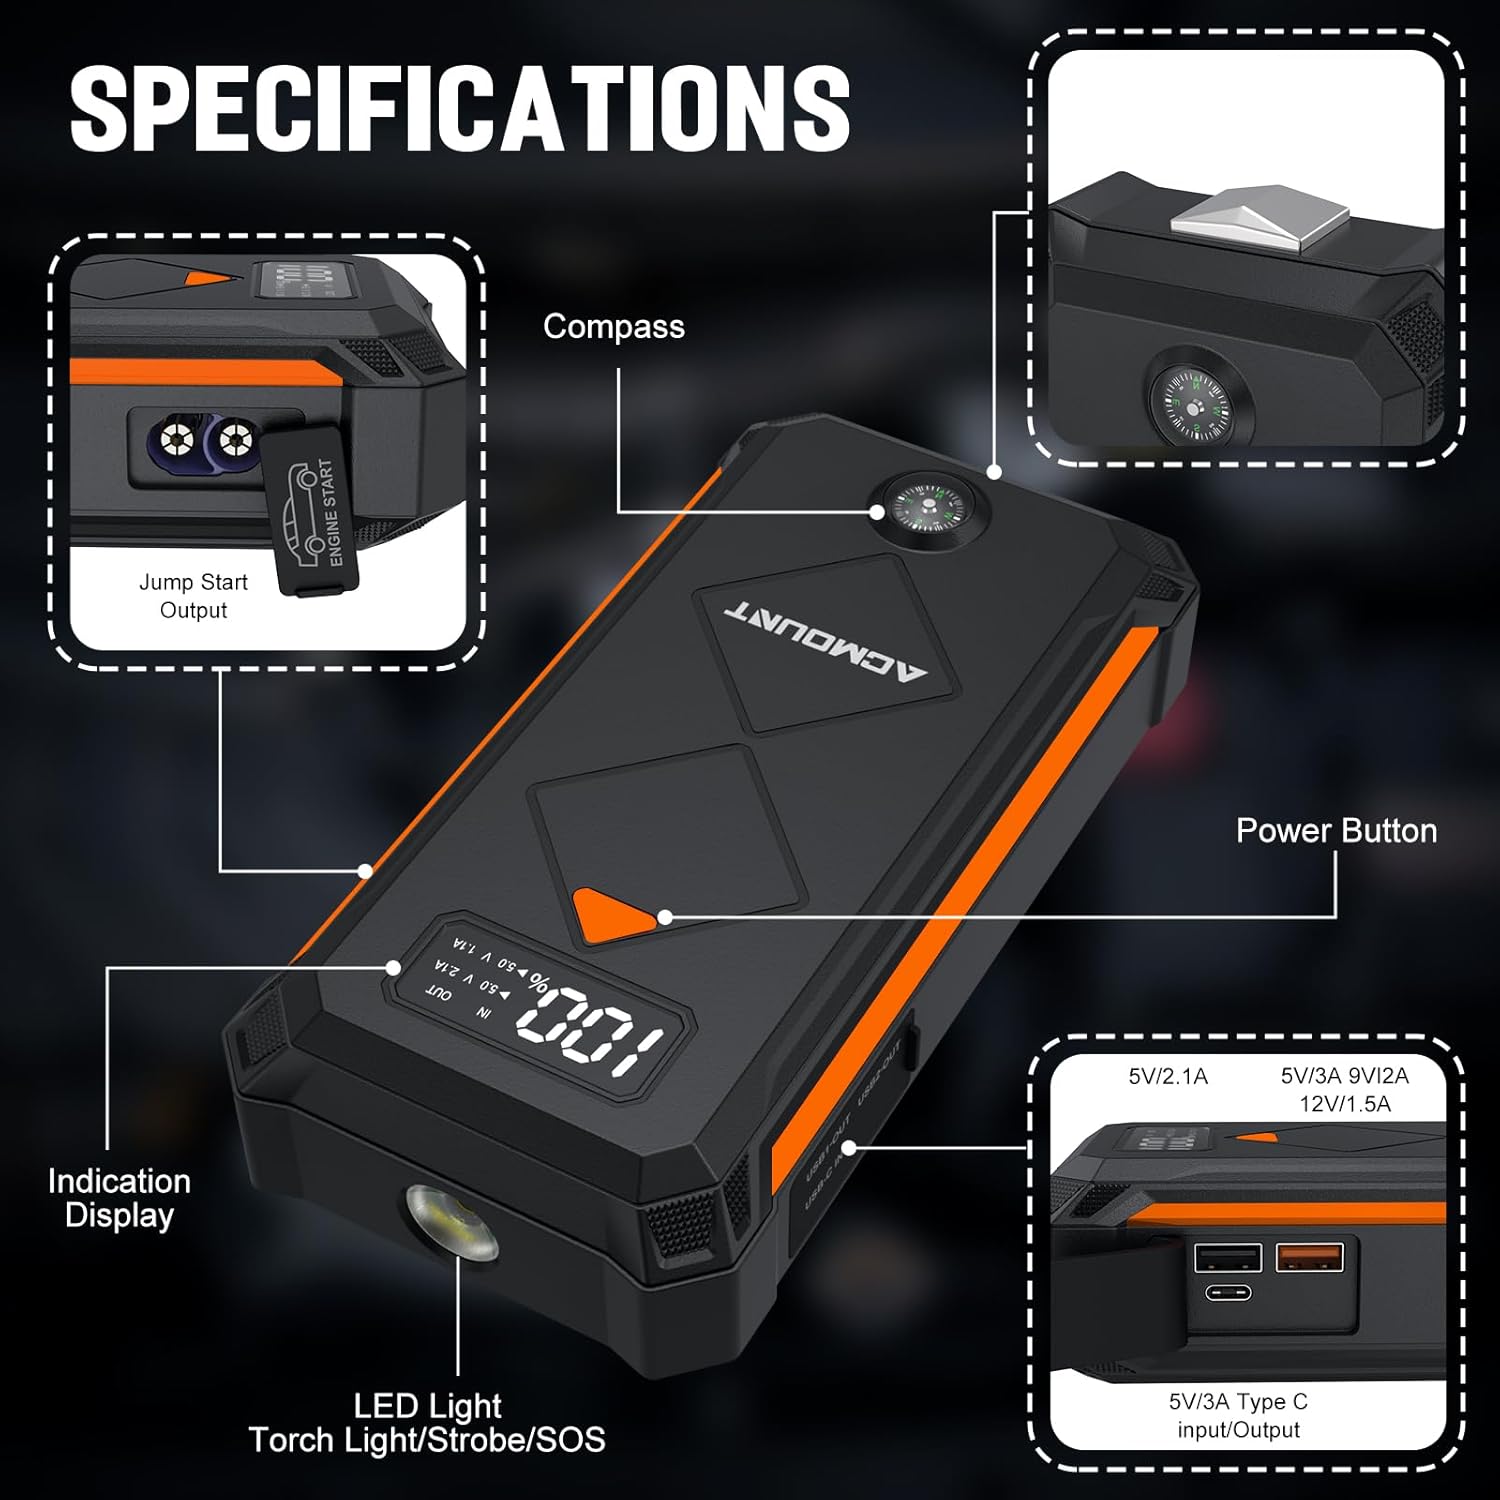
Image 4.1: Key components of the Acmount P110 Jump Starter.
- Jump Start Output: Port for connecting the smart jump cables.
- Compass: Integrated for navigation assistance.
- Power Button: Activates the device and controls LED light modes.
- Indication Display: Shows battery level and output status.
- LED Light: Functions as a flashlight, strobe, and SOS signal.
- USB-C Input/Output: For charging the jump starter and charging external devices.
- USB 3.0 Outputs: Dual ports (5V/3A, 9V/2A, 15V/1.5A) for charging smartphones and other USB devices.
5. Setup
5.1 Charging the Jump Starter
Before initial use, fully charge the Acmount P110 Jump Starter. It is recommended to charge the device every 2-3 months to maintain battery health, even when not in use.
- Connect the provided USB Type-C charging cable to the jump starter's USB-C port.
- Connect the other end of the USB Type-C cable to a suitable USB wall adapter (not included) or car charger.
- The indication display will show the charging progress. The device is fully charged when the display indicates 100%.
Note: Do not charge the starter immediately after a jump-starting operation. Allow the starter to cool down first.
6. Operating Instructions
6.1 Jump Starting a Vehicle
Follow these steps to safely jump start your vehicle:
- Prepare the Vehicle: Ensure the vehicle's ignition is off and the parking brake is engaged.
- Connect the Smart Jump Cables: Insert the blue end of the smart jump cable into the jump start output port on the Acmount P110. Ensure a firm connection.
- Attach Clamps to Battery:
- Connect the red positive (+) clamp to the vehicle's positive (+) battery terminal.
- Connect the black negative (-) clamp to the vehicle's negative (-) battery terminal.
Warning: Do not touch the red and black clamps together once connected to the jump starter.
- Check Indicator: The smart jump cable's indicator light will show its status. A solid green light indicates a safe connection and readiness to jump start. If any other light or sound occurs, refer to the troubleshooting section.
- Start the Vehicle: Once the indicator is green, start your vehicle's engine.
- Remove Clamps: After the engine starts, immediately remove the smart jump cables in reverse order: first the black negative (-) clamp, then the red positive (+) clamp.
- Disconnect from Jump Starter: Disconnect the smart jump cable from the Acmount P110.

Image 6.1: Visual guide for jump starting your vehicle.
6.2 Charging Electronic Devices
The Acmount P110 can also function as a portable power bank for your electronic devices.
- Connect your device's USB charging cable to one of the USB output ports (USB 3.0 or USB-C) on the Acmount P110.
- The jump starter will automatically begin charging your device. The indication display will show the output status.
- Disconnect your device once charging is complete.

Image 6.2: The Acmount P110 as a portable power supply for various electronic devices.
6.3 Using the LED Flashlight
The integrated LED flashlight has three modes: Flashlight, Strobe, and SOS.
- To turn on the flashlight: Long press the power button.
- To cycle through modes (Strobe, SOS): Short press the power button while the flashlight is on.
- To turn off the flashlight: Long press the power button again.
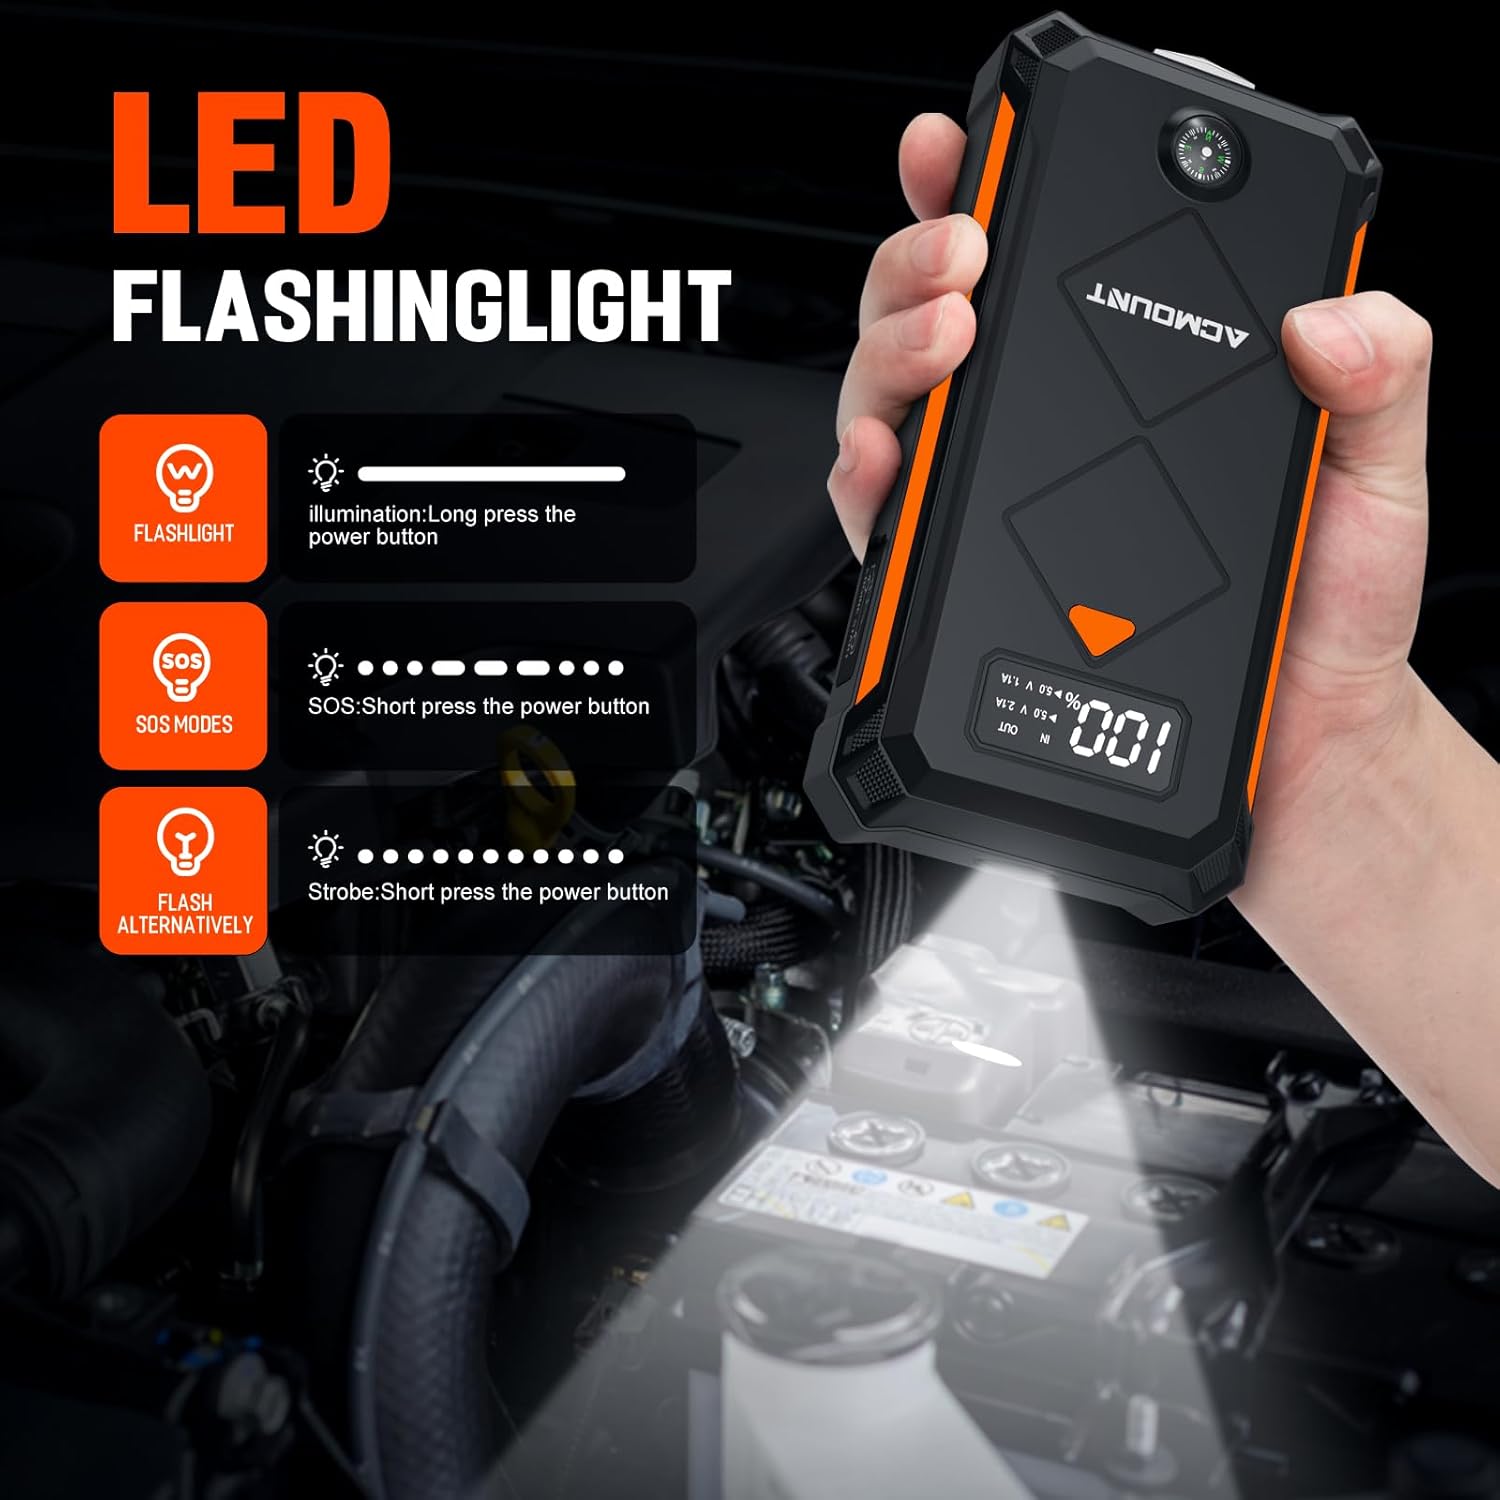
Image 6.3: Instructions for operating the LED flashlight modes.
7. Maintenance
Proper maintenance ensures the longevity and reliability of your Acmount P110 Jump Starter:
- Regular Charging: It is recommended to charge the jump starter every 2-3 months to keep the battery in a healthy state, even if not used. This helps prevent deep discharge and extends battery life.
- Storage: Store the device in a cool, dry place, away from direct sunlight and extreme temperatures. The device can hold power for about 12 months when not in use.
- Cleaning: Wipe the device with a soft, dry cloth. Do not use harsh chemicals or abrasive cleaners.
- Temperature Range: The device is designed to work in extreme environments, from -4°F (-20°C) to +140°F (+60°C).

Image 7.1: The Acmount P110 offers extended standby time, requiring less frequent charging.
8. Troubleshooting
If you encounter issues with your Acmount P110 Jump Starter, refer to the following common problems and solutions:
| Problem | Possible Cause | Solution |
|---|---|---|
| Vehicle does not start | Low charge on jump starter, incorrect clamp connection, severely discharged vehicle battery, vehicle issue. | Ensure jump starter is fully charged. Verify clamps are connected correctly (red to +, black to -). Try jump starting again after 30 seconds. If the vehicle still doesn't start, there might be another issue with the vehicle. |
| Smart clamp indicator light is not green | Incorrect connection, short circuit, reverse polarity, or other safety protection activated. | Disconnect clamps from both the jump starter and the vehicle battery. Re-read safety instructions and reconnect carefully, ensuring correct polarity. If the issue persists, the vehicle battery might be faulty. |
| Jump starter not charging | Faulty charging cable, adapter, or port. | Try a different USB-C cable and wall adapter. Ensure the cable is fully inserted into the jump starter's USB-C port. |
| Jump starter gets hot during use | Normal operation under heavy load, or potential overload. | A slight warmth is normal. If it becomes excessively hot, disconnect immediately and allow it to cool down. Ensure the vehicle's engine size is within the jump starter's specifications. |
If the problem persists after trying these solutions, please contact customer support.
9. Specifications
| Feature | Specification |
|---|---|
| Brand | Acmount |
| Model Number | P110 |
| Peak Output Current | 6000 Amps |
| Battery Capacity | 20000 Milliamp Hours |
| Battery Cell Composition | Lithium Ion |
| Voltage | 14.8 Volts |
| Engine Compatibility | Up to 10.0L Gas or 8.0L Diesel Engine |
| Product Dimensions (D x W x H) | 4"D x 5"W x 9"H |
| Item Weight | 1 Kilogram |
| USB Output 1 | 5V/3A |
| USB Output 2 | 9V/2A |
| USB Output 3 | 15V/1.5A |
| LED Flashlight Modes | Flashlight, Strobe, SOS |
| Operating Temperature | -4°F (-20°C) to +140°F (+60°C) |
10. Warranty and Support
The Acmount P110 Car Jump Starter comes with a 12-Month Warranty. Acmount also provides lifetime reliable technical support.
If you have any questions, concerns, or require assistance with your product, please contact our professional after-sales team. We are committed to providing a satisfactory solution.
For support, please refer to the contact information provided on the Acmount official website or your purchase documentation.