Introduction
This manual provides detailed instructions for the installation, operation, and maintenance of your FSCEPIXI 3 Handles Tub Shower Faucet Set with Waterfall Tub Spout. Please read this manual thoroughly before installation and use to ensure proper function and longevity of the product.
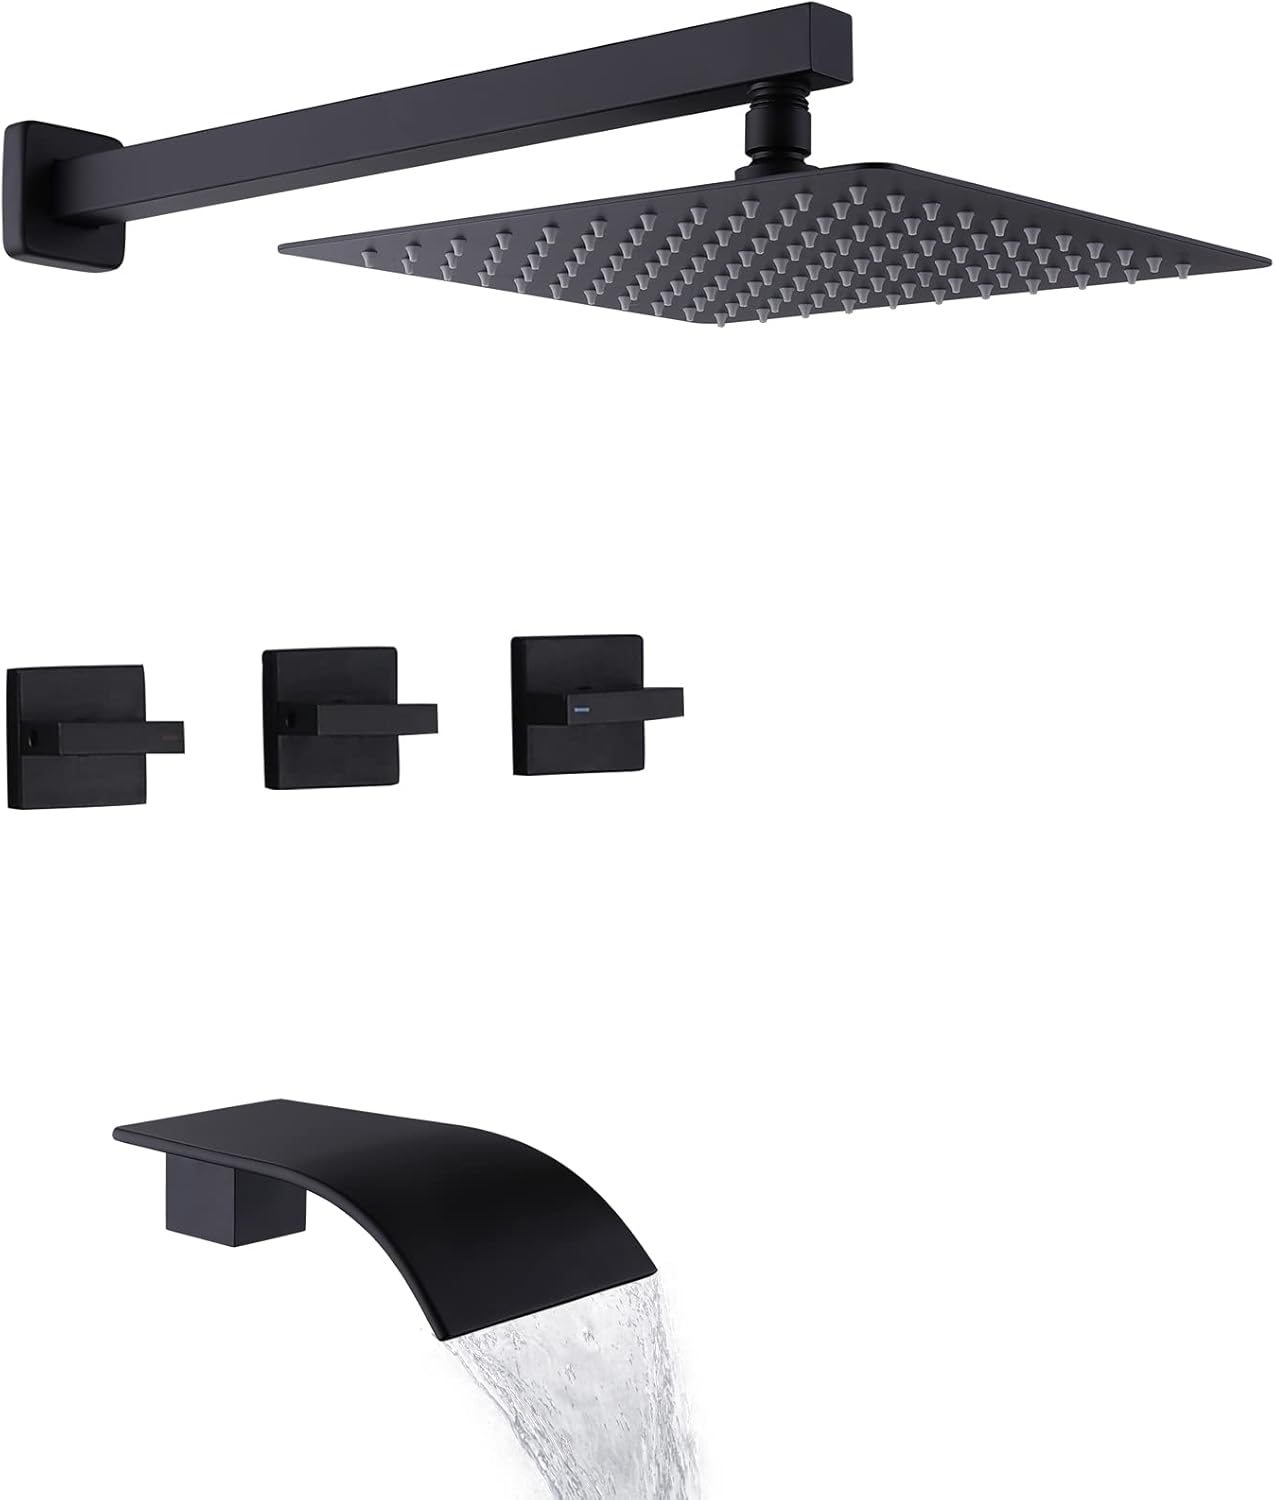
Image: The complete FSCEPIXI 3 Handles Tub Shower Faucet Set in matte black, featuring a square rain shower head, three control handles, and a waterfall tub spout.
Safety Information
- Always turn off the main water supply before beginning any installation or maintenance.
- Wear appropriate personal protective equipment (PPE) such as safety glasses and gloves during installation.
- If you are unsure about any part of the installation process, consult a qualified plumber.
- Ensure all connections are secure to prevent leaks.
Package Contents
Verify that all components are present and undamaged before beginning installation. If any parts are missing or damaged, contact customer service.
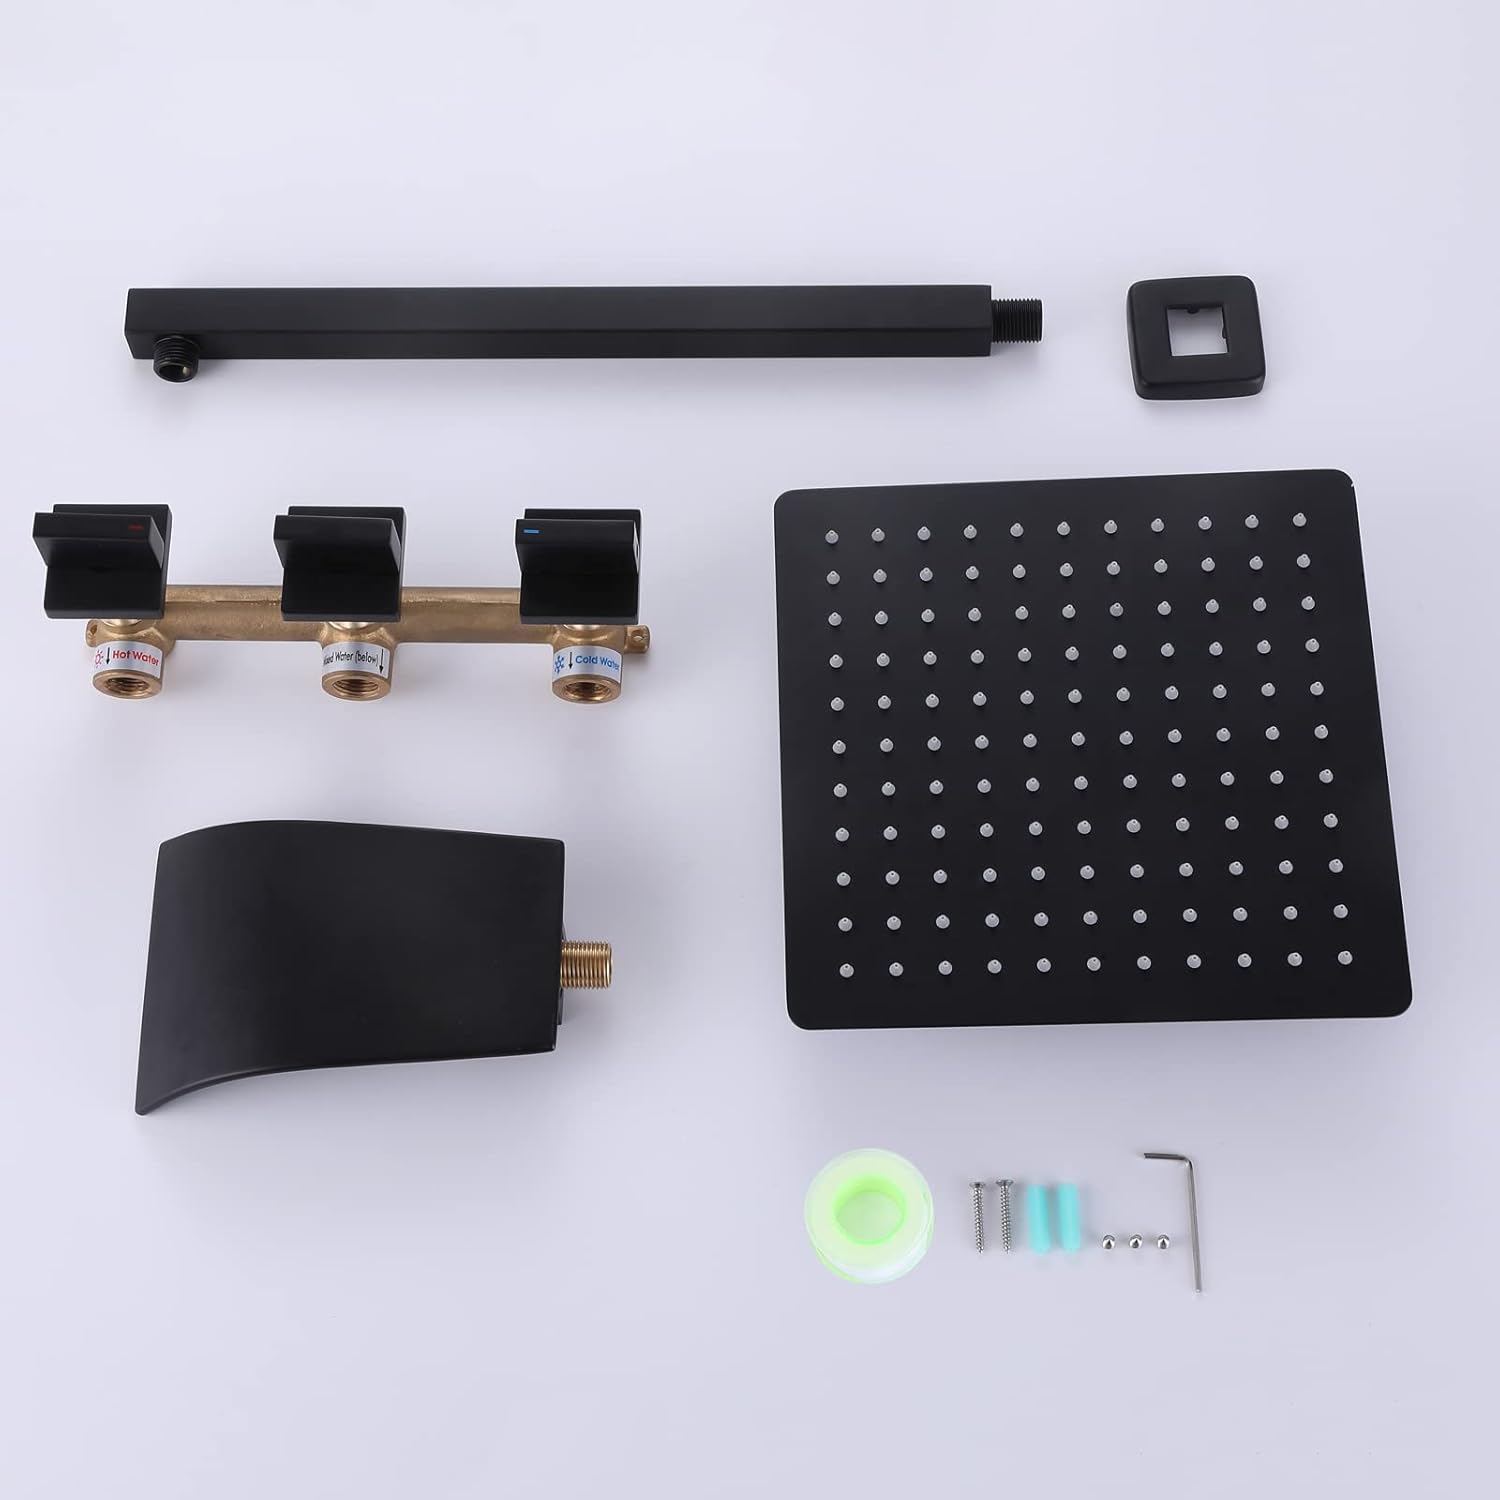
Image: All components of the FSCEPIXI 3 Handles Tub Shower Faucet Set, including the shower head, shower arm, three handles, valve body, tub spout, and installation hardware, laid out on a white background.
- Shower Head (10 inches, Square)
- Shower Arm
- 3 Handles
- Valve Body (Solid Brass)
- Waterfall Tub Spout
- Installation Hardware (e.g., PTFE tape, Allen wrench, screws)
Specifications
| Feature | Detail |
|---|---|
| Brand | FSCEPIXI |
| Model Number | 3HSWT-B02 |
| Color | Matte Black |
| Material | Brass, Stainless Steel |
| Finish Type | Matte Black |
| Number of Handles | 3 |
| Mounting Type | Wall Mount |
| Shower Head Size | 10 inches |
| Spout Reach | 7 Inches |
| Connection | U.S. Standard Plumbing 1/2 NPT |
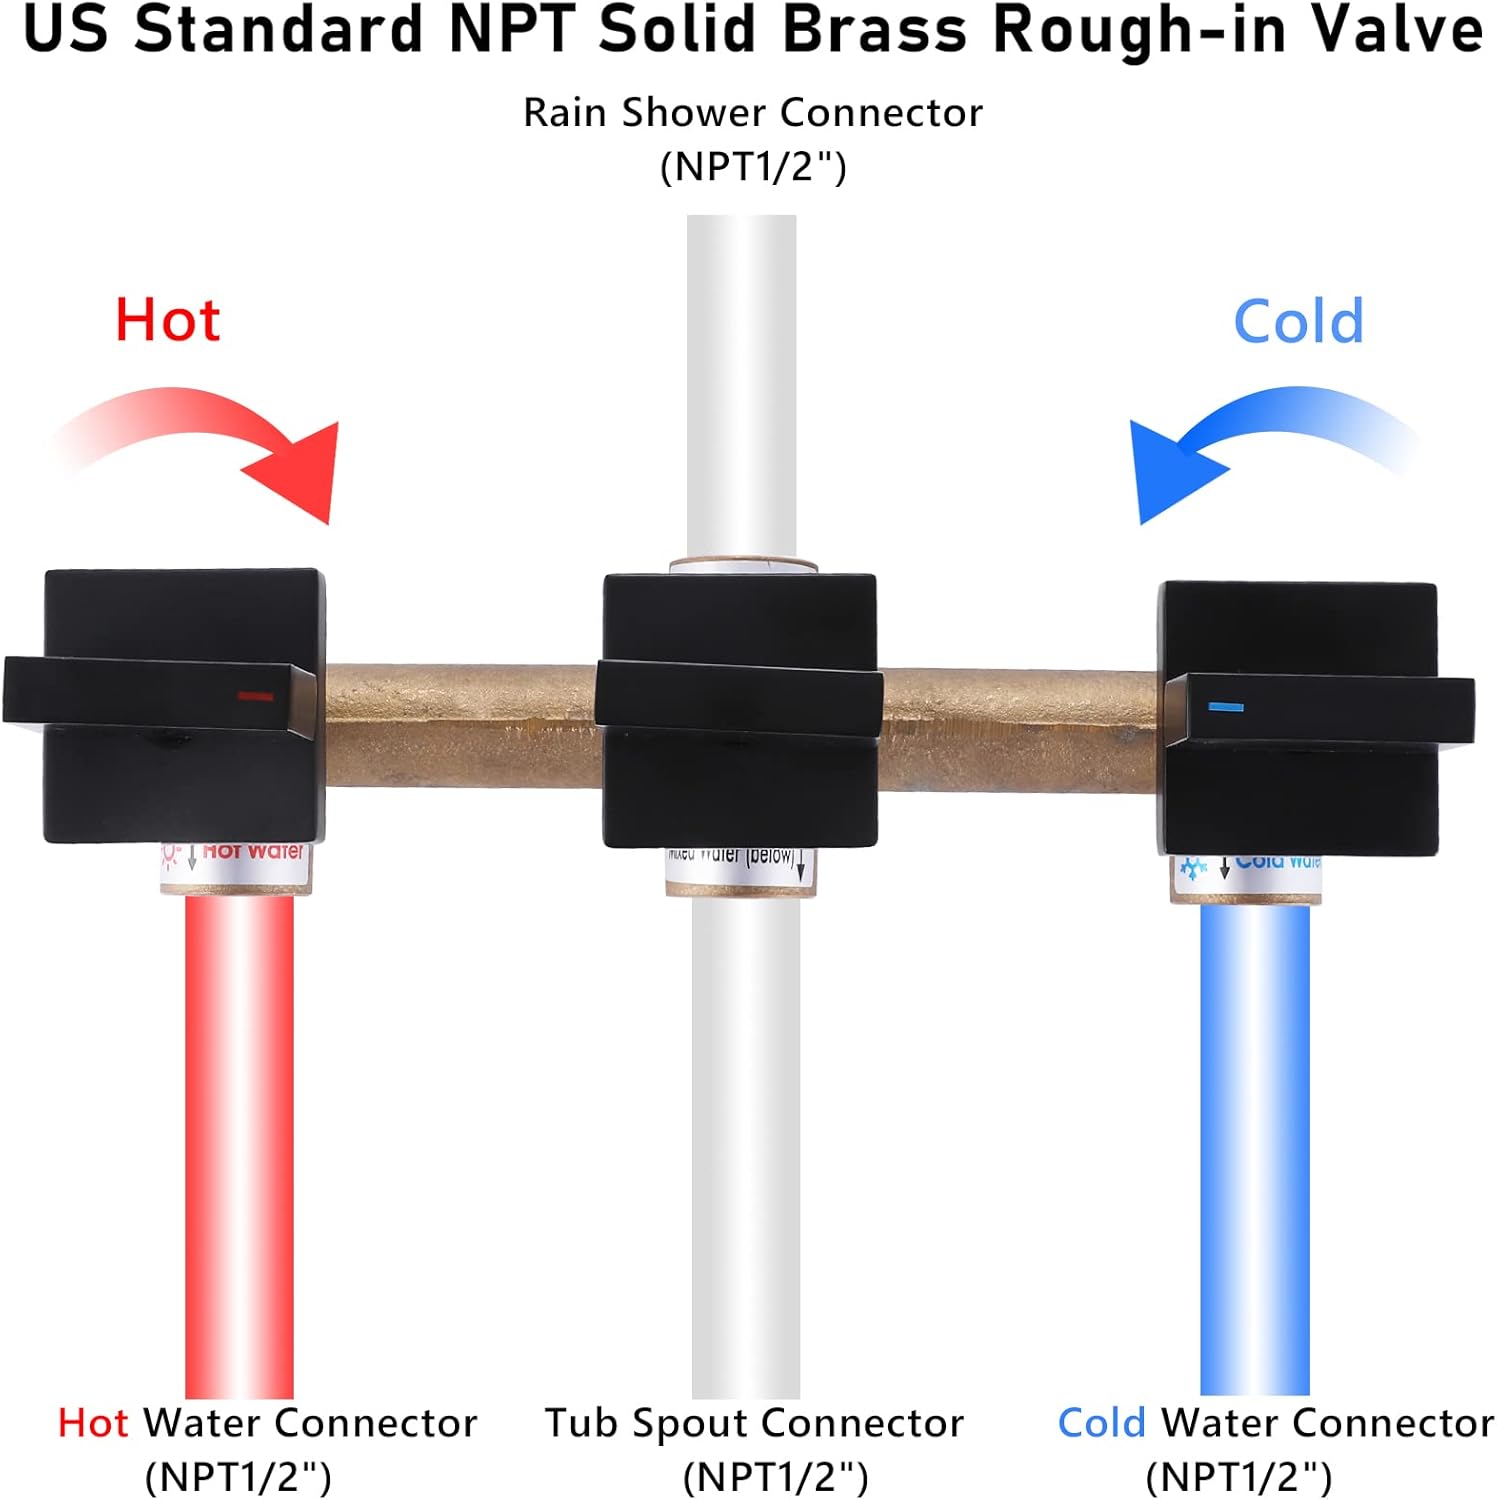
Image: Technical drawing showing the dimensions of the shower head, handles, and tub spout in both millimeters and inches for precise planning.
Installation
Important Notes Before Installation:
- Before purchasing, please check the size of the product to ensure it is the correct size for your bathroom, especially the mounting dimensions.
- The old shower valve must be removed, and the pipes reset if installing this shower kit. The item comes with its own valve and is not compatible with other brand valves or cartridges.
- This product uses U.S. standard plumbing 1/2 NPT connections.
Step-by-Step Installation
- Prepare the Installation Area: Turn off the main water supply to your bathroom. Remove any existing shower fixtures and prepare the wall opening for the new valve body.
- Install the Valve Body: Connect the hot and cold water supply lines to the appropriate inlets on the solid brass valve body (NPT1/2"). Connect the shower head outlet and tub spout outlet (NPT1/2"). Apply PTFE tape to all threaded connections for a watertight seal. Secure the valve body firmly within the wall according to local plumbing codes.
- Install the Shower Arm and Head: Thread the shower arm into the wall connection, ensuring PTFE tape is applied. Attach the 10-inch square shower head to the shower arm, tightening securely.
- Install the Tub Spout: Connect the waterfall tub spout to its designated outlet. Ensure it is securely fastened and sealed to prevent leaks.
- Install the Handles: Attach the three matte black handles to their respective valve stems. The handles control hot water, cold water, and the diverter function.
- Test for Leaks: Once all components are installed, slowly turn on the main water supply and carefully check all connections for any signs of leaks. Address any leaks immediately by tightening connections or reapplying sealant.
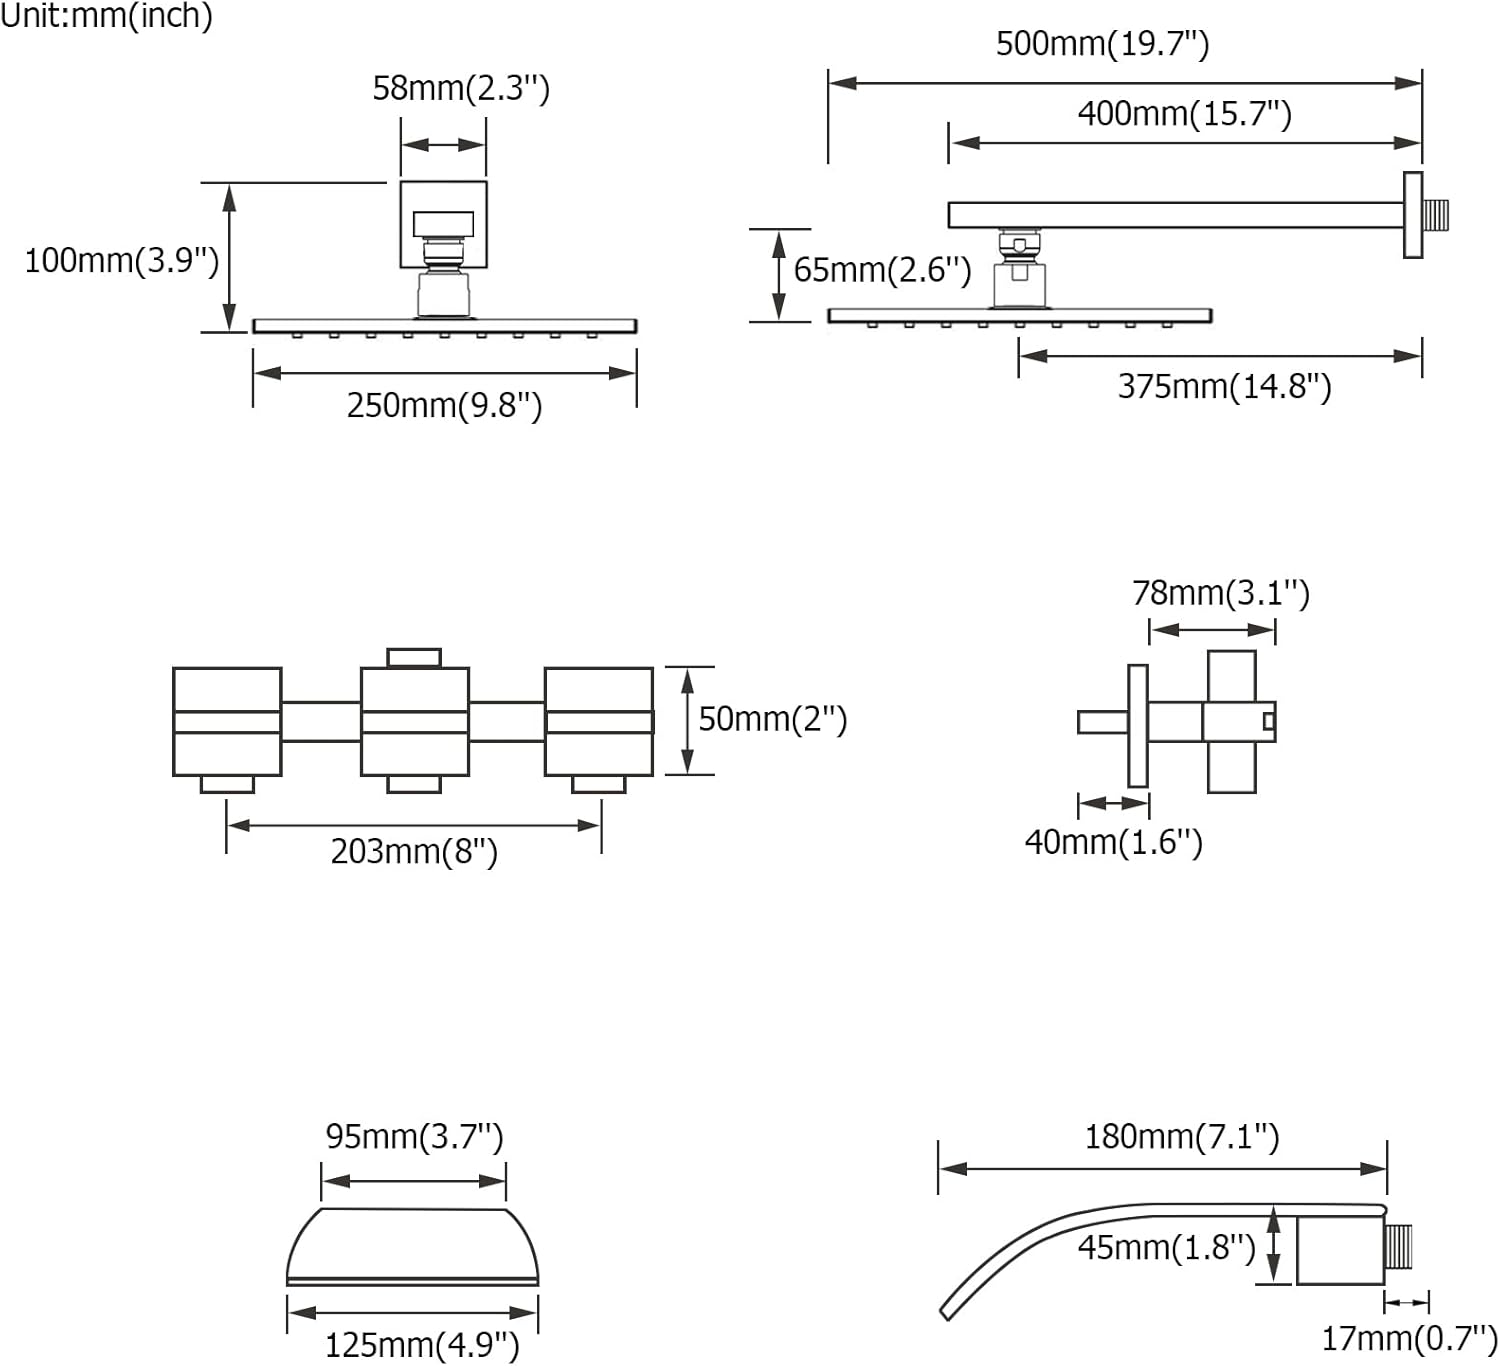
Image: Diagram illustrating the connections for the US Standard NPT Solid Brass Rough-in Valve, indicating hot water, cold water, and tub spout connectors, all with NPT1/2" threading.

Image: A close-up view of a hand demonstrating the operation of one of the matte black square handles, which controls water flow or temperature.
Operation
The FSCEPIXI 3 Handles Tub Shower Faucet Set features three distinct handles for precise control over water flow, temperature, and output.
- Hot Water Handle: Rotate this handle to control the flow and intensity of hot water.
- Cold Water Handle: Rotate this handle to control the flow and intensity of cold water.
- Diverter Handle: This handle allows you to switch the water flow between the shower head and the waterfall tub spout. Rotate the handle to select your desired output.

Image: A diagram titled "Easy Switch" demonstrating how a single rotation button on the diverter handle allows users to switch water output between the rain shower and the waterfall tub spout.
The 10-inch shower head adopts Air-in technology, injecting air into the water stream to provide a high-pressure, comfortable shower experience while conserving water. The wide-mouth waterfall spout delivers a graceful sheet of water, creating a serene effect.
Maintenance
Cleaning
- Clean the matte black finish with a soft, damp cloth and mild, non-abrasive soap.
- Avoid abrasive cleaners, harsh chemicals, or scouring pads, as these can damage the finish and void the warranty.
- For the shower head nozzles, gently rub them with your finger or a soft brush to remove any mineral buildup and maintain optimal water flow.
General Care
- Regularly check for any signs of leaks around connections. Tighten as necessary.
- If water pressure decreases, first check the shower head nozzles for blockages and clean them.
Troubleshooting
| Problem | Possible Cause | Solution |
|---|---|---|
| Low Water Pressure | Clogged shower head nozzles; partially closed shut-off valve. | Clean shower head nozzles by gently rubbing them; ensure all shut-off valves are fully open. |
| Leaks at Connections | Loose connections; insufficient PTFE tape. | Turn off water supply, tighten connections; reapply PTFE tape if necessary. |
| Water Not Switching Between Shower/Spout | Diverter handle not fully engaged or faulty diverter mechanism. | Ensure diverter handle is rotated completely to the desired position; if issue persists, inspect diverter mechanism or consult a plumber. |
| Inconsistent Water Temperature | Issues with hot/cold water supply; valve cartridge malfunction. | Check water heater settings and supply lines; if valve cartridge is suspected, consult a qualified plumber for inspection or replacement. |
Warranty and Support
For specific warranty information or technical support, please refer to the product packaging or contact FSCEPIXI customer service directly. It is recommended to keep your purchase receipt as proof of purchase for any warranty claims.
For further assistance and product information, you may visit the official FSCEPIXI store: FSCEPIXI Store