1. Introduction
The HEXIEDEN 2-in-1 Wireless Dog Fence and Training System is designed to provide both a wireless pet containment solution and a remote dog training tool. This system helps manage your pet's boundaries and behavior within a defined area, offering sound, vibration, and static correction options. It features an integrated design for ease of use, aiming to enhance your pet's safety and training.
Please read this manual thoroughly before operating the device to ensure proper setup, safe usage, and optimal performance.
2. Package Contents
Verify that all items listed below are included in your package:
- 1 x Wireless Transmitter
- 1 x Collar Receiver
- 1 x Adjustable TPU Strap
- 1 x Charger (USB cable and adapter)
- 1 x Test Light Tool
- 2 x Screws
- 4 x Metal Probes (2 short, 2 long)
- 4 x Silicone Sheaths
- 1 x User Manual (this document)
3. Product Overview
3.1. Wireless Transmitter
The transmitter is the central unit for both the wireless fence and remote training functions. It features an LED display and control buttons.

Figure 3.1: Transmitter Controls. This image displays the HEXIEDEN wireless transmitter with its various buttons and display labeled. Key features include the LED display for distance/level, MIN/MAX buttons for adjustment, MODE button to switch between fence and training modes, POWER ON/OFF, and dedicated buttons for Sound, Vibration, and Shock functions.
- LED Display: Shows current fence radius (in meters) or training level.
- MIN (-) / MAX (+) Buttons: Adjust fence radius or training levels.
- MODE Button: Switches between Wireless Fence Mode and Remote Dog Training Mode.
- POWER ON/OFF Button: Turns the transmitter on or off.
- SOUND Button: Activates an audible warning.
- VIBRATION Button: Activates a vibration warning.
- SHOCK Button: Activates a static correction.
- DC Charging Port: For recharging the transmitter.
3.2. Collar Receiver
The collar receiver is worn by your dog and delivers the warnings and corrections. It is waterproof and rechargeable.

Figure 3.2: Waterproof Collar Receiver. This image shows the HEXIEDEN collar receiver, highlighting its waterproof design suitable for use in wet conditions or during dog swimming. The receiver attaches to the adjustable TPU strap.
- Contact Points: Deliver static correction.
- ON/OFF Button: Powers the receiver on or off.
- LED Indicator: Shows power status and low battery.
- Charging Port: For recharging the receiver.
- Adjustable TPU Strap: Durable and reflective for night safety.

Figure 3.3: Receiver Contact Point Design. This image illustrates the design of the receiver's contact points, equipped with rubber protective covers for enhanced comfort for the dog. The probes are designed to be gentle while ensuring effective contact.
4. Setup
4.1. Charging the Devices
Before initial use, fully charge both the transmitter and the collar receiver.
- Connect the charger to the charging ports on both devices.
- The transmitter typically charges in 4-5 hours.
- The receiver typically charges in 2-3 hours.
- An indicator light will show charging status and turn off or change color when fully charged.

Figure 4.1: Charging the Devices. This image shows the wireless transmitter and collar receiver connected to their respective charging cables, indicating they are rechargeable. The image also specifies battery capacities: Transmitter 3.7V 2500mAh LiP, Receiver 3.7V 400mAh LiP.
4.2. Attaching Contact Probes and Collar Strap
- Select the appropriate length of metal probes (short or long) based on your dog's fur length. For dogs with longer fur, use longer probes to ensure proper contact.
- Screw the chosen metal probes onto the receiver.
- Place the silicone sheaths over the metal probes for added comfort and to prevent irritation.
- Connect the adjustable TPU strap to the receiver.
4.3. Fitting the Collar Receiver on Your Dog
Proper fit is crucial for the system's effectiveness and your dog's comfort.
- Turn on the collar receiver.
- Place the receiver on your dog's neck, ensuring the contact points are positioned underneath the neck, making direct contact with the skin.
- Adjust the strap snugly. You should be able to fit one or two fingers comfortably between the strap and your dog's neck. The collar should not be too loose, as this can cause inconsistent correction, or too tight, which can cause discomfort or skin irritation.
- The collar size ranges from 8 to 28 inches, suitable for dogs weighing 10 to 110 pounds.

Figure 4.2: Setup Steps. This image illustrates the step-by-step setup process, including mounting the transmitter, testing the receiver, screwing on contact probes, connecting the TPU belt, placing the collar on the dog's neck, and turning on both the receiver and transmitter.
5. Operating Modes
The system offers two primary operating modes: Wireless Fence Mode and Remote Dog Training Mode.
5.1. Wireless Fence Mode (Pet Containment)
This mode creates a circular boundary around the transmitter, keeping your dog within a designated safe area.
- Activate Fence Mode: Turn on the transmitter and press the MODE button until the LED display shows a distance value (e.g., 30, 60, 90, 150, 300).
- Set Boundary Radius: Use the MIN (-) or MAX (+) buttons to select the desired control radius. Available distances are 30, 60, 90, 150, and 300 meters (approximately 100ft, 200ft, 300ft, 500ft, 990ft).
- Placement: Place the transmitter in a central location within the desired containment area, ideally elevated and away from large metal objects or structures that could interfere with the signal.
- Operation: When your dog approaches the set boundary, the receiver collar will first emit a sound warning. If the dog continues to move out of range, it will receive a mild static correction to encourage it to return to the safe zone.
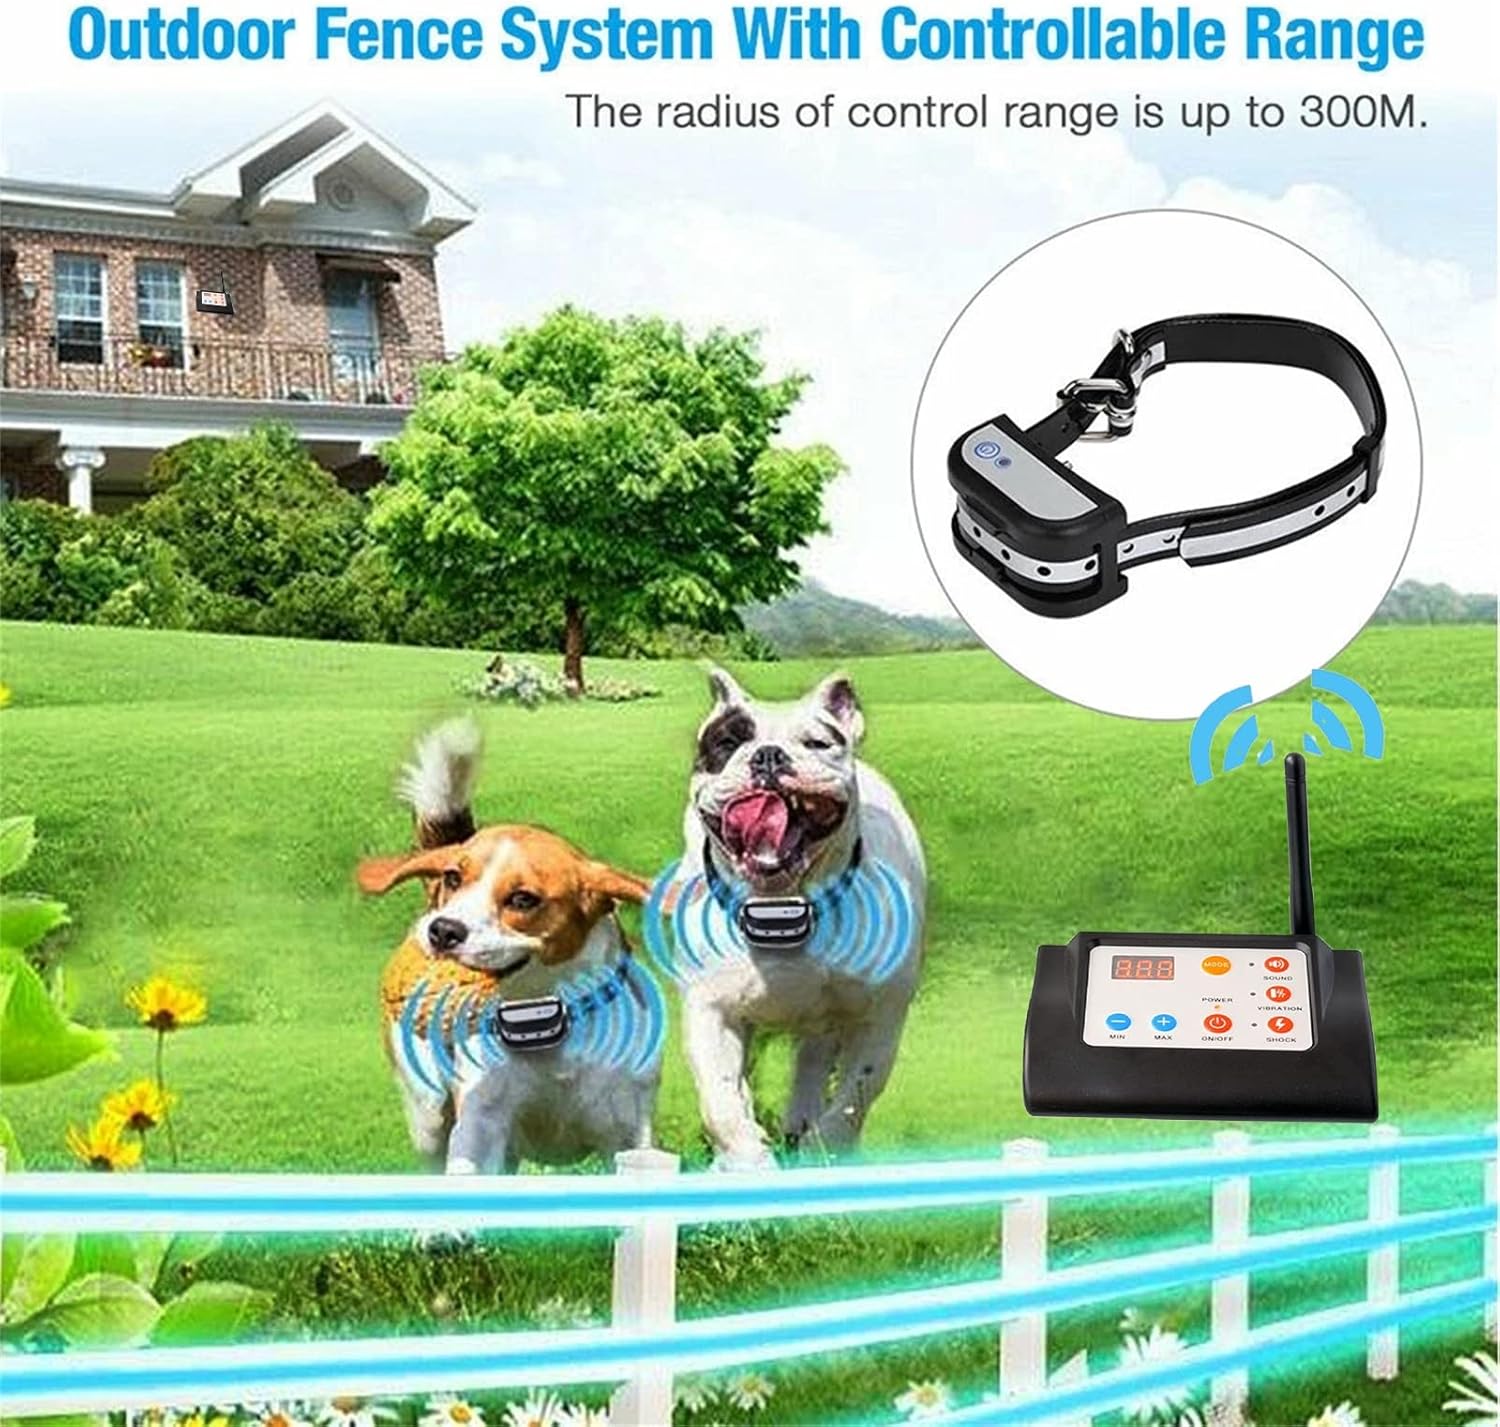
Figure 5.1: Wireless Fence System in Operation. This image depicts the HEXIEDEN wireless fence system in an outdoor setting, showing two dogs wearing the collar receivers within a defined circular boundary. The transmitter is visible, and the image highlights a controllable range of up to 300 meters.

Figure 5.2: Boundary Warning Sequence. This image illustrates the sequence of warnings when a pet exits the set range. Initially, the receiver emits sound warnings (5 seconds). If the pet continues, a static reminder is issued. Further movement triggers continuous sound warnings and electric shock for 6 seconds. After two working cycles, a continuous sound warning is emitted.
Important Note: Signal stability can be affected by obstacles, terrain, and electromagnetic interference. Always test the boundary before relying on the system for containment.
5.2. Remote Dog Training Mode
This mode allows you to manually deliver sound, vibration, or static corrections to train your dog.
- Activate Training Mode: Turn on the transmitter and press the MODE button until the LED display shows a dog number (e.g., 001, 002, 003).
- Pairing (Code Usage): For remote training, the transmitter and receiver(s) must be paired. Follow the specific pairing instructions in your manual (not detailed in provided JSON, but generally involves holding buttons on both devices). One transmitter can control up to three dogs (001, 002, or 003).
- Select Dog: Use the MIN (-) or MAX (+) buttons to select the dog you wish to train (001, 002, or 003).
- Select Correction Level: For Vibration and Shock functions, levels 1-6 are available. Use the MIN (-) or MAX (+) buttons to adjust the intensity. The higher the number, the longer or stronger the function will run.
- Deliver Correction: Press the SOUND, VIBRATION, or SHOCK button to deliver the desired correction.
6. Maintenance
6.1. Charging
Both the transmitter and receiver are equipped with rechargeable batteries. With normal use, batteries can last for weeks. When the power is low, the indicator light will flash, signaling a need for charging.
- Receiver: Charges in 2-3 hours.
- Transmitter: Charges in 4-5 hours.
- If the collar is inactive, it will enter standby mode, which can last over six months. Movement or touch will reactivate it.
6.2. Cleaning
- Regularly clean the collar receiver and contact points with a damp cloth.
- Ensure the contact points are free of dirt, debris, or corrosion to maintain effective operation.
- The TPU strap is environmentally friendly and designed to degrade over time (approx. 5 years).
6.3. Storage
When not in use for extended periods, store the devices in a cool, dry place. Ensure they are fully charged before storage to prolong battery life.
7. Troubleshooting
| Problem | Possible Cause | Solution |
|---|---|---|
| Receiver not responding to transmitter in Fence Mode. |
|
|
| No static correction. |
|
|
| Inconsistent boundary in Fence Mode. |
|
|
| Transmitter not controlling multiple dogs. |
|
|
8. Specifications
| Component | Detail |
|---|---|
| Brand | HEXIEDEN |
| Model | B0B65CSG44 |
| Transmitter Battery | 3.7V 2500mAh LiP (Rechargeable) |
| Receiver Battery | 3.7V 400mAh LiP (Rechargeable) |
| Receiver Waterproof Rating | IPX7 (Waterproof), IP65 (Dust-proof) |
| Wireless Fence Radius | 30m, 60m, 90m, 150m, 300m (approx. 100ft - 990ft) |
| Training Functions | Sound, Vibration (Levels 1-6), Static Shock (Levels 1-6) |
| Collar Strap Material | TPU (Reflective, Environmentally Friendly) |
| Collar Size Range | 8 to 28 inches |
| Suitable Dog Weight | 10 to 110 pounds |
9. Safety Information
- Not for Aggressive Dogs: Do not use this product on aggressive dogs. If your dog exhibits aggressive behavior, consult a professional dog trainer.
- Supervision: Always supervise your dog, especially during initial training and when using the wireless fence.
- Collar Fit: Ensure the collar is fitted correctly. An improperly fitted collar can cause skin irritation or be ineffective. Do not leave the collar on for more than 12 hours a day.
- Skin Checks: Regularly check your dog's neck for signs of irritation, redness, or sores from the contact points. If irritation occurs, discontinue use and consult a veterinarian.
- Static Correction: The static correction is designed to be mild and harmless. Use the lowest effective level for training.
- Children: Keep the device out of reach of children.
- Interference: Be aware that environmental factors can affect the wireless fence signal. Always test the boundary before use.
- Charging: Use only the provided charger. Do not attempt to charge damaged devices.
10. Warranty and Support
HEXIEDEN products are designed for reliability and performance. For specific warranty details, please refer to the warranty card included in your package or contact HEXIEDEN customer support.
If you encounter any issues or have questions regarding your product, please contact our customer support team. Contact information can typically be found on the product packaging or the official HEXIEDEN website.