
1. Introduction
Thank you for choosing the Modern Fan Company Ball 52-inch Ceiling Fan. This manual provides essential information for the safe installation, operation, and maintenance of your new ceiling fan. Please read all instructions carefully before beginning installation or use.
The Ball ceiling fan features a modern design with a sleek profile and three high-quality plywood blades. Its minimalist approach ensures efficient air movement and aesthetic appeal, suitable for various indoor and covered outdoor spaces.

Image 1.1: The Modern Fan Company Ball 52-inch Gloss White Ceiling Fan. This image displays the fan from a slightly upward angle, showcasing its spherical motor housing and three white blades extending outwards, all in a gloss white finish.

Image 1.2: The Modern Fan Company Ball 52-inch Gloss White Ceiling Fan installed in a modern living room with large windows overlooking the ocean. The fan is mounted on a white ceiling, demonstrating its integration into a contemporary living space.
2. Safety Information
To reduce the risk of electrical shock, fire, or personal injury, always follow these basic safety precautions:
- Read all instructions before installing and operating the fan.
- Consult a qualified electrician if you are unsure about wiring or installation procedures.
- Disconnect power at the main circuit breaker or fuse box before beginning installation or performing any maintenance.
- Ensure the installation site can support the fan's weight (approximately 16 pounds).
- Do not operate the fan with damaged blades or any other damaged components.
- Keep hands, clothing, and other objects clear of the fan blades when the fan is in operation.
- This fan is ETL listed for dry and damp locations, making it suitable for indoor use and covered outdoor areas. Do not expose to direct water spray.
3. Package Contents
Verify that all components are present before beginning installation:
- Ceiling Fan Motor Housing (Ball design)
- Fan Blades (3, white plywood)
- Down Rods (6-inch and 16-inch options)
- Mounting Bracket
- Canopy
- Hardware Pack (screws, washers, wire nuts)
- 3-Speed Hand Held Remote Control with Wall Mount
- Instruction Manual
4. Specifications
| Feature | Specification |
|---|---|
| Model Number | BAL-GW-52-WH-NL-003 |
| Blade Span | 52 inches |
| Number of Blades | 3 |
| Blade Material | Plywood |
| Finish | Gloss White |
| Construction | Die Cast Aluminum |
| Control Type | 3-Speed Hand Held Remote Control |
| Reversible Function | Yes (via switch on fan body) |
| Airflow (High Speed) | 4,401 CFM |
| Airflow (Low Speed) | 1,892 CFM |
| Power Source | AC |
| Product Dimensions (with 6" down rod) | 52"D x 52"W x 15"H |
| Item Weight | 16 pounds |
| Certifications | ETL listed for dry and damp locations |

Image 4.1: Detailed dimensions diagram for the Modern Fan Company Ball 52-inch Ceiling Fan, showing measurements for blade span, motor housing, and height with both 6-inch and 16-inch down rods.
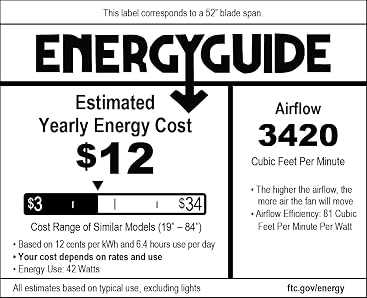
Image 4.2: EnergyGuide label for the Modern Fan Company Ball 52-inch Ceiling Fan, indicating an estimated yearly energy cost of $12 and an airflow of 3420 Cubic Feet Per Minute.
5. Setup and Installation
Professional installation by a qualified electrician is recommended. Ensure all local electrical codes are followed.
5.1 Pre-Installation Steps
- Turn off power at the circuit breaker.
- Ensure the outlet box is securely mounted and capable of supporting the fan's weight.
- Unpack all components and verify against the package contents list.
5.2 Mounting the Fan
- Attach the mounting bracket to the ceiling outlet box using the provided screws.
- Select either the 6-inch or 16-inch down rod based on your ceiling height and desired fan clearance.
- Feed the electrical wires from the fan motor through the chosen down rod.
- Secure the down rod to the fan motor housing.
- Carefully lift the fan assembly and hang it from the mounting bracket.
5.3 Wiring
- Connect the fan's electrical wires to the household wiring according to the wiring diagram in the full installation guide (not provided here, refer to included manual).
- Ensure all connections are secure and insulated with wire nuts.
- Tuck wires neatly into the outlet box.
5.4 Attaching Blades and Canopy
- Attach the fan blades to the motor housing using the provided screws. Ensure they are securely fastened.
- Slide the canopy up to the ceiling and secure it to the mounting bracket, covering the wiring connections.

Image 5.1: The Modern Fan Company Ball 52-inch Ceiling Fan, showing the fan body, downrod, and canopy, illustrating the components involved in the mounting process.
6. Operating Instructions
Your Modern Fan Company Ball ceiling fan is operated by a 3-speed hand-held remote control.
6.1 Remote Control Functions

Image 6.1: The Modern Fan Company 3-speed hand-held remote control. The remote features buttons for fan speed (Low, Medium, High), power on/off, and fan timer functions (1H, 2H, 4H).
- Power Button (⏻): Press to turn the fan on or off.
- Speed Buttons (L, M, H): Press 'L' for Low speed, 'M' for Medium speed, and 'H' for High speed.
- Fan Timer Buttons (1H, 2H, 4H): Press to set the fan to operate for 1, 2, or 4 hours respectively before automatically turning off.
6.2 Reversible Function
The fan features a reversible motor for year-round comfort. The reverse switch is located on the fan body. To change the direction of airflow:
- Turn off the fan using the remote control and wait for the blades to stop completely.
- Locate the reverse switch on the fan motor housing.
- Slide the switch to the opposite position.
- Turn the fan back on.
Summer Mode (Downward Airflow): Set the switch for counter-clockwise rotation to create a cooling breeze. This pushes air down, creating a wind-chill effect.
Winter Mode (Upward Airflow): Set the switch for clockwise rotation to draw air up towards the ceiling. This helps to circulate warm air trapped near the ceiling, distributing it throughout the room.
7. Maintenance
Regular maintenance ensures optimal performance and extends the life of your ceiling fan.
- Cleaning: Periodically wipe the fan blades and motor housing with a soft, damp cloth. Do not use abrasive cleaners or solvents, as these can damage the finish.
- Tightening Screws: Over time, screws may loosen. Check all screws on the mounting bracket, down rod, and blade attachments at least twice a year and tighten them as necessary.
- No Lubrication Required: The fan motor is permanently lubricated and does not require oiling.
Always ensure the power is turned off at the circuit breaker before performing any cleaning or maintenance.
8. Troubleshooting
If you experience issues with your ceiling fan, refer to the following common problems and solutions:
| Problem | Possible Cause | Solution |
|---|---|---|
| Fan does not start | No power to the fan Loose wire connections Remote control battery low | Check circuit breaker/fuse Verify all wire connections are secure (power off first) Replace remote control battery |
| Fan wobbles | Loose blade screws Improperly balanced blades Loose mounting bracket | Tighten all blade screws Use a blade balancing kit (not included) Ensure mounting bracket is securely fastened to the ceiling box |
| Remote control not working | Battery low or dead Incorrect pairing (if applicable) Obstruction between remote and receiver | Replace battery Refer to the full remote control manual for pairing instructions Ensure clear line of sight |
If you are unable to resolve an issue, please contact customer support.
9. Warranty and Support
The Modern Fan Company Ball 52-inch Ceiling Fan comes with a Manufacturer's Limited Lifetime Motor Warranty. Please retain your proof of purchase for warranty claims.
For detailed warranty terms, technical support, or replacement parts, please contact Modern Fan Company customer service directly. Contact information can typically be found on the manufacturer's website or in the original product packaging.