OBEST JKD-C618
OBEST Carbon Monoxide Detector Alarm User Manual
Model: JKD-C618
Brand: OBEST
1. Introduction
Thank you for choosing the OBEST Carbon Monoxide Detector Alarm, model JKD-C618. This device is designed to provide continuous monitoring for carbon monoxide (CO) gas, a colorless, odorless, and highly toxic gas. Equipped with a high-precision electrochemical CO sensor and a digital display, it offers reliable detection and timely alerts to help ensure the safety of your home or workplace.
Please read this manual carefully before installation and use to ensure proper operation and to maximize the lifespan of your detector. Retain this information in a safe and easily accessible place for future reference.

Image: Front view of the OBEST Carbon Monoxide Detector, showing the digital display and 'TEST' button.
2. Important Safety Information
This carbon monoxide detector is designed to protect individuals from the acute effects of carbon monoxide exposure. It will not fully safeguard individuals with specific medical conditions. If in doubt, consult a medical practitioner.
- Do not ignore the alarm: If the alarm sounds, follow the instructions in the "What to do if the alarm sounds" section immediately.
- Proper Placement: Install the detector in areas where CO is likely to be present, such as near fuel-burning appliances, and in sleeping areas. Avoid placing it in direct sunlight, near vents, or in extremely dusty/humid environments.
- Regular Testing: Test the detector regularly as instructed in this manual to ensure it is functioning correctly.
- Battery Replacement: Replace batteries promptly when the low battery warning is indicated.
- Maintenance: Keep the detector clean and free from dust. Do not paint over the unit.

Image: The carbon monoxide detector mounted on a wall in a living room, illustrating a typical installation location near a potential CO source like a fireplace.
3. Product Features
- High-Precision Electrochemical Sensor: Quickly detects CO gas leakage.
- LCD Digital Display: Shows real-time carbon monoxide concentration (ppm) and battery status.
- Voice Prompt: Alerts with voice when CO concentration exceeds safe levels.
- Self-Checking Function: Automatically detects hardware failures (internal circuits, CO sensor) in standby mode.
- Low Battery Warning: Notifies users to replace batteries for continuous protection.
- 85 dB Alarm Sound: Loud alarm to alert occupants.
- LED Status Indicators: Green for power, red for alarm, yellow for fault.
- Easy Installation: Can be easily installed on a wall or ceiling.
- 360° Air Inlet Design: Ensures comprehensive detection.

Image: A promotional image highlighting key features of the OBEST Carbon Monoxide Detector, including its LCD digital display, LED indicators, and 85dB alarm.
4. Setup and Installation
4.1 Battery Installation
The detector is powered by 3 x 1.5V AAA batteries (not included). Follow these steps to install the batteries:
- Rotate the back cover of the detector counter-clockwise to open it.
- Insert three AAA batteries into the battery compartment, ensuring correct polarity (+/-).
- After the batteries are installed, you will hear a beep sound. The detector will then start a 40-second warm-up period.
- Align the back cover and rotate it clockwise to close securely.
Video: This video demonstrates the process of opening the back cover, inserting the 3 AAA batteries, and closing the cover. It also shows the initial warm-up sequence of the detector.
4.2 Wall-hanging Installation Steps
The detector can be mounted on a wall or ceiling. Choose a location away from direct drafts, windows, or areas with high humidity. Follow these steps for wall mounting:
- Mark two mounting holes on the wall using the back plate as a template.
- Drill holes at the marked positions. Insert wall plugs into the holes and secure the mounting bracket with screws.
- Attach the detector to the mounted bracket by aligning and twisting it into place.

Image: A visual guide demonstrating the four steps for wall-hanging installation: marking holes, drilling and inserting plugs, inserting batteries, and testing the alarm.
5. Operation
5.1 Initial Warm-up
After battery installation, the detector will emit a beep and the LED indicator will flash. It will then warm up for approximately 40 seconds. During this period, the LCD display may show a countdown or fluctuating readings. Once the warm-up is complete, the detector enters normal monitoring state, the LCD screen will normally be off, and the green power indicator will flash once every 35 seconds.
5.2 Testing the Detector
It is recommended to test the detector weekly to ensure proper functionality.
- Press the "TEST" button located on the front of the detector.
- The indicator light will turn on, the red light will blink rapidly, and the alarm will activate with a loud sound.
- Release the button. The alarm will stop, and the detector will return to normal monitoring state.

Image: A hand pressing the 'TEST' button on the carbon monoxide detector, indicating the testing procedure.
6. Alarm Indications
The detector provides visual and audible alerts based on the detected carbon monoxide levels and device status.
6.1 CO Concentration Alarms
| CO Concentration (PPM) | Alarm Frequency |
|---|---|
| 50 PPM | Alarm occurs every 60-90 minutes |
| 100 PPM | Alarm occurs every 10-40 minutes |
| 300 PPM | Alarm occurs every 3 minutes |
| 400 PPM | Alarm occurs immediately |
When the detector enters an alarm state, the red alarm indicator flashes rapidly, and the buzzer sounds simultaneously. A voice prompt will also be heard.

Image: A visual representation of different carbon monoxide concentration levels (PPM) and the timeframes within which the alarm will sound, alongside a house layout.
6.2 Status Indicators
- Green Power Indicator: Flashes once every 35 seconds, indicating that the detector is working normally.
- Red Alarm Indicator: Flashes rapidly when the detector enters an alarm state, accompanied by the buzzer sound.
- Yellow Fault Indicator: Stays on, and the buzzer sounds 2 times every 8 seconds, indicating that the sensor has failed.
- Low Battery Warning: The LCD display will show a low battery icon, and the detector may emit a specific low battery chirp.
7. Maintenance
- Regular Cleaning: Gently vacuum the detector cover once a month using a soft brush attachment to remove dust and debris. Do not use cleaning solvents or detergents.
- Battery Replacement: Replace all three AAA batteries immediately when the low battery warning is indicated. Always use fresh, high-quality batteries.
- Annual Testing: In addition to weekly tests, perform a comprehensive test annually by pressing the test button.
- Do Not Paint: Never paint the detector. Paint can clog the sensing vents and prevent the unit from functioning properly.
8. Troubleshooting
| Problem | Possible Cause | Solution |
|---|---|---|
| Detector not powering on after battery installation. | Incorrect battery polarity; dead batteries; faulty unit. | Check battery orientation. Replace with new batteries. If problem persists, contact support. |
| Yellow fault indicator is on, buzzer sounds 2 times every 8 seconds. | Sensor failure. | The sensor has failed. The unit needs to be replaced. |
| Low battery warning (icon on LCD, specific chirp). | Batteries are low. | Replace all three AAA batteries immediately. |
| Alarm sounds without visible CO source. | Actual CO presence; false alarm due to interference; detector malfunction. | Follow "What to do if the alarm sounds" procedure. Ventilate area. If false alarm, check for strong fumes (e.g., paint, cleaning products). If persistent, replace unit. |
9. Specifications
- Model: JKD-C618
- Sensor Type: Electrochemical
- Gas Detection Type: Carbon Monoxide
- Alarm Sound: ≥85 dB
- Operating Temperature: 0℃ ~ 45℃
- Ambient Humidity: ≤95% RH (non-condensing)
- Battery: 3 x 1.5V AAA batteries (not included)
- Dimensions: Approximately 11.4 x 11.3 x 3.4 cm (4.5" x 4.4" x 1.3")
- Weight: 140 g
- Standard: EN50291-1:2018
- Power Source: Battery Powered
- Color: White
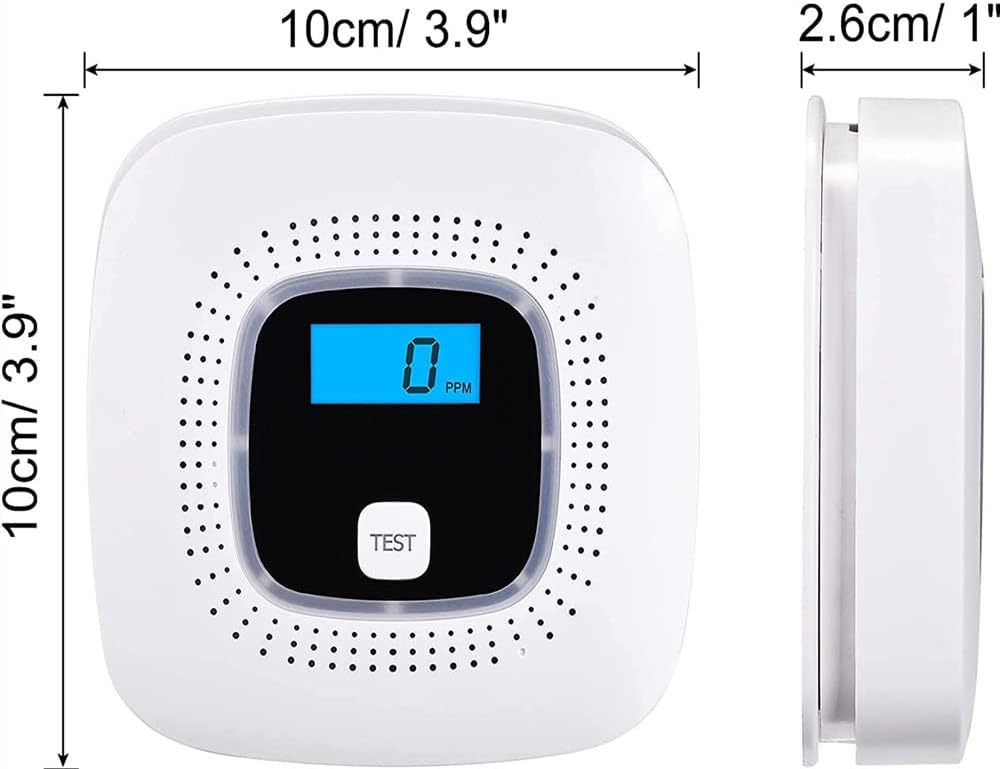
Image: A diagram illustrating the dimensions of the carbon monoxide detector, showing its length, width, and thickness.
10. What to do if the alarm sounds
- Immediately move to fresh air: Open doors and windows to ventilate the area. Move all occupants to fresh air outdoors or by an open door/window.
- Do not re-enter the premises: Do not re-enter the premises or move away from the open door/window until the emergency services have arrived, the premises have been aired out, and your alarm remains in its normal condition.
- Call emergency services: Call your emergency services (e.g., 999 in the UK, 911 in the US) or your gas supplier from a neighbor's phone or a mobile phone from outside the affected area.
- Identify and correct the source of CO: After the emergency services have cleared the area, have the source of the carbon monoxide identified and repaired by a qualified professional.
11. Warranty and Support
This product has undergone multiple evaluations to ensure its quality. If you have any questions or encounter issues after purchase, please contact the seller directly through the platform where you purchased the product. Please refer to your purchase receipt for specific warranty terms and contact information.
Ask a question about this manual
Ask about setup, troubleshooting, compatibility, parts, safety, or missing instructions. Manuals+ will review the question and use this page’s manual context to help answer it.