1. Introduction
Thank you for choosing the Zealtron T22 Industrial Endoscope Camera. This device is designed for visual inspection in hard-to-reach areas, offering high-resolution imaging and video recording capabilities. Its ultra-thin probe and waterproof design make it suitable for various industrial, automotive, and household inspection tasks.

Figure 1.1: Zealtron T22 Industrial Endoscope Camera and accessories.
2. Product Overview
2.1 Key Features
- Ultra-thin 3.9mm Probe: Facilitates access to extremely narrow spaces.
- 4.5-inch IPS Display: Provides clear 1080P images and smooth video.
- IP67 Waterproof Probe: Operates reliably in wet environments up to 1 meter depth for over an hour.
- 6 Adjustable LED Lights: Ensures clear visibility in dark conditions with 3 brightness levels.
- 4.0X Digital Zoom: Magnifies details for closer inspection.
- Image Rotation: Allows 180° image flip for optimal viewing angles.
- 32GB TF Card Included: For storing captured images (JPG) and videos (AVI).
- 3800mAh Rechargeable Battery: Offers 3-4 hours of continuous working time.
- Rear LED Flashlight: Provides additional illumination for the working area.
2.2 Components
The package typically includes:
- Zealtron T22 Endoscope Monitor
- 3.9mm Semi-rigid Camera Probe (5 meters)
- Micro USB Cable
- 32GB TF Card
- Accessory Set (Protective cap, hook, magnet)
- Travel Case
- User Manual

Figure 2.1: Package contents including the endoscope, probe, USB cable, TF card, and accessories.
3. Setup
3.1 Charging the Device
- Connect the Micro USB cable to the charging port on the endoscope monitor.
- Connect the other end of the USB cable to a standard 5V/1A USB power adapter (not included) or a computer USB port.
- The charging indicator light will illuminate. A full charge typically takes approximately 2 hours.
- The device can operate for 3-4 hours on a full charge.

Figure 3.1: The endoscope monitor connected for charging, showing the 3800mAh battery capacity and working time.
3.2 Inserting the TF Card
- Locate the TF card slot on the side of the endoscope monitor.
- Insert the provided 32GB TF card into the slot with the gold contacts facing down until it clicks into place.
- To remove, gently push the card until it springs out.
3.3 Attaching the Camera Probe
- Align the connector of the camera probe with the port on the top of the endoscope monitor.
- Gently push the probe connector into the port.
- Twist the locking ring clockwise to secure the probe in place.
- Ensure the connection is firm to prevent disconnections during use.
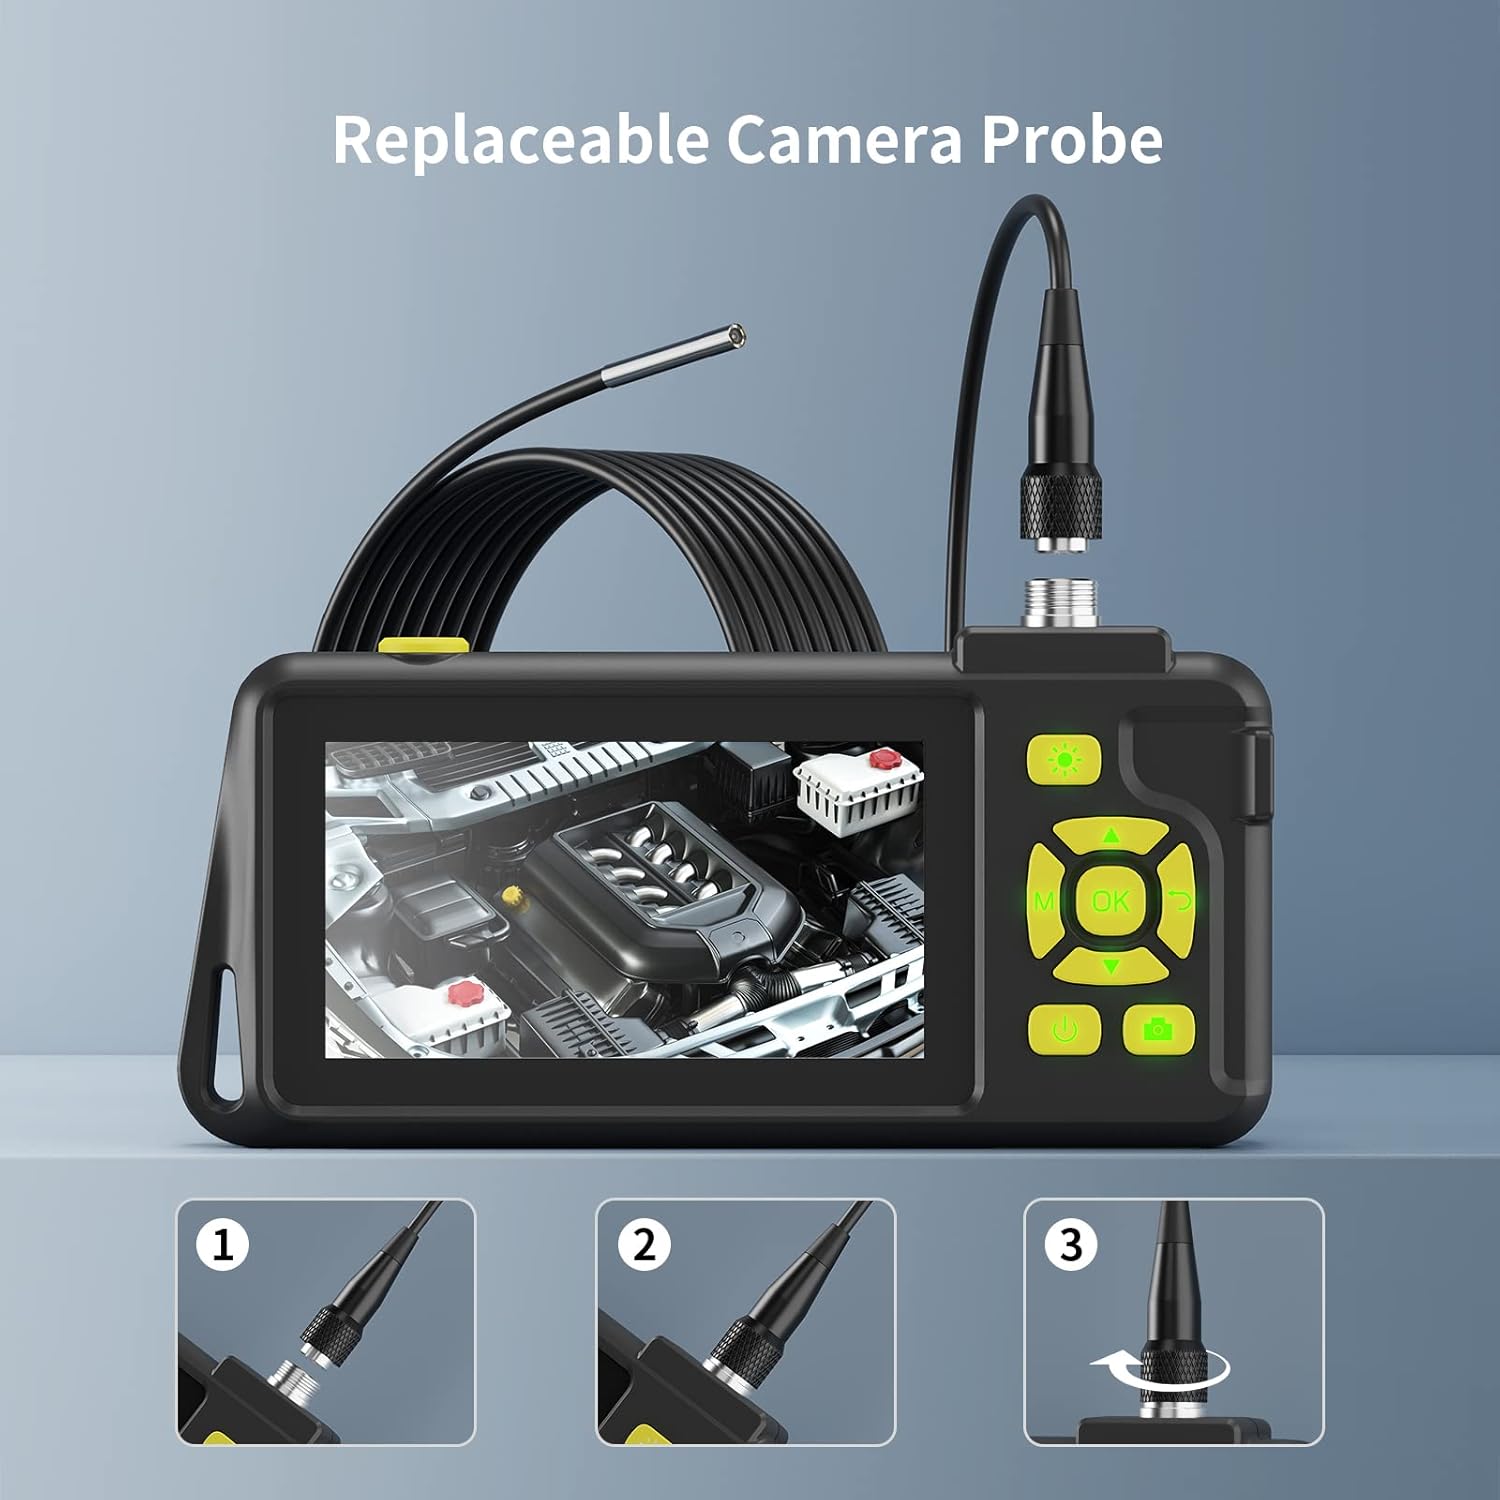
Figure 3.2: Steps for attaching the camera probe to the main unit.
4. Operating Instructions
4.1 Power On/Off
- To power on, press and hold the power button (U) for a few seconds until the screen illuminates.
- To power off, press and hold the power button again until the screen turns off.
4.2 Menu Navigation
- Use the M button to enter the menu.
- Use the Up/Down arrow buttons to navigate through menu options.
- Press the OK button to confirm a selection.
- Press the M button again to exit the menu.
4.3 Adjusting LED Lights
- While in live view, press the light bulb button (💡) to cycle through the 3 brightness levels of the probe's LED lights.
- The rear flashlight can be activated/deactivated by a dedicated button (refer to device layout).

Figure 4.1: Adjustable LED lights on the probe and the rear flashlight feature.
4.4 Capturing Images and Videos
- In live view, press the camera button (📷) once to take a still image.
- Press and hold the camera button to start video recording. Press again to stop recording.
- All captured media will be saved to the inserted TF card.
4.5 Zoom and Image Rotation
- Use the zoom buttons (typically Up/Down arrows or dedicated buttons) to adjust the 1.0x to 4.0x digital zoom.
- Press the image rotation button (often labeled with a circular arrow) to flip the image 180° for correct orientation.

Figure 4.2: Display features including IPS screen, rotation, zoom, and media capture.
5. Maintenance
5.1 Cleaning
- After each use, especially in dirty or wet environments, gently wipe the camera probe with a soft, damp cloth.
- Ensure the probe is dry before storage.
- Clean the monitor screen with a microfiber cloth. Avoid abrasive cleaners.
5.2 Storage
- Store the endoscope camera and its accessories in the provided travel case to protect them from dust and physical damage.
- Keep the device in a cool, dry place, away from direct sunlight and extreme temperatures.
5.3 Battery Care
- To prolong battery life, avoid fully discharging the battery frequently.
- If storing for an extended period, charge the battery to approximately 50% every few months.
6. Troubleshooting
- No Power:
Ensure the device is fully charged. Connect to a power source and check if the charging indicator lights up. If not, try a different USB cable or power adapter. - No Image on Screen:
Verify that the camera probe is securely connected to the monitor. Check if the probe cable is damaged. Restart the device. - Poor Image Quality / Dark Image:
Adjust the brightness of the probe's LED lights. Ensure the camera lens is clean. The optimal focal distance for the camera is typically a few centimeters from the object. - Cannot Record Images/Videos:
Check if the TF card is properly inserted. Ensure the TF card has sufficient free space. The card might need to be formatted (refer to menu settings for formatting option). - Probe Not Bending as Expected:
The probe is semi-rigid. While it offers flexibility, it may not navigate sharp 90-degree turns in very confined spaces. Avoid forcing the probe to prevent damage. - Device Freezes:
Press and hold the power button to force a shutdown, then restart the device. If the issue persists, ensure the battery is adequately charged.
7. Specifications
| Feature | Specification |
|---|---|
| Model Number | T22 |
| Probe Diameter | 3.9 mm |
| Display Screen | 4.5-inch IPS |
| Video Recording Resolution | 1080p |
| Water Resistance Level | IP67 (Probe) |
| LED Lights | 6 adjustable LEDs |
| Zoom Type | Optical Zoom (Digital 1.0x to 4.0x) |
| Storage Media | Micro SD Card (32GB included) |
| Battery Type | 1 Lithium-polymer (included) |
| Battery Capacity | 3800 mAh |
| Working Time | 3-4 hours |
| Connectivity Technology | USB |
| Product Dimensions | 20.32 x 12.7 x 7.62 cm |
| Item Weight | 453.59 grams (approx. 1 pound) |
8. Warranty and Support
Zealtron products are designed for reliability and performance. For any questions, technical support, or warranty inquiries, please refer to the contact information provided with your purchase or visit the official Zealtron website. Please retain your proof of purchase for warranty claims.
For further assistance, you may contact customer support via the platform where the product was purchased.