1. Introduction
The GOYERRNES GR-8808 Handheld Anemometer is a versatile instrument designed for measuring wind speed, wind temperature, and humidity. This device is suitable for a variety of applications including HVAC system analysis, outdoor sports, drone operation, and environmental monitoring. Its compact design, backlit LCD, and rechargeable battery make it a reliable tool for both professional and recreational use.
Key Features:
- Measures wind speed, temperature, and humidity.
- Large LCD with backlight for clear visibility in low light.
- Built-in flashlight for convenience.
- Rechargeable via Type-C USB port.
- Tripod mounting hole for continuous measurement.
- Data Hold, MAX/MIN/AVG functions.

Image 1.1: The GR-8808 Anemometer displaying its 3-in-1 measurement capabilities for wind speed, temperature, and humidity.
2. Package Contents
Please verify that all items are present in the package:
- GOYERRNES GR-8808 Anemometer
- Type-C USB Charging Cable
- Portable Storage Bag
- Hand Strap
- Small Screwdriver (for battery compartment)
- Instruction Manual (this document)

Image 2.1: All components included in the GR-8808 Anemometer package.
3. Setup
3.1 Initial Battery Connection and Charging
Before first use, the internal rechargeable battery must be connected. Follow these steps:
- Using the provided screwdriver, open the battery compartment cover located on the back of the device.
- Carefully connect the battery connector to the corresponding port inside the compartment.
- Close the battery compartment cover and secure it with the screw.
- Connect the device to a power source using the Type-C USB cable to fully charge it before initial operation. The charging indicator on the screen will show charging status.

Image 3.1: Steps for connecting the internal battery before first use.
3.2 Attaching the Hand Strap
Thread the included hand strap through the designated loop on the device to prevent accidental drops during use.
3.3 Tripod Mounting (Optional)
The GR-8808 features a standard metal threaded hole at the bottom, allowing it to be mounted on a tripod (not included) for stable, continuous measurements. This is particularly useful for applications requiring hands-free operation, such as drone flying or long-term monitoring.

Image 3.2: The anemometer can be mounted on a tripod for stable measurements.
4. Operating Instructions
4.1 Device Layout and Controls
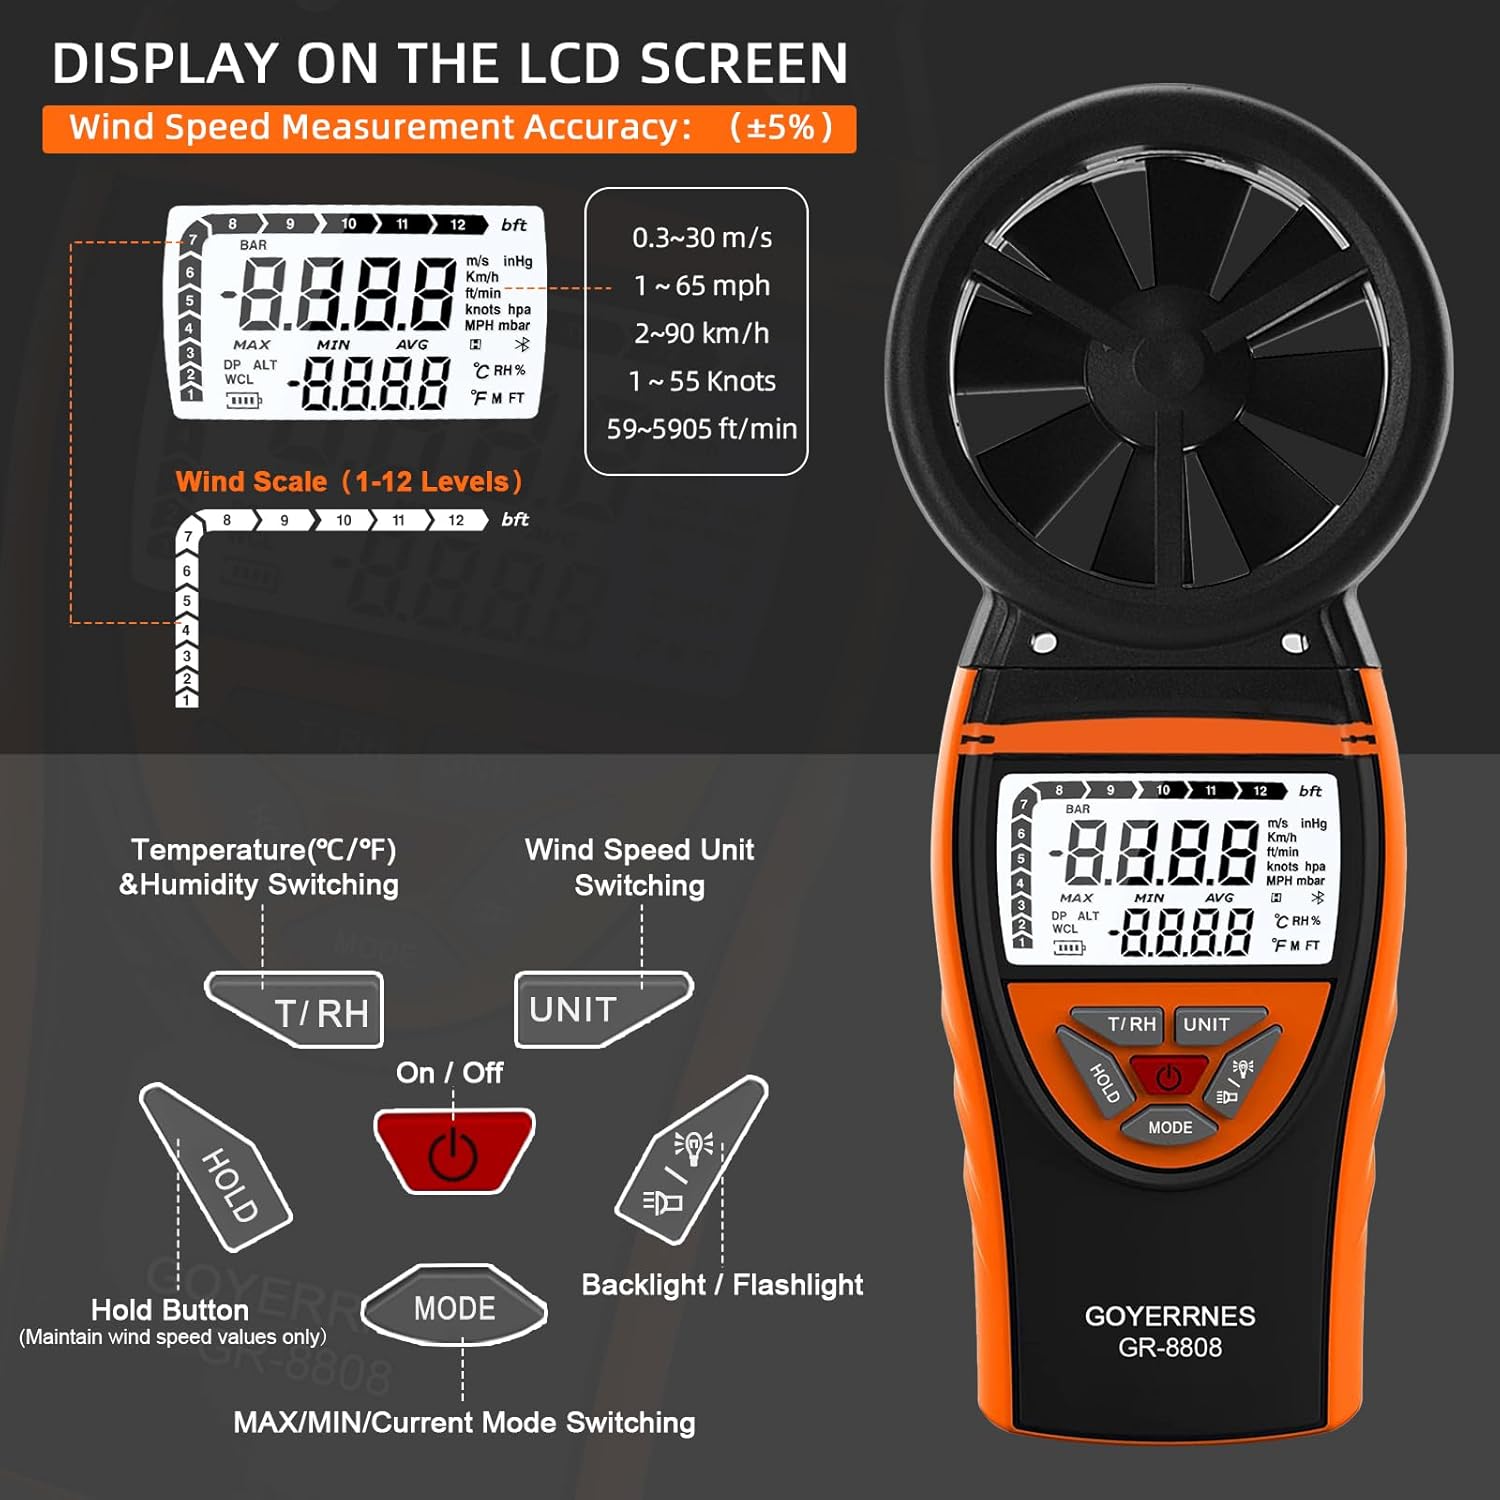
Image 4.1: Overview of the anemometer's display and control buttons.
- On/Off Button: Powers the device on or off.
- T/RH Button: Switches between temperature units (°C/°F) and displays humidity.
- UNIT Button: Cycles through wind speed units (m/s, km/h, ft/min, knots, mph).
- HOLD Button: Freezes the current measurement on the display. Press again to release.
- MODE Button: Switches between MAX, MIN, AVG, and current measurement modes.
- Backlight/Flashlight Button: Activates the LCD backlight and the built-in flashlight.
4.2 Power On/Off
Press the On/Off button to turn the anemometer on. Press and hold the On/Off button for a few seconds to turn it off. The device features an auto-off function to conserve battery power if inactive for a period.
4.3 Taking Measurements
Point the anemometer's fan blades towards the wind source. The LCD will display real-time wind speed, temperature, and humidity. Ensure the fan blades are unobstructed for accurate readings.
4.4 Switching Units
- Wind Speed: Press the UNIT button to cycle through available wind speed units: meters per second (m/s), kilometers per hour (km/h), feet per minute (ft/min), knots, and miles per hour (mph).
- Temperature: Press the T/RH button to switch between Celsius (°C) and Fahrenheit (°F).
4.5 MAX/MIN/AVG Modes
Press the MODE button to cycle through different measurement display modes:
- MAX: Displays the maximum wind speed recorded since the device was powered on or the mode was reset.
- MIN: Displays the minimum wind speed recorded.
- AVG: Displays the average wind speed recorded.
- Press MODE again to return to real-time measurement.
4.6 Backlight and Flashlight
Press the Backlight/Flashlight button to activate the LCD backlight for improved visibility in dark conditions. Press it again to turn on the built-in flashlight. A third press will turn both off.

Image 4.2: The anemometer's backlit screen and flashlight in use.
4.7 CFM Calculation Application
The anemometer can assist in calculating Cubic Feet per Minute (CFM) for airflow. To do this, measure the wind speed (in ft/min) and then multiply it by the cross-sectional area of the vent or duct (in square feet). The formula is: Air Flow (CFM) = Wind Speed (ft/min) × Duct Cross-Sectional Area (sq ft).
5. Maintenance
5.1 Cleaning
Wipe the device with a soft, dry cloth. Do not use abrasive cleaners or solvents, as they may damage the casing or display. Keep the fan blades free from dust and debris to ensure accurate readings.
5.2 Storage
When not in use, store the anemometer in its portable bag in a cool, dry place, away from direct sunlight and extreme temperatures. If storing for extended periods, ensure the battery is partially charged (around 50%) to prolong its lifespan.
5.3 Battery Care
Recharge the battery when the low battery indicator appears on the display. Avoid fully discharging the battery frequently. Use only the provided Type-C USB cable for charging.
6. Troubleshooting
| Problem | Possible Cause | Solution |
|---|---|---|
| Device does not turn on. | Battery not connected or discharged. | Ensure the battery is properly connected (refer to Section 3.1). Charge the device using the Type-C USB cable. |
| Inaccurate wind speed readings. | Fan blades obstructed or damaged; incorrect positioning. | Check for debris in the fan blades. Ensure the device is pointed directly into the airflow. Avoid holding the device in a way that blocks the airflow to the sensor. |
| Display is dim or not visible. | Backlight is off; low battery. | Press the Backlight button to activate. Recharge the battery if the low battery indicator is shown. |
| Temperature/Humidity readings seem incorrect. | Sensor interference; device not acclimatized. | Ensure the device has been in the measurement environment for a few minutes to acclimatize. Avoid direct sunlight or heat sources affecting the sensor. |
7. Specifications
| Feature | Detail |
|---|---|
| Brand | GOYERRNES |
| Model | GR-8808 |
| Wind Speed Range | 0.67 to 67.1 mph (0.3 to 30 m/s) |
| Wind Speed Accuracy | ±2% of reading |
| Temperature Range | 14°F to 113°F (-10°C to 45°C) |
| Temperature Resolution | 0.1°F / 0.1°C |
| Humidity Range | Not explicitly specified, but measured. |
| Display Type | LCD with Backlight |
| Power Source | Rechargeable Battery (Type-C USB charging) |
| Material | Acrylonitrile Butadiene Styrene (ABS) |
| Dimensions | 3.1 x 1.4 x 8.2 inches (approx. 80 x 35 x 210 mm) |
| Item Weight | 7.1 ounces (approx. 202 grams) |
| Special Features | Portable, Flashlight, Tripod Hole, Data Hold, MAX/MIN/AVG |
8. Warranty and Support
8.1 Warranty Information
GOYERRNES products are designed for reliability and performance. For specific warranty details regarding your GR-8808 Handheld Anemometer, please refer to the warranty card included in your product packaging or contact GOYERRNES customer support. Typically, a standard warranty covers manufacturing defects for a specified period from the date of purchase.
8.2 Customer Support
If you encounter any issues or have questions not covered in this manual, please contact GOYERRNES customer support. You can usually find contact information on the product packaging, the official GOYERRNES website, or through your retailer.