1. Introduction
Thank you for choosing the Galano Millicent 3-Door Sideboard Buffet Cabinet. This manual provides essential information for the safe assembly, operation, and maintenance of your new furniture. Please read all instructions carefully before beginning assembly and retain this manual for future reference.

Image 1.1: The assembled Galano Millicent 3-Door Sideboard Buffet Cabinet in Mexican Grey.
2. Safety Information
Always follow these safety guidelines to prevent injury or damage to the product.
- Anti-Tip Brackets: Securely attach the anti-tip brackets to the wall as instructed to prevent tipping. This is crucial for safety, especially in households with children or pets.
- Assembly: Assemble the cabinet according to the provided instructions. Use a mallet and screwdriver as specified. Do not use power tools unless explicitly stated, as overtightening screws can damage the engineered wood.
- Weight Limit: Do not exceed the maximum weight limit of 90.2 pounds for the entire unit. Distribute weight evenly across shelves.
- Placement: Place the cabinet on a flat, stable surface. Avoid placing it in areas with high humidity or direct sunlight to prevent material degradation.
- Children: Do not allow children to climb on or play with the cabinet. Keep small parts away from children during assembly.

Image 2.1: Important safety warnings, including the use of anti-tip brackets to prevent furniture tip-over.
3. Package Contents
Before beginning assembly, ensure all parts and hardware are present. Refer to the included assembly instruction booklet for a detailed list of components. If any parts are missing or damaged, please contact customer support.
4. Assembly Instructions
Assembly is required for this product. Follow the steps below carefully. An online assembly video is available for visual guidance.
Video 4.1: Official assembly video for the Galano Millicent 3-Door Storage Accent Cabinet. This video provides a visual guide to the assembly process.
Step-by-Step Assembly
- Prepare the Base: Attach the base support (E) to the bottom panel (Y) using the specified screws and dowels. Ensure a secure fit.

Image 4.2: Illustration of attaching base support to the bottom panel.
- Attach Side Panel (B): Secure side panel (B) to the assembled base using cam locks and pins.

Image 4.3: Illustration of attaching side panel B to the base.
- Attach Side Panel (A): Secure side panel (A) to the assembled base using cam locks and pins.

Image 4.4: Illustration of attaching side panel A to the base.
- Install Back Panel (M & N): Slide the back panels (M and N) into the grooves on the side panels. Secure with small nails.

Image 4.5: Illustration of installing the back panels into the cabinet frame.
- Attach Top Panel (Z): Place the top panel (Z) onto the assembled frame and secure it with cam locks.

Image 4.6: Illustration of attaching the top panel to complete the main frame.
- Insert Adjustable Shelves (W & X): Insert the adjustable shelves (W and X) into the desired positions using the shelf pins.

Image 4.7: Illustration of inserting the adjustable shelves into the cabinet compartments.
- Attach Door Hinges: Attach the hinges to the doors (L) using the provided screws. Ensure they are securely fastened.

Image 4.8: Illustration of attaching hinges to the cabinet doors.
- Mount Doors: Mount the doors (L) onto the cabinet frame by attaching the hinges to the pre-drilled holes.

Image 4.9: Illustration of mounting the doors onto the cabinet frame.
- Install Door Handles: Attach the metal handles to the doors (L) using the provided screws.

Image 4.10: Illustration of installing the door handles onto the cabinet doors.
- Install Anti-Tip Brackets: Secure the anti-tip brackets to the top rear of the cabinet and to the wall. This is a critical safety step.

Image 4.11: Illustration of installing the anti-tip brackets to secure the cabinet to the wall.
5. Operating Instructions
The Galano Millicent Sideboard is designed for versatile storage in your living or dining room. Its three doors conceal a 2-tier shelving system, providing ample space for various items.
- Opening/Closing Doors: Use the metal handles to gently open and close the acrylic mirror doors. Avoid slamming the doors to prevent damage to hinges and the cabinet structure.
- Adjusting Shelves: The inner shelves are adjustable. To change shelf height, remove the shelf pins, reposition them to the desired height, and then place the shelf back on the pins. Ensure all four pins are securely in place before placing items on the shelf.
- Storage: Utilize the spacious interior for organizing items such as dinnerware, books, decorative accessories, or other household essentials. Distribute weight evenly on shelves to maintain stability.
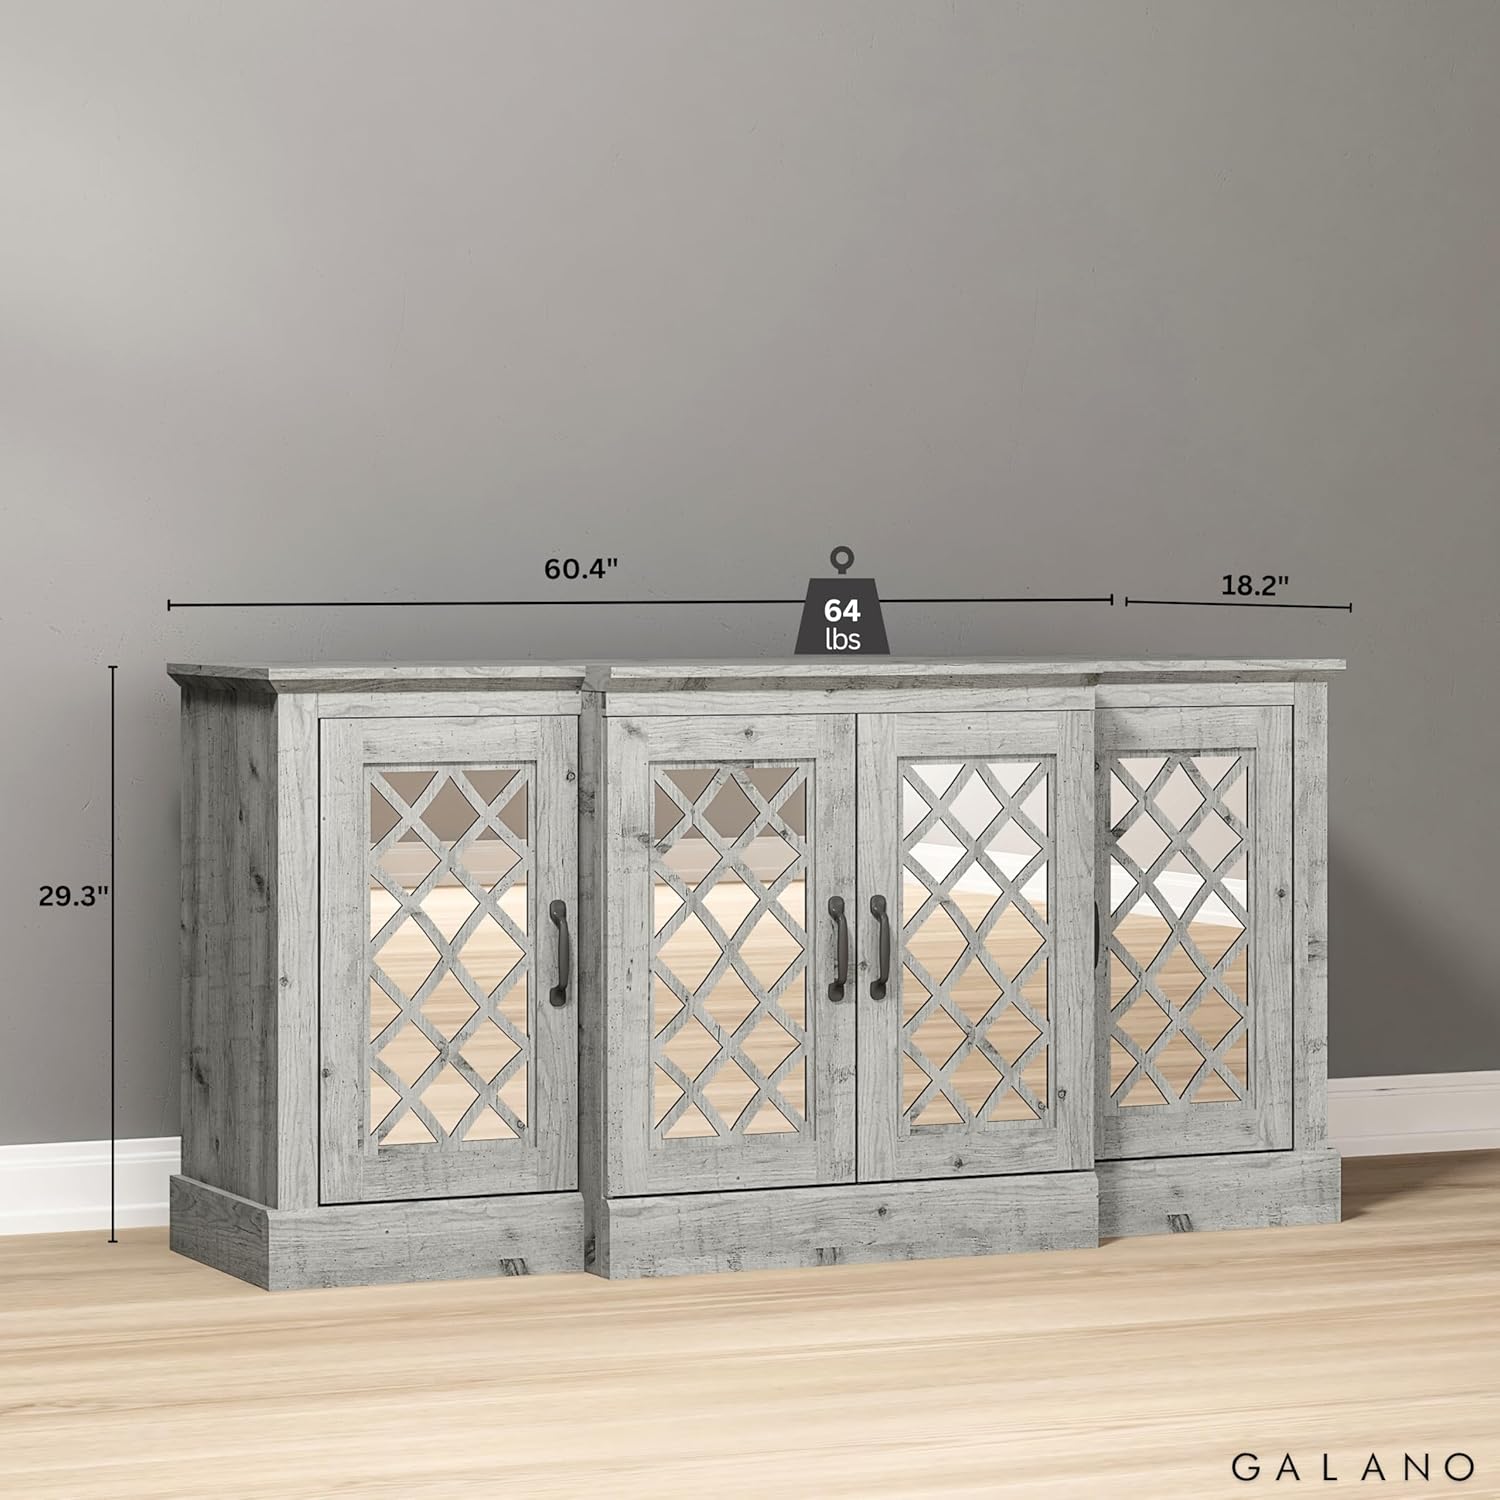
Image 5.1: Key features including adjustable shelves and acrylic mirror doors.
Video 5.2: Product overview of the Millicent 3-Door Sideboard in Mexican Grey, showcasing its features and storage capabilities.
6. Maintenance
Proper care will extend the life and appearance of your cabinet.
- Cleaning: Wipe surfaces with a soft, damp cloth. Avoid harsh chemicals or abrasive cleaners, which can damage the PU paper lamination finish.
- Spills: Immediately wipe up any spills to prevent moisture damage to the engineered wood.
- Inspection: Periodically check all screws and connections to ensure they remain tight. Retighten if necessary.
- Door Alignment: If doors become misaligned, refer to the troubleshooting section for adjustment instructions.
7. Troubleshooting
If you encounter issues with door alignment, follow these steps:
Door Hinge Adjustment
The hinges on your cabinet doors allow for lateral and vertical adjustments to ensure proper alignment and even gaps.
- Lateral Adjustment: To adjust the door horizontally (inward or outward), turn the front screw on the hinge. Turning clockwise moves the door inward, and anti-clockwise moves it outward. Adjust until the desired gap is achieved.
- Vertical Adjustment: To adjust the door vertically (upwards or downwards), loosen the mounting plate screws on the hinge. Move the door to the desired height, then tighten the screws securely.
- Gap Adjustment: To adjust the gap between the door and the cabinet frame, loosen the hinge screw located at the hinge arm. You can then move the door closer to the cabinet or slightly away from it. Once the door is in the desired position, tighten the screw securely.
Video 7.1: Detailed guide on how to adjust cabinet door hinges for proper alignment.
8. Specifications
| Feature | Description |
|---|---|
| Brand | Galano |
| Model Name | Galano Millicent |
| Item Model Number | FG-PU-19-656-AMS |
| Color | Mexican Grey |
| Product Dimensions | 15.7"D x 45.7"W x 29.3"H |
| Item Weight | 71 Pounds |
| Weight Limit | 90.2 Pounds |
| Material | Engineered Wood |
| Finish Type | PU Paper Lamination |
| Door Style | Acrylic Mirror Door |
| Number of Doors | 3 |
| Number of Shelves | 4 (2-tier shelving behind each door) |
| Special Feature | Adjustable Shelf, Anti-tip Brackets |
| Assembly Required | Yes |
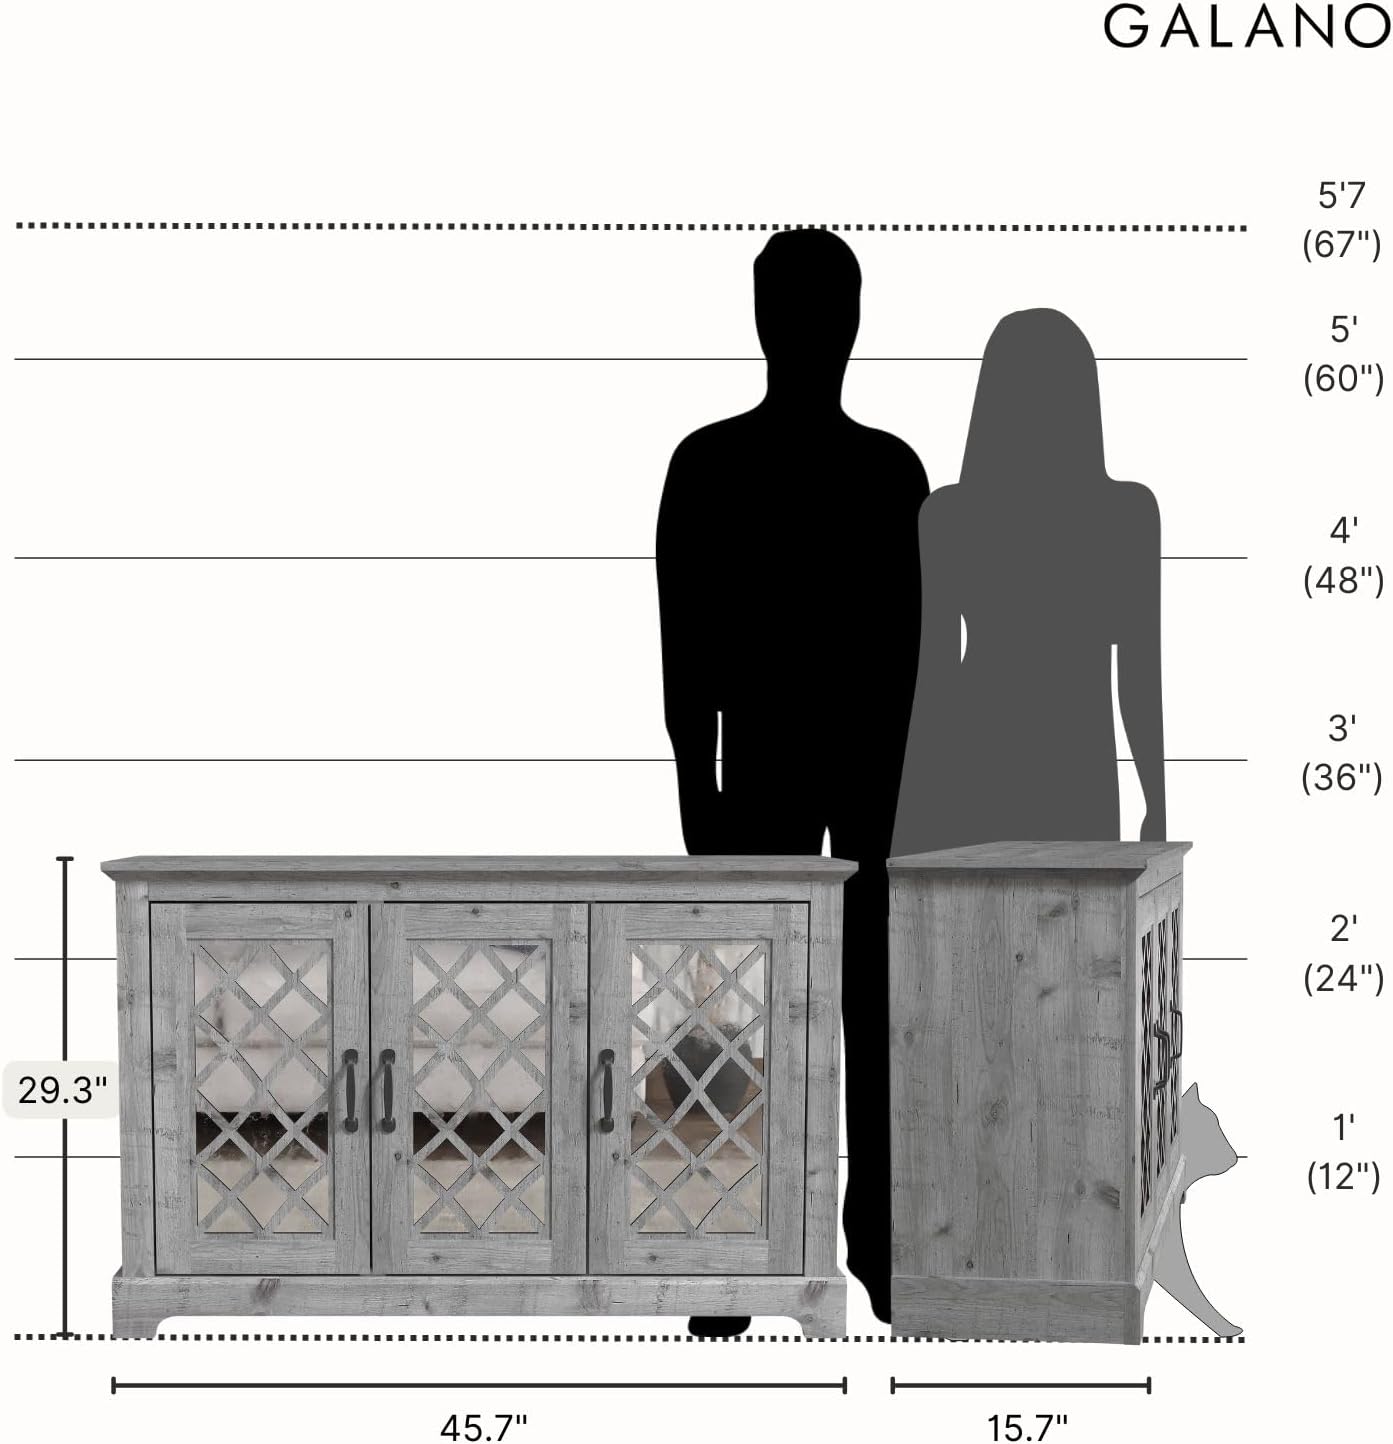
Image 8.1: Detailed product dimensions and internal measurements.
9. Warranty and Support
For warranty information or customer support, please refer to the documentation included with your purchase or visit the official Galano Furniture store on Amazon. If you have any concerns about assembly or if an item arrives damaged or defective, please contact our customer service team. We are committed to resolving issues by providing replacement parts, discounts, or offering a return and refund.


