1. Introduction
This manual provides detailed instructions for the safe and effective use of your Apollo HVLP Gravity Feed Spray Gun, Model 7600. Designed for both professional and DIY applications, this spray gun offers high-performance atomization and efficient material transfer. Please read this manual thoroughly before operation to ensure proper setup, usage, and maintenance, which will extend the life of your equipment and ensure optimal results.

Figure 1: Apollo HVLP Gravity Feed Spray Gun with 600cc cup. This image displays the complete spray gun assembly, featuring the black gun body, gold air cap, and the clear 600cc gravity feed cup attached at the top. A clear hose connects the cup to the air inlet.
2. Safety Information
Always prioritize safety when operating the spray gun. Failure to follow safety guidelines can result in injury or damage to equipment.
- Use in a well-ventilated area to prevent inhalation of fumes.
- Avoid contact with skin and eyes. Wear appropriate personal protective equipment (PPE), including safety glasses, gloves, and a respirator.
- Keep out of reach of children and pets.
- Always disconnect the air supply before cleaning, maintenance, or changing components.
- Ensure all connections are secure before operation.
- Do not point the spray gun at yourself or others.
- Follow all safety guidelines provided by the paint or coating manufacturer.
3. Package Contents
Verify that all items listed below are present in your package. If any items are missing or damaged, contact customer support.
- C7600 Performance Spray Gun
- 600cc Gravity Top Cup Assembly
- 600cc Replacement Cup Gasket
- Cleaning Brush
- Sample Gun Lube
- Deluxe Carrying/Storage Case
- Spare Parts Kit
- Gun Wrench

Figure 2: Contents of the Apollo HVLP Spray Gun kit. This image shows the spray gun, gravity cup, cleaning brush, and other accessories neatly organized within a black carrying case.
4. Product Features and Components
The Apollo HVLP Gravity Feed Spray Gun is engineered for precision and durability. Key features and components include:
- Industrial Quality Construction: Features stainless steel wetted parts and an aluminum spray gun body machined to aircraft tolerances, ensuring longevity and performance.
- High Transfer Efficiency: Independently tested to achieve 80+% transfer efficiency, reducing paint waste by over 40% compared to traditional compressed air systems.
- Expansive Fan Control: Ergonomically located adjustment at the front of the gun allows for easy fan pattern adjustment from 1/4" to 12".
- Microtech Atomization Technology: Developed for innovative, low overspray finishing.
- Ergonomic Design: Features a cool comfort handle for maximum comfort and balance during extended use.
- Versatility: Compatible with a range of custom-designed nozzles, needles, and air caps for various applications including automotive, marine, aviation, and home improvement.
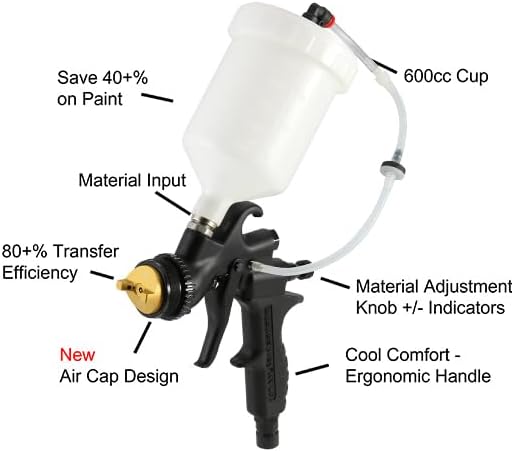
Figure 3: Key components and features of the Apollo HVLP Spray Gun. This diagram highlights the 600cc cup, material input, 80+% transfer efficiency, new air cap design, material adjustment knob, and ergonomic handle.
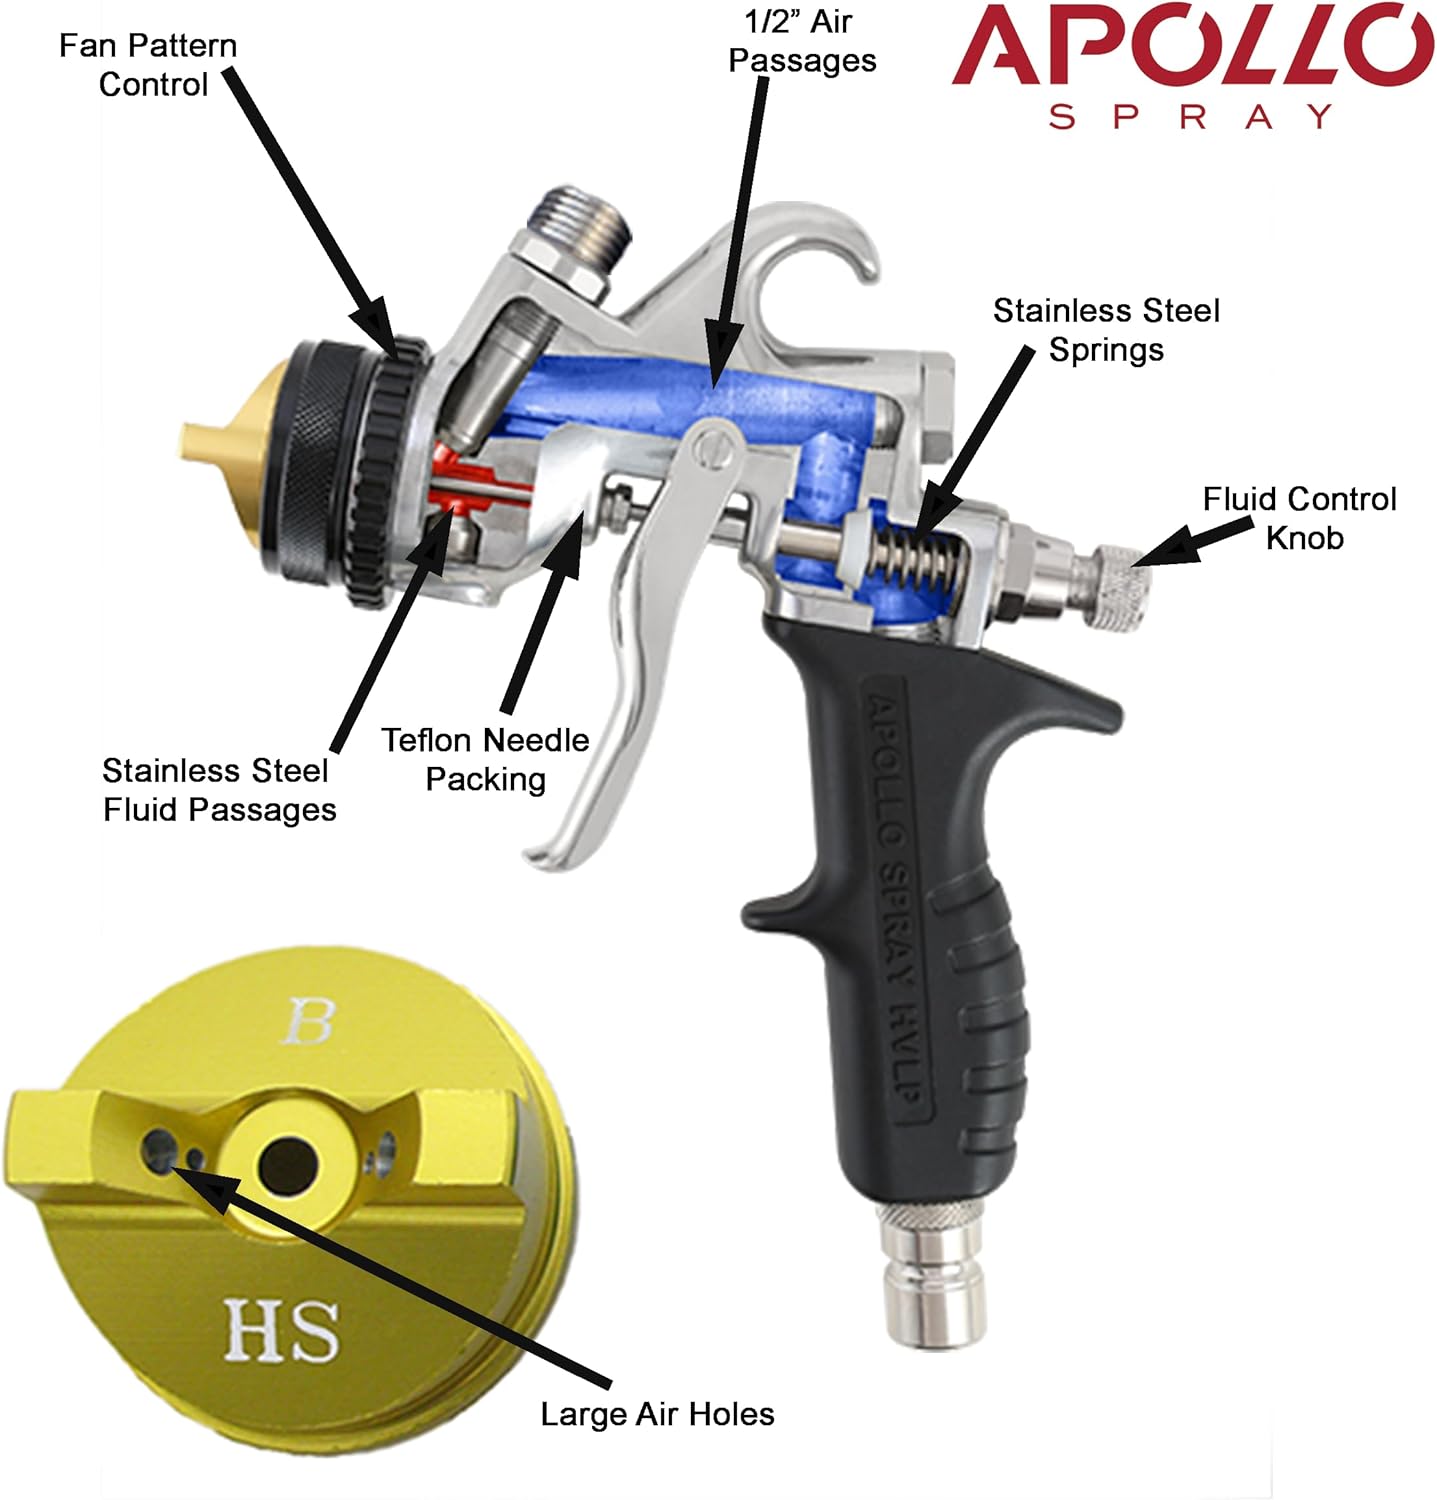
Figure 4: Internal view of the Apollo HVLP Spray Gun. This cutaway diagram illustrates internal components such as the fan pattern control, 1/2" air passages, stainless steel springs, fluid control knob, Teflon needle packing, stainless steel fluid passages, and large air holes in the air cap.
5. Setup
Proper setup is crucial for optimal performance and safety.
- Unpack and Inspect: Carefully remove all components from the packaging. Inspect for any damage.
- Assemble Gravity Cup: Attach the 600cc gravity cup assembly to the top of the spray gun body. Ensure the replacement cup gasket is properly seated to prevent leaks.
- Connect Air Supply: Connect your air hose to the air inlet at the bottom of the spray gun handle. Ensure a secure, airtight connection.
- Select Nozzle/Needle/Air Cap: Choose the appropriate tip/needle size and air cap for your specific application and material viscosity. Refer to the viscosity chart in Section 6 for guidance.
- Initial Cleaning: Before first use, flush the gun with a compatible cleaning solvent to remove any manufacturing residues.
6. Operating Instructions
Follow these steps for effective and consistent spray application.
- Prepare Material: Mix your paint or coating according to the manufacturer's instructions. Ensure the material is strained to remove any particles that could clog the gun.
- Fill Gravity Cup: Pour the prepared material into the 600cc gravity cup. Securely fasten the lid.
- Adjust Air Pressure: Set your air compressor to the recommended pressure for HVLP systems, typically between 10-20 PSI at the gun inlet, or as specified by your material manufacturer.
- Adjust Fluid Control: Turn the fluid control knob (located at the rear of the gun) to regulate the amount of material flowing through the gun. Start with a moderate setting.
- Adjust Fan Pattern: Use the fan pattern control (at the front of the air cap) to adjust the spray pattern width. Test on a scrap surface to achieve the desired pattern (from 1/4" to 12").
- Test Spray: Before applying to your workpiece, perform a test spray on a scrap piece of material to fine-tune your settings for fluid output, air pressure, and fan pattern.
- Application Technique:
- Maintain a consistent distance (typically 6-8 inches) from the surface.
- Move the gun parallel to the surface at a steady speed.
- Overlap each pass by approximately 50% to ensure even coverage.
- Release the trigger at the end of each pass to avoid excessive material buildup.

Figure 5: An individual using the Apollo HVLP spray gun to apply paint to a car panel. The user is wearing protective gear, demonstrating proper application technique.

Figure 6: Close-up of the Apollo HVLP spray gun being used to paint a red car bumper, illustrating the fine atomization and even coverage.
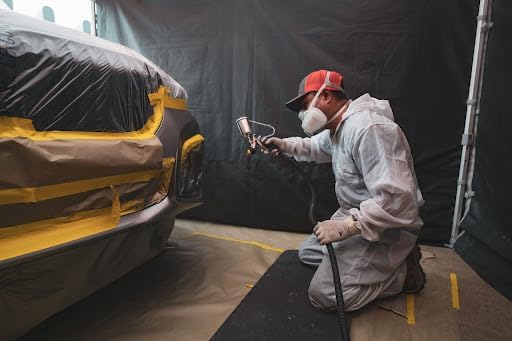
Figure 7: A detailed view of the Apollo HVLP spray gun in operation, showing the spray pattern and the user's hand holding the ergonomic handle.
Viscosity and Nozzle Selection Guide
Selecting the correct tip/needle size and air cap is essential for achieving optimal results with different materials.

Figure 8: This table provides guidance on selecting the appropriate tip/needle size, application type, recommended viscosity (Zahn #2), and compatible air cap for various fluids. For example, a 0.5mm tip is for extremely thin fluids, while a 1.0mm tip is for all-purpose lacquers and enamels.
*Note: The spray gun typically comes with a 0.8mm Needle & Nozzle with B-HS Air Cap installed.
7. Maintenance
Regular cleaning and maintenance will ensure the longevity and consistent performance of your spray gun.
- Immediate Cleaning After Use:
- Empty any remaining material from the gravity cup.
- Pour a small amount of compatible cleaning solvent into the cup.
- Spray the solvent through the gun until it runs clear.
- Disconnect the air supply.
- Disassembly and Detailed Cleaning:
- Remove the air cap, fluid nozzle, and needle.
- Use the provided cleaning brush and solvent to thoroughly clean all components, including the gun body's fluid passages.
- Pay close attention to the air cap holes and fluid tip to ensure they are free of dried paint. Do not use metal objects to clean nozzle openings as this can damage them.
- Lubrication: Apply a small amount of the provided gun lube to the needle packing and trigger pivot points after cleaning to ensure smooth operation.
- Reassembly: Reassemble the gun, ensuring all parts are correctly seated and tightened. Do not overtighten.
- Storage: Store the clean and dry spray gun in its deluxe carrying case to protect it from dust and damage.
8. Troubleshooting
Refer to this section for common issues and their solutions.
| Problem | Possible Cause | Solution |
|---|---|---|
| Uneven Spray Pattern | Clogged air cap holes; damaged fluid tip; incorrect air pressure. | Clean air cap; inspect/replace fluid tip; adjust air pressure. |
| No Material Flow | Clogged fluid tip/nozzle; fluid control knob closed; material too thick; air supply disconnected. | Clean fluid tip/nozzle; open fluid control; thin material; check air connection. |
| Excessive Overspray | Too much air pressure; gun too far from surface; material too thin. | Reduce air pressure; move gun closer; thicken material or use larger tip. |
| Leaking from Nozzle | Damaged needle packing; loose fluid tip; worn needle. | Replace needle packing; tighten fluid tip; replace needle. |
9. Specifications
Detailed technical specifications for the Apollo HVLP Gravity Feed Spray Gun, Model 7600.
| Brand | Apollo Spray |
| Model Name | Maxi-Miser (Model 7600) |
| Item Model Number | 7600 |
| Manufacturer Part Number | MM-C7600-600 |
| UPC | 619011907804 |
| Tank Volume | 600 Milliliters |
| Color | Black |
| Material | Stainless Steel, Metal, Nylon |
| Item Weight | 1.5 Pounds (0.68 kg) |
| Product Dimensions | 10 x 4 x 12 inches (25.4 x 10.16 x 30.48 cm) |
| Power Source | Manual (Air-powered) |
| Special Features | Gravity Feed, Lightweight, Low Pressure (HVLP) |
| Recommended Uses | Painting, Automotive, Marine, Aviation |
10. Warranty and Support
Your Apollo HVLP Gravity Feed Spray Gun is backed by a commitment to quality and customer satisfaction.
- 2-Year Limited Warranty: This product includes a limited 2-year warranty that covers manufacturing defects and workmanship from the date of purchase. Please retain your proof of purchase for warranty claims.
- Customer Support: For technical assistance, parts, or warranty inquiries, please visit the official Apollo Spray website or contact their customer service department.