1. Product Overview
The Signalfire AI-9 Fiber Optic Splicer is an advanced fusion machine designed for efficient and reliable optical fiber splicing. It features a 6-motor core alignment system, fast splicing and heating times, and integrated optical power meter (OPM) and visual fault locator (VFL) functions. This manual provides detailed instructions for its proper use and maintenance.
Key Features:
- Signalfire AI-9 fusion splicer is one of the most popular splicing machine in the market because of its excellent performance and stable quality.
- Signal fire AI 9 FTTH splicing machine design is innovative, built in 10mw laser source and optical power meter with measurement range -70~+3dBm and calibrated wavelength 850/1300/1310/1490/1550/1625nm.
- 5 seconds for splicing and 15 seconds for heating, multi-functional fiber holders to increase your work efficiency.
- AI-9 ARC fiber fusion splicer has 6 motors with auto focus, which supports for core to core alignment.
- 5.5 Inch TFT LCD display, 3000 times electrodes, 7800mAh capacity battery, 4 in 1 fiber stripper and high quality stool make work more pleasant.
2. Product Components and Views

Figure 2.1: The Signalfire AI-9 Fiber Optic Splicer, showcasing its compact and robust design. This view highlights the main display and control interface.

Figure 2.2: An overview of the AI-9 Fiber Fusion Splicer, detailing its primary features such as six motors for core alignment, fast splicing and heating times, integrated VFL and OPM functions, and a high-capacity 7800mAh lithium battery.

Figure 2.3: The specialized toolbox for the AI-9 splicer, which includes a built-in bench capable of supporting up to 100KG. The design allows the splicer to remain in the toolbox during operation, enhancing convenience and stability.
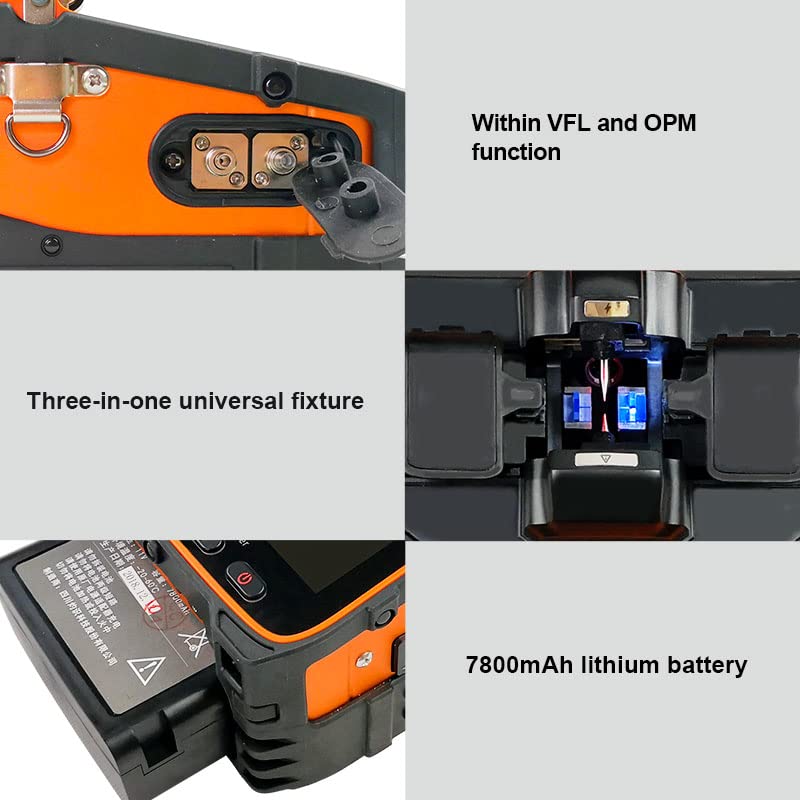
Figure 2.4: Detailed views of key internal components: the integrated VFL and OPM functions, the three-in-one universal fixture for various fiber types, and the high-capacity 7800mAh lithium battery for extended operation.

Figure 2.5: Comprehensive views of the AI-9 splicer from all four sides: front, back, left, and right. These images provide a complete understanding of the device's external layout and port locations.

Figure 2.6: The AI-9 splicer's user interface supports 10 languages, allowing users to switch freely for localized operation. Languages include Chinese, Russian, English, French, Italian, Portuguese, Polish, Spanish, Thai, and Arabic.

Figure 2.7: The AI-9 splicer shown alongside the included 4-in-1 optical fiber stripper. This combination is suitable for trunk cable welding projects up to approximately 100 kilometers.
3. Setup
- Unpacking: Carefully remove the splicer and all accessories from the packaging. Inspect for any signs of damage during transit.
- Power Connection: Connect the power adapter to the splicer and a suitable power outlet. Ensure the battery is fully charged before initial use for optimal performance. The 7800mAh battery provides extended operation.
- Placement: Place the splicer on a stable, level surface. The included toolbox with integrated bench can be used to provide a secure working platform.
- Initial Power On: Press the power button to turn on the device. The 5.5-inch TFT LCD display will illuminate.
- Language Selection: If necessary, navigate through the menu to select your preferred language from the 10 available options.
4. Operating Instructions
4.1 Fiber Preparation
- Stripping: Use the 4-in-1 fiber stripper to remove the fiber coating to the required length.
- Cleaning: Clean the stripped fiber thoroughly with an alcohol wipe to remove any residue.
- Cleaving: Use a high-precision fiber cleaver to cut the fiber end at a perfect 90-degree angle. A clean cleave is crucial for successful splicing.
4.2 Splicing Process
- Placement: Carefully place the prepared fibers into the V-grooves of the splicer, ensuring the fiber ends are positioned correctly within the splicing area. The three-in-one universal fixture accommodates various fiber types.
- Clamping: Close the fiber clamps to secure the fibers in place.
- Alignment: The AI-9's 6-motor auto-focus system will automatically align the fiber cores. Monitor the alignment process on the LCD display.
- Arc Fusion: Once aligned, the splicer will initiate the arc fusion process. The typical splicing time is approximately 5 seconds.
- Splice Inspection: After splicing, the splicer will display the estimated splice loss. Visually inspect the splice for any imperfections.
4.3 Heat Shrinking
- Sleeve Placement: Slide a heat shrink sleeve over the spliced fiber.
- Heating: Place the sleeved fiber into the heating oven. The typical heating time is approximately 15 seconds.
- Cooling: Allow the heat shrink sleeve to cool completely before handling the fiber.
4.4 Integrated OPM and VFL Functions
- Optical Power Meter (OPM): The built-in OPM can measure optical power with a range of -70~+3dBm and calibrated wavelengths of 850/1300/1310/1490/1550/1625nm. Connect the fiber to the OPM port and select the appropriate wavelength for measurement.
- Visual Fault Locator (VFL): The 10mW VFL can be used to identify breaks, bends, or poor connections in optical fibers by emitting a visible red light. Connect the fiber to the VFL port and activate the function.
5. Maintenance
- Electrode Cleaning and Replacement: Regularly clean the electrodes using a cotton swab and alcohol. Electrodes have a lifespan of approximately 3000 splices and should be replaced when performance degrades. Refer to the electrode replacement guide for detailed steps.
- V-Groove Cleaning: Keep the V-grooves clean from fiber debris and dust to ensure accurate fiber alignment. Use a soft brush or compressed air.
- Display Cleaning: Clean the 5.5-inch TFT LCD display with a soft, lint-free cloth. Avoid abrasive cleaners.
- Battery Care: To prolong battery life, avoid fully discharging the 7800mAh battery frequently. Store the device with a partial charge if not in use for extended periods.
- General Cleaning: Keep the exterior of the splicer clean and free from dust and contaminants.
6. Troubleshooting
| Problem | Possible Cause | Solution |
|---|---|---|
| High Splice Loss | Dirty fiber ends, poor cleave, worn electrodes, dirty V-grooves, incorrect splicing parameters. | Re-clean and re-cleave fibers. Clean V-grooves. Replace electrodes if necessary. Check splicing settings. |
| Fibers Not Aligning | Dirty V-grooves, damaged fiber clamps, fiber not seated correctly, motor malfunction. | Clean V-grooves. Ensure fibers are properly seated. Inspect clamps for damage. If problem persists, contact support. |
| Splicer Not Powering On | Low battery, faulty power adapter, power button issue. | Charge battery. Check power adapter connection. Try a different power outlet. |
| Display Issues | Software glitch, hardware fault. | Restart the splicer. If problem persists, contact support. |
7. Specifications
| Feature | Detail |
|---|---|
| Brand | Generic |
| Model | AI-9 |
| Power Source | Battery Powered (7800mAh) |
| Splicing Time | 5 seconds |
| Heating Time | 15 seconds |
| Motor Count | 6 Motors (Auto Focus, Core Alignment) |
| Display | 5.5 Inch TFT LCD |
| Electrode Lifespan | 3000 times |
| OPM Measurement Range | -70~+3dBm |
| OPM Calibrated Wavelengths | 850/1300/1310/1490/1550/1625nm |
| VFL Output Power | 10mW |
| Color | Orange |
| UPC | 641320971382 |
8. Warranty and Support
This product is designed for durability and performance. For any technical assistance, troubleshooting beyond this manual, or warranty inquiries, please contact the manufacturer or your point of purchase. While specific warranty details are not provided here, protection plans are available for extended coverage.
For information regarding protection plans, please refer to the product listing or contact your retailer. Always ensure to use genuine replacement parts for maintenance to maintain product integrity and performance.


