Introduction
This user manual provides comprehensive instructions for the GoolRC MicroZone 6CH RC Transmitter and Receiver. It covers essential information regarding product specifications, setup, operation, maintenance, and troubleshooting to ensure safe and effective use of your remote control system for various RC models including airplanes, UAVs, vehicles, and ships.
Product Overview
The GoolRC MicroZone 6CH RC Transmitter and Receiver system is designed for reliable and precise control of your RC models. It features multi-channel frequency hopping technology and a long control distance for enhanced performance.

Image: The GoolRC MicroZone 6CH RC Transmitter (top) and the MC7RB Receiver (bottom right). The transmitter is white and grey with a central display showing "6C MINI Microzone" and various control sticks and buttons. The receiver is a small black rectangular unit with multiple ports and an antenna.
Key Features:
- Multi-channel frequency hopping: Remote control CH5 three-stage switch, CH6 two-stage switch, convenient for multi-axis flight.
- Receiver supports PWM and SBUS dual signal output: Suitable for fixed-wing and multi-axis models, including traversing machines.
- Built-in antenna: Facilitates installation and reduces losses from antenna breakage.
- Remote control function: 6C-MINI features button switches with indicator lights and a button lock function, designed to be waterproof and rainproof.
- Runaway protection: Automatically returns to a set runaway protection value if the receiver loses signal from the transmitter, protecting the model from damage.
- Long control distance: Approximately 800m range with unique software algorithm for anti-interference experience.
- Wide application: Suitable for vehicles, boats, fixed-wing aircraft, multi-axis drones, lawn mowers, and intelligent agricultural machinery.
- Long battery life: Operates for over 8 hours with 4 AA batteries or 2 lithium batteries. Includes a low voltage alarm.
Components and Controls
Familiarize yourself with the various components and controls of the GoolRC MicroZone 6CH RC Transmitter.

Image: A detailed diagram of the GoolRC MicroZone 6CH RC Transmitter highlighting its various controls. Labels include Antenna, Signal light, D/R switch (left and right), Channel 5, Channel 6, Rocker (left and right), Throttle trim (left hand throttle), Elevator trim (left hand throttle), Elevator trim (right hand throttle), Throttle trim (right hand throttle), Rudder Fine Tuning, Aileron fine-tuning, and Power switch.
Transmitter Controls:
- Antenna: For signal transmission.
- Signal Light: Indicates signal status.
- D/R Switch: Dual Rate switch for adjusting control sensitivity (left and right).
- Channel 5 Switch: Three-stage switch for Channel 5.
- Channel 6 Switch: Two-stage switch for Channel 6.
- Rocker Sticks: Main control sticks for pitch, roll, yaw, and throttle.
- Trim Levers: Fine-tuning adjustments for throttle, elevator, rudder, and aileron.
- Power Switch: To turn the transmitter on/off.
- Monitor Display: Shows current settings and status.
- MIX Button: For mixing functions.
- AIL, ELE, THR, RUD Buttons: For channel reverse settings.
- LOCK Button: For button lock function.
Setup and Binding
Battery Installation:
The transmitter requires 4 AA batteries or 2 lithium batteries for operation. Ensure correct polarity when inserting batteries.
- Open the battery compartment cover on the back of the transmitter.
- Insert 4 AA batteries or connect a compatible 2-cell lithium battery pack.
- Close the battery compartment cover securely.
Binding the Transmitter and Receiver:
The MC7RB receiver needs to be bound to the MC6C transmitter for proper communication. Follow these steps for the binding process:
- Ensure both the transmitter and receiver are powered off.
- Connect the bind plug (if provided) to the BIND port on the MC7RB receiver.
- Power on the receiver. The receiver's LED should start flashing rapidly, indicating it is in binding mode.
- While holding down the BIND button on the transmitter (refer to the diagram for location, usually near the power button or on the back), power on the transmitter.
- Continue holding the BIND button on the transmitter until the receiver's LED turns solid, indicating a successful bind.
- Release the BIND button on the transmitter and power off both the transmitter and receiver.
- Remove the bind plug from the receiver.
- Power on the transmitter first, then the receiver. The receiver's LED should be solid, confirming the bind.
Note: If the binding process fails, repeat the steps. Ensure no other 2.4GHz devices are interfering during binding.
Operating Instructions
Pre-Flight/Pre-Operation Checks:
- Verify that both the transmitter and receiver have sufficient battery power.
- Ensure the transmitter and receiver are properly bound.
- Check all control surfaces and functions on your model respond correctly to transmitter inputs.
- Confirm that all trims are centered or set as required for your model.
- Perform a range check in a safe, open area before operating the model at full range.
Basic Operation:
- Power On Sequence: Always power on the transmitter first, then the receiver/model.
- Power Off Sequence: Always power off the receiver/model first, then the transmitter.
- Control Sticks: Use the left stick for throttle and rudder (Mode 2), and the right stick for aileron and elevator.
- Trim Adjustments: Use the trim levers to make small adjustments to keep your model flying straight or stable without constant stick input.
- Channel Switches (CH5, CH6): Utilize these switches for auxiliary functions such as landing gear, flaps, or flight modes, depending on your model's setup.
- D/R Switches: Adjust the dual rate switches to change the sensitivity of the control surfaces. Lower rates provide smoother control, while higher rates offer more aggressive response.
Runaway Protection:

Image: A visual representation of the runaway protection feature. The GoolRC MicroZone 6CH RC Transmitter and MC7RB Receiver are shown alongside a green shield icon with a plus sign, symbolizing protection. Text explains that the system works when the receiver cannot receive the transmitter signal normally or when the transmitter is turned off and the distance exceeds the signal range. In such cases, it returns to a set runaway protection value to prevent damage to the model.
The system incorporates a runaway protection feature. If the receiver loses signal from the transmitter (e.g., due to distance or transmitter power-off), it will automatically return to pre-set safe values (e.g., throttle to idle, control surfaces neutral) to minimize damage to the model. It is recommended to set these fail-safe values during initial setup.
Long Control Distance:
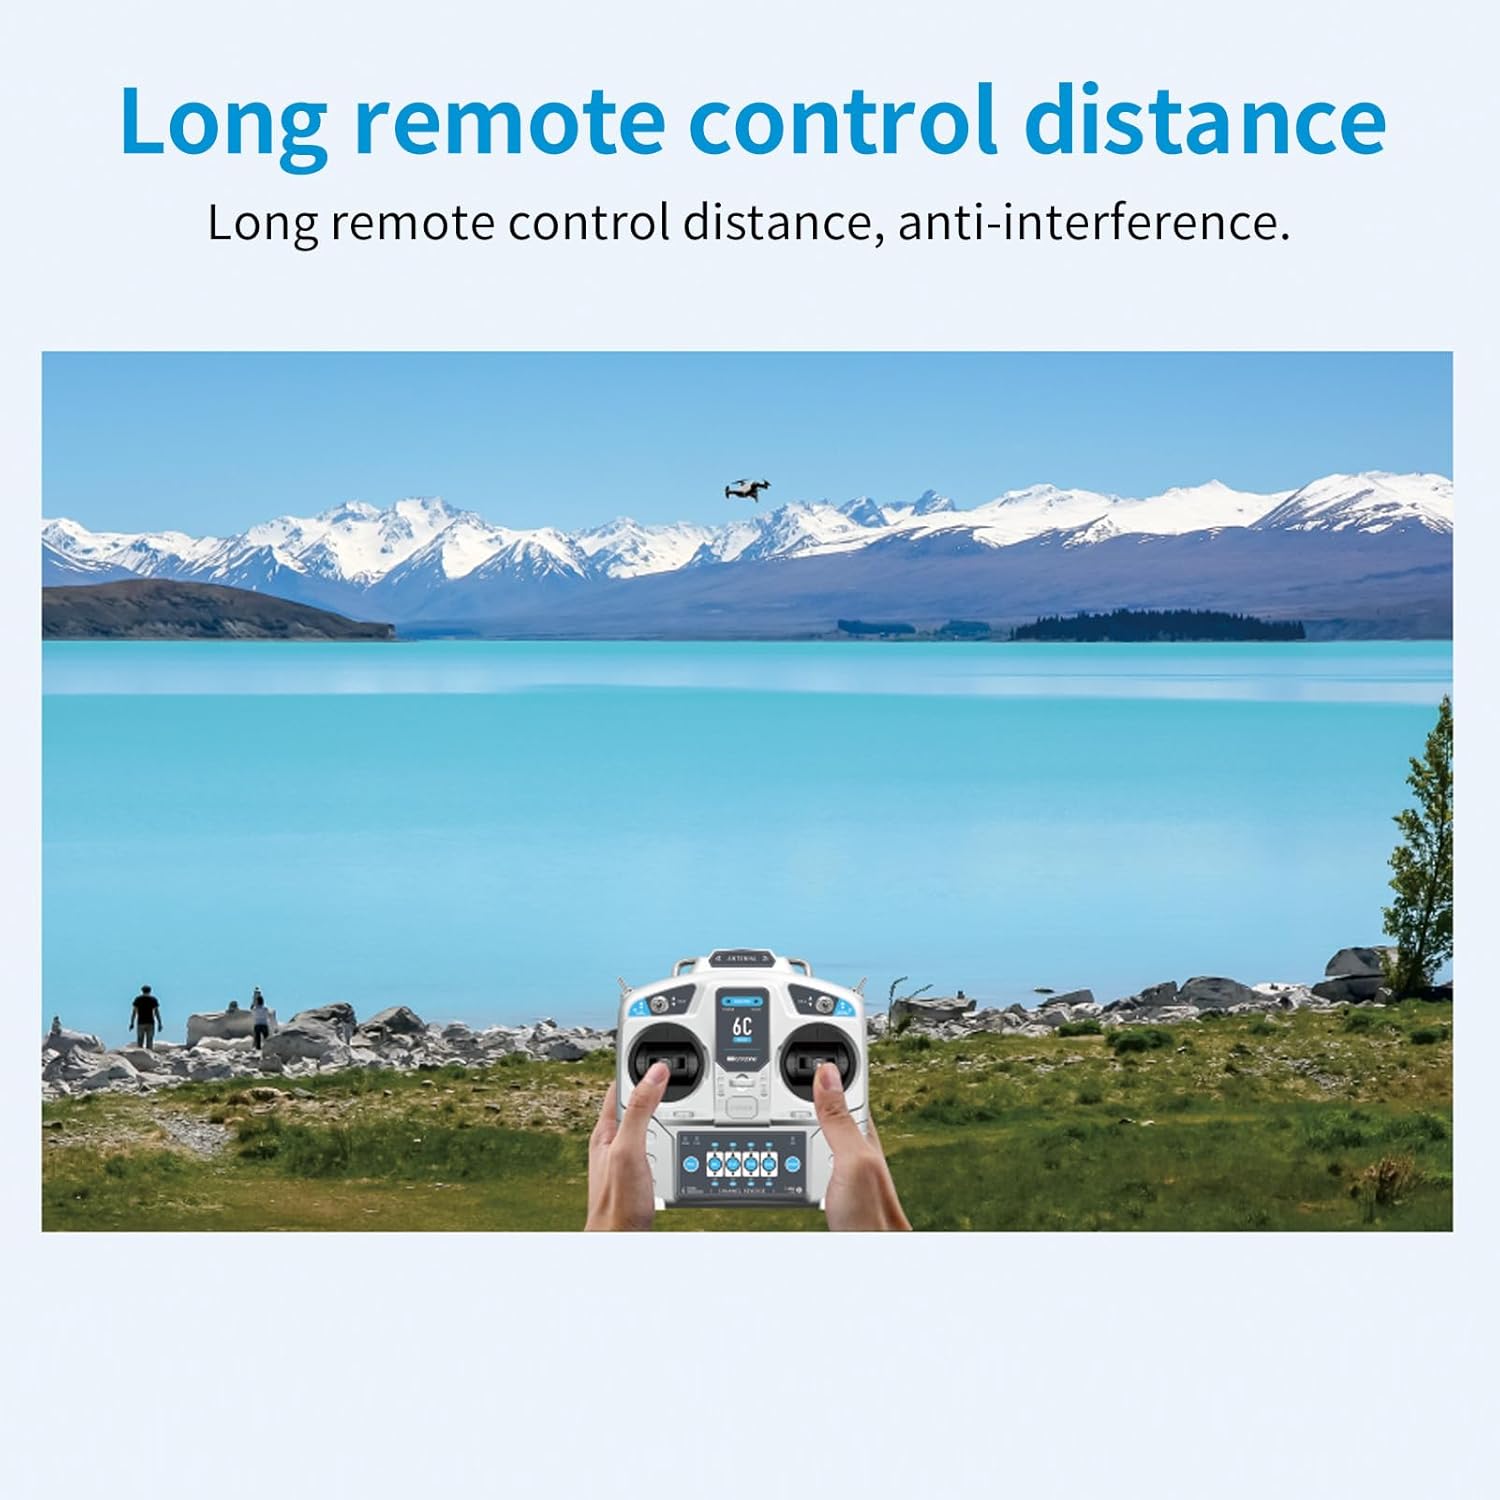
Image: A scenic view of a lake and mountains with a person holding the GoolRC MicroZone 6CH RC Transmitter, controlling a small aircraft in the distance. The image emphasizes the long remote control distance and anti-interference capabilities of the system.
The GoolRC MicroZone system offers an approximate control distance of 800 meters, thanks to its advanced software algorithm and anti-interference capabilities. Always operate your RC model within visual line of sight and within safe operating distances.
Maintenance
- Cleaning: Use a soft, dry cloth to clean the transmitter and receiver. Avoid using solvents or abrasive cleaners.
- Storage: Store the system in a cool, dry place away from direct sunlight and extreme temperatures. Remove batteries from the transmitter if storing for extended periods.
- Battery Care: If using rechargeable batteries, follow the manufacturer's charging instructions. Do not overcharge or deep discharge.
- Inspection: Periodically inspect all switches, sticks, and connections for any signs of wear or damage.
Troubleshooting
| Problem | Possible Cause | Solution |
|---|---|---|
| Transmitter not powering on. | Low or dead batteries; incorrect battery installation. | Replace batteries; ensure correct polarity. |
| Receiver not binding. | Incorrect binding procedure; interference; faulty receiver/transmitter. | Repeat binding steps carefully; try binding in a different location; contact support if issue persists. |
| Loss of control/signal. | Out of range; interference; low battery voltage (transmitter or receiver). | Operate within range; check for interference sources; charge/replace batteries. |
| Controls reversed. | Channel reverse setting enabled. | Adjust channel reverse settings on the transmitter (AIL, ELE, THR, RUD buttons). |
| Model not responding to specific channel. | Incorrect servo connection; faulty servo; channel not assigned. | Check servo connections; test with a different servo; verify channel assignment. |
Specifications
Transmitter (MC6C - MODE 2):
- Channel: 6
- Suitable Model: Airplane, UAV, Vehicle, Ship
- RF Range: 2401MHZ---2479MHZ
- RF Power: Less than 100MW
- Working Current: Less than 120MA
- Working Voltage: 4.5--8.5V
- Modulation Mode: FSK
- Sensitivity: 1024
- Signal Output: 6 PWM Signals and 1 SBUS Signals
- Analog and External Power Supply (not More than 8V): YES
- Low Voltage Alarm Mode: LED Indicator and Buzzer Alarm at the Same Time
- Power: 6V 1.5AA* 4 (4 AA batteries)
- FHSS Mode: Adopt the Latest FHSS Mode In Line with European Standards
- Dimensions (approx.): 160mm (W) x 165mm (H) (for 6C-mini version)
Receiver (MC7RB):
- Product Name: MC7RB
- Suitable Remote Control: MC6C, E6, MC7, MC10
- Size: 42MM*28MM*13MM
- Antenna Length: Built-in Antenna
- Output Channel: 6 PWM Signal Channels and 1 SBUS Signal Channels
- Reception Frequency: 2401MHZ-2479MHZ
- Voltage Range: DC3.5V-7.4V
- Opposite Frequency Mode: Contact Pair Frequency
Package Information:
- Package size: 22 * 21.5 * 10cm
- Package weight: 380g
- Packing List: 1 * MC6C Transmitter (MODE 2), 1 * MC7RB Receiver
Compatibility
The GoolRC MicroZone 6CH RC Transmitter and Receiver system is compatible with a range of MicroZone receivers and is suitable for various RC applications.

Image: A grid showing various MicroZone receivers compatible with the GoolRC system. These include MC6RE-V2, MC7RB-V2, MC6RE, E6R-E, MC7RB, and MC9002. Each receiver is depicted with a green checkmark, indicating compatibility.
This system is compatible with standard MC6RE-V2 and MC7RB-V2 receivers, as well as MC6RE, E6R-E, MC7RB, and MC9002 receivers.

Image: The GoolRC MicroZone 6CH RC Transmitter and Receiver are shown with examples of various RC models they can control. These include a sports car, a boat, a fixed-wing airplane, a multi-rotor drone, a tracked vehicle, and an agricultural sprayer drone, illustrating its wide application.
The system is widely applicable for controlling various RC models, including cars, boats, fixed-wing aircraft, multi-axis drones, and other specialized RC machinery.
Important Notes
- Transmitter Size: The 6C-mini version of the transmitter is smaller and lighter than the MC6C, making it more convenient for portability.
- Product Variation: Two styles of the transmitter may be randomly shipped. Both styles offer the same functionality.

Image: A side-by-side comparison of the GoolRC MC6C transmitter (right) and the 6C-mini transmitter (left), showing their relative sizes. The 6C-mini is depicted as 160mm wide and 165mm high, while the MC6C is 180mm wide and 185mm high, illustrating that the 6C-mini is indeed smaller and lighter.

Image: Two different styles of GoolRC RC transmitters are shown side-by-side. The left transmitter is the MC6C model, and the right is the 6C-mini model, illustrating that either style may be received.
Safety Guidelines
- Always operate your RC model in a safe and open area, away from people, animals, and obstacles.
- Never operate your RC model near power lines, roads, or water bodies.
- Ensure all batteries are fully charged before operation.
- Always perform a pre-flight/pre-operation check.
- Do not operate the system if you are feeling unwell or under the influence of substances.
- Keep the transmitter and receiver away from moisture and extreme temperatures.
- This product is recommended for users aged 14 years and up.
Warranty and Support
For warranty information and technical support, please refer to the official GoolRC website or contact your retailer. Keep your purchase receipt as proof of purchase.
Manufacturer: GoolRC
Model Number: ACH9135024029583AG
For further assistance, you may visit the GoolRC Store on Amazon.