1. Introduction
Thank you for purchasing the FanJu Digital Alarm Clock, Model FJ3215A. This device features a large LED display, dual alarms with snooze, temperature and humidity monitoring, and a convenient USB charging port. This manual provides detailed instructions for setup, operation, and maintenance to ensure optimal performance and longevity of your alarm clock.
2. Safety Information
- Read all instructions carefully before using the device.
- Keep the device away from water and high humidity environments.
- Do not expose the device to direct sunlight or extreme temperatures.
- Use only the provided USB power cable.
- Do not attempt to disassemble or repair the device yourself. Contact qualified service personnel.
- Keep out of reach of children.
3. Package Contents
Please check the package contents upon opening:
- 1 x FanJu Digital Alarm Clock (Model FJ3215A)
- 1 x USB Power Cable
- 1 x User Manual
4. Product Overview
Familiarize yourself with the components and controls of your alarm clock.
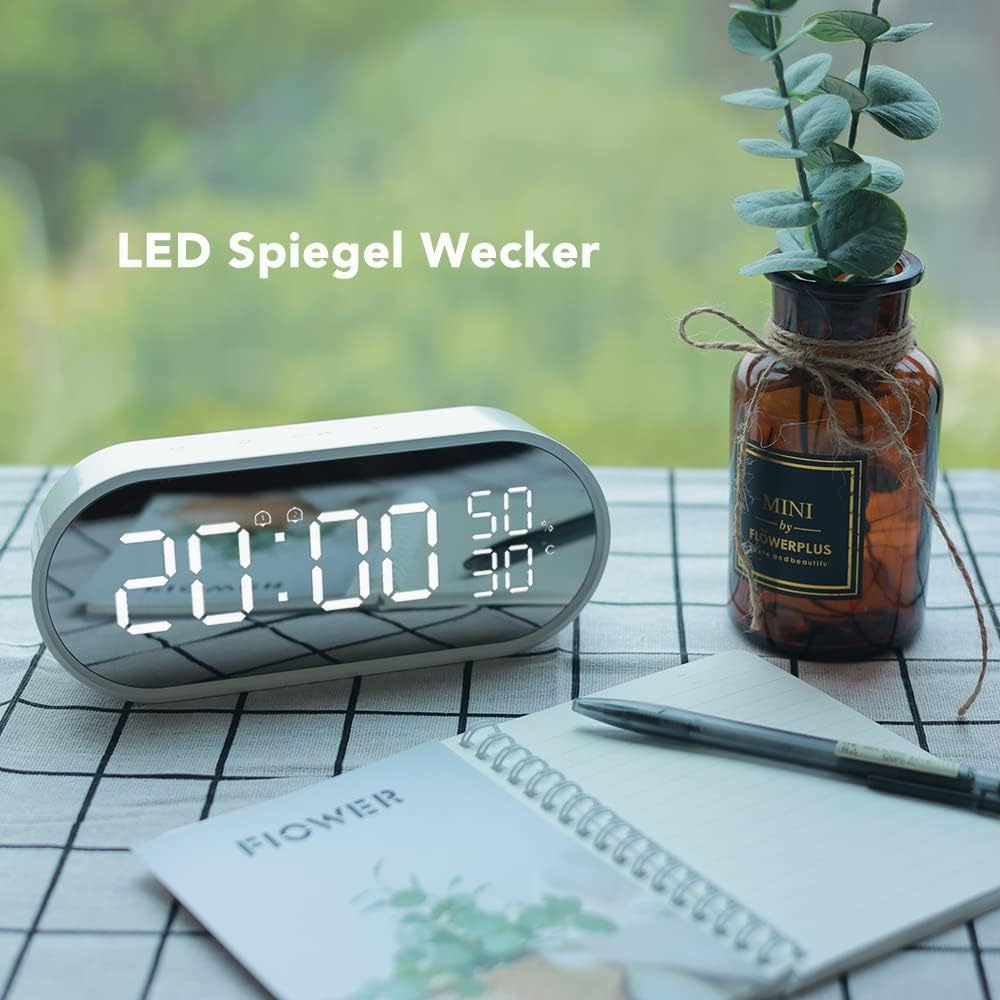
Figure 4.1: Front view of the FanJu Digital Alarm Clock, highlighting the large LED display for time, temperature, and humidity.

Figure 4.2: Top panel of the alarm clock with touch-sensitive control buttons for various functions.
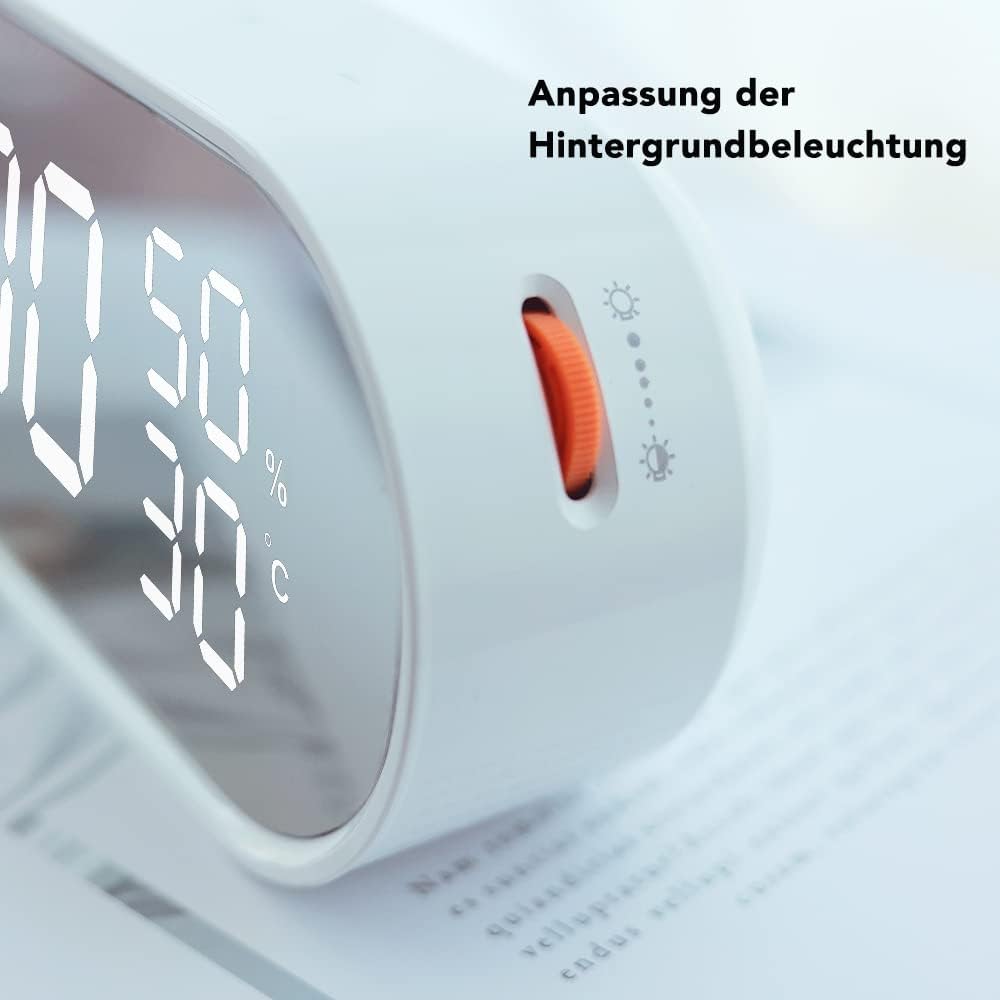
Figure 4.3: Side view illustrating the brightness adjustment wheel, allowing users to customize display intensity.

Figure 4.4: Side view displaying the integrated USB charging port for external devices.

Figure 4.5: Product dimensions: Length 15.8cm, Height 7.7cm, Width 5cm. USB power cable length: 1.5m.
5. Setup
5.1 Power Connection
- Connect the provided USB power cable to the DC 5V-1.2A input port on the back of the alarm clock.
- Plug the other end of the USB cable into a compatible USB power adapter (not included) or a powered USB port.
- The display will light up, indicating the clock is powered on.
5.2 Battery Backup Installation
The alarm clock requires 3 x AAA 1.5V LR03 batteries (not included) for backup power. These batteries preserve time and alarm settings during a power outage. When operating on battery backup alone, the screen will remain blank and only light up for 10 seconds when a button is touched.
- Locate the battery compartment on the back of the alarm clock.
- Open the battery compartment cover.
- Insert 3 AAA batteries, ensuring correct polarity (+ and -).
- Close the battery compartment cover securely.
6. Operating Instructions
6.1 Setting Time
- Press and hold the SET button (usually indicated by a gear icon or "M") to enter time setting mode. The hour digits will flash.
- Use the UP and DOWN buttons (or "+" and "-" icons) to adjust the hour.
- Press SET again to confirm the hour and move to minute setting. The minute digits will flash.
- Use the UP and DOWN buttons to adjust the minutes.
- Press SET again to confirm the minutes and exit time setting mode.
- To switch between 12-hour and 24-hour format, press the UP button briefly while in normal time display mode.
6.2 Setting Alarms (Dual Alarm)
This clock supports two independent alarms (AL1 and AL2).
- Press the ALARM button (bell icon) once to display AL1. Press again to display AL2.
- While AL1 or AL2 is displayed, press and hold the ALARM button to enter alarm setting mode. The alarm hour digits will flash.
- Use the UP and DOWN buttons to adjust the alarm hour.
- Press ALARM again to confirm the hour and move to minute setting. The alarm minute digits will flash.
- Use the UP and DOWN buttons to adjust the alarm minutes.
- Press ALARM again to confirm and exit alarm setting mode.
- To activate or deactivate an alarm, press the ALARM button briefly until the alarm icon (bell with 1 or 2) appears or disappears on the display.
6.3 Snooze Function
When the alarm sounds, touch the large SNOOZE button (often the top center button or a dedicated touch area) to temporarily silence the alarm. The alarm will sound again after the preset snooze interval (typically 5-10 minutes, refer to specific model settings if adjustable). To stop the alarm completely, press any other button.
6.4 Temperature and Humidity Display
The clock automatically displays indoor temperature and humidity. To switch between Celsius (°C) and Fahrenheit (°F) for temperature, press the DOWN button briefly while in normal time display mode.
6.5 Brightness Adjustment
Adjust the display brightness using the dedicated brightness adjustment wheel or button on the side or back of the clock. Rotate the wheel or press the button repeatedly to cycle through brightness levels.
6.6 USB Charging Port
The integrated USB charging port allows you to charge compatible electronic devices (e.g., smartphones) directly from the alarm clock. Simply connect your device's USB charging cable to the port on the alarm clock.
7. Maintenance
- Cleaning: Wipe the device with a soft, dry cloth. Do not use abrasive cleaners or solvents.
- Storage: If storing the device for an extended period, remove the backup batteries to prevent leakage.
- Environment: Ensure the device is kept in a dry, dust-free environment.
8. Troubleshooting
| Problem | Possible Cause | Solution |
|---|---|---|
| Display is blank or dim. | No main power; backup batteries low/missing; brightness set too low. | Ensure USB power cable is securely connected. Check/replace backup batteries. Adjust brightness using the wheel/button. |
| Alarm does not sound. | Alarm not activated; alarm volume too low (if adjustable); incorrect alarm time. | Verify alarm icon is displayed. Check alarm time settings. (Note: This model may not have adjustable alarm volume). |
| Time/settings reset after power outage. | Backup batteries are missing or depleted. | Install or replace 3 AAA backup batteries. |
| USB charging port not working. | Device not properly powered; connected device incompatible. | Ensure the alarm clock is connected to main USB power. Check if the device you are trying to charge is compatible and its cable is functional. |
| Incorrect temperature/humidity reading. | Sensor obstruction; extreme environmental conditions. | Ensure the clock is placed in an open area, away from direct heat sources or vents. Allow time for the sensor to stabilize. |
9. Specifications
| Model Number | FJ3215A |
| Display Type | Digital LED |
| Time Format | 12/24 Hour Selectable |
| Alarm Function | Dual Alarm with Snooze |
| Temperature Range | -9°C (16°F) ~ 50°C (122°F) |
| Humidity Range | 20% RH - 95% RH |
| Power Source | USB Power Cable (DC 5V-1.2A) |
| Backup Battery | 3 x AAA 1.5V LR03 (not included) |
| Special Features | USB Charging Port, Adjustable Brightness |
| Material | Acrylonitrile Butadiene Styrene (ABS) |
| Dimensions (L x H x W) | 15.8 cm x 7.7 cm x 5 cm (approximate) |
| Weight | 0.32 Kilograms (approximate) |
10. Warranty and Support
FanJu products are designed for reliability and performance. For warranty information, please refer to the warranty card included with your purchase or contact your retailer. If you encounter any issues or require technical assistance, please contact FanJu customer support through the retailer's platform or the official FanJu website for assistance.