1. Introduction
This manual provides detailed instructions for the installation, programming, operation, and maintenance of your Acvoce Garage Door Keypad, Model 1938011031. This wireless keyless entry system offers convenient access to your garage without the need for a remote control or key. It is designed for compatibility with various garage door openers.
2. Compatibility
The Acvoce Garage Door Keypad is compatible with Liftmaster, Chamberlain, and Craftsman garage door openers manufactured from 1993 to the current year. Compatibility is determined by the color of your garage door opener's learn button and its operating frequency.
Important: Before purchasing or installing, verify the color of the learn button on your garage door opener's motor unit (typically located on the ceiling-mounted opener). This keypad does NOT work with Craftsman 200.57933, 57943, 57953 Series 100 CR1150, 139.57943, or 139.57953 models.
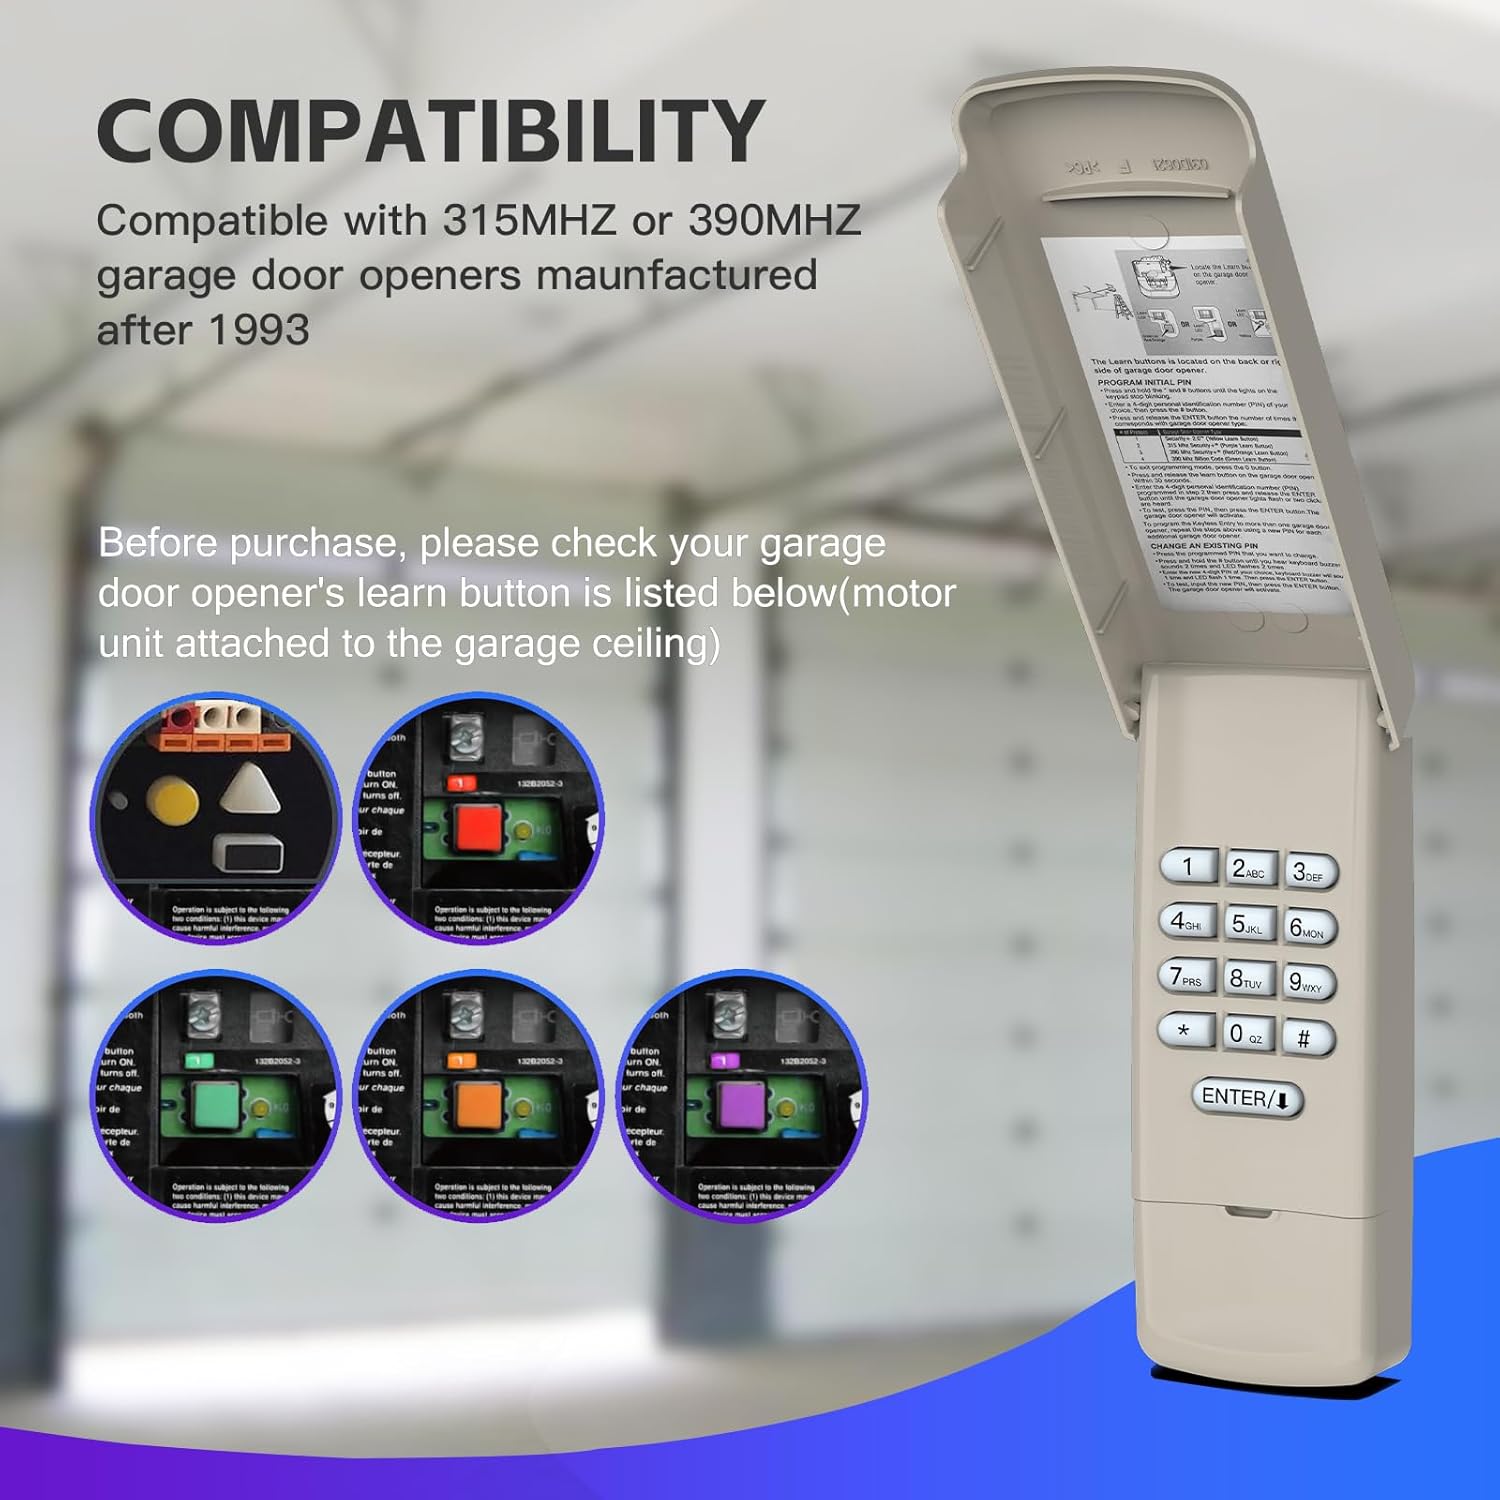
Figure 2.1: Compatibility chart based on learn button color, year, and frequency for Chamberlain, Liftmaster, and Craftsman openers. Ensure your opener's learn button matches one of the listed colors.

Figure 2.2: Visual guide to locating the learn button on your garage door opener. The learn button is typically found on the motor unit attached to the garage ceiling.
3. Setup and Installation
3.1. Battery Installation
The keypad requires one 9V battery, which is included. To install, open the keypad cover and locate the battery compartment. Insert the 9V battery, ensuring correct polarity. Close the compartment securely.
3.2. Mounting the Keypad
The keypad offers wireless installation. Choose a convenient location outside your garage door, typically on the door frame or an adjacent wall, at a height accessible to all users. Use the provided screws to securely mount the keypad. The cover provides weather protection.
3.3. Programming the Keypad
Follow these steps to program your Acvoce Garage Door Keypad with your opener:
- Locate the Learn Button: On your garage door opener's motor unit (mounted on the ceiling), locate the 'Learn' button. The color of this button is crucial for compatibility.
- Press Learn Button: Press and immediately release the 'Learn' button on your garage door opener. The LED indicator on the opener will light up, signaling it is ready to learn a new device. You have approximately 30 seconds to complete the next step.
- Enter PIN on Keypad: On the Acvoce keypad, enter your desired 4-digit Personal Identification Number (PIN).
- Press ENTER: Press and hold the ENTER button on the keypad.
- Release ENTER: Release the ENTER button when the garage door opener's light flashes or you hear two clicks. This indicates successful programming.
- Test Operation: Test the keypad by entering your 4-digit PIN and pressing ENTER. The garage door should activate.
This keypad has 3 channels, allowing you to control up to 3 different garage door openers with a single keypad. Repeat the programming steps for each additional opener, assigning a unique PIN or channel if applicable.
Video 3.1: A visual demonstration of the Acvoce Garage Door Keypad, showcasing its design and features. This video can assist with understanding the physical aspects of the keypad during installation.
4. Operating Instructions
4.1. Opening and Closing Your Garage Door
- To open or close the garage door, enter your 4-digit PIN and then press the ENTER button.
- One-Button-to-Close Feature: For security and to conserve battery life, after opening the garage door, you can press the ENTER button within 15 seconds to close the garage door. After 15 seconds, you must re-enter your 4-digit PIN followed by ENTER to close the door.

Figure 4.1: Keyless garage access in action. The keypad allows entry without a traditional remote or key.
4.2. Temporary Access Codes
The keypad supports programming temporary access codes for visitors, delivery personnel, or service providers. This allows them to access your garage without needing your personal PIN. Consult the full programming instructions for your specific opener model for details on setting temporary codes.

Figure 4.2: The keypad can be programmed with temporary access codes for convenient and secure access by authorized visitors or service personnel.
5. Maintenance
5.1. Battery Replacement
When the keypad's backlight dims or operation becomes inconsistent, it is time to replace the 9V battery. Open the keypad cover, remove the old battery, and insert a new 9V battery, observing polarity. Close the cover securely.
5.2. Cleaning
Clean the keypad's exterior with a soft, damp cloth. Avoid using abrasive cleaners or solvents, as these can damage the finish or electronic components. Ensure the keypad cover is closed when not in use to protect against weather elements.
6. Troubleshooting
6.1. Unable to Pair the Door Opener
- Check Compatibility: Verify that your garage door opener is compatible with the Acvoce keypad by checking the learn button color and year of manufacture against the compatibility chart in Section 2.
- Clear Opener Memory: If your opener's memory is full, it may prevent new devices from pairing. Refer to your garage door opener's manual to learn how to erase its memory, then attempt programming again.
- Try Different Keypad Buttons: If a specific button on the keypad does not seem to work during programming, try using another button to program.
- Ensure Door is Closed: In some cases, the garage door must be fully closed before programming can be successfully initiated.
- Battery Check: Ensure the keypad has a fresh 9V battery installed.
7. Specifications
| Brand | Acvoce |
| Model Number | 1938011031 |
| Max Number of Supported Devices | 3 |
| Compatible Devices | Liftmaster, Chamberlain, Craftsman Openers (1993-current, specific learn button colors) |
| Connectivity Technology | Radio Frequency (Security+ 2.0 rolling code) |
| Button Quantity | 6 (numeric keys + ENTER) |
| Battery Type | 1 x 9V battery (included) |
| Special Feature | Ergonomic, Backlit buttons, Weather protection |
8. Warranty and Support
8.1. Product Warranty
The Acvoce Garage Door Keypad comes with a 5-Year Warranty from the date of purchase. This warranty covers defects in materials and workmanship under normal use. Please retain your proof of purchase for warranty claims.
8.2. Customer Support
For technical assistance, troubleshooting not covered in this manual, or warranty inquiries, please contact Acvoce customer support. Refer to the product packaging or the official Acvoce website for the most current contact information.