Strivide WDGR-CUSTOM
Strivide Walk-in Door Gasket Replacement Instruction Manual
Model: WDGR-CUSTOM
Introduction
This manual provides detailed instructions for the installation, operation, and maintenance of your Strivide Walk-in Door Gasket Replacement. This magnetic seal is designed for cooler and freezer walk-in doors, compatible with various brands including Kolpak, Bally, and Leer. Please read these instructions carefully before proceeding with installation to ensure proper function and longevity of the product.
Safety Information
Always prioritize safety during installation and maintenance. Wear appropriate personal protective equipment (PPE) such as gloves and eye protection. Ensure the door is stable and secured before removing or installing the gasket. If you are unsure about any step, consult a qualified technician.
Setup and Measurement
Accurate measurement is crucial for a proper fit. Before ordering or installing, carefully measure your existing door gasket. Strivide gaskets are custom-made to your specified size.
Step 1: Measure Door Gasket Width and Height
Measure the width and height of the existing gasket from outer edge to outer edge. Ensure measurements are precise to guarantee a correct replacement fit.

Image 1: Diagram illustrating the correct method to measure the overall width and height of a walk-in door gasket. Arrows indicate the measurement points for both dimensions.
Step 2: Identify Gasket Profile
Compare your existing gasket's cross-sectional profile to the available Strivide profiles to ensure compatibility. This step is essential for a secure and effective seal.

Image 2: Detailed diagram of a gasket profile, showing dimensions of 11/16" width, 1-1/16" height, and 13/16" base width. This helps in matching the correct gasket type.

Image 3: Detailed diagram of a second gasket profile, showing dimensions of 5/8" width, 9/16" height, and 1" base width. This provides an alternative profile for comparison.
Installation Instructions
The Strivide Walk-in Door Gasket is designed for toolless and easy installation. Follow these steps for optimal results.
Step 1: Remove Old Gasket
- Open the walk-in door.
- Carefully pull the old gasket out of its channel. Start from a corner and work your way around the door frame.
- Clean the gasket channel thoroughly to remove any debris, dirt, or old adhesive.
Step 2: Install New Gasket
- Begin by inserting one corner of the new gasket into the door channel.
- Press the gasket firmly into the channel, working your way around the perimeter of the door. Ensure the magnetic strip is facing the door frame for a proper seal.
- Apply even pressure to ensure the gasket is fully seated and secure in the channel.
- If your gasket has pre-punched holes, align these with any existing fasteners if applicable.

Image 4: Illustration demonstrating how a magnetic gasket is pressed into the door frame channel. The image highlights the magnetic components and the secure fit within the frame.
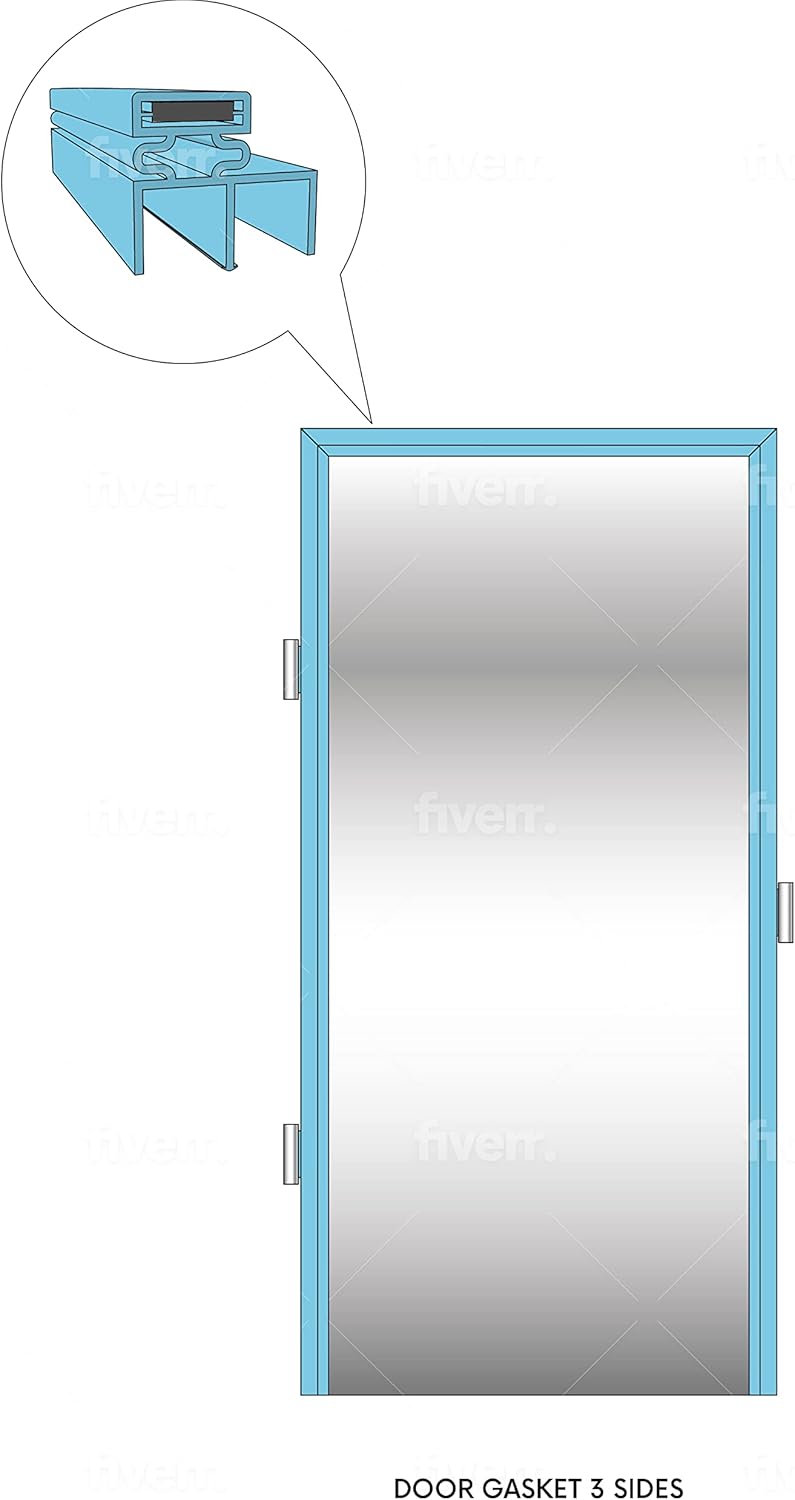
Image 5: Diagram depicting a door with a 3-sided gasket installed. This configuration is common for doors where the bottom edge does not require a gasket.

Image 6: Diagram depicting a door with a 4-sided gasket installed. This configuration provides a complete seal around the entire perimeter of the door.
Step 3: Test the Seal
- Close the door and check for any gaps or areas where the gasket is not sealing properly.
- Adjust the gasket by gently pressing it further into the channel if necessary.
- A good seal will prevent air leakage, maintaining the temperature inside the cooler or freezer.
Maintenance
Regular maintenance ensures the longevity and effectiveness of your Strivide door gasket. The material is designed to last and has no unpleasant smell.
- Cleaning: Periodically clean the gasket with mild soap and water. Avoid harsh chemicals or abrasive cleaners, as these can damage the material.
- Inspection: Regularly inspect the gasket for signs of wear, tears, cracks, or hardening. A damaged gasket can compromise the seal and lead to energy loss.
- Alignment: Ensure the door remains properly aligned. Misaligned doors can cause uneven pressure on the gasket, leading to premature wear.
Troubleshooting
| Problem | Possible Cause | Solution |
|---|---|---|
| Door not sealing properly / Air leakage | Gasket not fully seated; Gasket damaged; Door misalignment | Press gasket firmly into channel; Inspect and replace damaged gasket; Adjust door hinges for proper alignment. |
| Gasket falling out of channel | Improper installation; Channel dirty or damaged | Re-install gasket ensuring it is fully seated; Clean channel thoroughly; Repair or replace damaged channel. |
| Excessive condensation or ice buildup | Poor gasket seal; High humidity | Check gasket for proper seal and replace if necessary; Ensure proper ventilation in the room. |
Specifications
- Product Type: Walk-in Door Gasket Replacement
- Brand: Strivide
- Model Number: WDGR-CUSTOM
- Material: Magnetic Seal
- Compatibility: Kolpak, Bally, Leer, and other compatible walk-in cooler/freezer doors.
- Thickness: Approximately 0.56 Inches (varies by profile)
- Shape: Rectangular (customizable to size)
- Installation: Toolless, easy installation
- Origin: Made in USA
Warranty Information
Strivide products are manufactured with quality and durability in mind. For specific warranty details regarding your custom-made gasket, please refer to the documentation provided with your purchase or contact Strivide customer support. Generally, gaskets are covered against manufacturing defects for a limited period. Damage due to improper installation, misuse, or normal wear and tear is typically not covered.
Customer Support
If you have any questions, require assistance with installation, or need to report an issue, please contact Strivide customer support. You can find contact information on the official Strivide website or through your purchase platform.
For more information, visit the Strivide Store on Amazon.
Ask a question about this manual
Ask about setup, troubleshooting, compatibility, parts, safety, or missing instructions. Manuals+ will review the question and use this page’s manual context to help answer it.