Inkbird INK-VS02
INKBIRD INK-VS02 Vacuum Sealer Machine User Manual
Model: INK-VS02 | Brand: Inkbird
Introduction
Thank you for choosing the INKBIRD INK-VS02 Vacuum Sealer Machine. This manual provides detailed instructions for the safe and efficient operation, maintenance, and troubleshooting of your new appliance. Please read this manual thoroughly before using the device to ensure optimal performance and longevity. The INK-VS02 is designed to preserve food freshness up to 10 times longer than conventional methods, featuring multiple sealing modes and a convenient built-in cutter and roll storage.
Important Safety Instructions
- Read all instructions before using the appliance.
- Do not immerse the appliance, power cord, or plug in water or other liquids.
- Keep out of reach of children. This appliance is not intended for use by persons with reduced physical, sensory, or mental capabilities.
- Use only with vacuum sealer bags and rolls specifically designed for vacuum sealing.
- Do not operate the appliance if the power cord or plug is damaged, or if the appliance malfunctions or has been damaged in any manner.
- Unplug from outlet when not in use and before cleaning.
- Allow the appliance to cool down before putting on or taking off parts, and before cleaning.
- Do not use outdoors.
- Do not place on or near a hot gas or electric burner, or in a heated oven.
- Always ensure the lid is properly latched before operating.
Package Contents
Upon opening the package, please verify that all components are present and in good condition.
- 1 x INKBIRD INK-VS02 Vacuum Sealer Machine
- 1 x Vacuum Bag Roll (11 x 118 inches / 28 x 300 cm)
- 5 x Vacuum Bags (7.8 x 11.8 inches / 20 x 30 cm)
- 1 x Air Extraction Tube
- 1 x High Temperature Adhesive Strip (Replacement)
- 1 x Sealing Cotton (Replacement)
- 1 x User Manual

Image: The INKBIRD INK-VS02 Vacuum Sealer Machine along with its complete starter kit, including vacuum bags, a roll, air extraction tube, and replacement parts.
Product Overview
The INKBIRD INK-VS02 features a sleek design with intuitive controls and integrated functionalities for ease of use.

Image: The INKBIRD INK-VS02 Vacuum Sealer Machine with two vacuum-sealed bags, one containing meat and the other containing chickpeas, demonstrating its primary function.
Key Features:
- Built-in Vacuum Bag Roll Layer: Accommodates rolls up to 216.5 inches (approx. 18 feet) for convenient bag creation.
- Integrated 11.8-inch Cutter: Allows for custom bag sizing directly from the roll.
- Multiple Operating Modes: Dry, Moist, Pulse, Canister, and Seal-Only modes for versatile food preservation.
- Strong Suction Power: Achieves up to -85kPa vacuum pressure for effective air removal.
- Continuous Operation: Capable of sealing up to 200 bags continuously in dry mode due to a built-in cooling device.
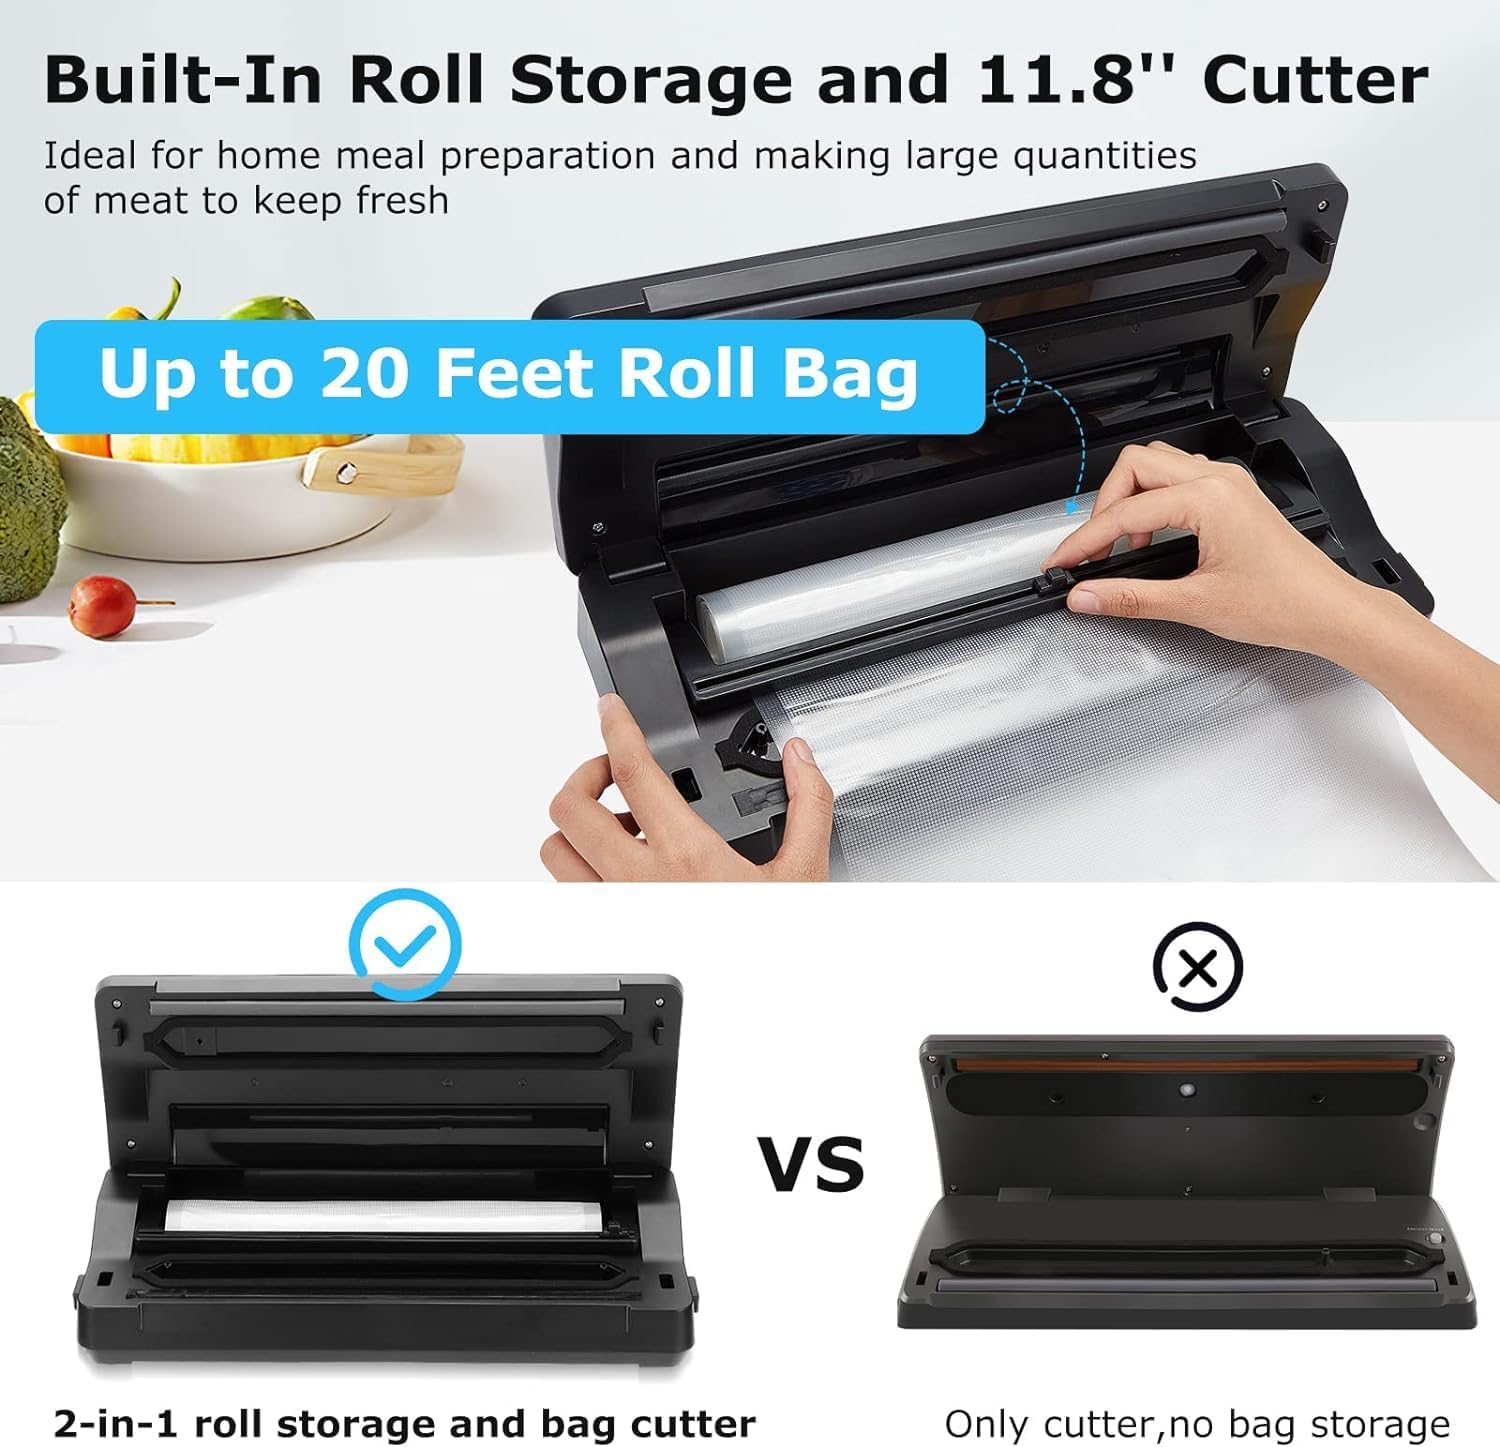
Image: A detailed view of the vacuum sealer's built-in roll storage and the integrated 11.8-inch cutter, highlighting its convenience for customizing bag sizes.

Image: A comparison graphic illustrating the wider 0.83-inch vacuum chamber and 12.6-inch sealing strip of the INK-VS02, alongside its ready-to-replace seals for easy maintenance.
Setup
- Unpack: Carefully remove the vacuum sealer and all accessories from the packaging.
- Inspect: Check the appliance for any signs of damage. Do not use if damaged.
- Placement: Place the vacuum sealer on a flat, stable, and dry surface. Ensure there is enough space around the unit for proper operation.
- Power Connection: Plug the power cord into a grounded electrical outlet.
- Initial Cleaning: Wipe down the exterior of the unit with a damp cloth. Do not use abrasive cleaners.
- Install Roll (Optional): If using a roll, open the lid and place the vacuum bag roll into the built-in storage compartment. Pull out a desired length of bag and use the integrated cutter to create a custom bag. Seal one end of the bag using the "Seal Only" function before vacuuming.
Operating Instructions
General Vacuum Sealing Steps:
- Prepare the Bag: Place the food item into a vacuum sealer bag. Ensure the open end of the bag is clean, dry, and flat. Leave at least 3 inches (7.5 cm) of space between the food and the top of the bag.
- Position the Bag: Open the lid of the vacuum sealer. Place the open end of the bag into the vacuum chamber, ensuring it lies flat across the sealing strip.
- Close the Lid: Firmly press down on both sides of the lid until you hear a click, indicating it is securely latched.
- Select Mode: Choose the appropriate mode based on your food type (Dry, Moist, Pulse, Canister). For most solid foods, "Food" (Dry/Moist) or "Vac & Seal" will be used.
- Start Operation: Press the corresponding button for your selected mode. The machine will automatically vacuum the air and then seal the bag.
- Release and Remove: Once the sealing process is complete and the indicator light turns off, press the release buttons (if applicable) or lift the lid to open. Remove the sealed bag.

Image: A visual step-by-step guide demonstrating how to vacuum seal food using the INKBIRD INK-VS02, from placing the bag to removing the sealed item.
Understanding Operating Modes:
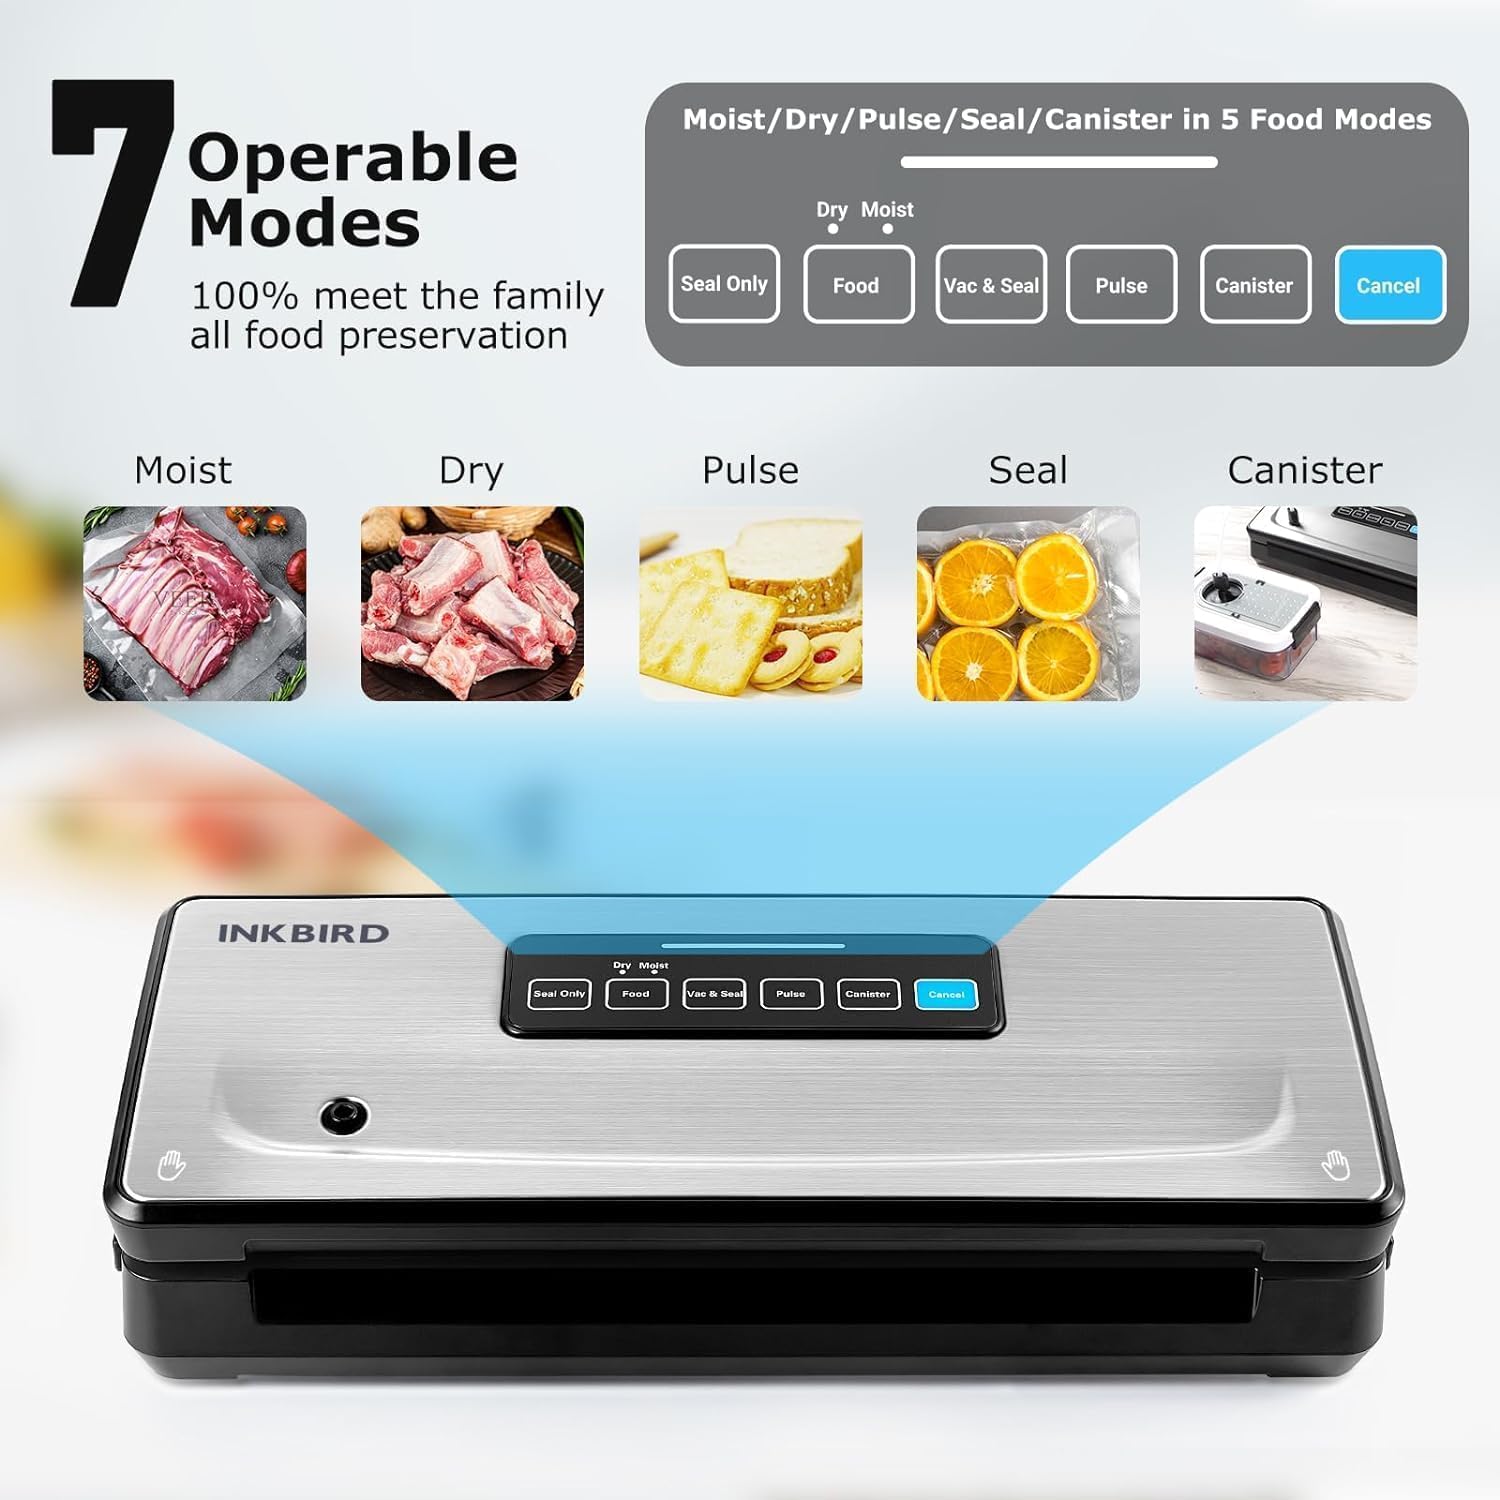
Image: An illustration detailing the seven operable modes of the INKBIRD INK-VS02, including Moist, Dry, Pulse, Seal, and Canister, with examples of food types suitable for each mode.
- Dry Mode: Ideal for solid, dry foods such as nuts, grains, and hard cheeses. Vacuuming time is typically 3-7 seconds.
- Moist Mode: Designed for foods with some moisture, like raw meats, fish, or cooked dishes. Vacuuming time is typically 12-15 seconds.
- Pulse Mode: Provides manual control over the vacuum process. Press and hold the "Pulse" button to vacuum, release to stop. This is useful for delicate foods like bread, chips, or soft fruits to prevent crushing. Once desired vacuum is reached, press "Seal Only" to seal.
- Canister Mode: Used for vacuum sealing external canisters or containers. Connect the air extraction tube to the appliance and the canister. Press the "Canister" button to start vacuuming.
- Seal-Only Mode: Creates a seal without vacuuming. This is used for making custom-sized bags from a roll or for sealing bags that do not require vacuuming.

Image: The INKBIRD INK-VS02 connected to an external vacuum canister, demonstrating its capability to vacuum seal liquids and delicate items like soups, stews, salads, and wine using the Canister mode.
Using the Built-in Cutter and Roll Storage:
The INK-VS02 features a convenient built-in storage for vacuum bag rolls and an integrated cutter for custom bag sizing.
- Load Roll: Open the lid and place a vacuum bag roll (up to 11.8 inches wide) into the designated compartment.
- Pull and Cut: Pull the desired length of bag material from the roll. Use the sliding cutter to create a clean, straight cut.
- Seal One End: Close the lid and use the "Seal Only" function to seal one end of the newly cut bag, creating a pouch.
- Fill and Seal: Fill the pouch with food and proceed with the standard vacuum sealing steps.
Maintenance
Cleaning the Appliance:
- Always unplug the appliance before cleaning.
- Wipe the exterior of the vacuum sealer with a damp cloth and mild soap. Do not use abrasive cleaners or solvents.
- Clean the vacuum chamber and sealing strip area with a damp cloth. Ensure no food particles or liquids remain.
- Dry all parts thoroughly before storing or next use.
Replacing Accessories:
The INK-VS02 is designed with easily replaceable parts for extended lifespan.
- Sealing Strip: Over time, the sealing strip may wear out. The included high temperature adhesive strip can be used as a replacement. Carefully peel off the old strip and apply the new one, ensuring it is flat and securely adhered.
- Sealing Cotton/Foam Gasket: If the foam gasket becomes dislodged or damaged, it can be replaced with the included sealing cotton. Ensure it is properly seated in its groove to maintain an airtight seal.
Image: A visual guide demonstrating how to easily replace the sealing strip and foam gasket on the INKBIRD INK-VS02, ensuring continued optimal performance.
Troubleshooting
| Problem | Possible Cause | Solution |
|---|---|---|
| Machine does not turn on. | Not plugged in; power outlet issue. | Ensure power cord is securely plugged into a working outlet. |
| Bag does not vacuum properly or air remains. | Bag not positioned correctly; lid not latched; sealing strip dirty/worn; foam gasket dislodged. | Ensure bag opening is flat and fully inside vacuum chamber. Press lid firmly until latched. Clean or replace sealing strip/foam gasket. |
| Bag does not seal. | Sealing strip dirty/worn; bag material incompatible; too much moisture. | Clean or replace sealing strip. Use only compatible vacuum sealer bags. For moist foods, use "Moist" mode or pre-freeze liquids. |
| Vacuum pump runs continuously. | Lid not fully latched; foam gasket issue. | Ensure lid is securely latched. Check and reposition/replace foam gasket. |
| Machine overheats. | Excessive continuous use. | Allow the machine to cool down for 15-20 minutes between cycles, especially after sealing many bags consecutively. |
Specifications
| Feature | Detail |
|---|---|
| Model | INK-VS02 |
| Brand | Inkbird |
| Power/Wattage | 160W |
| Vacuum Pressure | -85kPa |
| Material | Acrylonitrile Butadiene Styrene |
| Color | Silver |
| Item Weight | 1.8 kg (approx. 3.97 lbs) |
| Parcel Dimensions | 42.2 x 19.6 x 11.9 cm (approx. 16.6 x 7.7 x 4.7 inches) |
| Built-in Cutter Width | 11.8 inches (30 cm) |
| Max Roll Bag Length | 216.5 inches (approx. 18 feet) |
| Continuous Sealing (Dry Mode) | Up to 200 times |
| UPC | 723476905494 |

Image: A graphic illustrating the -85kPa strong suction power of the INKBIRD INK-VS02 and a comparison table showing how vacuum sealing extends food freshness up to 10 times longer than conventional storage methods for various food types.
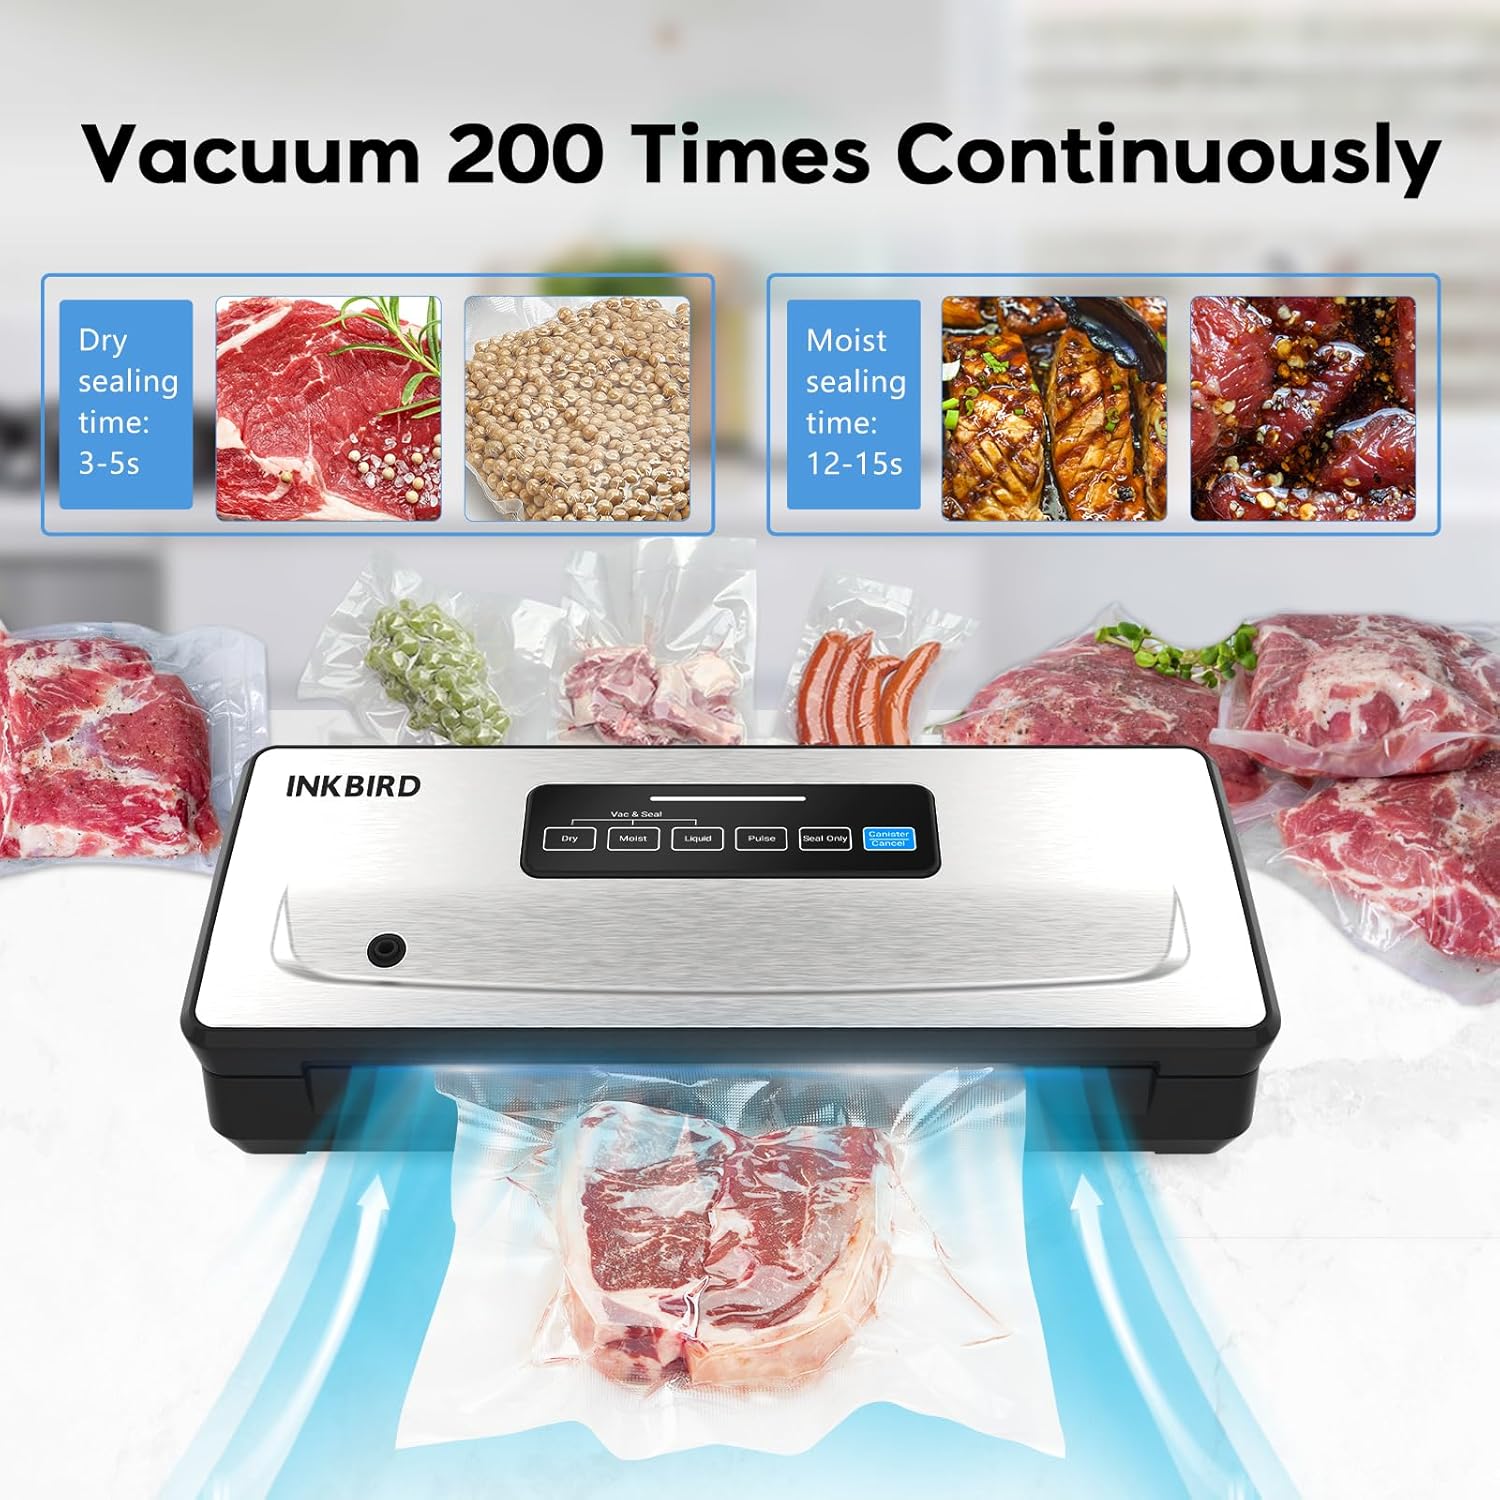
Image: The INKBIRD INK-VS02 demonstrating its capability to vacuum seal continuously, highlighting its efficiency for both dry and moist foods over extended periods.
Warranty and Support
For warranty information and customer support, please refer to the warranty card included in your product packaging or visit the official Inkbird website.
Official Inkbird Store: Inkbird Store on Amazon.ca
Related Documents - INK-VS02
 |
INKBIRD INK-VS02 Vacuum Sealer User Manual Comprehensive user manual for the INKBIRD INK-VS02 Vacuum Sealer, detailing features, operation, safety precautions, and troubleshooting for efficient food preservation. |
 |
INKBIRD VS01 Vacuum Sealer User Manual - Efficient Food Preservation Comprehensive user manual for the INKBIRD VS01 vacuum sealer. Learn how to preserve food efficiently with dry and moist settings, maintenance tips, and troubleshooting. |
 |
INKBIRD INK-VS01 Vacuum Sealer User Manual Comprehensive user manual for the INKBIRD INK-VS01 Vacuum Sealer, detailing features, operation, troubleshooting, cleaning, and storage for effective food preservation. |
 |
INKBIRD INK-IFT03 Infrared Thermometer Instruction Manual Comprehensive instruction manual for the INKBIRD INK-IFT03 Infrared Thermometer, covering specifications, operation, maintenance, and safety precautions. |
 |
INKBIRD Radon Detector User Manual User manual for the INKBIRD Radon Detector, providing information on product introduction, specifications, getting started, usage, safety precautions, and warranty. |
 |
INKBIRD PLUS INK-IFT01 Infrared Thermometer User Manual and Specifications Detailed user manual and specifications for the INKBIRD PLUS INK-IFT01 Infrared Thermometer, covering operation, features, warnings, and emissivity data. |
Ask a question about this manual
Ask about setup, troubleshooting, compatibility, parts, safety, or missing instructions. Manuals+ will review the question and use this page’s manual context to help answer it.