TGK 5520
TGK 1800W Heavy Duty Hot Air Gun Kit Instruction Manual
Model: 5520 | Brand: TGK
1. Introduction
This manual provides essential information for the safe and effective operation of your TGK 1800W Heavy Duty Hot Air Gun Kit. Please read these instructions thoroughly before first use and retain them for future reference. This heat gun is designed for various applications including shrink wrapping, paint removal, epoxy resin work, and other craft or DIY projects, offering dual temperature settings and robust performance.
2. Safety Instructions
WARNING: Failure to follow these safety instructions may result in electric shock, fire, and/or serious injury.
- Always wear appropriate personal protective equipment, including safety glasses and heat-resistant gloves.
- Ensure the work area is well-ventilated to prevent the accumulation of fumes, especially when removing paint or working with chemicals.
- Do not touch the metal nozzle during or immediately after use, as it will be extremely hot. Allow the tool to cool completely before handling or storing.
- Keep the heat gun away from flammable materials and liquids.
- Do not direct the hot air stream at people or animals.
- Never block the air intake or outlet vents. This can cause overheating and damage to the tool.
- The TGK heat gun features an overload protection system. If the tool overheats, it will automatically shut off. Allow it to cool before resuming operation.
- This tool is UL certified, indicating it meets specific safety standards. Use only with a 120V AC power source.
- Always unplug the heat gun when not in use, before cleaning, or when changing accessories.
3. Package Contents
Verify that all items are present in your TGK 1800W Heat Gun Kit:
- 1 x TGK 1800W Heat Gun (Model 5520)
- 3 x Nozzle Attachments (various shapes for different applications)
- 1 x Paint Scraper
- Assorted Heat Shrink Tubes
- Assorted Shrink Wrap Bags
- 1 x User Manual (this document)
- 1 x Warranty Card

Image: TGK 1800W Heat Gun Kit showing the heat gun, three nozzle attachments, a paint scraper, and various heat shrink materials.
4. Product Overview
Familiarize yourself with the components of your TGK Heat Gun:

Image: Labeled diagram of the TGK heat gun components.
- Nozzle: The hot air outlet.
- Air Vents: Allow for proper airflow and cooling.
- Rear Air Intake: Where ambient air is drawn into the tool.
- Handle: Ergonomically designed for comfortable grip.
- Power Switch: Controls power and airflow settings (OFF, I, II).
- Power Cord: 5.25 ft UL certified cord for power supply.
- Temperature Control Roller: Stepless adjustment for fine-tuning temperature.
5. Setup
- Select Nozzle: Choose the appropriate nozzle attachment for your task. Ensure the heat gun is unplugged and cool before attaching or removing nozzles. Push the nozzle firmly onto the heat gun's outlet.
- Power Connection: Plug the heat gun into a standard 120V AC power outlet.
6. Operating Instructions
The TGK heat gun offers precise control over both temperature and airflow.
6.1 Power and Airflow Settings

Image: Diagram illustrating the heat gun's power switch and temperature control.
Use the main power switch on the handle to select the desired airflow mode:
- Position '0': OFF. The heat gun is powered off.
- Position 'I': Low Airflow Mode. Provides 250 Liters per Minute (L/Min) airflow.
- Position 'II': High Airflow Mode. Provides 500 Liters per Minute (L/Min) airflow.
6.2 Temperature Control
The red stepless temperature control roller allows for variable temperature adjustment within each airflow mode:
- Mode I (Low Airflow): Temperature range from 122°F (50°C) to 572°F (300°C).
- Mode II (High Airflow): Temperature range from 122°F (50°C) to 1202°F (650°C).
Rotate the red roller to increase or decrease the temperature. Start with a lower temperature and gradually increase it to avoid overheating the workpiece.
6.3 Quick Heating

Image: Illustration highlighting the heat gun's rapid heating capability.
The 1800W heating element allows the heat gun to reach its maximum temperature of 1202°F (650°C) in approximately 1.5 seconds.
7. Applications
The TGK 1800W Heat Gun is suitable for a wide range of tasks:

Image: Various application scenarios for the TGK heat gun.
- Shrink Wrapping: Ideal for packaging, protecting items, or creating custom seals.
- Heat Shrink Tubing: For insulating electrical connections and protecting wires.
- Paint Removal: Softens old paint for easier scraping.
- Epoxy Resin Projects: Helps remove bubbles and cure resin faster.
- Bending Plastic Pipes: Softens PVC or other plastic pipes for shaping.
- Thawing Frozen Pipes: Use with caution and indirect heat to avoid damage.
- Crafts and DIY: Suitable for various creative projects requiring controlled heat.
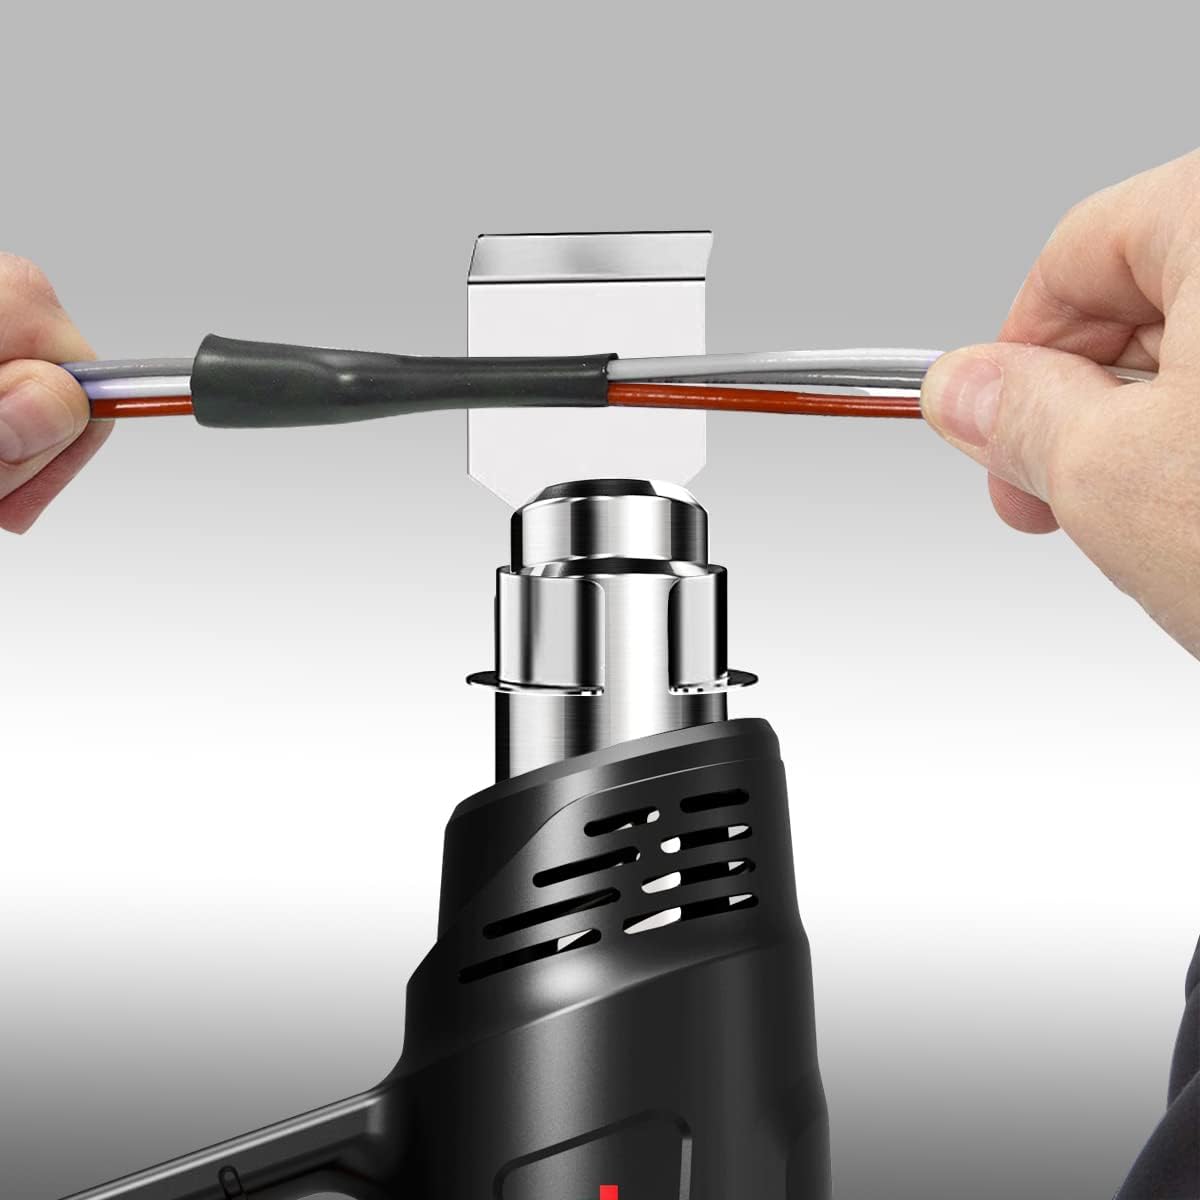
Image: Close-up of the heat gun being used to apply heat shrink tubing to electrical wires.
8. Maintenance
Proper maintenance ensures the longevity and safe operation of your heat gun.
- Cleaning: Ensure the heat gun is unplugged and completely cool. Wipe the exterior with a damp cloth. Do not use abrasive cleaners or solvents. Keep the air intake and outlet vents clear of dust and debris.
- Storage: Store the heat gun in a dry, safe place, out of reach of children. Ensure the power cord is not kinked or damaged during storage.
- Inspection: Regularly inspect the power cord for any signs of damage. If the cord is damaged, discontinue use and have it replaced by a qualified technician.
9. Troubleshooting
If you encounter issues with your TGK Heat Gun, refer to the following common problems and solutions:
| Problem | Possible Cause | Solution |
|---|---|---|
| Heat gun does not turn on. | No power supply; Power switch in '0' position; Faulty outlet. | Check power cord connection; Ensure switch is in 'I' or 'II'; Test outlet with another device. |
| Heat gun turns on but no heat. | Heating element failure; Overload protection activated. | Allow tool to cool down if overload protection was triggered; Contact customer support if issue persists. |
| Low airflow. | Air vents blocked; Switch in 'I' (low airflow) mode. | Clear any obstructions from air vents; Switch to 'II' for high airflow. |
| Heat gun overheats and shuts off. | Overload protection activated due to prolonged use or blocked vents. | Unplug the tool and allow it to cool for at least 15-20 minutes. Ensure vents are clear before restarting. |
10. Specifications
Technical details for the TGK 1800W Heat Gun (Model 5520):
| Feature | Specification |
|---|---|
| Model Number | 5520 |
| Power | 1800 Watts |
| Voltage | 120 Volts AC |
| Temperature Range | 122°F ~ 1202°F (50°C ~ 650°C) |
| Airflow Rate (Mode I) | 250 Liters Per Minute |
| Airflow Rate (Mode II) | 500 Liters Per Minute |
| Cord Length | 5.25 Feet |
| Material | High Temperature Resistance Body Nylon PA66+30%GF |
| Item Weight | 1.44 pounds |
| Product Dimensions | 8.66 x 7.09 x 2.36 inches |
| Special Features | Variable Temperature Control, 2-Temp Settings, Stepless Regulation, Overload Protection, Lightweight & Compact, Ventilation Design, Comfortable Hand Design, Heat-Resistant Shell |
11. Warranty and Support
Your TGK 1800W Heat Gun Kit includes a Warranty Card. Please refer to the card for specific warranty terms and conditions. For technical support, replacement parts, or any inquiries not covered in this manual, please contact TGK customer service through the contact information provided on your warranty card or the official TGK website.
Related Documents - 5520
 |
TGK2301/02/03 Digital Player Instruction Manual This document provides operating instructions and characteristics for the TGK2301/02/03 digital player, including details on its functions, connectivity, and FCC compliance. |
 |
TGK Motorsport INS-07 Differential Insert Installation Instructions Step-by-step guide for installing the TGK Motorsport INS-07 Differential Insert, including safety warnings, recommended tools, and detailed procedures for automotive enthusiasts. |
 |
Intelbras SC 5520 Series Installation Guide Comprehensive installation guide for the Intelbras SC 5520 series network switches, covering preparation, hardware installation, initial access, IRF fabric setup, and maintenance. Includes safety recommendations and troubleshooting tips. |
 |
Intelbras SC 5520 Series Installation Guide - Network Switch Setup Comprehensive installation guide for Intelbras SC 5520 Series Campus Switches. Learn about product features, safety precautions, installation steps, and warranty information for SC 5520-24M10U-E and SC 5520-24M5U-E models. |
 |
Street Fire CDI PN 5520 Installation Guide | MSD Ignition Comprehensive installation instructions for the Street Fire CDI PN 5520 ignition system by MSD Ignition. Learn how to wire, mount, and troubleshoot your new ignition system for optimal performance. |
Ask a question about this manual
Ask about setup, troubleshooting, compatibility, parts, safety, or missing instructions. Manuals+ will review the question and use this page’s manual context to help answer it.