1. Product Overview
The GOWENIC X58 Gaming Motherboard is designed for desktop computers, featuring an LGA 1366 CPU socket and support for DDR3 memory. This motherboard provides essential connectivity and performance for various computing needs.

Figure 1.1: Top-down view of the GOWENIC X58 Gaming Motherboard.
Key Features:
- CPU Support: LGA 1366 socket, compatible with Xeon series and Intel i7 quad-core/six-core CPUs.
- Memory: 2 DDR3 DIMM slots, supporting DDR3 1866, 1600, 1333MHz memory, including ECC memory.
- Power Design: All solid capacitor design with enhanced 5+1 phase power supply for stable performance.
- Storage: Multiple SATA ports for storage devices.
- Connectivity: USB 2.0 ports, network card interface, and audio ports.
- Expansion: PCIe graphics card slot and PCIe 1X slot.
2. Setup and Installation
This section provides instructions for installing the GOWENIC X58 Gaming Motherboard and its components. Ensure your system is powered off and unplugged before beginning installation.
2.1 CPU Installation
Carefully align your LGA 1366 CPU with the socket on the motherboard. Ensure the CPU is correctly oriented before gently placing it into the socket. Close the retention arm to secure the CPU.

Figure 2.1: Close-up of the LGA 1366 CPU socket on the motherboard.
2.2 Memory Installation
Locate the two DDR3 DIMM slots. Open the clips on both ends of the memory slot. Align the notch on the DDR3 memory module with the key in the slot, then press down firmly on both ends of the module until the clips snap into place. Note that common memory and ECC server memory cannot be mixed simultaneously.
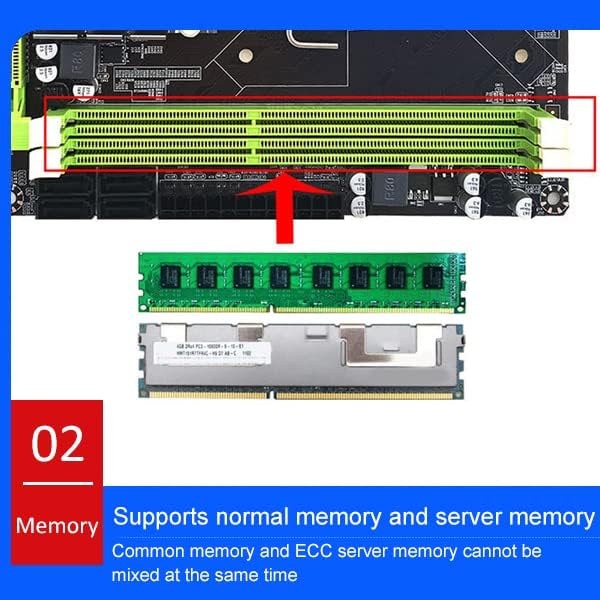
Figure 2.2: Illustration of DDR3 memory module installation into the motherboard slots.
2.3 Power Connections
Connect the 24-pin ATX main power connector from your power supply unit (PSU) to the corresponding port on the motherboard. Also, connect the 8-pin CPU power connector to the motherboard's CPU power interface.
2.4 Storage and Expansion Card Installation
Connect your SATA storage devices (hard drives, SSDs) to the available SATA ports on the motherboard. Install your graphics card into the PCIe graphics card slot and any other expansion cards into the PCIe 1X slot as needed.
2.5 Front Panel and I/O Connections
Connect the front panel headers (power switch, reset switch, power LED, HDD LED) to the designated pins on the motherboard. Refer to the motherboard layout diagram for correct pin assignments. Connect USB, audio, and network cables to the appropriate I/O ports.

Figure 2.3: Detailed layout of the motherboard with labeled interfaces including CPU power, LGA1366, DDR3, main power, SATA, PCIe slots, USB, and audio ports.

Figure 2.4: Diagram illustrating the front panel wiring connections (RESET SW, POWER SW, +POWER LED-, +H.D.D LED-).

Figure 2.5: Rear I/O ports including PS/2, USB, network card, and audio jacks.
3. Operating Instructions
Once all components are correctly installed and connected, you can power on your system. The motherboard supports Windows 10. Ensure all necessary drivers for your components are installed for optimal performance.
3.1 Initial Boot-up
- After connecting all peripherals and power, press the power button on your computer case.
- The system should initiate the boot process. You may need to enter the BIOS/UEFI setup to configure boot order or other settings.
- Install your operating system (e.g., Windows 10) if not already present.
3.2 Driver Installation
For full functionality, install the latest drivers for the chipset, network, audio, and any other integrated components. These are typically provided on a support CD or available for download from the manufacturer's website.
4. Maintenance
Proper maintenance can extend the lifespan of your motherboard and ensure stable operation.
- Dust Removal: Regularly clean dust from the motherboard and other internal components using compressed air. Ensure the system is powered off and unplugged before cleaning.
- Temperature Monitoring: Monitor system temperatures to prevent overheating, especially for the CPU and chipset. Ensure adequate airflow within the computer case.
- BIOS Updates: Periodically check for BIOS updates from the manufacturer. Only update the BIOS if necessary and follow the instructions carefully to avoid system instability.
5. Troubleshooting
If you encounter issues with your motherboard, consider the following basic troubleshooting steps:
- No Power: Ensure all power cables (24-pin ATX, 8-pin CPU) are securely connected. Verify the power supply unit is functioning correctly.
- No Display: Check that the graphics card is properly seated in its slot and connected to the power supply (if required). Ensure the monitor cable is securely connected to the graphics card and monitor.
- System Instability/Crashes: Verify that RAM modules are correctly installed and compatible. Test memory modules individually if possible. Check CPU and GPU temperatures.
- Component Not Detected: Ensure the component (e.g., hard drive, expansion card) is properly connected and seated. Check BIOS settings to confirm it is enabled.
- BIOS Reset: If system settings become problematic, you can reset the BIOS to default settings. This usually involves removing the CMOS battery for a few minutes or using a dedicated jumper on the motherboard.
6. Specifications
Below are the detailed specifications for the GOWENIC X58 Gaming Motherboard.

Figure 6.1: Motherboard dimensions: Approximately 21.6 cm x 18.4 cm (8.5 in x 7.2 in).
| Feature | Specification |
|---|---|
| Brand | GOWENIC |
| Model Name | GOWENIC90cqbiusxe7119 |
| CPU Socket | LGA 1366 |
| Compatible Processors | Intel X58, Core i7, Xeon series |
| Chipset Type | Intel X58 Express |
| RAM Memory Technology | DDR3 |
| Memory Clock Speed | 1333 MHz (Supports 1866, 1600, 1333MHz) |
| Memory Slots Available | 2 |
| Memory Storage Capacity (Max) | 16 GB |
| Main Power Connector Type | 24-Pin |
| CPU Power Connector Type | 8-Pin |
| Graphics Card Interface | Integrated (and PCIe slot for discrete GPU) |
| Total PCIe Ports | 1 (PCIe graphics slot) + 1 (PCIe 1X) |
| Total SATA Ports | 1 (System Bus Standard Supported: SATA 2) |
| Total USB Ports | 8 (USB 2.0) |
| S/PDIF Connector Type | Optical |
| Platform | Windows 10 |
| Motherboard Dimensions | Approx. 21.6 x 18.4 cm / 8.5 x 7.2 in |
7. Warranty and Support
For warranty information and technical support, please refer to the documentation included with your purchase or visit the official GOWENIC website. Keep your proof of purchase for warranty claims.
- Warranty Period: Please check your product packaging or the GOWENIC official website for specific warranty terms.
- Technical Support: Contact GOWENIC customer service for assistance with product issues or technical inquiries.
- Online Resources: Additional drivers, FAQs, and support documents may be available on the GOWENIC support page.